_GOTOBOTTOM
Armor/AFV: Braille Scale
1/72 and 1/76 Scale Armor and AFVs.
Hosted by Darren Baker
Phanomen Granit Ambulance - Attack model
spacewolfdad
Visit this Community
England - West Midlands, United Kingdom
Joined: May 23, 2010
KitMaker: 642 posts
Armorama: 593 posts
Posted: Saturday, September 15, 2012 - 06:32 AM UTC
Hi Folks,

I have just finished this little soft-skin, it was a labour of love, one of those models that just seemed to not want to be put together and finished. Well it did get done and the last problem was waiting for some Red Cross decals to add to it. I painted it using the 'hairspray' technique, the basecoat was Panzer Grey and the topcoat was Desert Yellow. I have to base it and after it is based I will add a little pigment powder to represent a dusty vehicle. Here it is, hope you like it and all comments welcome....


Well that's it, all the best,

Paul
tread_geek
Visit this Community
Ontario, Canada
Joined: March 23, 2008
KitMaker: 2,847 posts
Armorama: 2,667 posts
Posted: Saturday, September 15, 2012 - 07:42 AM UTC
Paul - Nice to see you posting something in this forum again! I believe that I saw a picture of this vehicle (kit) or something similar on another site a while ago. It looks like the hairspray method worked quite well and it makes me curious to try it with a whitewash effect in the future.

Is it just the picture or did you build it to look like there was quite a bit of weight pressing down on the rear axle? If the later, I must say that it looks quite appropriate with all that clutter on the back roof and the implication that the rear compartment might also have something in it. :-)

Cheers,
Jan
spacewolfdad
Visit this Community
England - West Midlands, United Kingdom
Joined: May 23, 2010
KitMaker: 642 posts
Armorama: 593 posts
Posted: Saturday, September 15, 2012 - 09:28 AM UTC
Hi Jan,

I did post some pictures of this on another forum, but it didn't have the Red Cross Decals, I was still waiting for them. I recommend the 'Hairspray' technique, it is simple and very effective, you must remember to just do a little section at a time to maintain control. The picture with the rear appearing weighed down is due to it being photographed on a book and you can just see the rise in the middle of the page is putting the model at a slight angle, it sits square in the other photos. I shall try to frequent this forum more often now, domestic pressures and health allowing. Thank you for your comments.

All the best,

Paul
DaGreatQueeg
Visit this Community
Napier, New Zealand
Joined: August 01, 2005
KitMaker: 1,049 posts
Armorama: 841 posts
Posted: Saturday, September 15, 2012 - 10:47 PM UTC
Looks really good with the red cross markings completed (and weathered) Paul, they make a great contrast against the desert yellow. Lol and I like the "sagging" rear end look too, she looks loaded and well used .....
firstcircle
Visit this Community
England - South East, United Kingdom
Joined: November 19, 2008
KitMaker: 2,249 posts
Armorama: 2,007 posts
Posted: Sunday, September 16, 2012 - 10:06 AM UTC
Paul, yes, I do like it. Paint job is very, very nice; I like the effects on the wheels and the radiator vents for example, and also the way the chipping is in the right places (where they keep slamming the door shut from the outside.) For such a small model, it looks really used and quite believable.

It's an oddly ungainly and old fashioned vehicle even for the 1940s, and one I have a bit of a soft spot for now that I saw one in real life, just down the road:


Looking forward to seeing your model again when you've got it on the base.
spacewolfdad
Visit this Community
England - West Midlands, United Kingdom
Joined: May 23, 2010
KitMaker: 642 posts
Armorama: 593 posts
Posted: Sunday, September 16, 2012 - 10:33 AM UTC
Hi Matthew,

Thank you for your kind comments,also thank you for the excellent photo of the vehicle. You can see that my engine louvres are slightly too long, but as I scratch built them and was trying out a new technique I think I can be excused the slight discrepancy. Unfortunately the Attack kit's bonnet sides had no detail at all, so I went for making my own and then discovered the Extratech etch set. Still I know how to do louvres now, so that was a plus. Here are some photos of what I did...


All the best,

Paul
spacewolfdad
Visit this Community
England - West Midlands, United Kingdom
Joined: May 23, 2010
KitMaker: 642 posts
Armorama: 593 posts
Posted: Sunday, September 16, 2012 - 10:38 AM UTC
@ DaGreatQueeg: Hi Brent, Thanks for the kind comments, I think when I apply the Desert Dust it will bring everything together nicely. It will be on a small base on its own and I may try to find a decent figure to go with it, just to add some interest.

All the best,

Paul
bat-213
Visit this Community
Canada
Joined: December 30, 2011
KitMaker: 902 posts
Armorama: 788 posts
Posted: Sunday, September 16, 2012 - 01:12 PM UTC
great build,love the paint work.
firstcircle
Visit this Community
England - South East, United Kingdom
Joined: November 19, 2008
KitMaker: 2,249 posts
Armorama: 2,007 posts
Posted: Monday, September 17, 2012 - 12:10 AM UTC
Paul, so these were pieces of strip or rod that you shaped to that kind of elongated D shape? Not too sure about them being too long - but you have only got 13 of them instead of the regulation 21... a terrible example of innaccuracy which I am sure any, ahem, knowledgeable show judge would instantly pick up on...!
I am joking of course, and one of the things I actually like about the small scales is that sometimes it is the convincing impression of detail rather than total accuracy that is more appropriate.
spacewolfdad
Visit this Community
England - West Midlands, United Kingdom
Joined: May 23, 2010
KitMaker: 642 posts
Armorama: 593 posts
Posted: Monday, September 17, 2012 - 09:20 AM UTC
Hi Matthew,

You got me, I knew I had too few, but this was the first time I had tried to do something like this and now I know what to do better I would be able to do the full number. Probably next time I will get the Part PE set and use that . It is the case though that you have some leeway with our scale, but not a lot. Thank you for your kind comments.

All the best,

Paul
PanzerAlexander
Visit this Community
Attica, Greece / Ελλάδα
Joined: February 17, 2010
KitMaker: 625 posts
Armorama: 608 posts
Posted: Monday, September 17, 2012 - 07:30 PM UTC
Hi Paul,

That is a very nice looking model. You git the heavy chipping effect right on the spot. Good work on the louvres too. I am glad I've spent enough time in this forum to see people getting better in how they make models.

Overall an excellent work, well done m8.

P.A.
Braille
#135
Visit this Community
California, United States
Joined: August 05, 2007
KitMaker: 1,501 posts
Armorama: 1,485 posts
Posted: Sunday, September 30, 2012 - 06:58 PM UTC
@spacewolfdad – Paul,

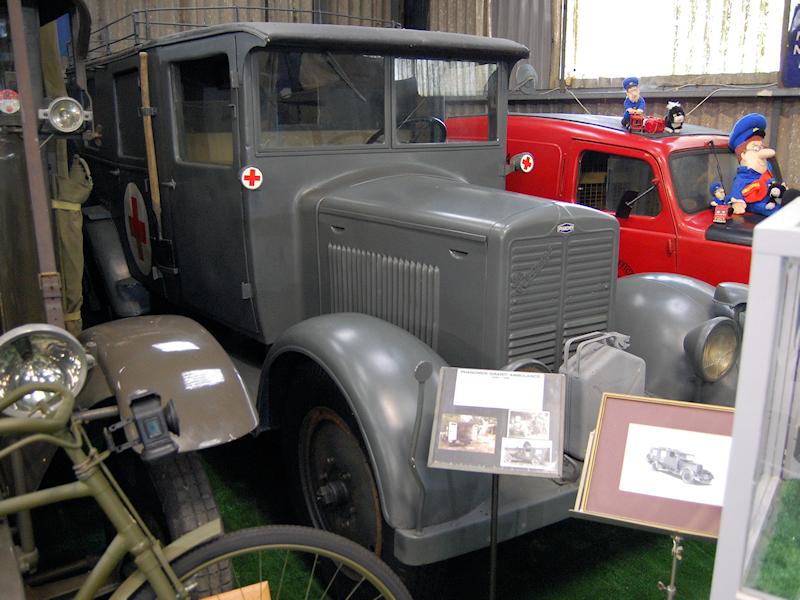
I thought I had already left you a comment here but now I remember why I had not. I needed to gather my thoughts to write down what I wanted to let you know but my wife interrupted me for lunch. Anyhow, that was quite a while ago now I’m back. I think you’ve done a beautiful and well-detailed rendition of this obscure vehicle. The paint chipping looks realistic, as does the slight amount of weathering. The chipped and worn Red Cross on the hood captures the extended and rugged treatment this vehicle must be enduring in service to the causalities of war. In all an excellent build, most impressive!

Paul, if you will I would like to leave you with a technique that I use successfully for windscreens and windows. Before I apply any windows to the model I carefully dip them in Future acrylic floor wax and allow them to cure overnight. This will give you the clearest windows and hides very slight surface scratches. I then paint the edges with flat black enamel. You could use acrylics but I find them to be too transparent and they are much harder to remove from the clear plastic or acetate sheets. This keeps the edges from silvering when the light hits them, similar to the effect you would get from decals applied over a grainy surface. You can then apply modeler’s masking tape, such as Tamiya’s, and mask off the areas you don’t want any dust on and airbrush them with your favorite dust color. This is something that I read about in one of his first how-to modeling books by Verlinden, and it works!

Thanks for posting and sharing your work here, hoping to see more of your splendid work here again.
~ Eddy
spacewolfdad
Visit this Community
England - West Midlands, United Kingdom
Joined: May 23, 2010
KitMaker: 642 posts
Armorama: 593 posts
Posted: Monday, October 01, 2012 - 09:23 AM UTC
@ Braille...

Hi Eddy, thank you for your kind comments, I am not making models for wargaming any more and am putting more care and time into my builds. I am getting more out of my modelling doing it this way, I hope I can show you some more builds that you will find just as interesting.

I thank you for your advice, it is very pertinent and I will be giving it a try. I don't know what was wrong with it, but the Evergreen clear sheet I purchased wouldn't cut cleanly and I think it has accentuated the 'silvering' you mention. I see that painting the edge black would be an excellent idea and would definitely eradicate the problem. I stick transparencies with Glue and Glaze so I don't need to have a unpainted edge to glue. I shall be posting more regularly now as well.

All the best,

Paul
PedroA
Visit this Community
Valencia, Spain / España
Joined: December 27, 2010
KitMaker: 324 posts
Armorama: 322 posts
Posted: Tuesday, October 16, 2012 - 02:21 AM UTC
This is a nice model and seeing your work it is a model that I want to build in a future. You have an excellent job with the engine louvres. No problem if they are too long. The important thing is your work.

Best regards. Pedro.
spacewolfdad
Visit this Community
England - West Midlands, United Kingdom
Joined: May 23, 2010
KitMaker: 642 posts
Armorama: 593 posts
Posted: Tuesday, October 16, 2012 - 01:44 PM UTC
Hi Pedro,

Seeing as it was your tutorial on how to do louvres that inspired me I take that as a real compliment. Thanks to you and your selfless sharing of your techniques I have picked up numerous ideas of how to do things. Hopefully my next louvres will be better than these now I have the hang of doing them. I would love to see you do this model full justice with your exceptional modelling skills, it is a neglected vehicle and was very common in the German army. I have to mount it on a base now and just give it a gentle dusting with pigment powder to bring it all together.

All the best,

Paul
 _GOTOTOP