Wow! That looks very impressive! Nice PE work, I have nothing to say actually...
I like your AAVP7A1 also!
Hosted by Darren Baker
M1070 Truck & M1000 HETS build

HILBERT

Joined: August 07, 2004
KitMaker: 4,808 posts
Armorama: 1,069 posts

Posted: Friday, December 14, 2012 - 01:44 AM UTC

Boris1991

Joined: October 13, 2009
KitMaker: 307 posts
Armorama: 278 posts

Posted: Friday, December 14, 2012 - 11:51 PM UTC
Quoted Text
well i started out on the bottom scraping off the weld bb's on the gooseneck and grinding out bad welds when the robot welder would run out of gas. later on i helped the guy on the gooseneck boring machine resizing the bores where the lift cylinder and the pivot tube go. I also spot welded the studs were the ID plates go on and bigger ones for the handle on the gooseneck.
one thing i don't see is on the very tip of the gooseneck where the air lines would hook, there is a flat place, on it the welders would weld the order numbers of that unit.
did the model come with the APU unit? it would go under the stairs on top of the gooseneck, it supplyed hyd pressure so you can raise/lower ,steer,and raise/lower the gooseneck,
to me the funnest part of the day was when they would flip it over, the suspensions were put on the deck upside down, they had a big rotaing hoyst out of the roof and they would put big straps around the deck and roll it over.
Nice man!
I what do you mean with an APU unit?
Wow, flipping over that trailer must be impressive

Quoted Text
these are bars to adjust the width of the ramps, you pry them left or right depending on the load, you stick the poinded end in the hole and use those notches to pry it , if you search youtube you can find vids of it.
great post! I was wondering what those things are used for.
Thanks for letting me know!
Quoted Text
HA! I don´t noticed it before - here is the video with the guys using them on the beginning...:
https://www.youtube.com/watch?v=vUS2lPR2rhg
Anyway - Essex looks great...I have one warship in my kitstore too - 1/200 Arizona...
Thanks for the video! couldn't be more clearer!
Thanks on the Essex! Warships are great fun and good for the variation!
I will post finished pictures soon, you will find it on my website.
Quoted Text
Wow! That looks very impressive! Nice PE work, I have nothing to say actually...
I like your AAVP7A1 also!
bedankt!

toadady

Joined: November 29, 2012
KitMaker: 4 posts
Armorama: 4 posts

Posted: Wednesday, January 16, 2013 - 01:21 PM UTC
Quoted Text
I what do you mean with an APU unit?
Auxillry
Power
Unit
it goes on the front "goose neck" between the uprights and under the stairs, it is a one cylinder Kubota diesel engine that runs a hydro pump to raise,lower,and steer the unit when servicing
Posted: Wednesday, January 16, 2013 - 04:23 PM UTC
WoW you are doing and amazing job.I can't wait till you start painting and weathering it. You going to put it in a diorama.
Happy Modeling
William DeCicco


Happy Modeling
William DeCicco



Thudius

Joined: October 22, 2012
KitMaker: 1,194 posts
Armorama: 1,077 posts

Posted: Thursday, January 17, 2013 - 09:44 AM UTC
Nice work. Are you planning on using the SKP lenses? Or has anybody else used them for this kit? I'd love to know what the sizes are.

Boris1991

Joined: October 13, 2009
KitMaker: 307 posts
Armorama: 278 posts

Posted: Saturday, February 23, 2013 - 07:52 AM UTC
Quoted Text
Quoted TextI what do you mean with an APU unit?
Auxillry
Power
Unit
it goes on the front "goose neck" between the uprights and under the stairs, it is a one cylinder Kubota diesel engine that runs a hydro pump to raise,lower,and steer the unit when servicing
Ah! yeah It's on my M1000! You can see it a little bit on those pictures of my M1000 trailer (click)
Ill try to shoot one better pic in the future update just for you

Quoted Text
WoW you are doing and amazing job.I can't wait till you start painting and weathering it. You going to put it in a diorama.
Happy Modeling
William DeCicco
Thanks buddy! Me neither, this build is one huge challenge, cant wait to get it over with and start the weathering

Yes, I HAVE to put in in a diorama, right? would be a shame not to do it

Quoted Text
Nice work. Are you planning on using the SKP lenses? Or has anybody else used them for this kit? I'd love to know what the sizes are.
Thanks Kimmo! No I dont think so.... sorry

Boris1991

Joined: October 13, 2009
KitMaker: 307 posts
Armorama: 278 posts

Posted: Saturday, February 23, 2013 - 08:02 AM UTC
Well guys! some progress pictures at last! I have completely finished painting the trailer, and it was not easy to achieve the hard-edge camo on the trailer! decided to only airbrush the NATO green and paint the brown and black by hand. Masking all those surfaces with PE on them would not be a good idea 
Turned out good right? At least Im happy about it.
ready for detail painting (lights etc) and weathering. Ill try to dust her up heavily.
Here are some shots:
(yeah thats right! I started with the M1070 as well, sneak preview )
)
---M1070-------M1000/091-------The---gooseneck---on---the---M1070---(M1070---Truck---Transporter-------M1000---HET).JPG)
---M1070-------M1000/092-------The---M1000---is---painted---in---woodland---camo---(M1070---Truck---Transporter-------M1000---HET).JPG)
The green on this pic is way to "froggish" (if you get it) I did not use my best camera for this . the first pic indicates the colors ay better
---M1070-------M1000/096-------M1000---woodland---camo---paint---(M1070---Truck---Transporter-------M1000---HET).JPG)
Thats it for now! More pictures of the paintjob can be found on my original update of the M1000 trailer
Like I said, I started with the M1070 truck! Made some big progress already (lots of extras) I will put that update here soon, have to write it first, but here's one sneek peek
---M1070-------M1000/087-------The---current---state---(M1070---Truck---Transporter-------M1000---HET).JPG)
All my previous updates are located here
Thanks for watching guys!

Turned out good right? At least Im happy about it.
ready for detail painting (lights etc) and weathering. Ill try to dust her up heavily.
Here are some shots:
(yeah thats right! I started with the M1070 as well, sneak preview
 )
)The green on this pic is way to "froggish" (if you get it) I did not use my best camera for this
 . the first pic indicates the colors ay better
Thats it for now! More pictures of the paintjob can be found on my original update of the M1000 trailer
Like I said, I started with the M1070 truck! Made some big progress already (lots of extras) I will put that update here soon, have to write it first, but here's one sneek peek

All my previous updates are located here
Thanks for watching guys!

Boris1991

Joined: October 13, 2009
KitMaker: 307 posts
Armorama: 278 posts

Posted: Friday, April 12, 2013 - 06:16 AM UTC
Thanks for the interest in my last post guys  thats great
Ill try it again with another update!
As mentioned in my last update, I got started with the M1070 and made some big progress as of now. I do not have pics of the latest status but this update should contain enough pics for now.
The towing system with sharp detail:
---M1070-------M1000/052-------The---towing---system---(M1070---Truck---Transporter-------M1000---HET).JPG)
Some more detail on the pressure bottles and storage system for underneath the cab:
---M1070-------M1000/056-------storage---space---pressure---bottles---(M1070---Truck---Transporter-------M1000---HET).JPG)
A real ladder, way more detail then Hobbyboss's ladder:
---M1070-------M1000/067-------One---more---beautiful---ladder---(M1070---Truck---Transporter-------M1000---HET).JPG)
Started with Miloslav's great engine!
---M1070-------M1000/075-------The---resin---engine---from---Real---Model---(M1070---Truck---Transporter-------M1000---HET).JPG)
A dryfit:
---M1070-------M1000/080-------The---first---part---of---the---M1070---(M1070---Truck---Transporter-------M1000---HET).JPG)
more stuff for a larger dryfit:
---M1070-------M1000/084-------This---is---the---current---state---(M1070---Truck---Transporter-------M1000---HET).JPG)
Hope you guys like it so far!
the full update with more pictures can be found in my original M1070 HET build log update
Thanks for watching!
Boris
 thats great
Ill try it again with another update!
As mentioned in my last update, I got started with the M1070 and made some big progress as of now. I do not have pics of the latest status but this update should contain enough pics for now.
The towing system with sharp detail:
Some more detail on the pressure bottles and storage system for underneath the cab:
A real ladder, way more detail then Hobbyboss's ladder:
Started with Miloslav's great engine!
A dryfit:
more stuff for a larger dryfit:
Hope you guys like it so far!
the full update with more pictures can be found in my original M1070 HET build log update
Thanks for watching!
Boris

Boris1991

Joined: October 13, 2009
KitMaker: 307 posts
Armorama: 278 posts

Posted: Friday, June 14, 2013 - 07:39 AM UTC
Well, the last few updates hasn't received much attention from you guys, so that explains the lack of updates here, but im gonna try it one more last time 
I have come close to finishing the entire build so there's a lot for you guys to catch up (if you're interested though)
The last update was the first one of the M1070 build, about a week ago I placed number six on my website so were gonna walk trough five updates of the M1070 build alone:
Update #02 /b]
In this update I started with the interior of the cab and the CPK kit:
The interior:


the seats

some scratching

a dryfit of the CPK

very thick glass! how thick is this in real life?

A lot of detail on the inner side of the doors

that was part 02
for the full update and more pics see M1070 build log part 02
[b]Update #03
In this update I worked on the colors of the interior, mudguards and mirrors


whats this? i comes with the CPK kit

mudguards

nice detail on the mirrors, the are movable when attached to the cab

that was part 03!
for the full update and more pics see
M1070 build log part 03
Update #04
In this update I airbrushed the chassis and painted the engine by Real Model. I did a dryfit with the CPK as well.
base color:

The engine:


The base color of the CPK some sanding after, needs another round of paint

starts to look like a M1070 right?


For the full update see m1070 build log part 04
Update #05
a small update on the constructions of the blast panels for the doors, the ladders and more PE details:


Now, whats this device?

that was part 05!
for the full build update and more pictures see: M1070 build log part 05
Update #06
that means we've landed at the final update for now!
but the best one if you ask me.
I have:
- fully painted the NATO camo
- Engine installed
- CPK kit painted
- applied the few decals
overview of the M1070 without the cab:


Some close-up pictures of the engine installation!
Great job on the Engine Miloslav!
I have review the engine here:
Real Model M1070 Engine review


and finally the M1070 with the cab on top:


Thats the last update! weathering is up next! and I think that will be a great challenge!
for all the pictures and full update on this part, see : M1070 build log part 06
I hope you guys liked it! and appreciate some replies this time.
thanks for watching !

I have come close to finishing the entire build so there's a lot for you guys to catch up (if you're interested though)
The last update was the first one of the M1070 build, about a week ago I placed number six on my website so were gonna walk trough five updates of the M1070 build alone:
Update #02 /b]
In this update I started with the interior of the cab and the CPK kit:
The interior:


the seats

some scratching

a dryfit of the CPK

very thick glass! how thick is this in real life?

A lot of detail on the inner side of the doors

that was part 02
for the full update and more pics see M1070 build log part 02
[b]Update #03
In this update I worked on the colors of the interior, mudguards and mirrors


whats this? i comes with the CPK kit

mudguards

nice detail on the mirrors, the are movable when attached to the cab

that was part 03!
for the full update and more pics see
M1070 build log part 03
Update #04
In this update I airbrushed the chassis and painted the engine by Real Model. I did a dryfit with the CPK as well.
base color:

The engine:


The base color of the CPK some sanding after, needs another round of paint

starts to look like a M1070 right?


For the full update see m1070 build log part 04
Update #05
a small update on the constructions of the blast panels for the doors, the ladders and more PE details:


Now, whats this device?

that was part 05!
for the full build update and more pictures see: M1070 build log part 05
Update #06
that means we've landed at the final update for now!
but the best one if you ask me.
I have:
- fully painted the NATO camo
- Engine installed
- CPK kit painted
- applied the few decals
overview of the M1070 without the cab:


Some close-up pictures of the engine installation!
Great job on the Engine Miloslav!
I have review the engine here:
Real Model M1070 Engine review


and finally the M1070 with the cab on top:


Thats the last update! weathering is up next! and I think that will be a great challenge!
for all the pictures and full update on this part, see : M1070 build log part 06
I hope you guys liked it! and appreciate some replies this time.
thanks for watching !
wingman

Joined: December 09, 2003
KitMaker: 880 posts
Armorama: 209 posts

Posted: Friday, June 14, 2013 - 08:29 AM UTC
SO COOL Boris. Great job, looking forward to more photos, thanks for posting. Wingman out.
hliu24

Joined: November 19, 2010
KitMaker: 798 posts
Armorama: 797 posts

Posted: Friday, June 14, 2013 - 10:33 AM UTC
Another killing 1070 
Jay

Jay

Teaker11

Joined: July 02, 2009
KitMaker: 962 posts
Armorama: 786 posts

Posted: Friday, June 14, 2013 - 11:10 AM UTC
Outstanding job on your HET build. I am late seeing your build from the start, I do have a question How did you find working with the ET Photo etch, were the drawings good and the PE fold easy? I an thinking of buying the trailer set . You make it look easy.
Jim
Jim

Posted: Friday, June 14, 2013 - 04:49 PM UTC
Looks Great Boris. 
And I have been following along from the beginning, just don't always comment.
Cheers Rob.

And I have been following along from the beginning, just don't always comment.

Cheers Rob.

Boris1991

Joined: October 13, 2009
KitMaker: 307 posts
Armorama: 278 posts

Posted: Sunday, June 16, 2013 - 08:48 PM UTC
Quoted Text
SO COOL Boris. Great job, looking forward to more photos, thanks for posting. Wingman out.
Thanks Wingman! more will follow as I'm close to finishing up!
Quoted Text
Another killing 1070
Jay
Glad you like it!
Quoted Text
Outstanding job on your HET build. I am late seeing your build from the start, I do have a question How did you find working with the ET Photo etch, were the drawings good and the PE fold easy? I an thinking of buying the trailer set . You make it look easy.
Jim
Thanks!
I loved the PE! I did a review on the trailer set on my website: M1000 trailer PE set review
I also did a review on the M1070 exterior PE set: M1070 Exterior PE set
If you have any questions after the review, let me know.
Im going to review the other ET sets as well
Quoted Text
Looks Great Boris.
And I have been following along from the beginning, just don't always comment.
Cheers Rob.
Thanks! nice to know:)
Sandbox

Joined: October 29, 2002
KitMaker: 350 posts
Armorama: 158 posts

Posted: Monday, June 17, 2013 - 12:09 AM UTC
Amazing. Absolutely amazing. Fantastic work especially with the PE. Very nice photographs. I have this kit on the shelf and hopefully I will be able to remember/find this trail and your build blog when I get to it. Inspiring.
BruceJ8365

Joined: December 25, 2012
KitMaker: 441 posts
Armorama: 441 posts

Posted: Monday, June 17, 2013 - 03:06 AM UTC
Amazed...
I don't know what kind of super shrink ray you used to shrink a real one down to that size, but somewhere there's a reserve unit going to wondering where it went when they walk out to the depot next weekend!
I don't know what kind of super shrink ray you used to shrink a real one down to that size, but somewhere there's a reserve unit going to wondering where it went when they walk out to the depot next weekend!

Boris1991

Joined: October 13, 2009
KitMaker: 307 posts
Armorama: 278 posts

Posted: Tuesday, June 18, 2013 - 09:00 PM UTC
Quoted Text
Amazing. Absolutely amazing. Fantastic work especially with the PE. Very nice photographs. I have this kit on the shelf and hopefully I will be able to remember/find this trail and your build blog when I get to it. Inspiring.
Thanks! glad you like it so much

Quoted Text
Amazed...
I don't know what kind of super shrink ray you used to shrink a real one down to that size, but somewhere there's a reserve unit going to wondering where it went when they walk out to the depot next weekend!
haha, thanks mate! thats what Im building for, thanks for the comment
I think you're gonna be amazed even more after the update where I weathered this beast. it looks great if you ask me.
hope to put that update here soon....
scottyboy

Joined: April 02, 2006
KitMaker: 29 posts
Armorama: 29 posts

Posted: Wednesday, June 19, 2013 - 08:03 AM UTC
Hi Boris, been following your build and what can I say, except fantastic,all that PE and other accessories you've used have made your HET into a beast of a truck. I am half way through my mammoth build of the HET, 5 months on and of so far , the end will soon be in sight.
One question I have, what is the correct number of air tanks the HET is supposed to have, kit has 4, real one has 5, can you or anyone else reading this, shed some light, many thanks.
One question I have, what is the correct number of air tanks the HET is supposed to have, kit has 4, real one has 5, can you or anyone else reading this, shed some light, many thanks.


Boris1991

Joined: October 13, 2009
KitMaker: 307 posts
Armorama: 278 posts

Posted: Wednesday, June 19, 2013 - 08:37 AM UTC
Quoted Text
Hi Boris, been following your build and what can I say, except fantastic,all that PE and other accessories you've used have made your HET into a beast of a truck. I am half way through my mammoth build of the HET, 5 months on and of so far , the end will soon be in sight.
One question I have, what is the correct number of air tanks the HET is supposed to have, kit has 4, real one has 5, can you or anyone else reading this, shed some light, many thanks.
Thanks Stephen! what a build the kit is huh? I really liked it, I started in september 2012!
I have no idea on the air tanks, but bet somebody here can help you out!
scottyboy

Joined: April 02, 2006
KitMaker: 29 posts
Armorama: 29 posts

Posted: Wednesday, June 19, 2013 - 09:04 AM UTC
ok Boris thanks for that reply, I hope someone here can, because i'm atempting to add extra detail to mine, ie air lines etc.
I'm using ET pe sets and Real model CPK set. Once again carry on with the good work , look forward to seeing this finished article.

I'm using ET pe sets and Real model CPK set. Once again carry on with the good work , look forward to seeing this finished article.

Posted: Wednesday, June 19, 2013 - 12:11 PM UTC
Here is a diagram, no.2 is the purge tank and 3-7 are air tanks.
Cheers Rob.
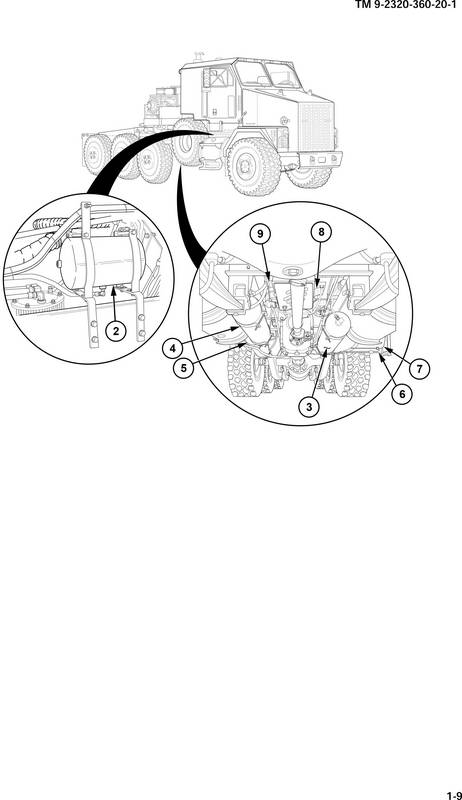
Cheers Rob.

scottyboy

Joined: April 02, 2006
KitMaker: 29 posts
Armorama: 29 posts

Posted: Wednesday, June 19, 2013 - 10:46 PM UTC
Cheers Rob for that diagram, now i can get on and fit a 5th tank and all the plumbing  much appreiciate the quick reply.
Steve
 much appreiciate the quick reply.
Steve

Boris1991

Joined: October 13, 2009
KitMaker: 307 posts
Armorama: 278 posts

Posted: Wednesday, June 19, 2013 - 10:52 PM UTC
Thanks for the help Rob!
Posted: Thursday, June 20, 2013 - 10:22 AM UTC
No problem, I have several technical manuals on the M1070 and trailer. If I get a chance I'll look through them for info on where all the lines run. 
Cheers Rob.
PS or have a look here:
https://www.google.ca/search?q=TM-9-2320-360-20-1&rlz=1C1CHLB_en-GBCA539CA539&oq=TM-9-2320-360-20-1&aqs=chrome.0.57.1566j0&sourceid=chrome&ie=UTF-8

Cheers Rob.
PS or have a look here:
https://www.google.ca/search?q=TM-9-2320-360-20-1&rlz=1C1CHLB_en-GBCA539CA539&oq=TM-9-2320-360-20-1&aqs=chrome.0.57.1566j0&sourceid=chrome&ie=UTF-8
Headhunter506

Joined: December 01, 2007
KitMaker: 1,575 posts
Armorama: 1,509 posts

Posted: Thursday, June 20, 2013 - 12:43 PM UTC
If anyone is interested, I drew up a 100% accurate 1/35 scale set of CPK belly armor and blast shield drawings, let me know. I decided to make my own out of brass sheet because NOBODY includes an accurate version in their PE sets.
Also, here's a heads up to everyone using the engine kit:
YOU ALL BUILT IT WRONG!!!!!!!!
1. Parts 20 and 21 should be mounted opposite as to what is indicated in the instruction sheet.
2. Part 20 should be attached, topside canted to the right, to the circular plate directly below where Part 21 was shown to be attached.
3. The area where Part 21 was shown attached in the instructions is actually the Accessory Drive housing. A pulley, which provides power, via two drive belts, to the 12V Rear Alternator, should be located there.
4. The previously mentioned 12V Rear Alternator is mounted onto the immediate lower right, as seen from the rear, of the Accessory Drive housing.
See, if youse mugs woulda bothered downloading the TM's I provided links for in an earlier thread, you woulda knowed that the information was in TM 9-2320-360-24P, riiiiiiight?
Also, here's a heads up to everyone using the engine kit:
YOU ALL BUILT IT WRONG!!!!!!!!

1. Parts 20 and 21 should be mounted opposite as to what is indicated in the instruction sheet.
2. Part 20 should be attached, topside canted to the right, to the circular plate directly below where Part 21 was shown to be attached.
3. The area where Part 21 was shown attached in the instructions is actually the Accessory Drive housing. A pulley, which provides power, via two drive belts, to the 12V Rear Alternator, should be located there.
4. The previously mentioned 12V Rear Alternator is mounted onto the immediate lower right, as seen from the rear, of the Accessory Drive housing.
See, if youse mugs woulda bothered downloading the TM's I provided links for in an earlier thread, you woulda knowed that the information was in TM 9-2320-360-24P, riiiiiiight?

 |


