_GOTOBOTTOM
Armor/AFV: AA/AT/Artillery
For discussions about artillery and anti-aircraft or anti-tank guns.
Hosted by Darren Baker
PAK 43 Finished
FAUST
#130
Visit this Community
Noord-Holland, Netherlands
Joined: June 07, 2002
KitMaker: 8,797 posts
Armorama: 4,190 posts
Posted: Sunday, November 11, 2012 - 10:06 AM UTC
Ola Guys

A while ago I decided to start a relatively big diorama depicting the defense of Berlin. And Because of it's size I'm building it in Modules and sections leaving only the weathering to the end to tie everything together. This PAK 43 is effectively item 1.

It is Trumpeters 88mm PAK 43 built OOTB, Preshade in black. Shadowlayer of the lafette and the gunshield in a dirty brown mix from tamiya colors and the Dunkelgelb comes from the 1945 Late war paint set from AK Interactive. Chips and weathering are done in Humbrols and oils.

Enough talk. here are the pics.


Curious to hear any feedback

With friendly greetz

Robert Blokker
AFVFan
Visit this Community
North Carolina, United States
Joined: May 17, 2012
KitMaker: 1,980 posts
Armorama: 1,571 posts
Posted: Sunday, November 11, 2012 - 03:22 PM UTC
Looks pretty nice to me, Robert. The paint looks good and it's not overly chipped. I'm sure the weathering will just add to it.
GregCloseCombat
Visit this Community
California, United States
Joined: June 30, 2008
KitMaker: 2,408 posts
Armorama: 2,394 posts
Posted: Sunday, November 11, 2012 - 03:54 PM UTC
I can picture it in action, so great job on the painting
Great idea for a dio, but man something smaller like 1/72 sounds easier to get more into it. Will look forward to seeing how you put it all together. Keep up the great work!
Hederstierna
#247
Visit this Community
Nordjylland, Denmark
Joined: January 03, 2008
KitMaker: 1,102 posts
Armorama: 1,018 posts
Posted: Monday, November 12, 2012 - 12:33 AM UTC
Hi Robert
Really nice work. You've done a wonderful paintjob, and thank you for NOT painting the barrel rot oxide Have you thought of adding a couple of shells in the ammobin?
Best regards
Jacob
retiredyank
Visit this Community
Arkansas, United States
Joined: June 29, 2009
KitMaker: 11,610 posts
Armorama: 7,843 posts
Posted: Monday, November 12, 2012 - 12:47 AM UTC
Great work! I'll be using this as a resource for future weathering. What paint did you use for the barrel?
FAUST
#130
Visit this Community
Noord-Holland, Netherlands
Joined: June 07, 2002
KitMaker: 8,797 posts
Armorama: 4,190 posts
Posted: Monday, November 12, 2012 - 04:14 AM UTC
Ola Guys

Thanks for the comments.

@ Bob
Yeah it is really hard to stay civilized once you started chipping. But I think I indeed kept it to the limit. The weathering stage is going to be fun but also because it will be the last step of the dio itself.

@ Greg
Thanks. It somehow is indeed a heavy looking gun. Pretty pleased I managed that with my sloppy painting. You are right about size. But For me personally 1:72 is too small. I would never get a result out of it I'm happy with. Currently it is not easy to get an exact idea of size as I need to finish some key elements first. A miniart building and an ICM Merc L1500 is in the works. Then I can shuffle the stuff around a bit till I'm satisfied. And then I can get an overview of the works. And that is only the ground floor. It also will be multilayered from sewer to factory attic.

@ Jacob
Thanks for the comments. I learned some years ago that indeed the barrels were primed Grey instead of Oxid Rot. Allthough I have to admit it gives a very interesting look to a vehicle I opted to go for a more historically realistic look. I have thought about adding shells to the ammo bin however I decided against it. It will be apparent why in the eventual diorama as it really is the last stages of defense in Berlin and a period where the gun is firing continuously. Easier to grab the shells directly from the crates.

@ Matt
Your welcome. Hope it is of some use to you. The barrel was painted completely with Tamiya Acrilics. Preshade with black on both ends. Filled in with panzer grey and then misted a lighter grey over the top side of the barrel. Then some oildot filters with white and there you are: grey barrel.
Hederstierna
#247
Visit this Community
Nordjylland, Denmark
Joined: January 03, 2008
KitMaker: 1,102 posts
Armorama: 1,018 posts
Posted: Tuesday, November 13, 2012 - 03:47 AM UTC
Hmm! That make sense. Looking forward to see more.
Jacob
GALILEO1
Visit this Community
Maryland, United States
Joined: April 18, 2006
KitMaker: 1,794 posts
Armorama: 1,431 posts
Posted: Tuesday, May 14, 2013 - 10:49 AM UTC
Bump for a very nice artillery piece! The colors look stunning! Robert, would you mind telling me what you used to replicate the nice metal effect on the breech?

Rob
FAUST
#130
Visit this Community
Noord-Holland, Netherlands
Joined: June 07, 2002
KitMaker: 8,797 posts
Armorama: 4,190 posts
Posted: Tuesday, May 14, 2013 - 07:30 PM UTC
Ola Rob

I nearly missed it as the topic title in latest posts was not green anymore. I did not even recognise the topic title. And was severly puzzled by the "you created this"
Thanks for the compliments. The colors of the AK interactive late war set are really neat. The Metal on the inside of the breech is handpainted with Citadel Chainmail silver. Really nice metal color which dries up very smooth too.

ChiefGunner
Visit this Community
Setubal, Portugal
Joined: July 24, 2010
KitMaker: 205 posts
Armorama: 203 posts
Posted: Tuesday, May 14, 2013 - 10:24 PM UTC
GREAT JOB.

ChiefGunner
yeahwiggie
Visit this Community
Dalarnas, Sweden
Joined: March 24, 2006
KitMaker: 2,093 posts
Armorama: 1,359 posts
Posted: Tuesday, May 14, 2013 - 10:37 PM UTC
hej Robert,
that's one serious looking piece of hardware!
Personally I think the chipping is too heavy and the dark barrel stands out too much, but that's a matter of personal taste.
I would have liked to see more of the actual construction.
Nevertheless it will make a good centrepiece in any diorama!
JSoltoft
Visit this Community
Fyn, Denmark
Joined: December 09, 2008
KitMaker: 95 posts
Armorama: 79 posts
Posted: Tuesday, May 14, 2013 - 10:49 PM UTC
Love your model Robert. Great paintjob with the fading to dark colours at the bottom. Its interesting to look at and one doesn't get the feeling that the modeller(you) went too far with unnecessary details to catch the viewers eye.

- Johan
jrutman
Visit this Community
Pennsylvania, United States
Joined: April 10, 2011
KitMaker: 7,941 posts
Armorama: 7,934 posts
Posted: Wednesday, May 15, 2013 - 01:57 AM UTC
I think the paint colors that you used are spot on. I am glad that this was bumped because I never got to see it.
Any progress on the associated dio?
J
GALILEO1
Visit this Community
Maryland, United States
Joined: April 18, 2006
KitMaker: 1,794 posts
Armorama: 1,431 posts
Posted: Wednesday, May 15, 2013 - 03:21 AM UTC

Quoted Text

Ola Rob

I nearly missed it as the topic title in latest posts was not green anymore. I did not even recognise the topic title. And was severly puzzled by the "you created this"
Thanks for the compliments. The colors of the AK interactive late war set are really neat. The Metal on the inside of the breech is handpainted with Citadel Chainmail silver. Really nice metal color which dries up very smooth too.


Thanks for the feedback, Robert. I keep hearing about these Citadel metal paints so I really need to grab some. Are these lacquers or acrylic paints?

Again, very inspiring work.

Rob
FAUST
#130
Visit this Community
Noord-Holland, Netherlands
Joined: June 07, 2002
KitMaker: 8,797 posts
Armorama: 4,190 posts
Posted: Wednesday, May 15, 2013 - 05:08 AM UTC
Ola guys

hehehe talk about a thread revival.

@ Chiefgunner
Thanks for the compliments. Really appreciated.

@ Ron
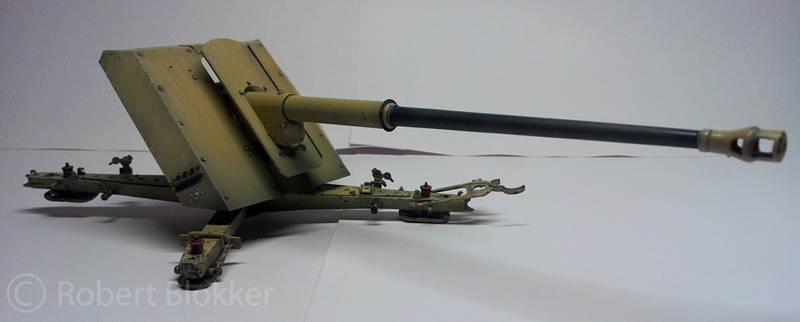
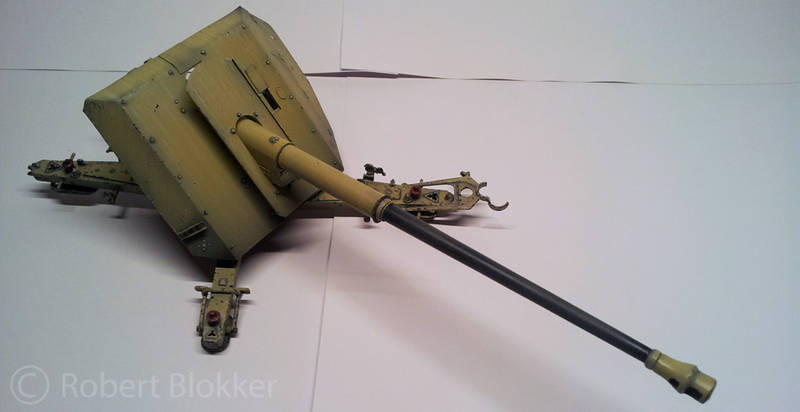
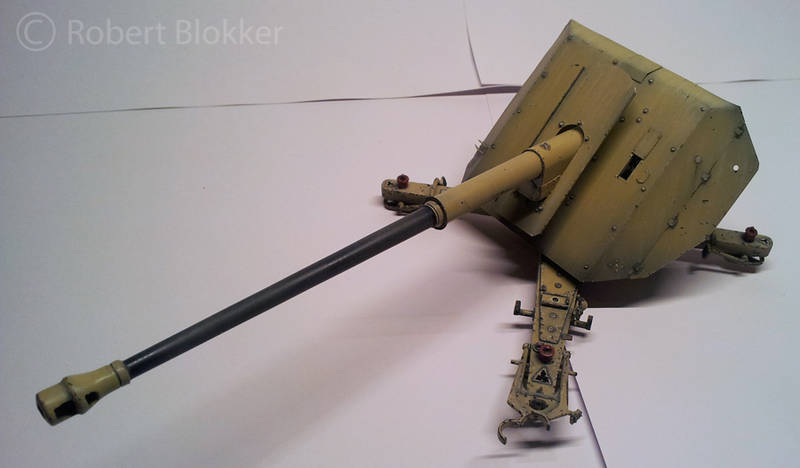
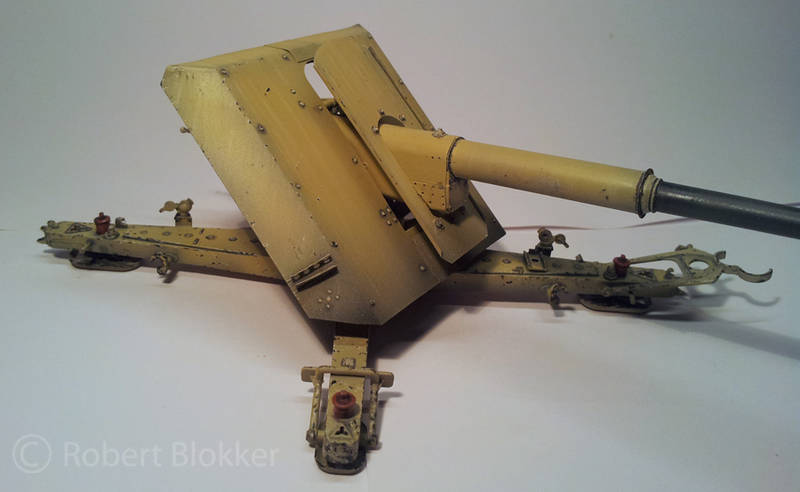
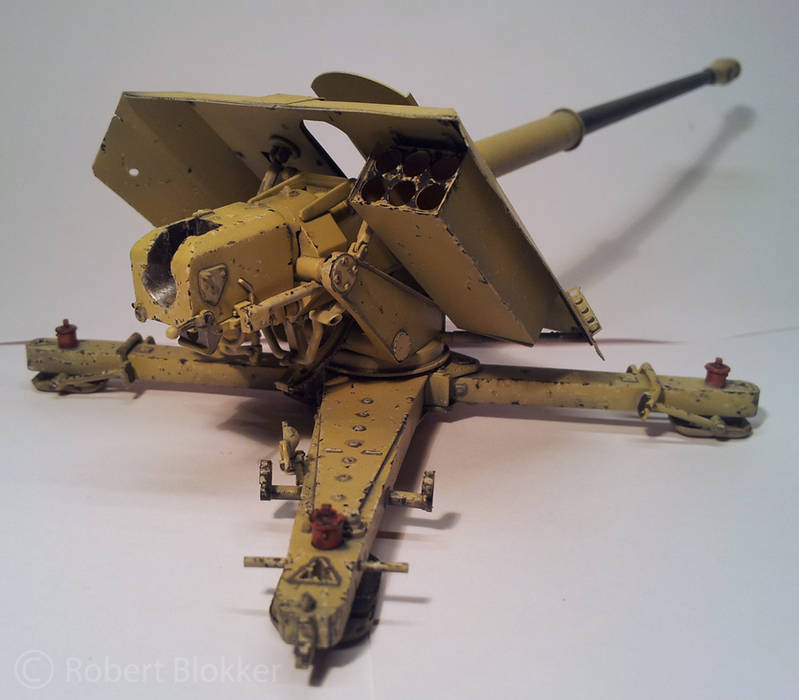
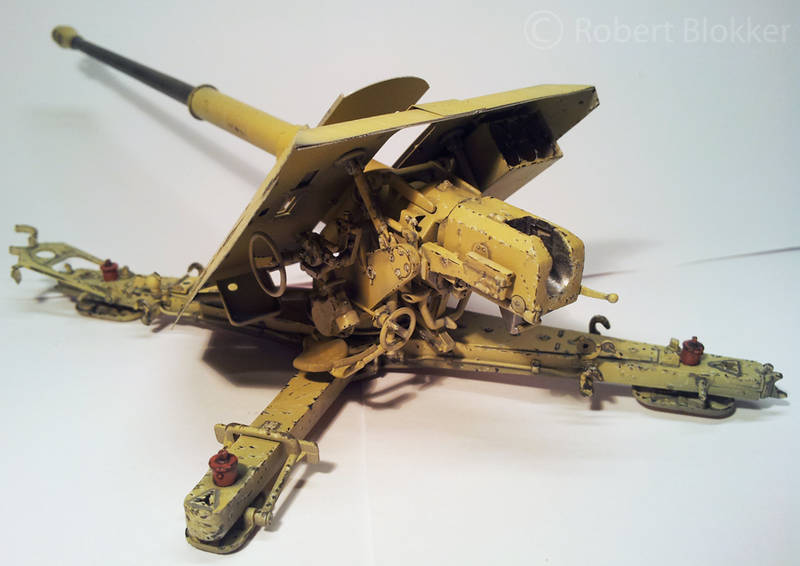
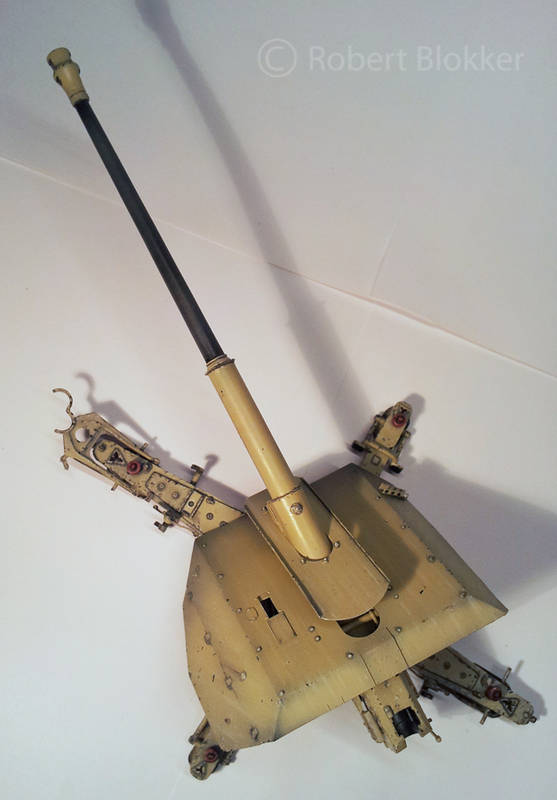
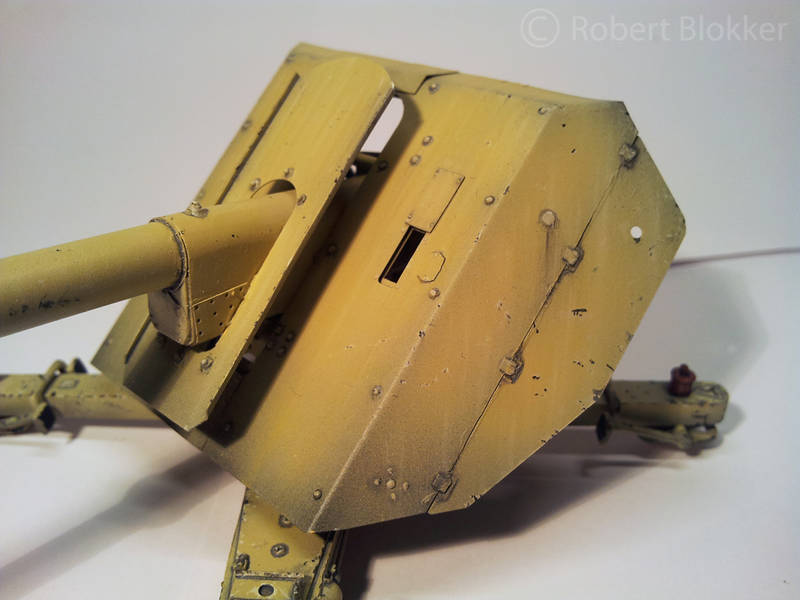
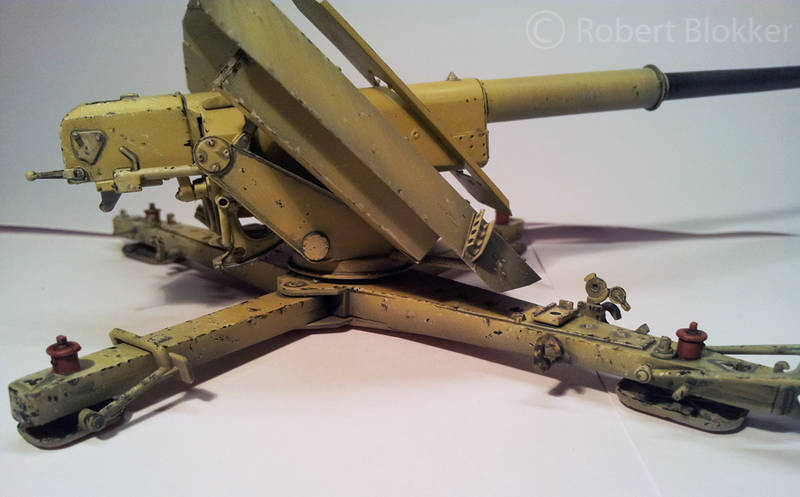
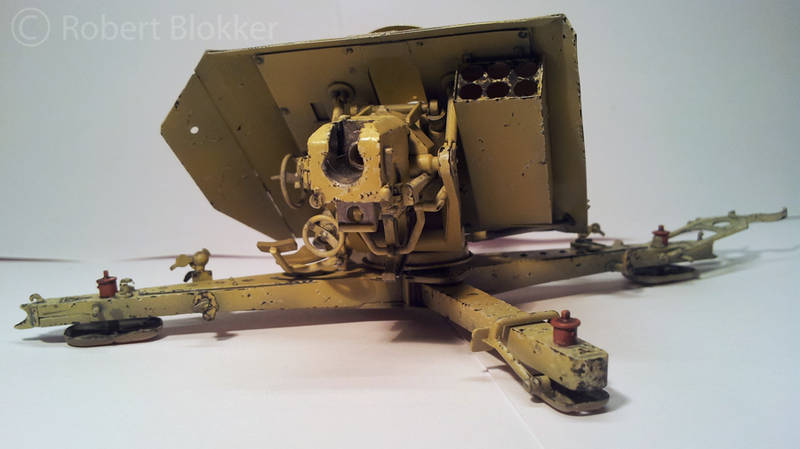
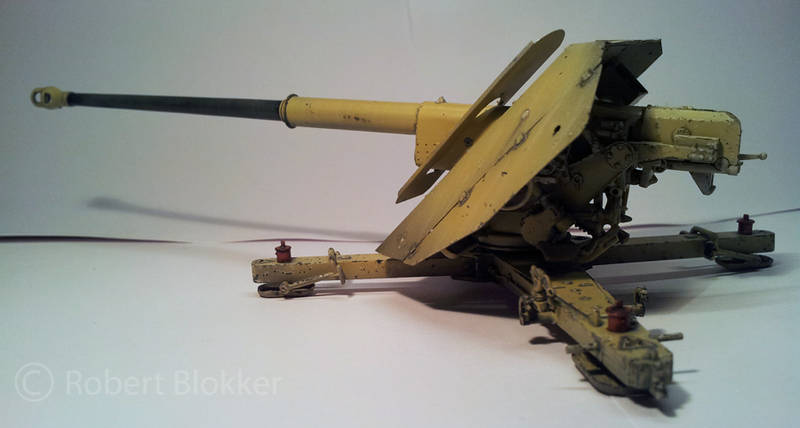
It is a big gun that's for sure. I have no pics of the construction. I assembled it mostly on an event here. And did not make any photographs of that. But it is the Trumpeter kit built completely OOTB. As for the chipping it is indeed a personal taste thing. I don't think it is overly chipped. Just enough.

@ Johan
Thanks for the compliments. You actually hit it right on the head there. As this was a built that I wanted to start and finish in a short amount of time and trying to make it interesting with a minimum amount of color, techniques and weathering. I'm glad you noticed and liked the fading.

@ Jerry
Thanks mate for the compliments. Glad you like it. I was pretty surprised that this thread got revived. But I'm not complaining .
I made sketches for the diorama. It was planned as an absolute gargantuan scene featuring the gun. A Merc L1500. All the 88 mm Ammo crates the German army had. A sewer, a factory building and then at one point I called myself an idiot. Teared up all the drawings and decided to cut the scene to the bare minimum to tell the same story. It still will be a multilayered project but much smaller. But as of today it is not yet started.

@ Rob
I can fully recommend the citadel paints. The metal colors are really good. I have several that I use a lot. They are enamel based. And they really apply smoothly right from the tin. Plus they are not badly priced either.
Panzer-Ole
Visit this Community
Kobenhavn, Denmark
Joined: August 27, 2006
KitMaker: 155 posts
Armorama: 145 posts
Posted: Wednesday, May 15, 2013 - 05:21 AM UTC
Looking mean and highly potent, so I like it.

I like the colours you have used, the shading and the primer coloured barrel, It breaks up the monoton dunkelgelb colour.

Thank you for sharing.

Br Ole
FAUST
#130
Visit this Community
Noord-Holland, Netherlands
Joined: June 07, 2002
KitMaker: 8,797 posts
Armorama: 4,190 posts
Posted: Wednesday, May 15, 2013 - 06:43 PM UTC
Ola Ole

Thanks for the compliments. Really appreciated.
Steel_Spektor
Visit this Community
Queensland, Australia
Joined: December 19, 2012
KitMaker: 74 posts
Armorama: 68 posts
Posted: Wednesday, May 15, 2013 - 07:45 PM UTC
Your Pak looks quite realistic. How did you achieve the chipping effect?
FAUST
#130
Visit this Community
Noord-Holland, Netherlands
Joined: June 07, 2002
KitMaker: 8,797 posts
Armorama: 4,190 posts
Posted: Wednesday, May 15, 2013 - 09:10 PM UTC
Ola Luke

Thanks for the reply. Chipping was done in 2 steps with Enamels. desert yellow with a bit of white to make it lighter. Diluted it a bit so it dries smooth. This is the first chipping layer (actually this is more like scuffed paint.) After that smaller chips of Panzergrey (again diluted a bit) were painted in some of the scuffed areas.
All handpainted with a very small brush 10/0.
I went about quickly on this gun. I think the whole chipping proces took me 2,5 hours.
The hardest part is not to overdo it and put them in places where they are logic. The gun shield has less chips then the lafette and the breech end of the gun. And nearing the top of the shield it gets even less chips. The lafette is more chipped because of people constantly walking over it and because of the actions needed when it is put into position. Same goes for the breech end where shells are put in and out constantly
 _GOTOTOP