_GOTOBOTTOM
Dioramas: Techniques
Diorama techniques and related subjects.
Hosted by Darren Baker
Modern camo net
Vonflak
Visit this Community
Maryland, United States
Joined: December 06, 2010
KitMaker: 59 posts
Armorama: 53 posts
Posted: Wednesday, December 12, 2012 - 06:42 AM UTC
I made my own camo net. I found stuff you could buy and it looks great. I like to make my own stuff though when I can. Plus I'm frugal (cheap)

So, I set off to "roll-my-own" and here's how it worked:

I painted with craft paint both sides of a hunk of tissue paper.

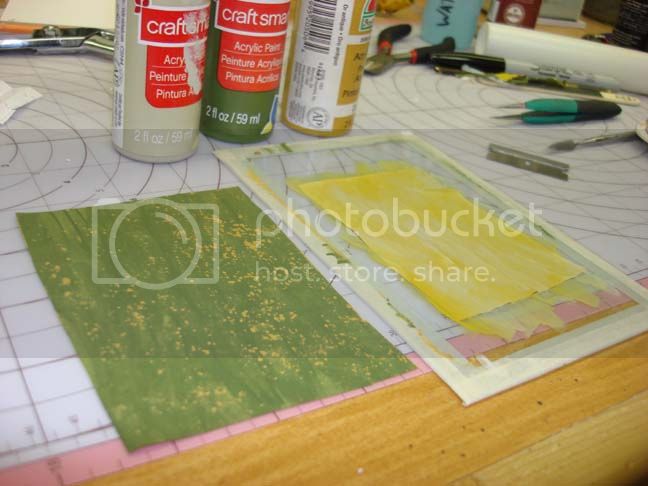
It bleed through some but no biggie. Also I got the sand side a little too yellow.

Then I folded it into a fan shape just like in elementary school.


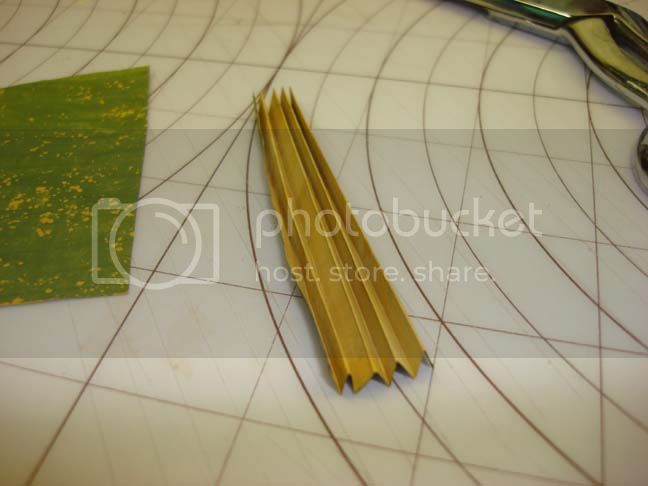
Here's the part that I had to scratch my brain over, the cuts:

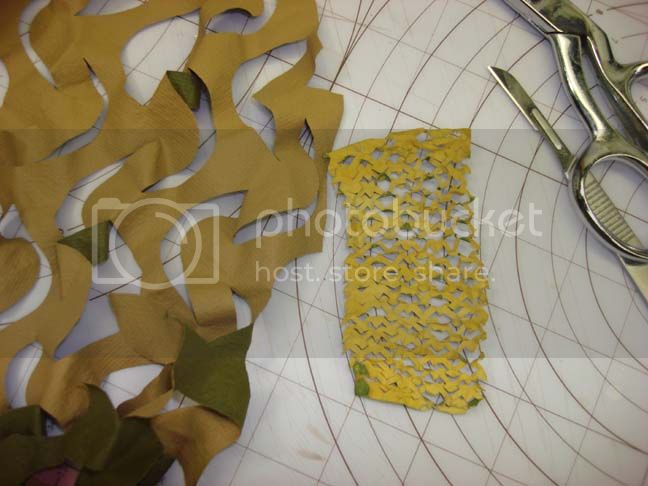
I thought the cuts would be hard to see so next to the real thing is the "training aid." A sharp blade is nessesary to get through ALL the folds.

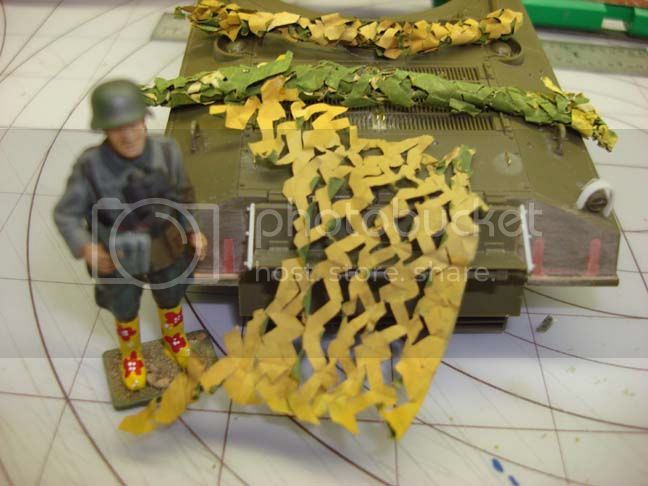
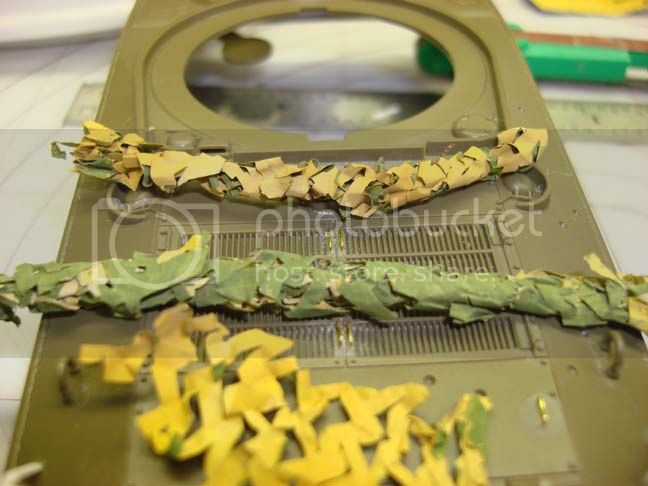
Then I just unfolded it and rolled and crumpled it to get the proper look.


Once in place I wet the paper down to give it a droopy look but all the crinkles came out and it wanted to go back into it's original flat configuration.

I started again with regular copy paper and it looked much better, it has a "weight" to it. Alot tougher to cut though, I had to unfold and re-cut some areas.

So, there it is, maybe helpful to someone.

flugwuzzi
Visit this Community
Lower Austria, Austria
Joined: November 02, 2007
KitMaker: 633 posts
Armorama: 599 posts
Posted: Wednesday, December 12, 2012 - 06:51 AM UTC
Very interesting technique, Bryan.

I wonder how the net would look like on armor ... any pics for us?

Thanks for sharing and showing your idea.
Cheers
Walter
Tiger_213
Visit this Community
California, United States
Joined: August 10, 2012
KitMaker: 1,510 posts
Armorama: 1,443 posts
Posted: Wednesday, December 12, 2012 - 07:30 AM UTC
Nice idea Bryan.
Thudius
Visit this Community
Uusimaa, Finland
Joined: October 22, 2012
KitMaker: 1,194 posts
Armorama: 1,077 posts
Posted: Wednesday, December 12, 2012 - 08:15 AM UTC
Cool. I was just contemplating the same problem. I was thinking of taking a piece of plastic bag, suitably painted, folding a few times and then cutting squiggly lines with a double blade. Trim off the edges and thread into some gauze.
cdharwins
Visit this Community
New Jersey, United States
Joined: October 28, 2006
KitMaker: 491 posts
Armorama: 462 posts
Posted: Wednesday, December 12, 2012 - 08:31 AM UTC
Bryan, you're the man! I was trying to figure out how to make one of these! I'm going to try you're idea out tonight,

Chris
1stjaeger
Visit this Community
Wien, Austria
Joined: May 20, 2011
KitMaker: 1,744 posts
Armorama: 1,727 posts
Posted: Wednesday, December 12, 2012 - 09:23 AM UTC
Very interesting indeed Sir!
Thanks for sharing!!
Cheers
Romain
parrot
Visit this Community
Ontario, Canada
Joined: March 01, 2002
KitMaker: 1,607 posts
Armorama: 1,581 posts
Posted: Wednesday, December 12, 2012 - 12:24 PM UTC
Bryan,
Why didn't you come up with this a few months ago?
I've been working on a Canadian Leopard now for ages.I'm also cheap and wouldn't pay for AM turret and hull.After useless decals I went for Eduard baracuda nets that are working,but with the wasted money I could have just got the AM conversion.Exellent idea.

Tom
BROCKUPPERCUT
Visit this Community
Rhode Island, United States
Joined: October 29, 2006
KitMaker: 191 posts
Armorama: 102 posts
Posted: Wednesday, December 12, 2012 - 12:58 PM UTC
or you could make a blade with a curved blade(or use a curved lathe tool) and lightly hammer through the paper to make the cuts semi circular cuts like the actual camo net . just a thought.
TacFireGuru
Visit this Community
Colorado, United States
Joined: December 25, 2004
KitMaker: 3,770 posts
Armorama: 2,263 posts
Posted: Wednesday, December 12, 2012 - 01:23 PM UTC
Very interesting technique indeed!

Quoted Text

I wonder how the net would look like on armor ... any pics for us?


Agreed. Love to see how that looks...scale wise.


Quoted Text

or you could make a blade with a curved blade(or use a curved lathe tool)


Touche'!

Mike
Vonflak
Visit this Community
Maryland, United States
Joined: December 06, 2010
KitMaker: 59 posts
Armorama: 53 posts
Posted: Thursday, December 13, 2012 - 04:32 AM UTC
Thanks guys! I hope it will come in handy! I placed some rolled scraps over a sherm I'm working on so you can see scale. My work space forman Otto wanted in the pic too. Rolled up they look good, unrolled though they are over scale, will hafta get smaller next time.


This is the project that I developed the net for.

Thudius
Visit this Community
Uusimaa, Finland
Joined: October 22, 2012
KitMaker: 1,194 posts
Armorama: 1,077 posts
Posted: Thursday, December 13, 2012 - 08:23 AM UTC
It's a good start and got people thinking of how to improve or adapt. That's always a good thing.
zontar
Visit this Community
Hawaii, United States
Joined: August 27, 2006
KitMaker: 1,646 posts
Armorama: 1,557 posts
Posted: Thursday, December 13, 2012 - 10:05 AM UTC
Bryan: Nice technique and a good scene you are working on there. Also, where did you get the portable toilet?

Happy Modeling, -zon
Vonflak
Visit this Community
Maryland, United States
Joined: December 06, 2010
KitMaker: 59 posts
Armorama: 53 posts
Posted: Thursday, December 13, 2012 - 04:33 PM UTC
Thanks Zon, I had to scratch build the port-a-john. Got some measurements on-line and took a few pics of one.
zontar
Visit this Community
Hawaii, United States
Joined: August 27, 2006
KitMaker: 1,646 posts
Armorama: 1,557 posts
Posted: Thursday, December 13, 2012 - 05:30 PM UTC
Bryan: Nice!! It looks dead on and is weathered just right.

Happy Modeling, - zon
flugwuzzi
Visit this Community
Lower Austria, Austria
Joined: November 02, 2007
KitMaker: 633 posts
Armorama: 599 posts
Posted: Thursday, December 13, 2012 - 07:16 PM UTC
Bryan, thanks for sharing the pics.

The camo nets look really nice but in my op. need some more "finesse" when placed on a detailed vehicle. If I look on the house-roof - they look quite right ;-)

... the toilet looks great!!

cheers
Walter
Maki
Staff MemberSenior Editor
ARMORAMA
Visit this Community
Croatia Hrvatska
Joined: February 13, 2002
KitMaker: 5,579 posts
Armorama: 2,988 posts
Posted: Thursday, December 13, 2012 - 08:03 PM UTC

Quoted Text

Bryan: Nice technique and a good scene you are working on there. Also, where did you get the portable toilet?


Verlinden makes one in 1/35. Sorry for the off-topic.

Mario
retiredyank
Visit this Community
Arkansas, United States
Joined: June 29, 2009
KitMaker: 11,610 posts
Armorama: 7,843 posts
Posted: Thursday, December 13, 2012 - 11:44 PM UTC
Nice technique. I was just going to use crate paper, as it looks to be the correct scale and no further modifications are needed.
Plasticat
Visit this Community
Idaho, United States
Joined: September 03, 2003
KitMaker: 448 posts
Armorama: 245 posts
Posted: Friday, December 14, 2012 - 12:50 AM UTC
I wonder how Silkspan would work...or even the tissue that comes in Guillow's rubber band power kits? Both would be stronger than regular tissue but tougher and still be very thin.
MegaMang
Visit this Community
Canada
Joined: December 14, 2012
KitMaker: 10 posts
Armorama: 10 posts
Posted: Friday, December 14, 2012 - 03:41 AM UTC
Cool technique, this really does resemble the modern camo netting. I agree it needs a little weight, especially around the areas were the jetting touches the ground. Did you try a mixture of glue/water to see how it sets?
Vonflak
Visit this Community
Maryland, United States
Joined: December 06, 2010
KitMaker: 59 posts
Armorama: 53 posts
Posted: Friday, December 14, 2012 - 12:05 PM UTC
I did try to wet it some with elmers and water to get it to sag some, the curled up portions wanted to uncurl back into their original just cut configuration. They can be pulled back up with tweezers and pretty much stay put, just tedious.

Tissue paper does work good and surprisingly tough after painted. I have some aircraft tissue, when I paint it It looks more like fabric to me so I didn't try it. Now that you mention it though , it might be just the thing. I'll hafta give it a try next time. I'm gonna want to work in net on all my modern stuff now.

Thanks for the compliments on the toilet. It isn't every day one gets a compliment like that
shneezbert
Visit this Community
Arizona, United States
Joined: October 31, 2005
KitMaker: 134 posts
Armorama: 99 posts
Posted: Friday, December 14, 2012 - 06:02 PM UTC
I've seen a similar technique posted somewhere but can't remember, they used tissue and a half circle chisel tool to cut the paper. How wide did you make the folds
Vonflak
Visit this Community
Maryland, United States
Joined: December 06, 2010
KitMaker: 59 posts
Armorama: 53 posts
Posted: Saturday, December 15, 2012 - 12:44 PM UTC
The paper was folded to about 3/16. I like the chisel idea too.
Frenchy
Visit this Community
Rhone, France
Joined: December 02, 2002
KitMaker: 12,719 posts
Armorama: 12,507 posts
Posted: Saturday, December 15, 2012 - 08:00 PM UTC

Quoted Text

I've seen a similar technique posted somewhere but can't remember, they used tissue and a half circle chisel tool to cut the paper.


Here you go

http://www.plasticwarfare.se/2007/10/how-to-make-realistic-barracuda-camouflage-netting-in-135/

HTH

Frenchy
Vonflak
Visit this Community
Maryland, United States
Joined: December 06, 2010
KitMaker: 59 posts
Armorama: 53 posts
Posted: Monday, December 17, 2012 - 03:31 PM UTC

Quoted Text


Quoted Text

I've seen a similar technique posted somewhere but can't remember, they used tissue and a half circle chisel tool to cut the paper.


Here you go

http://www.plasticwarfare.se/2007/10/how-to-make-realistic-barracuda-camouflage-netting-in-135/

HTH

Frenchy


His method has great results. That's a lot of curly-cues to pound out and keep straight though. I'll try a hybrid method next time.
 _GOTOTOP