_GOTOBOTTOM
Armor/AFV: Modern - USA
Modern Armor, AFVs, and Support vehicles.
Hosted by Darren Baker
M1114 Diorama help
RangerDC
Visit this Community
United States
Joined: January 01, 2013
KitMaker: 12 posts
Armorama: 11 posts
Posted: Tuesday, January 01, 2013 - 08:41 AM UTC
Hey folks, been lurking and now need your help. Used to do models as a teen (detailed, Verlinden, etc, focused on Vietnam) and now getting ready for my first model in nearly 20 years.

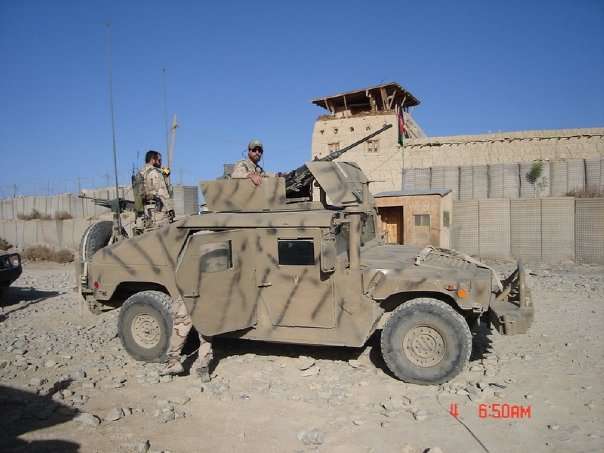
I am a combat vet and doing a diorama of my SOF team in Afghanistan....4 figures, 2 custom M1114s, desert base for diorama - probably 16" x 16".

Couple things - what are these photo etch things? Never saw those back in the day. Have been looking at the Legend kits for the Bronco models I got.

I never did airbrush, all my stuff was done by hand....recommendations?

Also, what are some great techniques for weathering/dusting - stuff like tires, floor mats, etc?

Thanks for the help...will post once I get started!

Mick
Mario_HR
Visit this Community
Croatia Hrvatska
Joined: June 28, 2006
KitMaker: 376 posts
Armorama: 303 posts
Posted: Tuesday, January 01, 2013 - 09:18 AM UTC
Hey.Mick welcome back to the hobby. You'll find many.talented modelers here as well as people from various branches of the military so you'll feel.right at home here

PE parts are usually thin strips or sheets of brass that are chemically etched and are used to obtain details that are otherwise impossible to get in styrene. a lot of of Voyager's stuff is very well designed and useful and you will probably need a nice set of scissors to cut them out from the sheet or use a scalpel blade. Then you can use sanding paper to.remove what's left of the attaching point. Cyano-acrilate or superglue is used to glue them to the model as regular glue.such as tamiya's extra thin won't work. Also when painting a primer is very useful to to stop the paint flaking.

airbrushing is great for obtaining paint results that are very difficult to get by brush painting but I would refer you to read some of the features here on armorama as the topic is quite extensive.

weathering is also a huge topic but to cover but a large step.forward are pigments, weathering liquids etc. from AK interactive, MIG, Vallejo just to name a few.

looking forward to see you start again and if this helps out let me know
RangerDC
Visit this Community
United States
Joined: January 01, 2013
KitMaker: 12 posts
Armorama: 11 posts
Posted: Thursday, January 03, 2013 - 03:13 PM UTC
Mario,

Dobar dan! Fellow Croat here, though unfortunately the language died with my grandmother. I have made it to Rijeka, but didn't have time to get up to the family village unfortunately.

Thank you for your response. I searched around and have been catching up on washing (believe this is the same as "weathering). I will be painting in enamel and it looks as if I should do my wash with acrylic thinner and acrylic paints so as not to ruin the base paint. Is this correct?

Also, what are your recommendations on clear coat (I believe some folks call this "future?"). I obviously don't want a shiny model for the desert but all teh washing sites recommend doing it so the wash "flows" better. So if I do clear coat, how do I keep a matte/flat appearance?

Any other recommendations before I get started?

Also, how can I post a pic in a response? Would like to post pics of my trucks from Afghanistan.

Hvala

Doviđenja
didgeboy
Visit this Community
Washington, United States
Joined: September 21, 2010
KitMaker: 1,846 posts
Armorama: 1,509 posts
Posted: Thursday, January 03, 2013 - 04:16 PM UTC
Best to start with an acrylic base, then future, then oil washes, seal with acrylic clear flat (I use the testors) then your dry brushing and pigments (pastels for us old guys). The acrylic flat will take away the shine and allow the dry brushing and pigments to stick better.
Just below the area here where you post your response there is a button [img] that you will put your code in between those bookends. That should help, let us know.
Anirudharun
Visit this Community
England - West Midlands, United Kingdom
Joined: February 16, 2008
KitMaker: 597 posts
Armorama: 530 posts
Posted: Thursday, January 03, 2013 - 10:57 PM UTC
Hello Mick

Your diorama idea sounds really cool, I can't wait to see your progress on it. You seem to be on the right track with regards to the weathering so I'll just give you a couple of hints.
If you're painting with enamels then Model Master Desert Sand is the closest match to the sand colour used by US forces.

To post photos, you need to click the [ img ] button below a post reply box, which gives you this piece of HTML (without the spaces):

[ img ] http://put.url.here/image.file [ /img ]

Then, right click on the photo you wish to post (in you Kitmaker gallery) and click "copy image URL" (if you're using chrome, the firefox/IE options are pretty similar), then replace the http in the code with the image URL.

As an example, heres an image posted from your gallery:


Your trucks look awesome and from what I can see the Bronco kit has you pretty much sorted. If you want some options for accessories, I'd suggest looking at Live Resin (weapons) and Pro Art (radios) and Legends for the figures.
The Legends SF have the correct kit compared to your photos, and having just used them, they are very well sculpted.

Let us know if you need any more info, Good luck!
Anirudh
RangerDC
Visit this Community
United States
Joined: January 01, 2013
KitMaker: 12 posts
Armorama: 11 posts
Posted: Friday, January 04, 2013 - 01:01 AM UTC
Anirudh - believe it or not, that is one of my trucks!! YOu probably got it form crnkovich.com. That's me!
Anirudharun
Visit this Community
England - West Midlands, United Kingdom
Joined: February 16, 2008
KitMaker: 597 posts
Armorama: 530 posts
Posted: Friday, January 04, 2013 - 01:11 AM UTC
Actually, as an example I posted one of the images from your Kitmaker gallery here on Armorama. If you want me to remove it (Opsec reasons etc) let me know.

Hope my little guide helped you with posting photos!

Anirudh
amoz02t
#192
Visit this Community
Kentucky, United States
Joined: November 25, 2009
KitMaker: 1,383 posts
Armorama: 1,281 posts
Posted: Friday, January 04, 2013 - 01:26 AM UTC
Mick,

Welcome and thank you for your service. I (like many on this site) am very much interested in your history with the M1114 over there as well as your photos. Thank you for posting and hope this contact brings you more friends and a relaxing hobby. One minor thing I have tried is oil based art paints for the tires. The subtle mixing of black, white, and greys is easier with the extra time the oil takes to dry. You can fade out to match the real thing. Wishing you all the best. POST MORE PICS!
Mario_HR
Visit this Community
Croatia Hrvatska
Joined: June 28, 2006
KitMaker: 376 posts
Armorama: 303 posts
Posted: Friday, January 04, 2013 - 02:36 AM UTC
Pozdrav! It's nice to see you haven't forgot about your "other" home I was in Rijeka just a few days ago so anytime you visit, let me know, the beer's on me...

Washing is a technique in the weathering process, basically a capillary flow of thinned out paint that gets into crevices, panel lines, around raised parts like bolts, rivets, etc creating a hard line of sort, a color limit so it accentuates details. For this you need a gloss/clear cote of some sort. Future (not sure if it's called like that any more) is a household item; a floor wax to be precise. Modelers use it because it's more economical than dedicated modeling products, it's self-leveling and can have lots of other uses like gluing really thin PE parts, polishing tiny scratches from clear parts etc, and it's good enough for decaling and washing of course.

In general, a clear cote protects your base color, as thinned out paint can dilute into your basic paint job and then everything gets either messy or even lifts up paint. To do this you need to figure out what are you dealing with i.e.;

enamel base coat = acrylic clear coat = enamel (artist oil) wash

acrylic base coat = enamel clear coat = acrylic wash... I hope you get the idea here.

gloss cote also helps to avoid silvering while decaling - air bubbles get trapped beneath the decal due to the surface roughness resulting in little white dots. When the surface is glossy it evens out the surface layer (better) so decals go on much smoother.
In the end you need to flat cote everything (that needs to be matte) and it will not obscure your painting or weathering. Let me know if I'm making sense or send me a private message and we can catch up if you get stuck somewhere...

I see Anirudh already explained about pic posting, but if you feel the kitmaker gallery is complicated, perhaps using some free picture hosting sites like photobucket, imageshack, etc is better.

I hope you post lots of photos as I'm very interested in seeing how you did your truck
Hell, send a pm anyway and let's catch up on some more talk in croatian
Removed by original poster on 01/04/13 - 14:42:50 (GMT).
RangerDC
Visit this Community
United States
Joined: January 01, 2013
KitMaker: 12 posts
Armorama: 11 posts
Posted: Friday, January 04, 2013 - 02:45 AM UTC
Anirudh, no worries on the pics...will try and add more to this post.

Gillespie - here you go (I hope!!)

Mario - thanks so much for the tips. Again, I don't have an airbrush, can I spray on the clear coat, or should I hand brush it on? Is there a spray product you would recommend - likewise for the flat?

RangerDC
Visit this Community
United States
Joined: January 01, 2013
KitMaker: 12 posts
Armorama: 11 posts
Posted: Friday, January 04, 2013 - 02:47 AM UTC


OK - pic posting isn't working so good for me!

This is what I put in? What am I missing?

""

Are there spaces somewhere that I am missing? I even tried dropping the "http://"

Thanks, guys!
RangerDC
Visit this Community
United States
Joined: January 01, 2013
KitMaker: 12 posts
Armorama: 11 posts
Posted: Friday, January 04, 2013 - 02:49 AM UTC
damn! In the quotes was the link, framed by the {img} things with the square parentheses...WTF? ARRGH!
Burik
Visit this Community
New Jersey, United States
Joined: March 12, 2002
KitMaker: 1,437 posts
Armorama: 1,303 posts
Posted: Friday, January 04, 2013 - 03:04 AM UTC
Mick, I find putting your photos on Photobucket first is easier. Then copy and paste the image from photobucket to your post here. It is pretty easy.

You just hover over your photo on Photobucket and some boxes come up below your photo. The bottom box is the copy box. Click on that box and then come over here and right click to paste. It takes seconds after you load up your photos on Photobucket.

Bob
Mario_HR
Visit this Community
Croatia Hrvatska
Joined: June 28, 2006
KitMaker: 376 posts
Armorama: 303 posts
Posted: Friday, January 04, 2013 - 03:28 AM UTC
Surprisingly Future is decent enough for brushing, as the leveling feature negates the brush marks to a degree but a spray/airbrush in my opinion is always better.

For spraying from the top of my head I could recommend Gunze Sangyo sprays. They are a modelling dedicated product but probably any hobby shop stores some brand of gloss/matte cote sprays.

They look something like this:


or this depending on the base (acrylic or lacquer):


P.S. It's easy to mess up things with a big fat layer of gloss/matte cote from a spray can so go with numerous but thin layers. It's also a good idea to allow drying time between layers
Removed by original poster on 01/04/13 - 15:45:47 (GMT).
Removed by original poster on 01/04/13 - 15:46:35 (GMT).
Removed by original poster on 01/04/13 - 15:47:27 (GMT).
Removed by original poster on 01/04/13 - 15:48:05 (GMT).
RangerDC
Visit this Community
United States
Joined: January 01, 2013
KitMaker: 12 posts
Armorama: 11 posts
Posted: Friday, January 04, 2013 - 03:50 AM UTC
RangerDC
Visit this Community
United States
Joined: January 01, 2013
KitMaker: 12 posts
Armorama: 11 posts
Posted: Friday, January 04, 2013 - 04:03 AM UTC
More to follow - pre- and post-paint. One truck had an Ibis Tek bumper and another a scratch tube bumper. Some antenna shots. Note the tow strap from the bumper routed through the hood eyelets for rapid extract. Also note teh rear hatches had been removed. One truck also had Ibis Tek rear deck with fuel rack.

In another post folks posted about Polaris ATV pics - have added one, have others.


Hope this gives you some idea of how we rolled!

Mick
amoz02t
#192
Visit this Community
Kentucky, United States
Joined: November 25, 2009
KitMaker: 1,383 posts
Armorama: 1,281 posts
Posted: Friday, January 04, 2013 - 06:07 AM UTC
Wow these photos are great! Especially the ATV and the local costume pics. What a range of colors for the clothing! I have heard that the ANA are fond of bright baseball caps, etc. Thank you so much for posting. Reminds me of (I assume you are familiar with) Capt Benjamin "Ring" Tupper's blogs and books from his year as an Army ETT in 2006? I look forward to reading more of your insights.
35th-scale
Visit this Community
Kildare, Ireland
Joined: November 21, 2007
KitMaker: 3,212 posts
Armorama: 2,807 posts
Posted: Friday, January 04, 2013 - 07:38 AM UTC
Great pictures, thanks, and good luck with your dio....will follow with interest!
RangerDC
Visit this Community
United States
Joined: January 01, 2013
KitMaker: 12 posts
Armorama: 11 posts
Posted: Friday, January 04, 2013 - 08:34 AM UTC
Thanks, fellas. Man, I forgot how tiny 1/35 really is. Got my Ibis Tek bumper all put together, along with the tow bar. Just waiting for all my other kits to come, then let the building begin!

Here are some additional ATV pics for those interested, along with a DSHK truck, some colorful ANA, a minesweeper, etc. Just some food for thought for other modellers...and of course, yours truly for figure ideas!

Thanks!

Mick


amoz02t
#192
Visit this Community
Kentucky, United States
Joined: November 25, 2009
KitMaker: 1,383 posts
Armorama: 1,281 posts
Posted: Saturday, January 05, 2013 - 02:45 AM UTC
Excellent photos sir! Thank you for posting!

I feel we need to get model producers to shift more focus on to modern era (2003-2013) subjects. These photos you are sharing (like of the Polaris ATVs) should inspire those folks. ...and everyone loves the unusual head gear! Hah!
 _GOTOTOP