Well, Everyone I'm happy to say that the model is officially...
---FINISHED---


since the last post The last of the tools were added. This would include the Ax, clipper, Jack, jack block, and tow cable

For the Ax I used a small German ax from Sixth scale Icons, the parts needed no mods outside paint / weathering. For the Clipper I used a white metal casting from Armorpax. The clipper's molded in handles were removed and wood handles were added in their place. The molded in end knobs were recycled and were painted to represent the Bakelite material that the knobs were made of on the real unit

Once weathering was done they were mounted to the interior mounts that I fabricated back when I was building the interior details.


For the cable I fabricated a tow cable out of flexible framing cable, after it was painted/ weathered it was spooled in the cable mounts on the rear fender.

After the cable I mounted another Tetra fire extinguisher. Like the first one used on the model's interior this unit was also from armorpax.

For the Jack I casted my own light german AFV jack, The Jack block was fabricated out of real wood, both were weathered and mounted to the jack blocks on the other rear fender.


The last interior detail that was needed to be added were two german gas mask cans... I acquired these from Monkey depot and were from Dragon. They were simply added to the canister mounts that were built into the interior


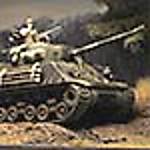
On the Model's wheels I added the center hub protector plates. These plates were designed to protect the center hub from shrapnel which could damage the unit and knock out / disable the car.

It was a good concept, however having seen many wartime pics of these pieces off I would think that they were tossed by the crews as they made getting to the lug nuts and changing a wheel more difficult and time consuming.

The ones on the model were supplied with the panzerwerk wheels and were added with no mods needed. They simply mounted over the wheel lug nuts


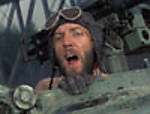
To finish off the turret, the antenna rod was mounted along with the radio head set and throat mic.


The headgear was Dragon and mounted directly to the Panzerwerk radio with no mods required... they just plugged in!

On the rear portion of the turret's top corner there were strips of rubber that were used as headrests. On the model these were fabricated out of styrene strips with fastener detailing added.


The last fitting to be added to the turret and probably the most notable was the Coax MG34. For the base gun I used a wrecked Dragon prebuilt MG34. This one was one of the AA versions which would have originally had the spider sight and Bipod. These parts were missing from the gun and the model had some other superficial damage.
The superficial damage was repaired, the gun muzzle was drilled out, the molded in bipod mount was deleted, and the over scaled spider mount tube was deleted for a more to scale spider mount peg. The most important mod that needed to have been made was to the Buttstock


Like with all German AFV the Buttstock was removed off the MG34 (or MG34T) when placed on a vehicle mount, this was done to save space in the vehicle. The MG34 has a unique feature of a quick detach buttstock. with the push of a tab the stock rotates and is removed. When removed the buffer tube is exposed.


The buffer tube detail was fabricated and will be added to the ECA catalog shortly


The gun was repainted and weathered,


The original buttstock will be positioned on the interior of the model, The buttstock was reworked in having it's internal tube added, and the tube's mounting slot screw detailing added. The stocks are painted to represent red Bakelite which like above was used frequently on weapon grips during this period.


The gun was added to the mount on the turret completing the turret's interior detailing!


With last bits added the model was complete, felt strange when the last part was added as I've been working on this build for such a long period of time :S


A youtube video update was made going over in more detail on what was done to the model,
Part 1:
https://youtu.be/ercqeOhiVtcPart 2:
https://youtu.be/_zR8p-BdqoQAlso more pics were posted on the ECA facebook page,
https://www.facebook.com/EastCoastArmory/With the model now done, Next nice day I get I can take the model outdoors for some nice outdoor dio shots, then she will be put in a display case, give the shop a real good long overdue cleaning, then off to other builds! More to come!