_GOTOBOTTOM
Dioramas
Do you love dioramas & vignettes? We sure do.
Assembling & painting a hydrocal plaster kit.
downtowndeco
Visit this Community
Montana, United States
Joined: December 08, 2005
KitMaker: 306 posts
Armorama: 272 posts
Posted: Friday, January 11, 2013 - 07:46 PM UTC


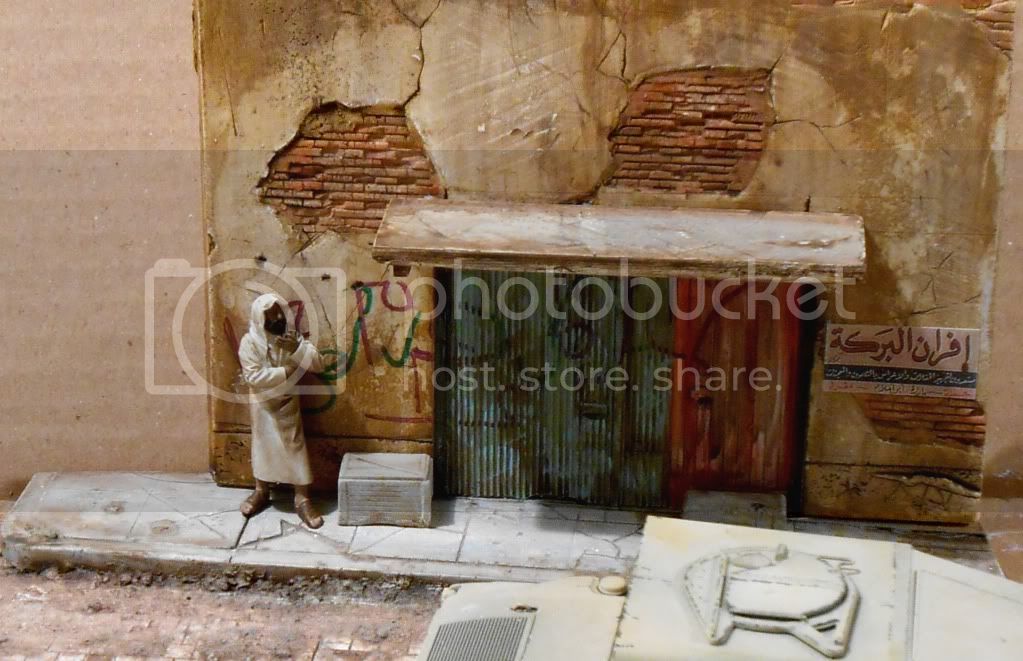
I'm going to walk you through the build of our new kit, Afghan Shops". If you've never built a hydrocal kit before, let me give you a little primer.

Hydrocal is simply a very hard casting plaster. IMO it has advantages to the more common vacuform plastic kits because the detail is much crisper & construction is much quicker. In most cases the basic plaster kit can be glued together & ready to paint (the fun part) in about 15 minutes.

In the past some plaster kits have sort of gotten a bad rap because they would often arrive at the customers door broken. We rarely have that problem at DP. All of the plaster parts are protected by bubblewrap & then shrink wrapped to cardboard. If by chance, you ever end up with a broken piece, for whatever reason, we'll replace the part at no charge. In the 4 years we've been selling kits I can count on one hand the amount of parts we've had to replace, we really try to pack them good.

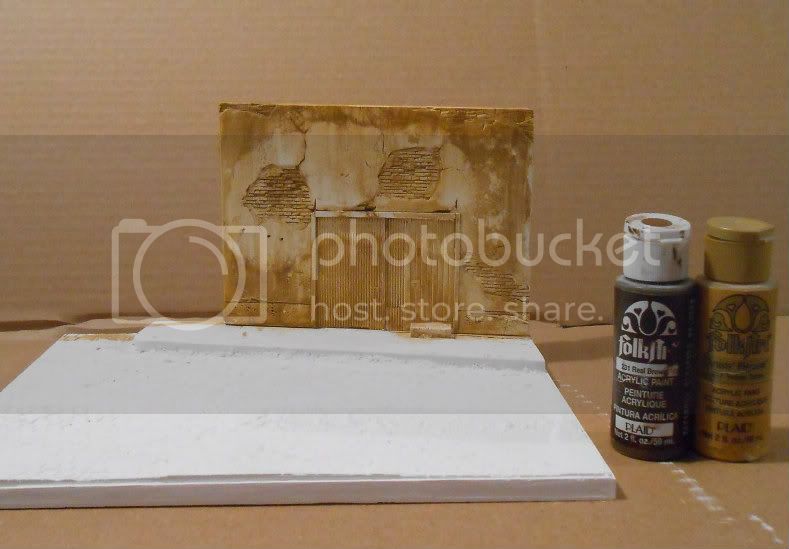
OK, on to the kit. This kit only has 4 basic parts. the base, the main wall, a tiny side wall & the cast concrete awning. I cleaned up the parts with a few swipes of a sanding block & then glued the main & small side wall to the base with 5 minute epoxy. I like to use epoxy because while it gives you a couple of minutes to make sure the parts are where you want them you don't have to wait all night for the parts to dry like if you use white glue.

After I had the parts glued together I then gave the entire building & base 3 or 4 coats of flat white spray paint to "sort of" seal the plaster. Yes, when you start to add your colors your paint will still soak in but it won't instantly, you'll have a few moments to "push the paint around" before it soaks in.

I used acrylic craft paints (Folk Art brand) for the building. I mixed up Real Brown & Yellow Ocre & applied it real wet with lots of water. As soon as I had it coated I sort of scrubbed some of the paint off by dragging my thumb against it vertically. This made the detail pop out a bit more.


I'll be back tomorrow with the next step. Feel free to ask questions. Cheers!

Randy Pepprock
Dioramas Plus

downtowndeco
Visit this Community
Montana, United States
Joined: December 08, 2005
KitMaker: 306 posts
Armorama: 272 posts
Posted: Saturday, January 12, 2013 - 03:23 PM UTC
The next thing I did was to paint the concrete sidewalks gray. My favorite color for that is Poly S Concrete, I was out of that, so I used something that was pretty close. Just make sure whatever gray you use has more brown tones to it than blues.


The next step involved a couple of things. First I brushed on an acrylic white base coat on the doors, and painted the framing black. Next I painted the exposed bricks using acrylic Terra Cotta color. Finally, I gave a wet wash to the street and sidewalk using thinned down "Real Brown" acrylic.


It's not looking too great yet but trust me, a few more simple steps & we'll be there.

Randy Pepprock
Dioramas Plus
www.dioramasplus.com
downtowndeco
Visit this Community
Montana, United States
Joined: December 08, 2005
KitMaker: 306 posts
Armorama: 272 posts
Posted: Sunday, January 13, 2013 - 09:00 AM UTC
The next thing I did was to paint the doors. I've noticed that often even though the rest of the building might be a drab, mud/earth color, the doors are painted the brightest colors they can find. I used an Aqua color for one & a Bright Orange for the other. When they dried a ran a Raw Umber wash over them & when that dried, I sort of "dabbed/dry brushed" on a bit more of the Aqua & Orange colors to make the detail pop.


I gave the entire structure/street a Raw Umber wash to "dirty it up a bit more", then, when they were dry, I lightly "buffed" the surfaces using a very, very fine grade polishing sandpaper. It sort of creates an effect like dry drushing, only you're not addding paint, you're taking the tiniest bit off the high points. A little goes a long way here so if you find you've taken a bit too much off & white plaster shows simply touch those areas up w/the Raw Umber.


Randy Pepprock
Dioramas Plus.
www.dioramasplus.com
downtowndeco
Visit this Community
Montana, United States
Joined: December 08, 2005
KitMaker: 306 posts
Armorama: 272 posts
Posted: Sunday, January 13, 2013 - 09:12 AM UTC
One of the last things I did was to add some graffiti. I googled "Graffiti Afhganistan" & a bunch of images came up. I simply copied a couple of the sloppy designs directly onto the wall using Sharpie Markers.


I epoxied the awning in place,and then did a tiny bit of dry brushing w/a light tan/white color. In this close up you can really see the cool effect the polishing sandpaper gives you when you buff the surfaces.


OK, that's it. The whole project just took a couple of hours. You can speed it up even more by using a hairdrier to make the paint dry faster. Questions?

Randy Pepprock
Dioramas Plus
www.dioramasplus.com

OK,
QUAX_MAXIMUS
Visit this Community
El Salvador
Joined: December 13, 2010
KitMaker: 46 posts
Armorama: 43 posts
Posted: Sunday, January 13, 2013 - 01:06 PM UTC
great work and very good advices. thanks a lot
18Bravo
Visit this Community
Colorado, United States
Joined: January 20, 2005
KitMaker: 7,219 posts
Armorama: 6,097 posts
Posted: Sunday, January 13, 2013 - 01:24 PM UTC
Looks very nice. That would work very well in Iraq as well. That sign is Arabic for al Baraka bakery, so I wouldn't use it in Afghanistan.
downtowndeco
Visit this Community
Montana, United States
Joined: December 08, 2005
KitMaker: 306 posts
Armorama: 272 posts
Posted: Sunday, January 13, 2013 - 01:59 PM UTC
Thanks. : ) I needed a translator I guess. Cheers!

Randy


Quoted Text

Looks very nice. That would work very well in Iraq as well. That sign is Arabic for al Baraka bakery, so I wouldn't use it in Afghanistan.

wildsgt
Visit this Community
Kentucky, United States
Joined: May 27, 2007
KitMaker: 327 posts
Armorama: 259 posts
Posted: Sunday, January 13, 2013 - 08:04 PM UTC
Nice Dio
downtowndeco
Visit this Community
Montana, United States
Joined: December 08, 2005
KitMaker: 306 posts
Armorama: 272 posts
Posted: Wednesday, June 26, 2013 - 06:41 AM UTC
Any orders we get this week through either our site or off ebay will get an extra set of pour cast bricks & rubble no charge. Cheers!

http://www.ebay.com/itm/Brand-New-from-Dioramas-Plus-1-35-Scale-Diorama-Afghan-Shops-Middle-East-/400517991814?pt=Model_Kit_US&hash=item5d40bb8d86

Randy Pepprock
Dioramas Plus
 _GOTOTOP