Hello to everyone out there.
This is my first post here and it will be a model with some firsts too.
- First wary attempt to stray away from instructions and the moulded model itself.
- First cautious tries at scratch building.
- First application of PE.
- First use of an airbrush.
So, enough first words. Letīs turn to the model.
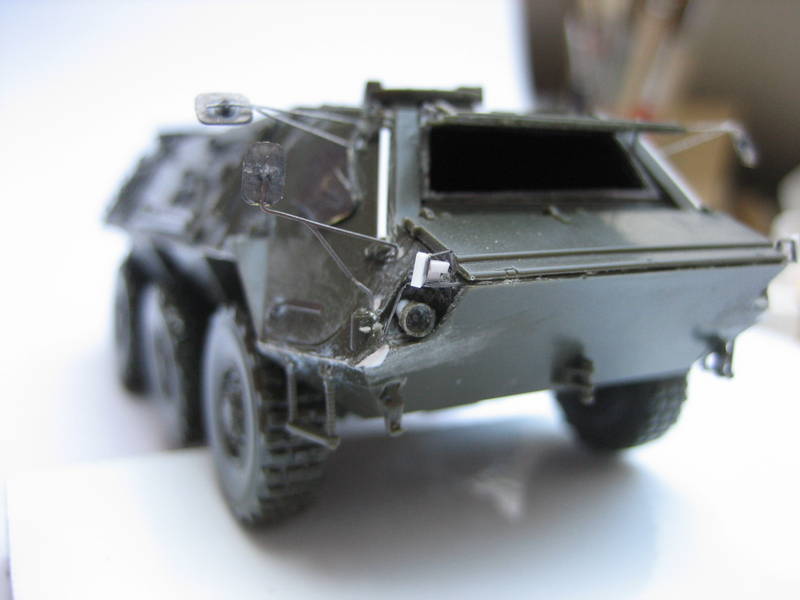
I used Revells well known 1/72 Fuchs (3114) and added some detail with Eduards PE-Set (22082). Having served myself as a combat engineer who used this vehicle, I opted for the combat engineer version.
A few changes have been made at spots where I have not been satisfied with Revels model or where I wanted to have an appearance different from the preset.
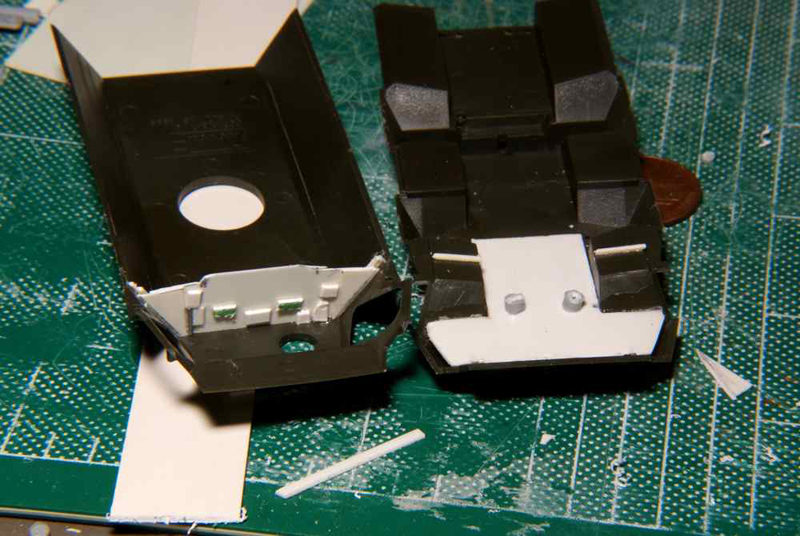
One of the first taskes was to sand away the hinges of the drivers compartment doors and to replace them with styrene tube.
I didnīt like the cable either and constructed one myself. I wanted the tarp straps without a tarp. So the inbox tarp went to the spare parts box. Straps were cut from tape and the locks are represented by bent copper wire.
Revels Fuchs has the smoke grenade launchers in line. This is not the case at the real thing. To correct this, all launchers were cut frome the base, reassambled in a fan shaped fashion and pimped with a tiny copper wire cap chain.
I wanted as well the rear tool rack on the right side to be empty. This required the removal of all tools from the rack and the addition of the clamps. They have been build from PE left overs.
The models tow bar is too thin in diameter, so that its tube was replaced by a bigger metal tube.
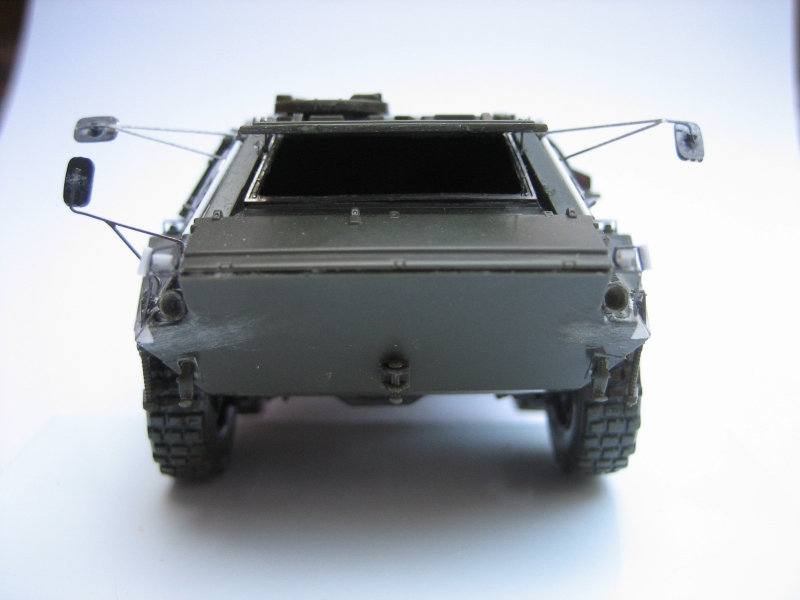
Although visible only on second glance, quite some effort went into the face lift. The area of the headlights is not very well represented in the model and some sawing, sanding, filling and detailing was needed.
(lenses for the headlights will be added after painting)
The model was then primed in light grey and some preshading followed.
This was succeeded by a layer of paint with Revels Nato Olive No. 65, lighted to scale with light grey and yellow. Panels were further highlighted with three to four tones of even ligther touches of the basic colour to break the monotony.
And that is the shape she is in right now.
Of course there is more to come:
- airbrushing the 3 colour NATO scheme
- Decals
- Weathering
I hope you like my first post. Any comment, critique or encouragement is appreciated.
Hosted by Darren Baker
My little Fox (Fuchs)
panorama
Germany
Joined: January 18, 2013
KitMaker: 254 posts
Armorama: 253 posts
Joined: January 18, 2013
KitMaker: 254 posts
Armorama: 253 posts
Posted: Saturday, January 19, 2013 - 01:28 PM UTC
PanzerAlexander
Attica, Greece / Ελλάδα
Joined: February 17, 2010
KitMaker: 625 posts
Armorama: 608 posts
Joined: February 17, 2010
KitMaker: 625 posts
Armorama: 608 posts
Posted: Saturday, January 19, 2013 - 11:06 PM UTC
Hi Michael and welcome to Armorama.
Although you give us a nice description of your work I can see no photos, and you know that a photo equals a thousand words so maybe you want to check your links again. Again, welcome to ARma
P.A.
Although you give us a nice description of your work I can see no photos, and you know that a photo equals a thousand words so maybe you want to check your links again. Again, welcome to ARma
P.A.
panorama
Germany
Joined: January 18, 2013
KitMaker: 254 posts
Armorama: 253 posts
Joined: January 18, 2013
KitMaker: 254 posts
Armorama: 253 posts
Posted: Saturday, January 19, 2013 - 11:57 PM UTC
Hi Alex,
thanks for the welcome. I struggled a little bit to get the pics in but finally succeded.
MattieP
Pennsylvania, United States
Joined: April 06, 2007
KitMaker: 81 posts
Armorama: 78 posts
Joined: April 06, 2007
KitMaker: 81 posts
Armorama: 78 posts
Posted: Sunday, January 20, 2013 - 03:32 PM UTC
Looking GREAT so far!!! Can't wait to see more!!!
Matt
Matt
Posted: Sunday, January 20, 2013 - 06:20 PM UTC
@panorama Michael,
Welcome, hope your stay here will be a happy and enjoyable one.
I like all of the additions you have added to your build, this will pay dividends on the completed and painted model. Bringing things to scale takes a lot of time, work and patience but well worth the extra effort, good job!
Its hard to do pre-shading with an airbrush on these smaller sized models (at least it is for me ) but you pulled it off nicely. Looking forward to your next update.
~ Eddy
firstcircle
England - South East, United Kingdom
Joined: November 19, 2008
KitMaker: 2,249 posts
Armorama: 2,007 posts
Joined: November 19, 2008
KitMaker: 2,249 posts
Armorama: 2,007 posts
Posted: Sunday, January 20, 2013 - 07:30 PM UTC
Michael, fabulous, I love the mirrors...
Though we can see the pix now, you're showing the thumbs which means viewing them in the gallery rather than in line here. I think if you leave the word thumbs out of the link and then enclose it in [img ] and [/img ] (leaving out those last spaces before the brackets) it will work...
tread_geek
Ontario, Canada
Joined: March 23, 2008
KitMaker: 2,847 posts
Armorama: 2,667 posts
Joined: March 23, 2008
KitMaker: 2,847 posts
Armorama: 2,667 posts
Posted: Monday, January 21, 2013 - 04:08 AM UTC
@panorama - Michael,
Firstly, welcome to Armorama and the Braille Scale Forum. Hope to see you as an active and participating member in this forum. I have built the Fuchs in 2011 (and the Luchs earlier) so I have a good idea of what is involved. The suspension construction was quite an experience. My Fuchs was largely out of the box except for an interior in the drivers compartment. Here's a picture of what I mean:
I agree with Matthew (firstcircle) that the mirrors are particularly eye catching, especially when compared to the kit ones as seen in this picture.
While not a bad little kit your improvements will really make your model a winner.
Cheers,
Jan
PanzerAlexander
Attica, Greece / Ελλάδα
Joined: February 17, 2010
KitMaker: 625 posts
Armorama: 608 posts
Joined: February 17, 2010
KitMaker: 625 posts
Armorama: 608 posts
Posted: Thursday, January 24, 2013 - 08:37 AM UTC
Hi Michael,
Nice additions on your modelS, I agree about the mirrors the look very in-scale.
I preshade my models the same way except I also add a reversed effect (prehighlighting) too.
Your base color looks good.
P.A.
Nice additions on your modelS, I agree about the mirrors the look very in-scale.
I preshade my models the same way except I also add a reversed effect (prehighlighting) too.
Your base color looks good.
P.A.
Removed by original poster on 01/26/13 - 07:30:04 (GMT).
Removed by original poster on 01/26/13 - 07:31:37 (GMT).
panorama
Germany
Joined: January 18, 2013
KitMaker: 254 posts
Armorama: 253 posts
Joined: January 18, 2013
KitMaker: 254 posts
Armorama: 253 posts
Posted: Saturday, January 26, 2013 - 06:30 AM UTC
Thanks everybody for the encouraging words. I still struggle with the pictures (as you can see at the deleted posts). Found now a `how to`. So letīs give it another try with a so far unpuplished picture
panorama
Germany
Joined: January 18, 2013
KitMaker: 254 posts
Armorama: 253 posts
Joined: January 18, 2013
KitMaker: 254 posts
Armorama: 253 posts
Posted: Saturday, January 26, 2013 - 06:35 AM UTC
Puh, quite tricky.
Now lets continue to build!
panorama
Germany
Joined: January 18, 2013
KitMaker: 254 posts
Armorama: 253 posts
Joined: January 18, 2013
KitMaker: 254 posts
Armorama: 253 posts
Posted: Sunday, February 03, 2013 - 03:42 AM UTC
A little update after masking the base colour for the second colour of the three colour NATO camouflage. Masking NATO camouflage is work for somebody who shot mother and father. Particularly in Braille! I finally succeded using tape cut to shape and closed the gaps over protuding details with white tack (well if I really did succeed, I will only know after the paint will be applied and the maskes are removed ). To cut the masks I used the Revell instructions as a template. If I recall it right, an increase to 116 % of the original size will match with the model. Then masking tape was stuck on top of the picture, the pattern which shone through, was transferred, the tape removed from the template, the pattern cut out and stuck to the model.
The slanting surfaces require an additional step: At the Fuchs they have an angle of 45 or 60°. So these areas have to be enlarged accordingly (this sinus/cosinus-stuff will help to calculate the magnification).
So, the little Fuchs waits now for me to come home from holiday to receive some more colour.
Your most welcome to let me know what you think.
Michael
firstcircle
England - South East, United Kingdom
Joined: November 19, 2008
KitMaker: 2,249 posts
Armorama: 2,007 posts
Joined: November 19, 2008
KitMaker: 2,249 posts
Armorama: 2,007 posts
Posted: Monday, February 04, 2013 - 01:07 AM UTC
Quoted Text
Masking NATO camouflage is work for somebody who shot mother and father.
Michael, tape looks like hard work around all of those shapes; may I recommend toothpaste? Method described in page two of this thread.
panorama
Germany
Joined: January 18, 2013
KitMaker: 254 posts
Armorama: 253 posts
Joined: January 18, 2013
KitMaker: 254 posts
Armorama: 253 posts
Posted: Monday, February 04, 2013 - 05:43 AM UTC
Quoted Text
Quoted TextMasking NATO camouflage is work for somebody who shot mother and father.
Michael, tape looks like hard work around all of those shapes; may I recommend toothpaste? Method described in page two of this thread.
TOOTHPASTE???? Has anyone ever heard of that? Sounds weird. But - looking at your thread - it looks good. I will surely keep this in the back of my head. Only one last thing: can you please give me those time-saving advises next time BEFORE I take the pains?! That would be very much appreciated
firstcircle
England - South East, United Kingdom
Joined: November 19, 2008
KitMaker: 2,249 posts
Armorama: 2,007 posts
Joined: November 19, 2008
KitMaker: 2,249 posts
Armorama: 2,007 posts
Posted: Monday, February 04, 2013 - 07:55 AM UTC
Michael, you've only done the first colour, you have one more to do, I think, so plenty of time to get the toothpaste from the bathroom. Recommend not putting it on the clear plastic window, and allow the sprayed paint to dry a little between coats, as you should when using an airbrush anyway. It works! :-)