Field stone rubble suggestions
Ontario, Canada
Joined: October 17, 2002
KitMaker: 448 posts
Armorama: 306 posts
Posted: Tuesday, January 29, 2013 - 03:04 AM UTC
Hi,
I'm making my 1st serious attempt at a diorama and I've hit a road block. I'm working on the following building.

I need to add some debris to the road it's situated on but I'm not sure how to make it. Searches online have given me a lot of great ideas for brick building rubble, but this appears to be more like a field stone building.
I was thinking of making some larger identifiable stones out of modelling clay and sitting that in kitty litter or something to represent smashed rock.
Here's where I am with things preliminarily. Sorry it's the only photo I have right now.

The sherman is going to be moved and I'm building new crew in a casual pose when they arrive.
Any suggestions?
Thanks
Jeff
Go Green! Go White!
On the bench
1/32 BF-109 G-6
1/24 1968 Dodge Dart
Washington, United States
Joined: September 21, 2010
KitMaker: 1,846 posts
Armorama: 1,509 posts
Posted: Tuesday, January 29, 2013 - 03:42 AM UTC
No expert by far here, but what about using cork cut to the size you want? Granted this might be a bit labor intensive but the results might be worth it?
On the workbench:
Trumpeter Faun SLT 56
Tamiya A- 10 1/48
Academy 1/700 USS KITTY HAWK
Spain / España
Joined: July 04, 2003
KitMaker: 693 posts
Armorama: 682 posts
Posted: Tuesday, January 29, 2013 - 04:56 AM UTC
Hi Jeff, besides cork, that is a good solution, I think that these stones can be done also with school chalk bar, cutted in diferent sizes as we seen in the wall.
Indiana, United States
Joined: August 19, 2007
KitMaker: 2,184 posts
Armorama: 1,468 posts
Posted: Tuesday, January 29, 2013 - 10:20 AM UTC
Hey Jeff, what you have is called dressed stone. Basically a stone that has been trimmed out to be flat on all sides. Another way to recreate this stone for rubble would be to pour some plaster in appropriate thickness and break it up into smaller size pieces, then square them off. Of course you want to leave some broken. Then just paint them up.
There is no return policy on time spent
United Kingdom
Joined: August 25, 2005
KitMaker: 216 posts
Armorama: 215 posts
Posted: Tuesday, January 29, 2013 - 10:33 AM UTC
Hi Jeff,
I was about to echo what Bob just said, you could pour some plaster into a deep enough tray & then cut it to size when set. A little white glue in the mix might strengthen it when cutting to shape the blocks. Even better if you can initially colour the plaster in the same colour as the stone work, then by crumbling some pieces into different sizes to give a realistic rubble effect....hope that helps someway, good luck

Simon.

#003
Donegal, Ireland
Joined: May 14, 2002
KitMaker: 9,763 posts
Armorama: 7,444 posts
Posted: Tuesday, January 29, 2013 - 11:22 AM UTC
Rubble is more than one item in different sizes. Making stones to the size of those used in the building and broken stones is a good start to be appropriate for the house in question. Mix in small gravel, sand and bits of fine timber ... like lollipop sticks/tea stirrers/etc. Build height by adding a little of each on top of your initial pile. Keep adding until you feel its representitive of the damaged inflicted.
Mix in some roof parts, furniture, etc. Great chance to scratchbuild these ... no matter how it works out, little pieces of them will add to the effect and also allow you to add some contrasting colours to the rubble.

IPMS Stockholm
"The problem with common sense, is that it is not that common"
Ontario, Canada
Joined: October 17, 2002
KitMaker: 448 posts
Armorama: 306 posts
Posted: Tuesday, January 29, 2013 - 01:18 PM UTC
Dressed stone, thank you for the proper terminology. That has helped my Google photo searches immensely.

Thanks for the plaster suggestion. I'll add photos as I progress if anyone's interested in seeing them.
Cheers
Jeff
Go Green! Go White!
On the bench
1/32 BF-109 G-6
1/24 1968 Dodge Dart
Karnataka, India / भारत
Joined: April 15, 2010
KitMaker: 186 posts
Armorama: 161 posts
Posted: Wednesday, January 30, 2013 - 01:57 AM UTC
Jeff like the other members said breaking plaster into smaller pieces and rounding them off around the edges is the ideal way. You can also add some railway ballast to it to simulate fine broken pieces...I have used iron ore railway ballast with broken plaster pieces in one of my models to simulate broken bricks...result was quite satisfactory
Hawaii, United States
Joined: August 27, 2006
KitMaker: 1,646 posts
Armorama: 1,557 posts
Posted: Wednesday, January 30, 2013 - 10:01 AM UTC
Jeff: Not to rain on your concept, but another viewpoint humbly offered; where is the rubble coming from in the story? The building looks in pretty good shape, except for possibly the side wall. Thus if there is rubble, it would likely only be "in the back" by the side wall. I think a couple of windows, a door and a roof and that building is good to go. Just a thought.
Happy Modeling, -zon

"Certainty of death.
Small chance of sucess.
What are we waiting for?"
-Gimli, Return of the King.
Ontario, Canada
Joined: March 01, 2002
KitMaker: 1,607 posts
Armorama: 1,581 posts
Posted: Wednesday, January 30, 2013 - 10:44 AM UTC
Quoted Text
Jeff: Not to rain on your concept, but another viewpoint humbly offered; where is the rubble coming from in the story? The building looks in pretty good shape, except for possibly the side wall. Thus if there is rubble, it would likely only be "in the back" by the side wall. I think a couple of windows, a door and a roof and that building is good to go. Just a thought.
Happy Modeling, -zon
I have to agree with Zon,there doesn't seem to be any damage to the building to begin with.If there was my prefered rubble is kitty litter.Cheap,a bag lasts for years,looks very convincing and it absorbs the watered down clue for a perfect adhesive.Add what you like,pieces of balsa wood,cork or larger stones.
Tom
Indiana, United States
Joined: August 19, 2007
KitMaker: 2,184 posts
Armorama: 1,468 posts
Posted: Wednesday, January 30, 2013 - 11:28 AM UTC
Dam computer, 2nd time trying to get this to stay put. Any way, Brown kitty litter is great for debris (the gray is made of clay and will turn to mush if wet down) but if you look at any building that has collapsed you will still see large pieces and whole stones/bricks. Any material used in the construction will be visible whether it is wood, plaster, pipes, roof tiles ect. So a mixture of debris is needed to be convincing. And a good question the guys brought up, where will your debris be and from what. If you battle damage your building anywhere then it will be needed, just make sure that the damage you have is equivalent to the sized pile of debris.
There is no return policy on time spent
Ontario, Canada
Joined: October 17, 2002
KitMaker: 448 posts
Armorama: 306 posts
Posted: Wednesday, January 30, 2013 - 12:01 PM UTC
Thanks for the advice.
I should have been clearer on my initial post since I was hoping to focus more on the back of the building which right now is dead space. (sorry about the quality of the photo camera phone wife is borrowing my real one). Bottom of the frame is the roof I'm slowly working on.
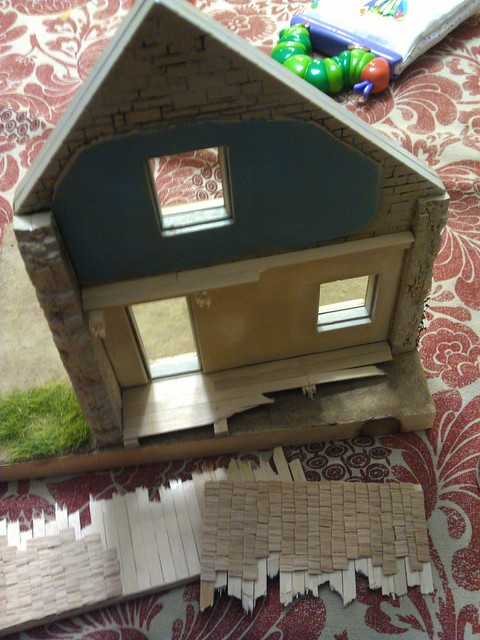
I think I need to add a little more visual interest to the front of building as well by way of groundwork.
Thanks once more for the input.
Cheers
Jeff
Go Green! Go White!
On the bench
1/32 BF-109 G-6
1/24 1968 Dodge Dart
Pennsylvania, United States
Joined: April 10, 2011
KitMaker: 7,941 posts
Armorama: 7,934 posts
Posted: Thursday, January 31, 2013 - 03:02 AM UTC
I agree totally with the need for a mix of material. Anything used to build the building would be part of the rubble!
Another way to look at plaster. Mix some plaster maing it kind of a dryer mix. smooth it out on a piece of wax paper and smooth out the surface,making the layer as thick as your wall stones would be. While still damp,use your hobby knife to score lines in the plaster about the size of your stones,making the lines randon width. Let dry and break the slab up and there you have cheap rubble!
J
Ontario, Canada
Joined: October 17, 2002
KitMaker: 448 posts
Armorama: 306 posts
Posted: Wednesday, February 13, 2013 - 03:18 AM UTC
Here's a couple more photos of where I am with the Sherman's base. I tired to use a lot of the advice given on this post.
Sorry the photos aren't great used my phone.


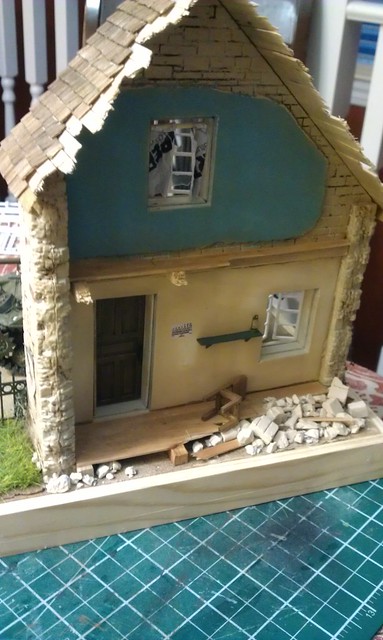
Working on shutters, and trying to figure out how to make blinds. All I've figured is foil is ok, but I need a curtain rod smaller then a toothpick.
Scratched up a shelf and a chair, but planning on cluttering up the interior a touch more too. I'm thinking of adding a cord of firewood to the yard just to add a little more interest there.
After that figure painting which terrifies me, but picked up a painting DVD so hopefully I can translate some new skills into presentable or better figures.
I hoping to enter this in my 1st contest early next month so any suggestions are greatly appreciated. Don't plan on placing, just hoping to enjoy the experience.
Cheers
Jeff
Go Green! Go White!
On the bench
1/32 BF-109 G-6
1/24 1968 Dodge Dart
Massachusetts, United States
Joined: December 23, 2010
KitMaker: 384 posts
Armorama: 320 posts
Posted: Thursday, February 14, 2013 - 01:16 AM UTC
Jeff - I'm really confused now. I see a bit of rubble at the bottom of the front wall, and on the inside, but on the other hand there's a well-tended lawn (well - it could use mowing), curtains in the windows, and zero sign of damage to the front of the building.
As was suggested previously, you need to tell us just where the rubble is from - create a story. The interior suggests that the residents have evacuated and someone has trashed the inside of the place, but you would never know it by looking at the front wall - with the door intact.
If you just wanted a scenic location for the tank to stop so they could check their map, then you don't need to make the place look ruined - and you seem a bit hesitant to do so. You could even-out that right wall and the roof-line, build a new wall on the other side (plaster over presumed stone), have a young girl playing in the grass (maybe a loose chicken), the curious son is checking out the tank cautiously, maybe helping with the map - perhaps with the family dog, potted plants on the windowsill, maybe a sign declaring "fresh eggs", and mom is leaning out the upper story window (yelling at her son to get back inside).
The road looks to be a good basic color, but it's much too level, with no indication that other vehicles have ever driven by - including the tank. Since the road is angled, you may have room for low shrubs or a simple fence (if tanks haven't knocked it down - or perhaps they have) on the front side to help frame it.
I think what I'm trying to suggest is that the contrast between placid family life and an enemy tank suddenly stopped at your door could be more dramatic than a bit of gratuitous rubble spread around with no apparent source or reason. You need to decide on what you want the viewer to perceive when they look at the completed scene, and then build to that.
Charles
Pennsylvania, United States
Joined: April 10, 2011
KitMaker: 7,941 posts
Armorama: 7,934 posts
Posted: Thursday, February 14, 2013 - 02:48 AM UTC
Quoted Text
Jeff - I'm really confused now. I see a bit of rubble at the bottom of the front wall, and on the inside, but on the other hand there's a well-tended lawn (well - it could use mowing), curtains in the windows, and zero sign of damage to the front of the building.
As was suggested previously, you need to tell us just where the rubble is from - create a story. The interior suggests that the residents have evacuated and someone has trashed the inside of the place, but you would never know it by looking at the front wall - with the door intact.
If you just wanted a scenic location for the tank to stop so they could check their map, then you don't need to make the place look ruined - and you seem a bit hesitant to do so. You could even-out that right wall and the roof-line, build a new wall on the other side (plaster over presumed stone), have a young girl playing in the grass (maybe a loose chicken), the curious son is checking out the tank cautiously, maybe helping with the map - perhaps with the family dog, potted plants on the windowsill, maybe a sign declaring "fresh eggs", and mom is leaning out the upper story window (yelling at her son to get back inside).
The road looks to be a good basic color, but it's much too level, with no indication that other vehicles have ever driven by - including the tank. Since the road is angled, you may have room for low shrubs or a simple fence (if tanks haven't knocked it down - or perhaps they have) on the front side to help frame it.
I think what I'm trying to suggest is that the contrast between placid family life and an enemy tank suddenly stopped at your door could be more dramatic than a bit of gratuitous rubble spread around with no apparent source or reason. You need to decide on what you want the viewer to perceive when they look at the completed scene, and then build to that.
Charles
Yep!!! Totally agree. This would be a quick and thoughtful fix to your conundrum!
J
Ontario, Canada
Joined: October 17, 2002
KitMaker: 448 posts
Armorama: 306 posts
Posted: Thursday, February 14, 2013 - 03:08 AM UTC
Thanks for the suggestions, it's definitely a work in progress so I'll make changes where I can.
The door is just dry fitted there right now for a quick photo. I'm planning on hanging it half knocked off it's frame and adding more rubble to the interior is in the works, I agree it needs to be piled higher.
I tried working on a variation of this photo.
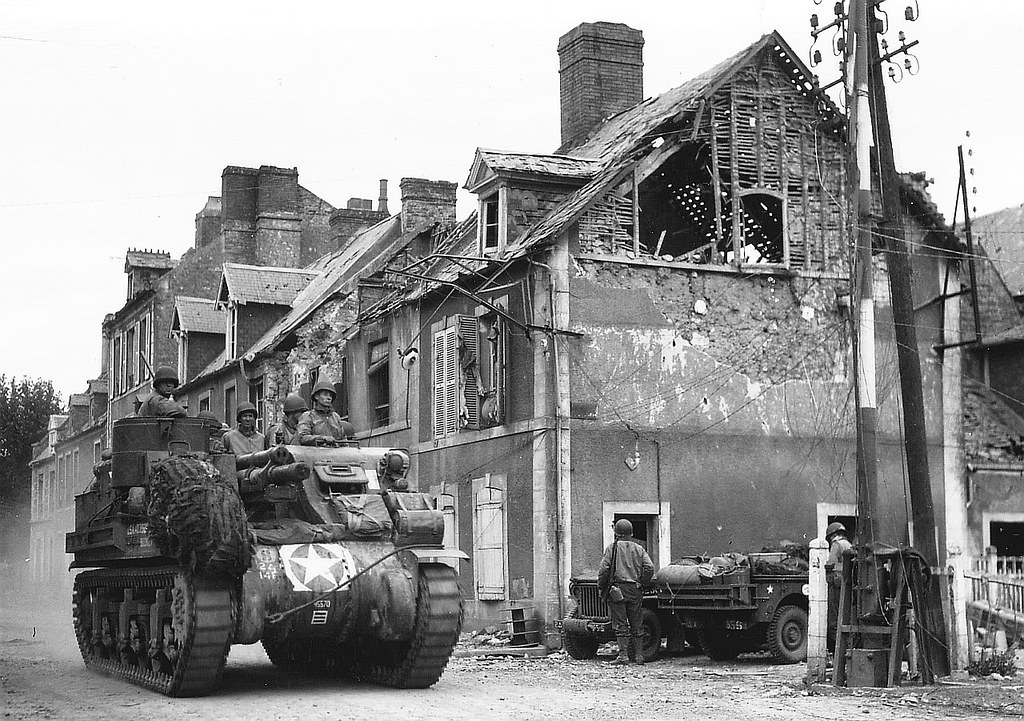
There's a small bits of rubble in front of a building without a ton of structural damage on the facade. I just assumed it came from a building across the street.
People always say the road should be torn up by the tank that just passed through, but I've lived in logging and farming communities growing up and seen a lot of heavy equipment on hard pack dirt roads. It's surprisingly resistant. I mean here's a photo of a panther it weighed what 12-14 tonnes more then a Sherman and the road looks pretty unaffected. Granted a Sherman had higher ground pressure.

Anyways, it's my first attempt at a diorama. I appreciate the suggestions because they will help me improve.
Cheers
Jeff
Go Green! Go White!
On the bench
1/32 BF-109 G-6
1/24 1968 Dodge Dart
Michigan, United States
Joined: March 24, 2009
KitMaker: 312 posts
Armorama: 296 posts
Posted: Thursday, February 14, 2013 - 03:15 AM UTC
Go down to home depot or Lowes and ask for a scrap piece of dry wall. Usually they will just give it to you. Take it home put it in a paper bag and hit it a couple of times with a hammer. Presto assorted sizes of rubble that look like it really is off the side of a building.
'United States Army Special Forces! When you care enough to send the very best'
Pennsylvania, United States
Joined: April 10, 2011
KitMaker: 7,941 posts
Armorama: 7,934 posts
Posted: Thursday, February 14, 2013 - 05:02 AM UTC
You are correct about the roads. I was in the mech infantry and so was around a lot of APCs and tanks. They do not collapse a road surface unless the ground underneath is soft and on a unimproved road unless it is wet/muddy. The dirt roads on the training areas when wet,just had a 4 to 5 inch covering of gooey mud but underneath was still compacted and hard as a rock. When a tank goes off road,that's another matter!
I love the pic you posted of the timber framed daub and wattle construction. Interesting how the facade peeled off.
J
Connecticut, United States
Joined: May 16, 2008
KitMaker: 24 posts
Armorama: 20 posts
Posted: Monday, February 25, 2013 - 06:15 AM UTC
Just a thought. I don't know if any of you have used Hirst art molds. A large variety of masonry choice and a vast number of molds to build plaster fantasy buildings. I sure you could find something close to your blocks that you could damage smash ect. to fit your need
Mike
Overijssel, Netherlands
Joined: July 01, 2010
KitMaker: 1,322 posts
Armorama: 1,239 posts
Posted: Monday, February 25, 2013 - 06:34 AM UTC
Quoted Text
You are correct about the roads. I was in the mech infantry and so was around a lot of APCs and tanks. They do not collapse a road surface unless the ground underneath is soft and on a unimproved road unless it is wet/muddy. The dirt roads on the training areas when wet,just had a 4 to 5 inch covering of gooey mud but underneath was still compacted and hard as a rock. When a tank goes off road,that's another matter!
I love the pic you posted of the timber framed daub and wattle construction. Interesting how the facade peeled off.
J
Dear Jeff, the above is true if you take in account that you were in the army not so long ago! But.......

............the period you are in with your dio was in the beginning 40-ies. In those days, many roads in the area where your type of housing was typical, were made of thin tarmac, covered with fine debries, made of broken stone (in the Netherlands they even made this rubble from ancient stone graves!!!!), but in rural areas there was no such tarmac at all. You could state that the tank used belonged to the first party, entering a village. Therefore no serious road damage occured, the more since no turns were made.
However, another issue is the roofing of the farm house. The type of farm house you used would most likely not have had wooden tiles, since this is a typical eastern European kind of roofing. More likely would be slate or roofing tiles.
But, to be honest, I am not discussing your quality, I hope to help you to avoid style mishapps. No intention to offend.
Ontario, Canada
Joined: October 17, 2002
KitMaker: 448 posts
Armorama: 306 posts
Posted: Monday, February 25, 2013 - 07:22 AM UTC
Quoted Text
However, another issue is the roofing of the farm house. The type of farm house you used would most likely not have had wooden tiles, since this is a typical eastern European kind of roofing. More likely would be slate or roofing tiles.
But, to be honest, I am not discussing your quality, I hope to help you to avoid style mishapps. No intention to offend.
No offence taken, and thank you for being tactful that's a rare commodity on the internet.
I agree 110% that I should have went the tile route. It pretty much came down to material on hand. I was thinking of how to build the roof and remembered some thin wood veneer I had. I think through google I found 1 or 2 French farm house period photos with wood shingled roofs and thought "good to go". Of course I had to ignore the 11,234 houses I saw with tile or slate.
It's my first attempt at a dio and have enjoyed it. Next time I'll bounce ideas off the forum more in the planning stages. It's not great (or good) by any standard, but it's been good for learning technique and the forward planning needed for a good dio.
Take care and thanks again everyone for all the advice.
Jeff
Go Green! Go White!
On the bench
1/32 BF-109 G-6
1/24 1968 Dodge Dart
Massachusetts, United States
Joined: December 23, 2010
KitMaker: 384 posts
Armorama: 320 posts
Posted: Tuesday, February 26, 2013 - 12:38 AM UTC
Jeff - one quick thought on the road. There are indeed few ruts in the two B&W photos you posted (that first one is great - the wall could be a dio just by itself), but there is a "linearity" to the material on the roads, particularly in the second image. Scatter a little loose material on the base and run something back and forth over it, then secure with white glue and water. Charles
Provincia de Lugo, Spain / España
Joined: April 23, 2003
KitMaker: 12,927 posts
Armorama: 9,486 posts
Posted: Tuesday, February 26, 2013 - 01:11 AM UTC
The facade o the building you've done is really excellent - until I saw the 2nd batch o photos I thought it was a professionally-done resin or plaster kit.
Some personal thoughts on where to go now...
1) Use a (slightly) deeper base (no more than a couple of inches) and have the house a little bit back rom the road. An inch or two of basic sidewalk or paving in front o the house would work...
2) Regardding the road surface itself, I'd start with a surface made out of reasonably fine grade wet 'n dry paper (assuming you want a tarmac road) if not, use acrylic gel mixed with some VERY fine sand to give a bit of texture.
3) Limit the damage to the house to broken windows/door.
4) I honestly don't think you need much rubble in the scene - perhaps a bit more behind, perhaps a broken chair or something? At the front, perhaps to break things up a little, a bicycle or something?
Just some basic thoughts, it's looking very good at the moment...


