_GOTOBOTTOM
Dioramas
Do you love dioramas & vignettes? We sure do.
Normandy - SdKfz 234/2 Puma 1/35
maestromae
Visit this Community
Lodz, Poland
Joined: September 03, 2011
KitMaker: 19 posts
Armorama: 19 posts
Posted: Saturday, February 23, 2013 - 02:09 AM UTC
Puma from Italeri, with panzer crew from Zvezda. Diorama based on Miniart components.


Looking forward to your comments!
ivanhoe6
Visit this Community
Wisconsin, United States
Joined: April 05, 2007
KitMaker: 2,023 posts
Armorama: 1,234 posts
Posted: Saturday, February 23, 2013 - 02:38 AM UTC
What can I saw but WOW !!! Your Miniart building is one of the best I've ever seen. Great weathering on the building. I couldn't tell if there was glass in the windows. If there is I would break a few panes of glass. You made the old Italeri kit really shine. Great weathering and chipping, not too much, not too little, just right. The figures look really good too. Are those the heads that came with the figures? They look really good brought to life by your painting skills.
Thank you for sharing! What is your next project?
SgtRam
Staff MemberContributing Writer
AEROSCALE
#197
Visit this Community
Ontario, Canada
Joined: March 06, 2011
KitMaker: 3,971 posts
Armorama: 2,859 posts
Posted: Saturday, February 23, 2013 - 02:40 AM UTC
Very well done, really like the use of the Miniart base, excellent execution.

Thanks for sharing
FAUST
#130
Visit this Community
Noord-Holland, Netherlands
Joined: June 07, 2002
KitMaker: 8,797 posts
Armorama: 4,190 posts
Posted: Saturday, February 23, 2013 - 03:28 AM UTC
I agree with the people above me... A wonderfull diorama.
You pulled the best out of the old Italeri Puma. Expert painting. Love the minimalistic chipping and the weathering looks top notch too.

Love what you did to the Miniart building as well. Very neat job. I'd say on display material.
BBD468
Visit this Community
Texas, United States
Joined: March 08, 2010
KitMaker: 2,465 posts
Armorama: 2,383 posts
Posted: Saturday, February 23, 2013 - 03:31 AM UTC
Splendid dio Damian...well done sir!

Gary
jrutman
Visit this Community
Pennsylvania, United States
Joined: April 10, 2011
KitMaker: 7,941 posts
Armorama: 7,934 posts
Posted: Saturday, February 23, 2013 - 03:52 AM UTC
I pretty much agree with the above posts!
J
velotrain
Visit this Community
Massachusetts, United States
Joined: December 23, 2010
KitMaker: 384 posts
Armorama: 320 posts
Posted: Saturday, February 23, 2013 - 08:23 AM UTC
==> WARNING: Looong


Damian –

I like this dio a lot, particularly the subdued colors. I do agree with the former comments, but will mention a few things previously un-commented on that I observed.
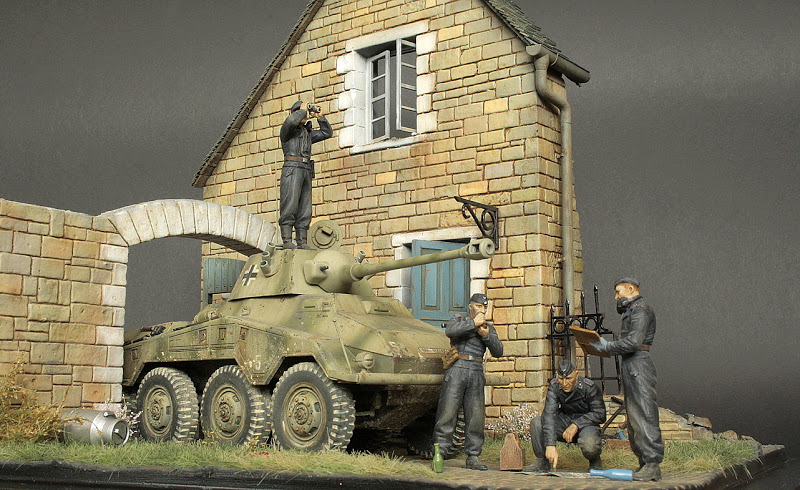
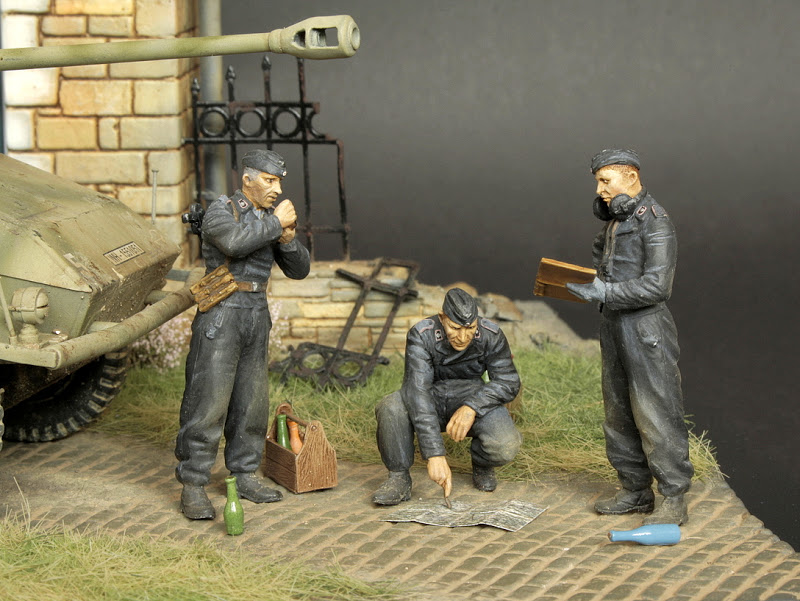
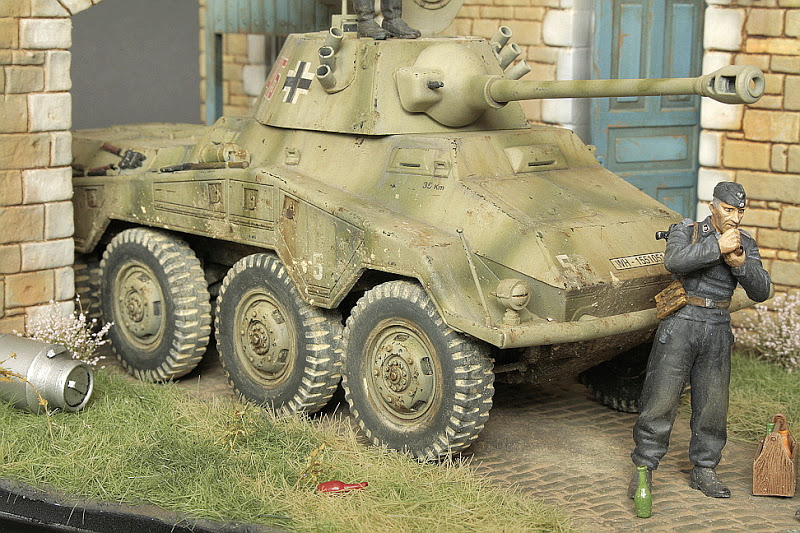
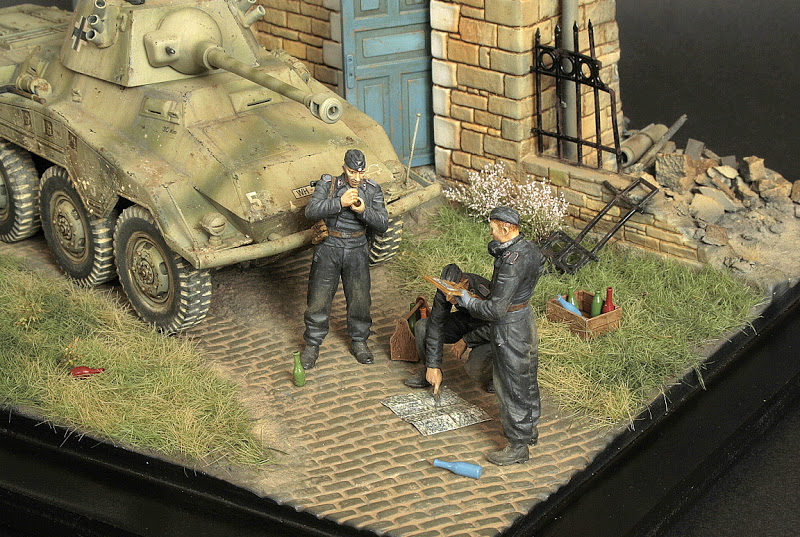
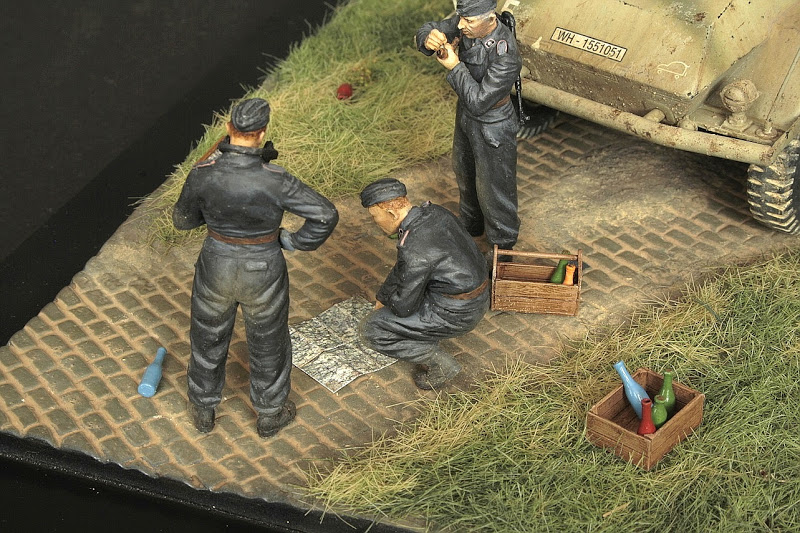
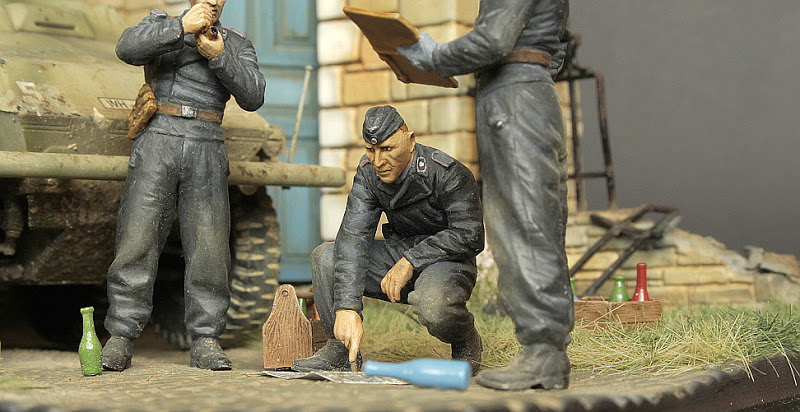
The “bottles” really distract me, and the green one almost looks like the shoe of the guy lighting the pipe in the one close-up. I take it these represent beer bottles, but I don’t understand all the different colors – which I find distracting from the more important elements of the scene. They don’t look like glass. I don’t know what the original material was, but they’re painted so they are opaque, looking like glazed ceramic material. Also, in wartime I would think that very few brands are being produced, and they should all have the same beer - color of bottle, or two at most – say a lager and a boch (in season). One thing that would help a lot (although I would still changes the bottles) is some sort of label. It doesn't even have to say anything - just random scribble and maybe a couple of colors. Make sure that it isn't way oversized.

Usually when there is printing on the bottle, you still perceive that it is glass underneath it. Also, the printing doesn’t cover the entire bottle, and never the lip at the top. Beer bottles in Europe were traditionally brown or green glass, so these colors seem very odd - outside of a contemporary convenience store. It looks like these guys have been here a long time, with so many bottles laying around. I’m OK with one standing up next to a guy drinking it (when not lighting the pipe, which takes both hands), but the two lying down might better go in the “empties box”. The commander must be very loose with his men, especially since it looks like they’re preparing for action.

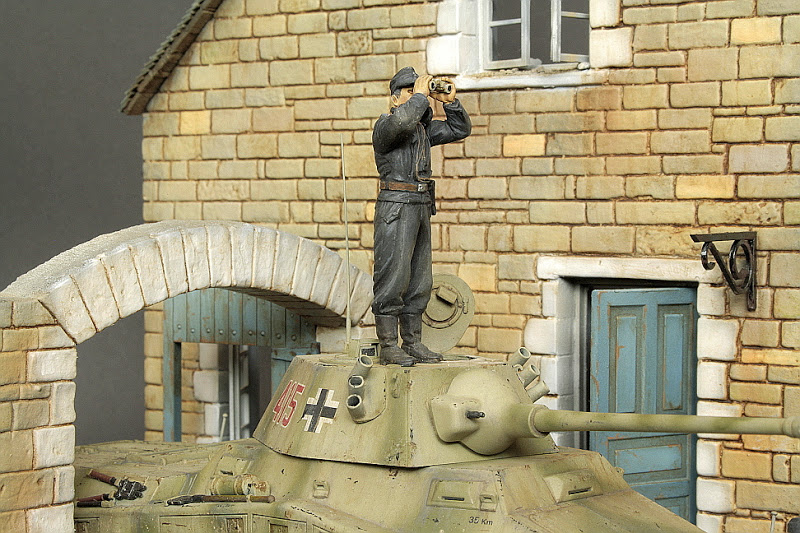
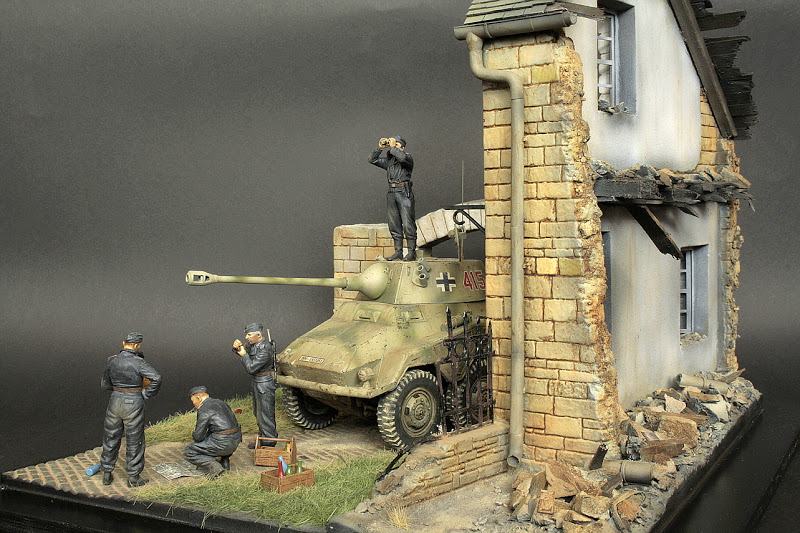
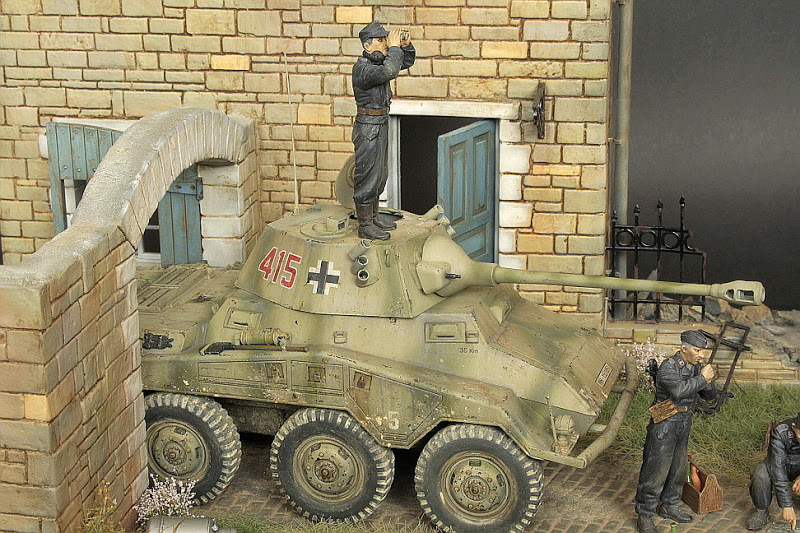
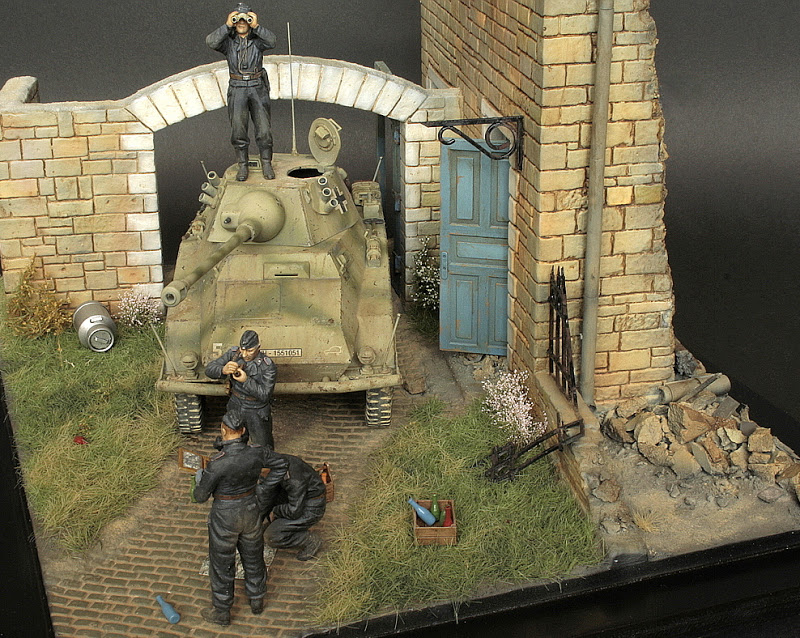
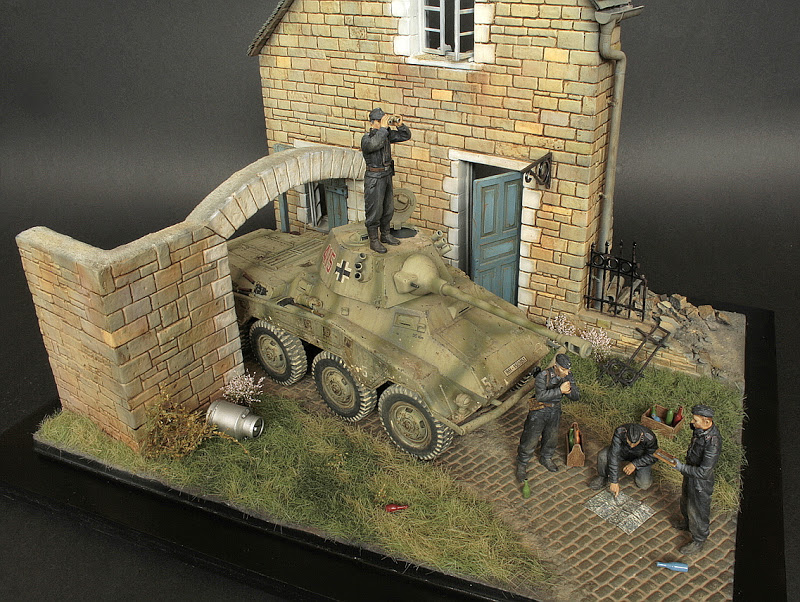
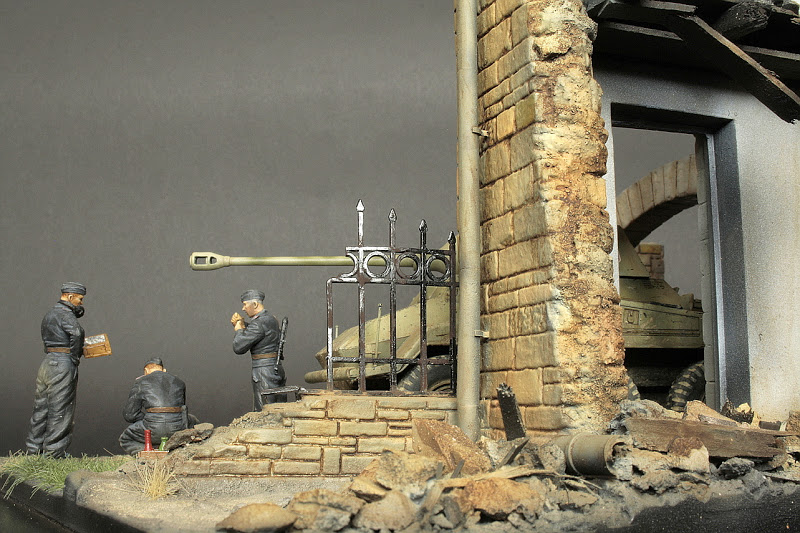
I generally like MiniArt buildings (unlike some folks), but I have issues with a couple of things they consistently do with the ones that are similar to this, by which I mean not totally destroyed. First is that no matter what may have happened to the rest of the building, the front façade is miraculously untouched. I’m not sure what the answer is, but it just seems so odd that there is never a stone out of place, and often not even any chipped by shrapnel, although I admit that whatever happened to it was on the other side of the wall.

The other problem I have – with them, not you – is the way the side walls are “broken” in such a straight line, almost as if there was a zipper that someone pulled. Looking at photos, many of the breaks are indeed vertical, but seldom as neat at they make it look. I might be wrong, but especially with stone (and less so brick) I would think there might be a tendency for the joinery to give way sometimes, instead of the stone block always breaking. For me, this seems especially likely where there is just a little piece of the stone left in the wall still standing. Knowing the nature of the MiniArt kits, I realize that cutting some stone sections out will mean a lot of work to create a new “middle section” between the thin walls. BTW – you have done an excellent job in joining them with no indication of the seam; I think the best I’ve seen so far.

On the few floor-boards that are left of the second floor, there are pieces of broken stone where I don’t see anywhere above this that the stone could have come from. Some could have been blown there by the blast, but it seems like there might be a little too much; if it was blown up and hit the wall, most would bounce back to the bottom instead of staying in that narrow shelf. On the bottom floor, maybe it should be concentrated along the broken walls, without it being so evenly placed along the inside of the front wall.
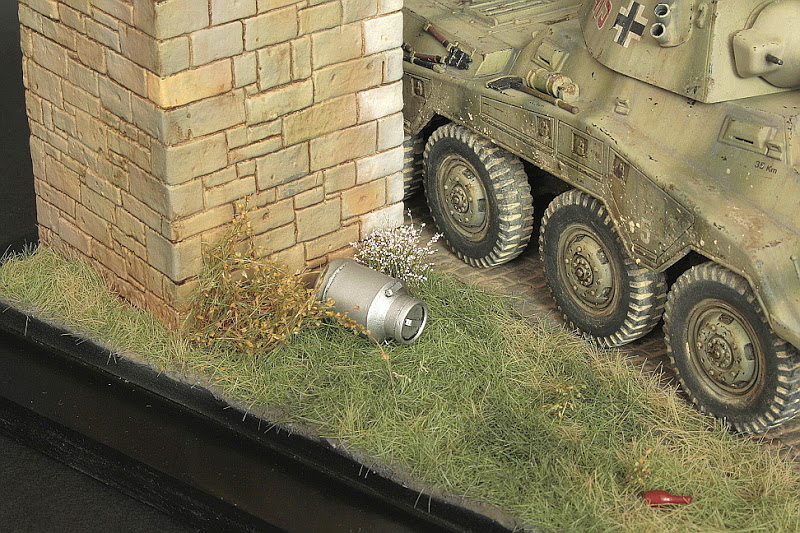
This isn’t just on this dio, but it seems to me that rubble is often “strewn” around just for the sake of rubble, but without thought of exactly what the material should be, and where it should logically go, and in what concentrations. I know MiniArt doesn’t give you much room, but it seems there should be more by the fence, and how is it that none landed on the grass? It just looks a little too neat for random bomb or artillery rubble. The whole scene beyond the façade looks untouched by the war, except for the stray milk-can.

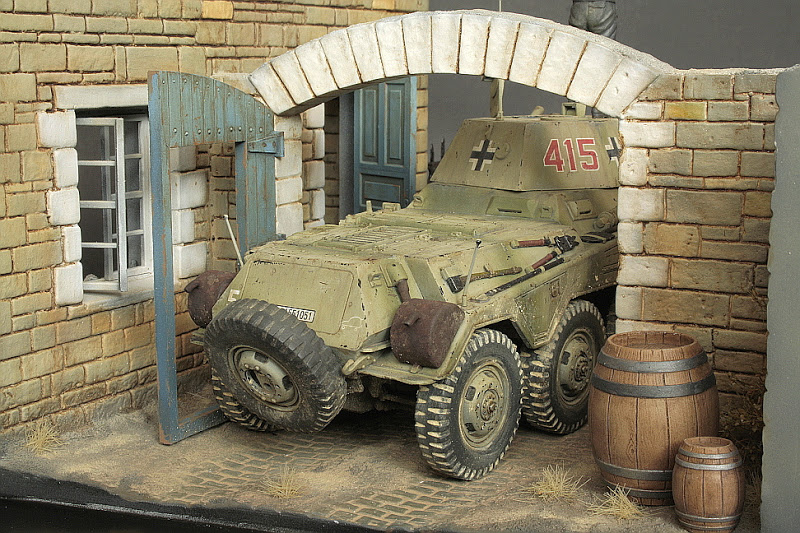
MiniArt likes to show the broken interior plaster line, but it doesn’t always make sense – especially on the upper front wall. However, if they show it, we should see some pieces of it on the floorboard nearby and the ground. We have stone pieces with no obvious source, a piece of gutter against the inside front wall, some fallen by the metal fence, but the rest of it intact on the outside (how did that one piece get around the corner?). Lots of grey plaster missing from the walls inside, but I don’t see where it has fallen to.

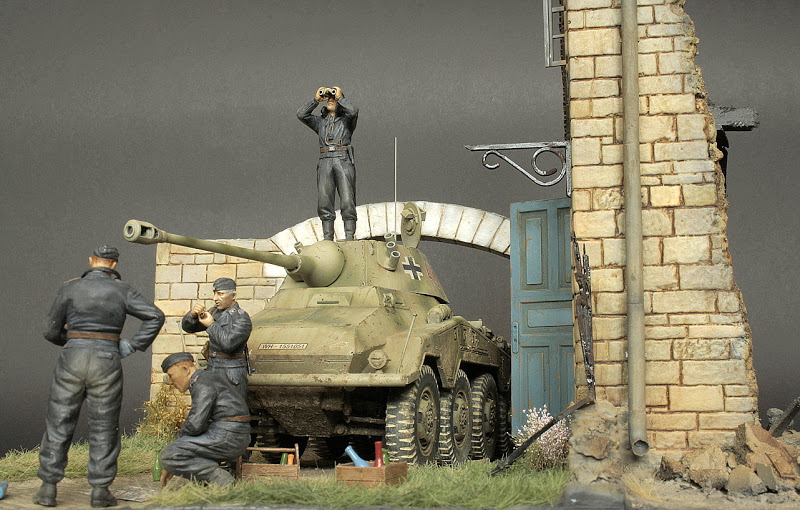
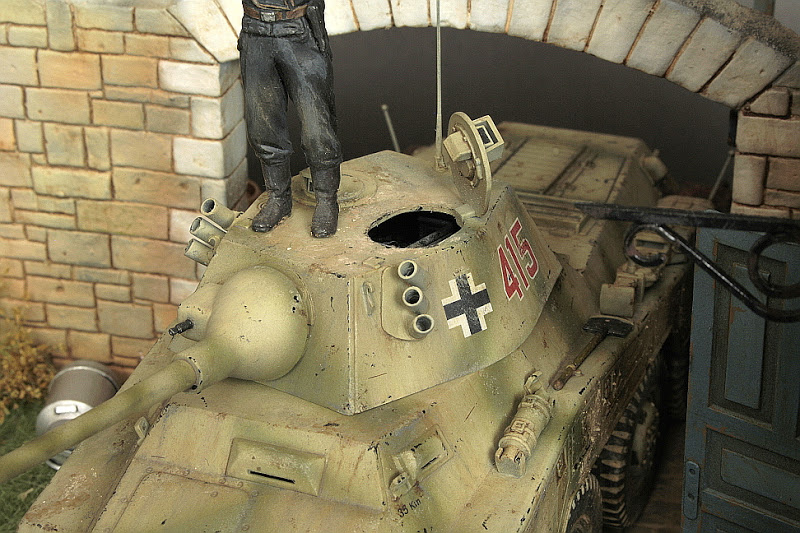
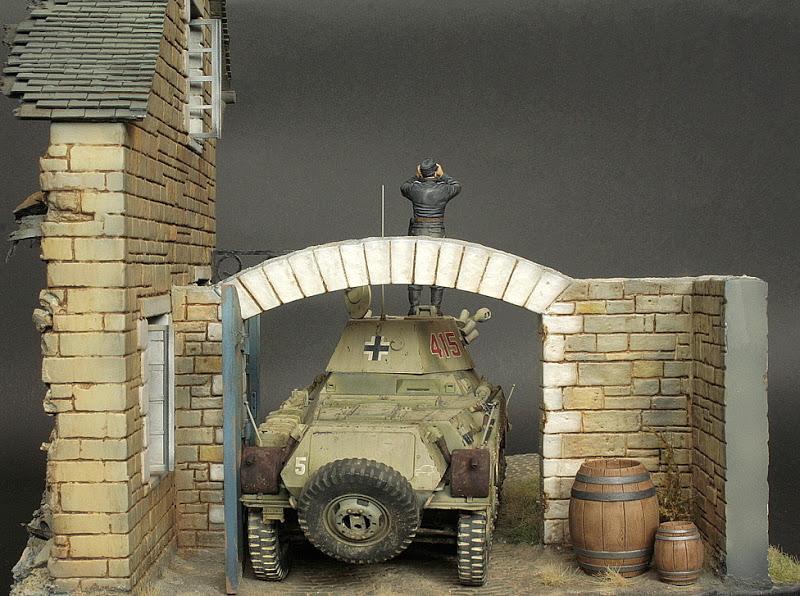
I really have no experience regarding armor, but to my uneducated eye the turret looks like it is so close to the upper hull (is that the correct term?), that there is no space for it to pivot.

One last thing. Although I do like the subdued colors, the more I looked at the photos, I started thinking that they all appeared a little dark and maybe murky. I was curious, so I copied some over to my hard drive. The first thing I tried was “auto correct”, and what a difference it made! I also did some rotation and cropping for composition – mostly so the base does not show. I hope you agree that the images look a lot better.


I may know the reason – if you’re using a digital camera, what do you have “white balance” set to? It was probably inappropriate for the type of light illuminating the dio – almost all digital cameras will have an “auto” setting for this if you don’t want to be bothered to manually set it all the time. Another idea is to bring the diorama outside with a stool to set it on, and find a background that will complement it. Almost all models of any sort photograph better in natural light.

I hope none of my many comments offend you, but they are only meant to help improve something that is already very good. Sometimes - the better something is overall, the few things that I see as “not quite right” (and this is just my own biased opinion) stand out all the more. This also applies to the other dios that I’ve commented on; I’m truly not trying to be negative, but this is just how my vision and perception have developed over the years. Also, since I don’t have the armor/AFV and diorama experience that most of you do, it’s reasonable that I tend to be conscious of different types of details than many of you are.

Charles
QUAX_MAXIMUS
Visit this Community
El Salvador
Joined: December 13, 2010
KitMaker: 46 posts
Armorama: 43 posts
Posted: Saturday, February 23, 2013 - 12:57 PM UTC
you have made a very nice job!!!! i like all in your diorama looks like you really did have fun on this one. congrats.
All_You_Can_Kit
Visit this Community
Jakarta Raya, Indonesia
Joined: August 22, 2012
KitMaker: 599 posts
Armorama: 527 posts
Posted: Saturday, February 23, 2013 - 05:19 PM UTC
100 thumbs up briiiilllliaannnttt, Damian!!!

Again, I agree with previous kind comments for your project and also, several things may be improved:

a. The bottle.
I agree with Charles said, even I never create model of 1/35 bottles before, but based on one of Armorama's tutorial about making a 1/35 bottle, simply I can share that a clear blue or clear green paint (I ever see one of them is from Tamiya) may be applied to the bottles assuming you already scratch them from transparent material as simulated in the tutorial.

b. The window of the house.
The houses somewhat ruined, so I assume a couple of window's glasses are broken, partially left in the window frame, and somewhat cracked in a such condition. Also assuming that my eyes don't do a wrong observation, I don't see any piece of glasses left in the window frame at all. Just insert a piece of broken transparent paper onto the frame and don't forget to simulate it's crack. I hope you understand what I mean

c. The kneeled crew point out at the map.
Regarding to his action and expression, I'm sure that he hope to be got interact with another fellow crews. But, I don't get the point since IMO the other two crews closest to him may interact each others, not to him. Poor him! No attention paid for what he was talking about! I think, an addition with another figures may add a strong feel for him, maybe just about 2 infantrymen figures bending toward him and another one smokin'. Of course, not a crew figure anymore since the SdKfz 234 only operated by 4 crewmen, right?

Once again, one hundred thumbs up for your work, truly inspiring!!

Best regards from Indonesia


Garry
maestromae
Visit this Community
Lodz, Poland
Joined: September 03, 2011
KitMaker: 19 posts
Armorama: 19 posts
Posted: Saturday, February 23, 2013 - 10:39 PM UTC
Thank you very much for all the comments! I'm happy that you like my diorama.

velotrain - thanks for your looong comment. You're right the photos look a bit too dark. I was using Cine Style profile for the photos above, and probably it's because of that (the lack of contrast). I improved contrast - here are updated photos (i can't edit my previous post, so it would be great if a moderator could replace the previous one with these):


Regarding bottles you're right, but i just wanted to have something on my diorama, that would introduce some additional colors. Bottles are painted that way to look like a crockery one with gloss finish. As they have different shapes I assumed that I shouldn't make them look like a beer boottles, so I didn't put any label on it. They could be made by local, village hands, and contain a self-made wine

The ruin itself for sure is not ideal, but as you said, there is no much space to represent it well. I just wanted to do something with the rear of the building, and focus on the scene next to its front. velotrain - thanks for your very constructive comment

Garry_007 - thanks for your ideas, next time I will try to prepare some "glass" bottles. BWT it looks like your country flag looks very similar to the Polish one
All_You_Can_Kit
Visit this Community
Jakarta Raya, Indonesia
Joined: August 22, 2012
KitMaker: 599 posts
Armorama: 527 posts
Posted: Saturday, February 23, 2013 - 11:37 PM UTC

Quoted Text

Thank you very much for all the comments! I'm happy that you like my diorama....

...I improved contrast - here are updated photos (i can't edit my previous post, so it would be great if a moderator could replace the previous one with these)...

...Garry_007 - thanks for your ideas, next time I will try to prepare some "glass" bottles. BWT it looks like your country flag looks very similar to the Polish one


You're welcome Damian, at anytime

About editing your posted topic, I ever have a similar problem, but yes, it is: we are not able to edit our posted topic after several hours since Armorama's software didn't allowed to do so. I already read about it from several fellow modellers' topic that have similar problem. The only one solution is just to made another reply posted by yourself containing the corrected/edited photos. You're already on the right path my friend.

And yes, beside of similar flags (simply just do a little reverse ), between Indonesia and Poland have a strong partnership in economy, politic, and cultural. So, hope to be so in scale modelling world!

Can't wait too see for your another stunning work and have a quality scale modelling for all of us!

Best regards from Indonesia


Garry
Plasticbattle
#003
Visit this Community
Donegal, Ireland
Joined: May 14, 2002
KitMaker: 9,763 posts
Armorama: 7,444 posts
Posted: Monday, February 25, 2013 - 11:52 AM UTC
Very nice scene Damian. Great job on the old Italeri Puma and the MiniArt house. I agree with the poster above, in that it may have been better to slice of the damaged part of the house to show an intact house .... hard to imagine one wall standing in a relatively un-damaged state.
milvehfan
Visit this Community
North Carolina, United States
Joined: June 26, 2007
KitMaker: 2,116 posts
Armorama: 1,080 posts
Posted: Monday, February 25, 2013 - 01:54 PM UTC
WOW !
A Very Very COOL piece of work !

milvehfan
velotrain
Visit this Community
Massachusetts, United States
Joined: December 23, 2010
KitMaker: 384 posts
Armorama: 320 posts
Posted: Monday, February 25, 2013 - 11:52 PM UTC

Quoted Text

.... hard to imagine one wall standing in a relatively un-damaged state.


Frank - I think the blame lies with all the companies who insist on designing kits that way - it's not just MiniArt. They must think it's atmospheric or something. Part of it is that they make the building shallow because they know space is tight on the diorama and extending the side walls further back increases their materials costs - and shipping cost if it's not vacuum-formed. I wrote Mini-Art and suggested they develop generic wall sections so modelers could more easily kit-bash non-ruined structures. It's not like every kit has a unique wall texture.

You notice that all their new 1:72 kits are complete buildings, so maybe they're hoping for an OO railroad spin-off in the U.K., or suggesting that people build larger scenes - I notice that happens in 1:87 with the wealth of Euro HO structure kits available. I think they hurt themselves by endlessly reconfiguring the same old wall sections into supposedly new kits - same thing they do in 1:35.
velotrain
Visit this Community
Massachusetts, United States
Joined: December 23, 2010
KitMaker: 384 posts
Armorama: 320 posts
Posted: Tuesday, February 26, 2013 - 12:21 AM UTC

Quoted Text


You're right the photos look a bit too dark.

Regarding bottles you're right, but i just wanted to have something on my diorama, that would introduce some additional colors. Bottles are painted that way to look like a crockery one with gloss finish. As they have different shapes I assumed that I shouldn't make them look like a beer boottles, so I didn't put any label on it. They could be made by local, village hands, and contain a self-made wine


Damian -

The new photos are lighter, but I'm not sure they're * brighter * Compare the "bottle" colors in your first new image to the ones I posted.

I've been trying to think of how else to introduce other colors. One possibility might be bright window curtains that wave through the broken glass, although I agree that some shards should be left. Maybe a flag mounted on the angle bracket over the front door - you could tell us what country we're in.

I mostly find the bottles and the colors distracting. If each guy is drinking multiple bottles of wine, they're really in no condition to fight - or even read a map ;-) Wine had been stored in glass for over a century before the war - see:
http://www.wineintro.com/history/glassware/general.html
I have no idea what might be stored in crockery in that era, and it would more likely be a jug shape.

Charles
jimbrae
Visit this Community
Provincia de Lugo, Spain / España
Joined: April 23, 2003
KitMaker: 12,927 posts
Armorama: 9,486 posts
Posted: Tuesday, February 26, 2013 - 01:21 AM UTC
Excellent. Simply excellent.

Only point I woud make is perhaps to tone done the building color a touch and give it a more aged effect?
roudeleiw
Visit this Community
Luxembourg
Joined: January 19, 2004
KitMaker: 2,406 posts
Armorama: 2,224 posts
Posted: Tuesday, February 26, 2013 - 01:32 AM UTC
Very good job!

Nice colours overall and very good painting

Greets
Claude
Biggles2
Visit this Community
Quebec, Canada
Joined: January 01, 2004
KitMaker: 7,600 posts
Armorama: 6,110 posts
Posted: Wednesday, February 27, 2013 - 05:55 AM UTC
Diopark has a dining set #35003, with table and chairs and crockery, but most importantly, a clear sprue with bottles, etc. and label decals to put on them.
 _GOTOTOP