_GOTOBOTTOM
Armor/AFV: Axis - WWII
Armor and ground forces of the Axis forces during World War II.
Hosted by Darren Baker
SdKfz 250/3 Ausf.B Nordland division
yeahwiggie
Visit this Community
Dalarnas, Sweden
Joined: March 24, 2006
KitMaker: 2,093 posts
Armorama: 1,359 posts
Posted: Friday, May 10, 2013 - 06:19 AM UTC
it is about time I started actually building again.
For this I chose the following picture and I will try to replicate that as good as possible. It is a command halftrack from the Nordland Division, situated in Letland 1944.


These are the kits I will be using, apart from the Zündapp w/ sidecarkit.


Much to my surprise I noticed that, after opening the box and checking the contents, the vehicle depicted by Dragon on the boxart has a strong resemblence to the actual vehicle. The interior, the markings and even the sitting figure in the accompanying box, which is also shown on the boxart, are very similar.


So I started with doing some research first. The first question that arose was wether this was a 250/3 commandvehicle or a 250/5 observationvehicle, since those 2 decriptions pop up and are used or mixed up regularly.
So far I have come to the conclusion that appearantly the basic vehicles were identical. The only difference being the actual designation, intended role of use and adaptation for that role by matching radiosets. The various sources I checked mentioned even the radiolayout to be mostly identical, being the FuG4 and FuG8. With higher levels of command or within the Luftwaffe that would vary.
Given the fact that by the time the 250 Ausf.B was widely used, the german army would facing materialshortages, so I somehow doubt if they would be using (wasting) an expensive vehicle that was much needed by combattroops as an observationvehicle.
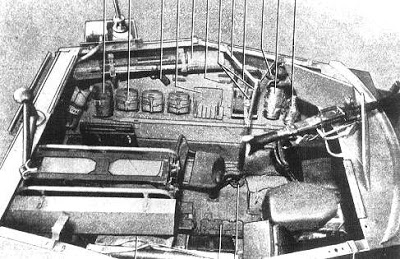
Unfortunately there is very little photographic evidence of the interiors of these vehicles, wether they are different or not. The few pictures I found all showed the same layout, both for the /3 and the /5.
All the pictures are from the Bundesarchive. The first 2 pictures are from the same series and the latter 4, also.


Pictures 3-6 are from the same series too, and pic.5 has been identified as the 250/3 of a batallionadjutant.


yeahwiggie
Visit this Community
Dalarnas, Sweden
Joined: March 24, 2006
KitMaker: 2,093 posts
Armorama: 1,359 posts
Posted: Friday, May 10, 2013 - 06:22 AM UTC
Let the building begin!


Day 1 of the build and i run into challenges right away!
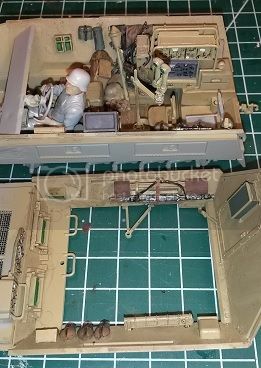
The fit of the hullparts is not as I would like to see them. The parts are warped, causing a lot of missalignment. The lowerhull parts were glued and forced into place one step at a time. The upperhull looks more challenging.


I also tried to replicate the damaged to the left front stowagelockers as can be seen on the picture. The plastic in this area is quit thick, so I went to work by slightly heating it, distorting it and than some sanding. The fender has been slightly bent out of line as has the mudguard behind the muffler.


There was a bit of filler needed. Lots of sinkmarks in the rearplate and since the vehicle in the picture does not have any tools on the left fender, I will not need to add them on the model either. The locationholes were filled up.


As you can see progress is slow, but steady. a few subassemblies have been doen, like the lower hill, upper hull, bulkhead, radiounit, frontwheelassembly minus the wheels and the lengths of track grow steadily...
panzerconor
Visit this Community
Massachusetts, United States
Joined: February 08, 2012
KitMaker: 1,271 posts
Armorama: 1,253 posts
Posted: Friday, May 10, 2013 - 07:31 AM UTC
I've seen that particular photo many times, should be an awesome scene when all is said and done.

I'll be watching

-Conor
ElCapitan
Visit this Community
Pennsylvania, United States
Joined: May 14, 2007
KitMaker: 219 posts
Armorama: 217 posts
Posted: Friday, May 10, 2013 - 07:40 AM UTC
Ron,

I'm just starting the old Dragon 250/9 and have seen many of the same photos while doing some reseach on the Bundesarchiv. I'm curious to see if I run into similar problems with fit as you do.

Thanks for posting, I'll be interested to see how you make out.

Kevin
jrutman
Visit this Community
Pennsylvania, United States
Joined: April 10, 2011
KitMaker: 7,941 posts
Armorama: 7,934 posts
Posted: Friday, May 10, 2013 - 08:19 AM UTC
Excellent!! Let's get this halftrack thing cranked up man!! You build way faster than I can,that's for sure.
Have you seen the PE sets for the radio racks? They are superb.
J
jrutman
Visit this Community
Pennsylvania, United States
Joined: April 10, 2011
KitMaker: 7,941 posts
Armorama: 7,934 posts
Posted: Sunday, May 12, 2013 - 01:59 AM UTC
What treads will you be using for this?
J
All_You_Can_Kit
Visit this Community
Jakarta Raya, Indonesia
Joined: August 22, 2012
KitMaker: 599 posts
Armorama: 527 posts
Posted: Sunday, May 12, 2013 - 02:16 AM UTC
Very good start! Keep moving

Cheers


Garry
yeahwiggie
Visit this Community
Dalarnas, Sweden
Joined: March 24, 2006
KitMaker: 2,093 posts
Armorama: 1,359 posts
Posted: Saturday, June 22, 2013 - 06:43 AM UTC
First some additional info on the vehicle itself.
I became a member of the Svenskt Militärhistoriskt Bibliotek (swedish militaryhistory library) and because of that I got a good deal on a couple of books. One of those was this one; Division Nordland i strid,
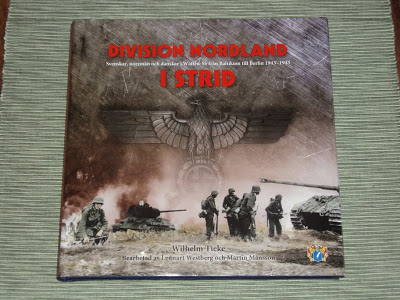

based on Wilhelm Tieke's "Tragödie um die Treue" (Tragedy of the faithfull) and reworked by Lennart Westberg & Martin Mĺnsson.
It describes the role of the Nordland Division within the III. SS Panzerkorps with many personal accounts and new (to me) pictures, including this one;


I believe it is the same vehicle, photographed on a different occassion or location, from a different side, but atill the same. Why?
First of all the timeframe and area are the same, secondly it is the same type of vehicle; a 250/3 Ausf.B with rodantenna and starantenna. Thirdly the uniforms shown match; SS camouflagesmocks. Then the shown number matches both in style and in colour, allthough the "4" is not visible. And finally this vehicle lacks all its tools, too.
Noteworthy is that on this side too the stowage bins are damaged. I guess the vehicle drove through something that proved to be a tad to narrow. It also makes it easier to determine the sort of camouflagepattern the vehicle had, but he used colours are anyone's guess.
And as a final bonus I received the last items to complete this build. From a couple of Dutch fellowbuilders of the Twenot I got the desired figure(s) and the required DKW motorcycle.... which I happened to receive twice as well. I also got the needed divisional markings from Archer Transfers. Great service this company has! A quick delivery (2 weeks from the US to Sweden), carefully packed, with an additional testingsheet with various surfaces, like antiskidplating and such.

A big thanks to them all!!
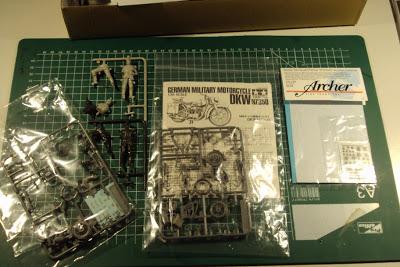

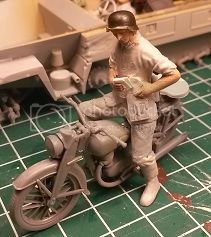
In the last week of may this year, I turned my attention to the DKW and rider, instead of the halftrack, just as a little change of pace, so to speak.
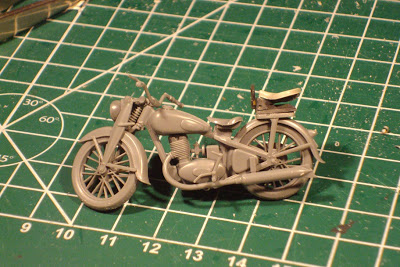
The first thing I did was take care of the bike; 10 minutes of work including the clean up! Some very clever designing by Tamiya. During that I noticed something; there was a ring behind the rider's seat, something that did not show up on pictures of an original DKW. Crossreferencing should the DKW in the picture has a much bigger "butt" than its cousins. I thought I recognised the passengerseat of a BMW or Zündapp 750! So out came the saw and the sparesbox....
I also need to add some more bits and pieces, like the gearshifting rods and cables. I took away the front numberplant too.

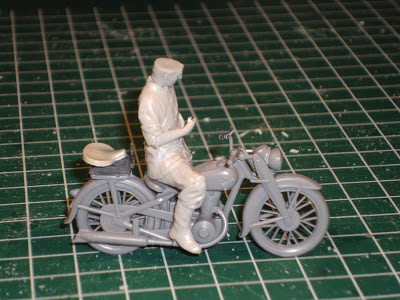
Next was the rider. As a basis I took 2 old Italeri figures, since those showed the correct features I needed; camouflagesmock, rolled up sleeves and high boots with normal pants.
I took the legs from one figure and the torso from the other. Some old fashioned sawing, sanding and glueing of the joints and a new Dragonhead.
The figure is supposed to show a rider in the proces of putting away the written orders into a pouch.




Right now I am continueing with the build. The absolute wonderfull weather this spring has caused a lot of outdoortime, including a lot of work in the garden and in firewoodpreparation and -storage....
I have been busy trying to realign the rear of the superstructure. With some pushing and pulling, some twisting and glueing, this is the result;


Many of the subassemblies are done, including the driver's section. Now i could focus my attention on that figure too.
While working of the figure I could not help but wonder how these guys in those days were able to fit in that position, let alone operate a vehicle???
Even the midgetlike figure Dragon provides could not ne squeezed in!


I had to alter the angle of the legs, sand off his shoesoles, alter the position and angle of arms and hands en trim off even more of his allready flimsy butt. The head needed some pushing down as did the helmet. Next I had to sand several parts of trousers and arms in order to make them fit several of the surfaces of the vehicle.


And in this small square of free room I need to fit a seat with pole + scissor binoculars (Scherenfernrohr), 2 standing figures and a lot of details....
jrutman
Visit this Community
Pennsylvania, United States
Joined: April 10, 2011
KitMaker: 7,941 posts
Armorama: 7,934 posts
Posted: Saturday, June 22, 2013 - 09:59 AM UTC
Wow,you really made a lot of progress since the last post. It is really taking shape with the clever switching of figure parts.
J
yeahwiggie
Visit this Community
Dalarnas, Sweden
Joined: March 24, 2006
KitMaker: 2,093 posts
Armorama: 1,359 posts
Posted: Sunday, June 23, 2013 - 11:15 PM UTC
Hi Jerry, it looks like a lot, but it actually isn't all that much.
Right now I'm going nuts over the other figures and above all, all the details I'm planning to put into the vehicle...
jrutman
Visit this Community
Pennsylvania, United States
Joined: April 10, 2011
KitMaker: 7,941 posts
Armorama: 7,934 posts
Posted: Monday, June 24, 2013 - 01:19 AM UTC
Ah yes,well....I know how that is!
J
yeahwiggie
Visit this Community
Dalarnas, Sweden
Joined: March 24, 2006
KitMaker: 2,093 posts
Armorama: 1,359 posts
Posted: Monday, June 24, 2013 - 07:14 PM UTC
Details, details, details...... It's all about the details.

Here's a picture of what I intended took include into this build; To the right uppercorner the stuff Dragon provides, to the left uppercorner the stuff I think they should have included as well and at the bottom half the extra's I will be including... and as it turned out that became even more... much more...


For the layout of the interior I used interiorshots of a 250/3 or /5 Ausf.A. I figured they would use the same layout for an Ausf.B. So I added the parts shown in the top half of the above picture.


I also did some basic work on the figures, making sure they would fit and that I would have a suitable crew of 4. Unfortunately the standing guy in the middle is not wearing a smock and the guy in the rear is sitting, instead of (half) standing.


The driver I have described allready, the sitting figure on top was altered in that I carved away pieves of his rear, so that would follow the contours of the grabhandle and rim. I had to stretch out his left arm in order to reach the gunshield.
The stance of the commander needed altering too. He was standing with his feet apart and I wondered why? He'd never fit like that...... Untill I realised that he was constructed to stand on a bench, which was a standard feature of a 250. So I needed to bring the feet closer together. I cut off his left leg and sanded and dryfitted until I got an acceptable fit. I also used a bare head from the sparesbox. The sitting figure in the rear is an old tamiyafigure (I think, judging by the features). He just got a small Dragonhead and fieldcap. All the figures need to be reworked and toughed up at this stage.


And after that I got a bit carried away....
I searched through my sparesbox, thinking that a crew also had personal gear.... and weapons... and other stuff... I started collecting all the things a German soldier would have; a personal weapon, ammopouches for that, a haversack. In order to show the wide variety of weapons used back then I took a Kar98 for the radioman, the driver had his MP40, the passenger would have a Sturmgeweht and the commander a captured ppsh. In the book there are several mentionings of armorpiercing weapons, so a Panzerfaust was added too. A case of handgrenades, an ammobox for the MG42 and one with drummagazines. I added belts, where appropriate. Offcourse there is vehicle-equipment too; the metal strips that hold up the tarpaulin, the tarpaulin itself, the scissorbinoculairs, the second MG42 and there was this strange looking opening at the bottom of the radio. I added some drawers from Tamiya's set.

And I crammed all that into that tiny open square in the back and I glued it all in such a way that I can handle each subassembly seperately while painting.


retiredyank
Visit this Community
Arkansas, United States
Joined: June 29, 2009
KitMaker: 11,610 posts
Armorama: 7,843 posts
Posted: Monday, June 24, 2013 - 09:14 PM UTC
Nice job on the interior. It is really starting to look the part.
SDavies
Visit this Community
England - South East, United Kingdom
Joined: January 09, 2010
KitMaker: 979 posts
Armorama: 959 posts
Posted: Monday, June 24, 2013 - 10:20 PM UTC
Great start and I am looking forward to future updates

S
jrutman
Visit this Community
Pennsylvania, United States
Joined: April 10, 2011
KitMaker: 7,941 posts
Armorama: 7,934 posts
Posted: Tuesday, June 25, 2013 - 01:51 AM UTC
Looking suitably "busy". For the guy without the smock,what about just doing a very minor conversion and then painting on a 4 pocket 44 cammo jacket?
J
yeahwiggie
Visit this Community
Dalarnas, Sweden
Joined: March 24, 2006
KitMaker: 2,093 posts
Armorama: 1,359 posts
Posted: Monday, December 15, 2014 - 08:35 PM UTC
A long stalled project revived!

The interior is starting to take shape or at least is starting to show some colour.
Turns out my hands are not as steady as they used to be and my eyesight has not improved either...
Using less than optimal illumination is not all that helpfull!


SiStorey
Visit this Community
England - North East, United Kingdom
Joined: March 14, 2014
KitMaker: 242 posts
Armorama: 161 posts
Posted: Monday, December 15, 2014 - 09:39 PM UTC
Hi Ron, brilliant work, well done!! Like the step by step you have done, nicely breaking it down into little sections, by try this in the future. But well done!!
panzerbob01
Visit this Community
Louisiana, United States
Joined: March 06, 2010
KitMaker: 3,128 posts
Armorama: 2,959 posts
Posted: Monday, December 15, 2014 - 11:09 PM UTC
GREAT stuff, Ron!

Just looking back at your posted ref pics up front in this thread...

One of the cool details that YOU may be able to catch up on as you move forward with this is that rear hatch... Looks to me like it was camo-painted on its inside face, from the pics with it standing open! THAT would, I think, be a way-cool detail to include - specially if you actually plan on having it pulled to (closed)!

Looking forward to seeing this roll to a finish!

Bob
jrutman
Visit this Community
Pennsylvania, United States
Joined: April 10, 2011
KitMaker: 7,941 posts
Armorama: 7,934 posts
Posted: Monday, December 15, 2014 - 11:51 PM UTC
Nice progress. Good to see you back at it. I think the Panzerfaust would be heavy part downward maybe? Hard to make it stand this way.
J
yeahwiggie
Visit this Community
Dalarnas, Sweden
Joined: March 24, 2006
KitMaker: 2,093 posts
Armorama: 1,359 posts
Posted: Tuesday, December 16, 2014 - 12:05 AM UTC
Thank Si, it is an approach I regularly use, albeit not with this much equipment. Painting is a bit of a pain in the lower rearend.

Hi Bob, the one with the camouflaged door actually isn't the same vehicle I am depicting. The previous one is wehrmacht, while mine is W-SS. Still a cool detail, true.

Hey Jerry, the panzerfaust actually leans towards the side and is jammed in between gear at the bottom, but also fits right between the canteens and other stuff at the top. It can't go anywhere like that, I figured.
yeahwiggie
Visit this Community
Dalarnas, Sweden
Joined: March 24, 2006
KitMaker: 2,093 posts
Armorama: 1,359 posts
Posted: Wednesday, January 13, 2016 - 08:29 PM UTC
Panzerconor's thread about his build of this particular vehicle made me go back to mine as well. This has been stalled for a long time...

I was kind of surprise to see that I actually painted pretty much the entire interior, but some parts had come loose and I need to add more details; cables, wires, gear. That sort of thing...

I also used this opportunity to try a new, to me, technique that Jerry Rutman uses; undercutting. Brings out soft details much more, but I need to get the hang of it.

The vehicle will rise of course, when the wheels and tracks are added. Then the angle between crew and rider will be corrected.


The interior so far;


The figure actually fits quite well without surgery. No idea what kit it came from, though.
Some parts are still loose, like the panzerfaust, the helmet and the gasmask canister.


The rider; I added a messengerpouch, removed the lid and made a new one from plasticcard, cut to the fit of the hand. Quite an annoying and fiddly job, but essential... to me. The folded plastic crad pieces in his hand are just for the photo to show the idea, but they do look kind of good, actually.
I also tried the undercutting method on this guy, particularly around the collar and the edges of the smock.

steve-o
Visit this Community
Ohio, United States
Joined: February 05, 2004
KitMaker: 545 posts
Armorama: 295 posts
Posted: Sunday, March 20, 2016 - 07:53 AM UTC
Just came here after seeing the current 250/251 build campaign. This looks great, and I think I'm going to try it for my next build with an interior!

Can;t wait to see some completed photos of this one!
Steve
yeahwiggie
Visit this Community
Dalarnas, Sweden
Joined: March 24, 2006
KitMaker: 2,093 posts
Armorama: 1,359 posts
Posted: Sunday, March 20, 2016 - 01:48 PM UTC
Thanks Steve. So do I....
 _GOTOTOP