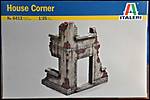
_GOTOBOTTOM
Dioramas
Do you love dioramas & vignettes? We sure do.
1st diorama attempt
turkeyshot
Visit this Community
New South Wales, Australia
Joined: February 06, 2012
KitMaker: 138 posts
Armorama: 133 posts
Posted: Wednesday, June 19, 2013 - 03:11 PM UTC
A few months ago I found this old Italeri house Corner (Kit #6413) on sale in my local modelling store (see Photo 1). Having never attempted a diorama before I though that this might be a good place to start.

PHOTO 1: The kit


Then, with the kit in hand I starting trawling the boards looking for inspiration and hoping to learn a few new techniques that I could try out. In my search I encountered Bruce D's (aka "Meaty Hellhound") "Never Abandoned" Jagdpanther diorama (see here). I really liked the look of the strewn rubble and the cobblestones made out of cork (a great technique attributed to Carlos Elias, aka "blockhaus"), and wanted to give it a try myself.

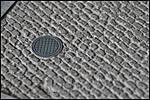
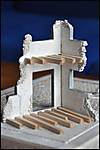
One of the cork saucepan mats from the kitchen made for a suitable sidewalk (6mm thick). This was glued into an old wooden base that I made well over a decade ago. I then found some thin (2mm) cork sheets in a local dollar store. This was cut to size and also glued onto the base to star to build up the roadway. A second sheet of the 2mm cork was cut up into hundreds of small pieces to represent the cobblestones, which were then painstakingly glued onto the base (see Photo 4). I glued the guttering down first and then added row after row of the cobblestones to gradually build up the roadway. Photos 2 and 3 show the position of the sidewalks, placemarks for where the building ruin will go, and the majority of the cobblestones now laid. As indicated on the base, I will also add a manhole and drain to the diorama for additional interest. Both of these will be sourced from Miniart kits. These only just arrived this morning, and so once these have been installed I will be able to finish adding all of the cobblestones around them.

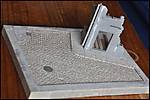
PHOTO 2: Layout of the base


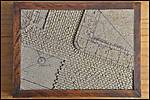
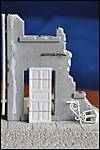
PHOTO 3: Building in place


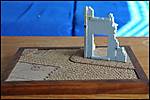
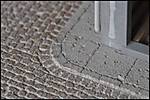
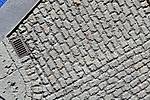
PHOTO 4: Cobblestones


As can be seen in the photos, when first laid, the cobblestones are very square and smooth and look quite unrealistic. Roughing the edges with the sharp end of a needle file solves this problem, producing a very believable texture. Compare the cobblestones adjacent to the areas as yet unlaid to the rest to see what I mean by this. See Photo 2 above, and Photo 5 below for a close up of this. Photos 6 and 7 show additional details of the cobblestones and sidewalk thus far.

PHOTO 5: Cobblestone detail 1


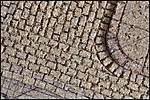
PHOTO 6: Cobblestone detail 2


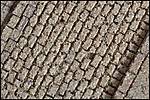
PHOTO 7: Cobblestone and sidewalk detail 3


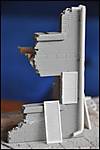
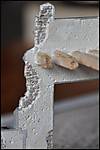
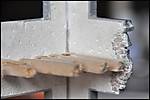
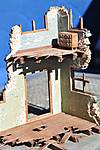
Those of you familiar with the old Italeri kits will know that they are only one-sided and do not have any interior detail. This was solved by pouring some plaster into the hollow interior of the building. Photos 8 and 9 below were taken once the plaster had set, though before sanding. I have started to gouge out some of the plaster around some of the broken portions of the of the wall. Once sanded, these sections will be filled with exposed brick fashioned from the same cork used for the cobblestones. Photo 9 below shows the balsa floor joists which will form what is left of the second floor. Meanwhile, I will also add broken window frames, doors and floorboards, made from balsa (shown in Photo 10, which also shows additional cobblestones and one of the saucepan mats used to make the sidewalk).

PHOTO 8: Interior walls 1


PHOTO 9: Interior walls 2


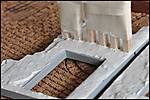
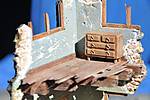
PHOTO 10: Wood and stone


Extra details such as a door, window shutters, a downpipe, a street lamp, and street signs will also be added in due time. Most of these will also be sourced from Miniart sets and more photos of these will be added in subsequent posts.

Finally, I have also made some of the rubble which will be strewn about the diorama. This was simply made from plaster, coloured with different pastel dust, which once set was later broken into various shaped and sizes. Thanks again go to "Meaty Hellhound" for this technique.

PHOTO 11: Rubble


More photos will be posted as this build slowly progresses. As always, I welcome any and all suggestions or comments that you may have for me. Speaking of suggestions, I am yet to decide what to do with this diorama. At this point, I am leaning towards making this diorama depict a scene from Normandy during WW2 (possibly showing a civilian scene of the 1940 exodus), although may instead depict a scene from Holland. Thoughts/ideas/suggestions? While you are at it, I am also seeking ideas as to what AFV or other to place on this scene. I look forward to hearing your thoughts. Cheers.
turkeyshot
Visit this Community
New South Wales, Australia
Joined: February 06, 2012
KitMaker: 138 posts
Armorama: 133 posts
Posted: Monday, June 24, 2013 - 02:32 PM UTC
I have made a little more headway on the diorama. The Miniart accessories that I was waiting for have arrived and some of these have now been incorporated into the build. The cobblestones, drain, and manhole have been 'grouted' into place with spackle (See Photos 12-16 below).

Photo 12: Overview


Photo 13: Top view


Photo 14: Drain detail


Photo 15: Manhole detail


Photo 16: Sidewalk and gutter detail


I have also done a little more work to the building ruin. The 2 halves have now been glued together and I have added the downpipe and started on the wall lamp from the Miniart set. The horizontal pipe on the front of the building will be an electrical conduit for the wires to the lamp (shown on the ground in Photo 19). Unfortunately, the Miniart windows and doors are noticeably taller and narrower that those on the Italeri base (See Photos 17 & 18 below). Photo 17 shows the work that I have already done to cut one of the shutters down to a more appropriate size: compare it against the one on the ground. Photo 18 shows the size of the door compared to the doorway. I still need to cut the door down to fit the doorjam, while also widening it with some balsa wood.

Photo 17: Side of building with shutter and downpipe


Photo 18: Front of building with door and lamp


Since my last post, I have also done some more work on the interior. I have sanded the inner walls, gouged out areas to show the exposed brick, filled those areas with cork brickwork and and grouted them in with some more spackle (See Photos 20-25 below).

Photo 19: Building interior


Photo 20: Building interior detail 1


Photo 21: Building interior detail 2


Photo 22: Building interior detail 3


Photo 23: Building interior detail 4


Photo 24: Building interior detail 5


I'd love to hear your thoughts on what I have managed thus far. Does anyone have any comments or suggestions for me?
Grauwolf
#084
Visit this Community
Quebec, Canada
Joined: September 14, 2005
KitMaker: 2,485 posts
Armorama: 743 posts
Posted: Monday, June 24, 2013 - 02:40 PM UTC
Excellent work so far. Your texture is superb, keep it
going!
Looking forward to more!
Cheers,
Joe
turkeyshot
Visit this Community
New South Wales, Australia
Joined: February 06, 2012
KitMaker: 138 posts
Armorama: 133 posts
Posted: Tuesday, June 25, 2013 - 06:48 PM UTC

Quoted Text

Excellent work so far. Your texture is superb, keep it
going!
Looking forward to more!
Cheers,
Joe


Thanks Joe, I appreciate the feedback. As I said before, I have never done this before and so am flying blind here. I have no idea how any of these new techniques are going to turn out until I give them a shot. I am glad to hear that you think I am on the right track. Cheers.
exer
Visit this Community
Dublin, Ireland
Joined: November 27, 2004
KitMaker: 6,048 posts
Armorama: 4,619 posts
Posted: Tuesday, June 25, 2013 - 07:59 PM UTC
Great step by step and amazing work for a first diorama. You should submit this as a feature
jointhepit
Visit this Community
Oost-Vlaanderen, Belgium
Joined: May 14, 2006
KitMaker: 3,829 posts
Armorama: 881 posts
Posted: Wednesday, June 26, 2013 - 08:17 AM UTC
never knew you could actually make some great corner with that kit, 'adding your details of course!)


great job !
turkeyshot
Visit this Community
New South Wales, Australia
Joined: February 06, 2012
KitMaker: 138 posts
Armorama: 133 posts
Posted: Wednesday, June 26, 2013 - 11:25 AM UTC
Thanks Tha Pit - I have just given her a coat of primer and will start on the painting soon. I don't have an airbrush and so it remains to be seen how this will look when done. Fingers crossed!

Thanks Pat - that's some high praise mate! Given that I am still only very new to the boards and don't really know what the hell I am doing, I wouldn't feel right submitting any of my work a a feature. I am touched that you think it is good enough though. Cheers mate.
pdelsoglio
Visit this Community
Mendoza, Argentina
Joined: November 13, 2005
KitMaker: 561 posts
Armorama: 553 posts
Posted: Wednesday, June 26, 2013 - 12:13 PM UTC
Jason,

This is quite a good work... Are you sure this is your first diorama?
The cobblestones really look the part!

I'm looking forward for new updates on this great work!

Cheers

Pablo
turkeyshot
Visit this Community
New South Wales, Australia
Joined: February 06, 2012
KitMaker: 138 posts
Armorama: 133 posts
Posted: Sunday, June 30, 2013 - 11:27 AM UTC

Quoted Text

Jason,

This is quite a good work... Are you sure this is your first diorama?
The cobblestones really look the part!

I'm looking forward for new updates on this great work!

Cheers

Pablo


Hi Pablo, thanks for the kind words ... and yes, I am quite sure that this is my 1st diorama.
retiredyank
Visit this Community
Arkansas, United States
Joined: June 29, 2009
KitMaker: 11,610 posts
Armorama: 7,843 posts
Posted: Sunday, June 30, 2013 - 01:24 PM UTC
Keep up the great work! I appreciate step by step posts. Nice job on the beams.
turkeyshot
Visit this Community
New South Wales, Australia
Joined: February 06, 2012
KitMaker: 138 posts
Armorama: 133 posts
Posted: Thursday, July 04, 2013 - 01:00 AM UTC
Cheers Matt. I am glad you like it.
turkeyshot
Visit this Community
New South Wales, Australia
Joined: February 06, 2012
KitMaker: 138 posts
Armorama: 133 posts
Posted: Thursday, August 08, 2013 - 10:57 AM UTC
I have managed to find some time to do a little more work on this build since my last post: the roadway and building are now painted (although I am not happy with the way that the building exterior looks at the moment; this will need to be revisited). I have also added the floorboards and the window and door frames and have scratch-built a small dresser to add extra interest to the interior. However, I have decided to shelve this project for a little while as I work on another build for the Postcard Campaign. I will return to this dio and post up some more progress photos once I have that Campaign out of the way. Thanks for your interest. Cheers.
Tojo72
Visit this Community
North Carolina, United States
Joined: June 06, 2006
KitMaker: 4,691 posts
Armorama: 3,509 posts
Posted: Thursday, August 08, 2013 - 11:08 AM UTC
First dio,outstanding work,keep it coming.
1stjaeger
Visit this Community
Wien, Austria
Joined: May 20, 2011
KitMaker: 1,744 posts
Armorama: 1,727 posts
Posted: Thursday, August 08, 2013 - 05:38 PM UTC

Quoted Text

However, I have decided to shelve this project for a little while as I work on another build for the Postcard Campaign. I will return to this dio and post up some more progress photos once I have that Campaign out of the way. Thanks for your interest. Cheers.


Pity!! I was very much looking forward to seeing progress!!
You're quite a talent, you know!
Hardly ever seen a "first" with such detail!!

Don't forget to post once you're back onto the project!!

Cheers

Romain
Kira_Yamato
Visit this Community
Hanoi, Vietnam
Joined: July 29, 2013
KitMaker: 33 posts
Armorama: 29 posts
Posted: Friday, August 09, 2013 - 04:01 AM UTC
wow,that's a beautiful Diorama you got,sir.I'm building a diorama now,and I have some problem with painting the buildings,Can you show me how

sorry for my english
Kira,
1stjaeger
Visit this Community
Wien, Austria
Joined: May 20, 2011
KitMaker: 1,744 posts
Armorama: 1,727 posts
Posted: Friday, August 09, 2013 - 08:06 AM UTC

Quoted Text

wow,that's a beautiful Diorama you got,sir.I'm building a diorama now,and I have some problem with painting the buildings,Can you show me how

sorry for my english
Kira,


Kira, I sent you a direct message! Check your inbox!

R.
turkeyshot
Visit this Community
New South Wales, Australia
Joined: February 06, 2012
KitMaker: 138 posts
Armorama: 133 posts
Posted: Friday, August 09, 2013 - 12:41 PM UTC
Thanks fellas, that's very nice of you to say. I am very happy with the way that she is looking so far, but to be honest I am only trying out some of the techniques developed and mastered by some of the other members here on the boards. I have just carefully read some of their build logs here on Armorama and other similar sites to see how they do it and then given it a shot. Kind of standing on the shoulders of giants as it were.

As for painting ... I kinda suck at that. That is very nice of you to ask Kira, but as I am still only very new to this hobby, you would be far better placed to ask someone else with much more experience and skill than me. Good luck with it.
Kira_Yamato
Visit this Community
Hanoi, Vietnam
Joined: July 29, 2013
KitMaker: 33 posts
Armorama: 29 posts
Posted: Friday, August 09, 2013 - 01:39 PM UTC
thanks R .I hope It solves my problem
turkeyshot
Visit this Community
New South Wales, Australia
Joined: February 06, 2012
KitMaker: 138 posts
Armorama: 133 posts
Posted: Thursday, August 22, 2013 - 01:19 PM UTC
I know that I said that I was shelving this project for a while ... and I have, but I thought that I would share a couple more photos with you to show the extra work that I said I have already done to it. As I think I mentioned in a previous post, I have since primed, painted, and drybrushed the groundwork and am pretty happy with the way that it now looks. While most of the cobblestones were painted in mid-grey, I painted some in various shades of brown, tan, light grey, and even flesh to add a little more interest and variation. I then applied a coat of Smoke over the cobbles to tie all of the different colours together, and once that was dry, I drybrushed on various browns, tans and Buff to pick out the texture of the stonework. I still need to drop some rubble and debris all over the base and give it a final weather with some pigments, otherwise I am quite happy with the way it now looks.

I have also started slapping some paint on the building. I am pretty happy with the way the interior looks now(short of the application of pigments), but the outside still needs a lot more work. Speaking of the interior, the floorboards, skirting, and door and window frames have all been added with thin strips of balsa. Most of this is now painted, although some bits here and there will need revisiting. I am yet to make the broken shards of glass for the window frames, as these will be one of the last details I expect to add. Oh yeah, and I have also tried my hand at scratch-building a piece of furniture for added interest.

I haven't done anything to this build for a couple of months now, but expect to return to it later in the year once I get some of my other projects finished. Thanks for following this build and for your interest. As always, your thoughts/comments/suggestions are welcomed. Cheers.

PHOTO 25: Overview of painted groundwork


PHOTO 26: Cobblestone and drain detail. Note the subtle tonal difference in the cobbles


PHOTO 27: Painted interior


PHOTO 28: 2nd floor showing floorboard and dresser detail
meaty_hellhound
Visit this Community
Alberta, Canada
Joined: July 23, 2010
KitMaker: 786 posts
Armorama: 753 posts
Posted: Tuesday, August 27, 2013 - 02:12 PM UTC
really great progress and attention to detail on this complex project Jason.

look forward to seeing it all come together. thanks for sharing. cheers
turkeyshot
Visit this Community
New South Wales, Australia
Joined: February 06, 2012
KitMaker: 138 posts
Armorama: 133 posts
Posted: Saturday, August 31, 2013 - 11:47 AM UTC

Quoted Text

really great progress and attention to detail on this complex project Jason.

look forward to seeing it all come together. thanks for sharing. cheers


Thanks Bruce, and thanks for sharing your Jagdpanther dio which inspired this build.
reccymech
Visit this Community
Victoria, Australia
Joined: February 20, 2011
KitMaker: 87 posts
Armorama: 74 posts
Posted: Monday, September 02, 2013 - 12:21 PM UTC
Great work mate.
 _GOTOTOP