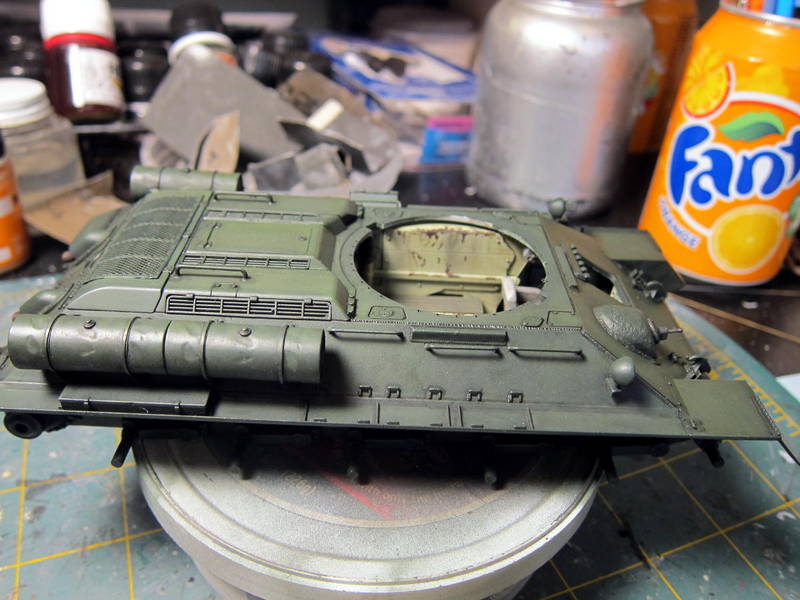
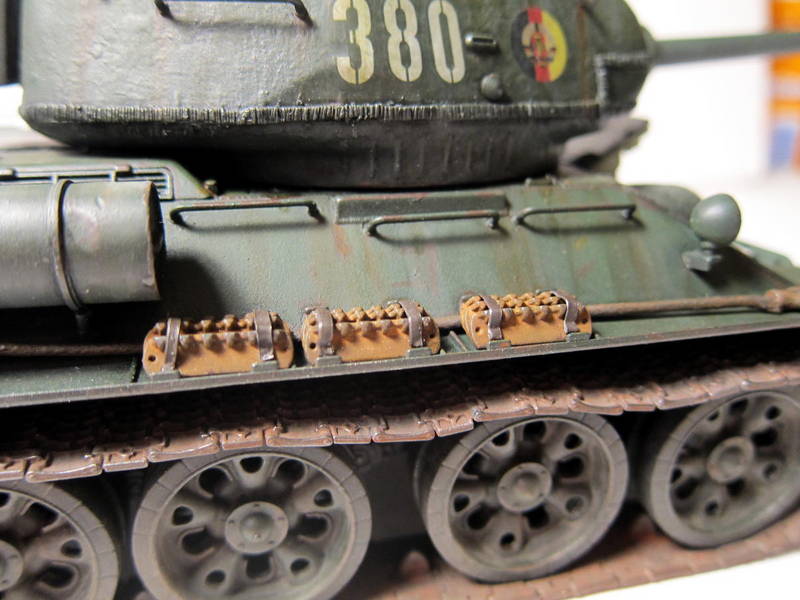
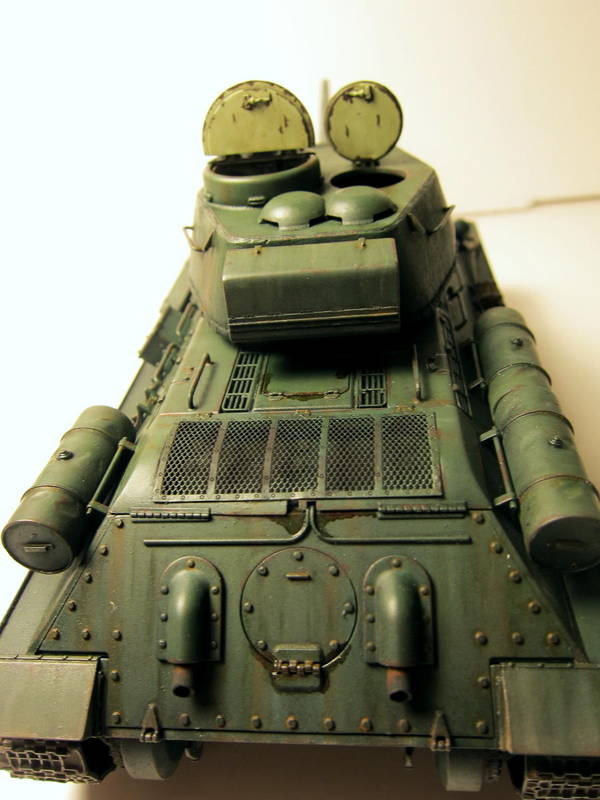
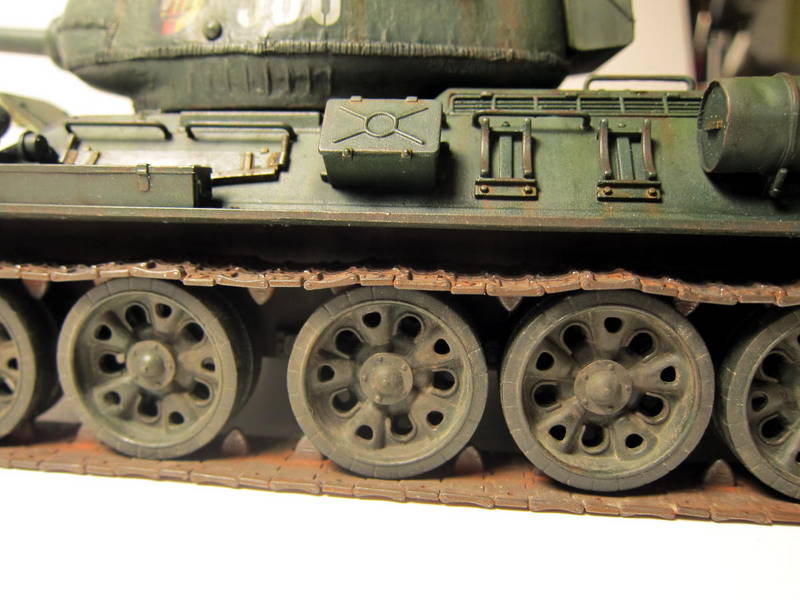
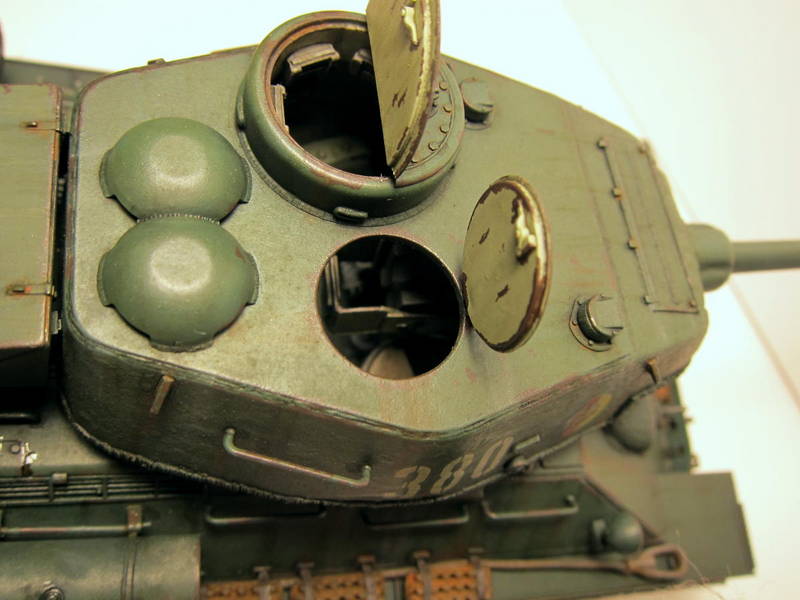
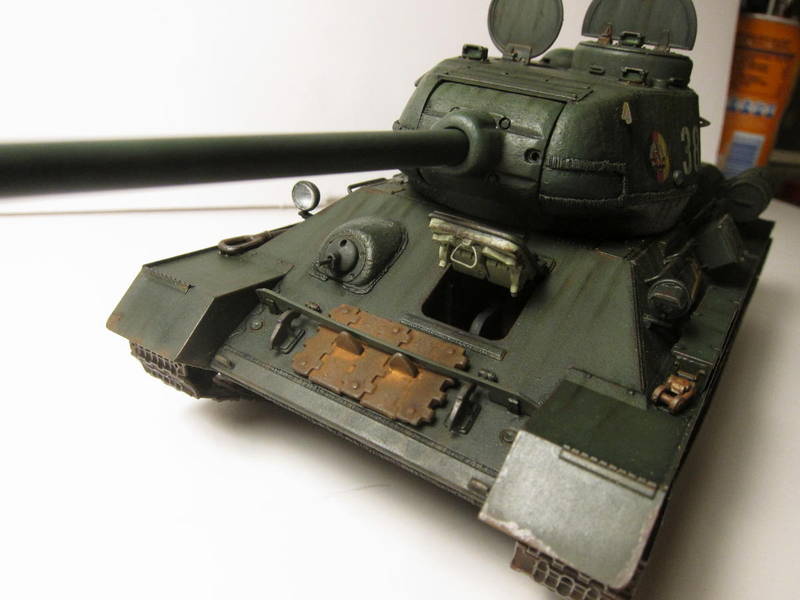
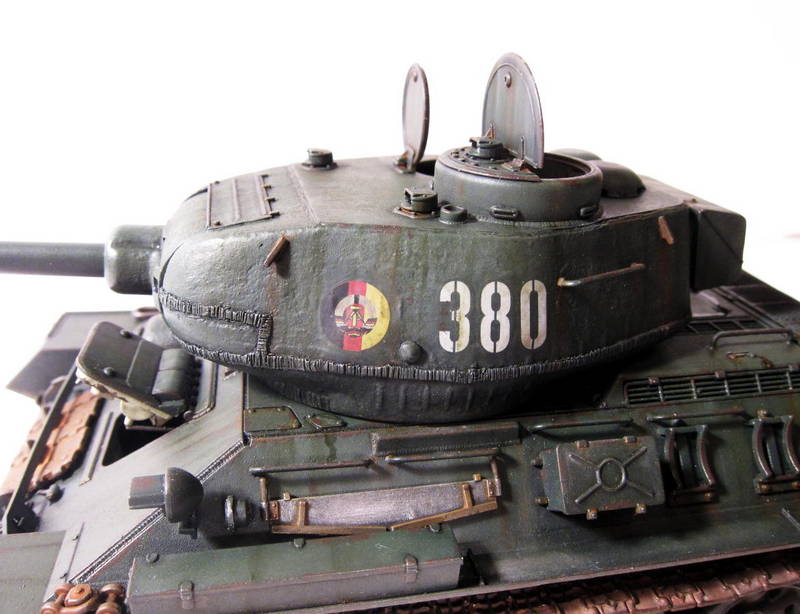
I’ve finally made some time to post some photos of my first couple of armor models since getting back into the hobby early in 2012 after a 8+ year hiatus. I specifically wanted to post my first couple of projects as a follow up to the forum posting I made HERE regarding my first failed attempt at getting a tank model finished. I would really to thank everyone who helped me “see the light” as to the way armor models are painted and weathered these days, as opposed to the ‘90s when I was heavily into the hobby. I’d really like to thank Mike Rinaldi for taking the time in that posting to explain his methods and helping the light bulb flicker on for me in regards to how some of the techniques I’ve used over the decades just don’t cut it anymore for armor.
Anyway, on with the show…
My second completed armor model since the ‘90s is the CyberHobby/Dragon 1/35 T-34/85m. I finished the model to represent an East German tank of the NVA (Nationale Volksarmee). My initial plan was to depict an NVA tank as it would have been in August 1961 when the Berlin Wall went up, but that was way to early for a T-34/85m. I had this kit in my stash and didn’t want to get into spending tons of money on another kit or aftermarket to correct that, so I just went as-is and figure the tank will be from the mid-to-late ’1960s.
The model was almost built OOB, with the exception of the following:
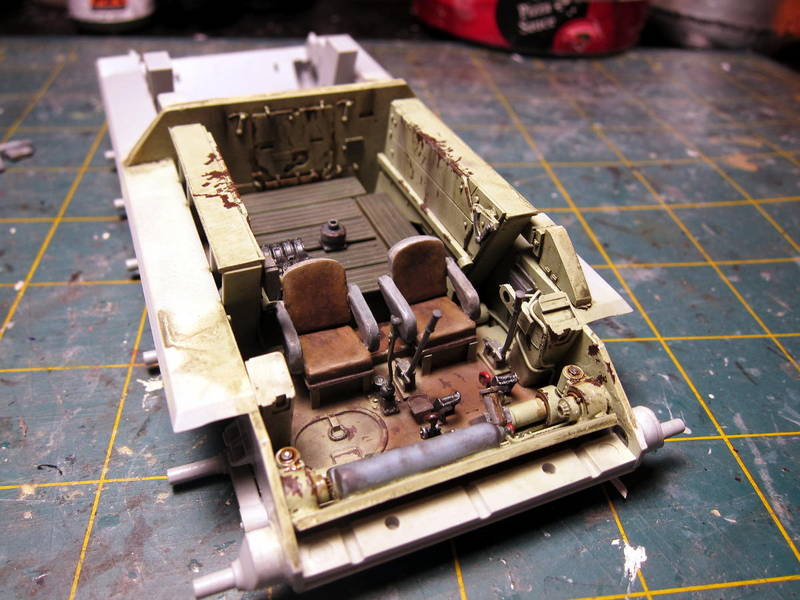
- I added a Verlinden interior set, and added some wiring and plumbing with bits of solder.
- I replaced the nasty kit engine deck grille with an Eduard photoetch piece. It was meant for a Tamiya kit, so it was slightly larger than the grille molded into the Dragon part.
- I scratchbuillt engine louvers to fill the void created by opening up the engine grille.
- I scratchbuilt a splashboard on the glacis plate to reflect NVA T-34s that were so equipped (as most of them seemed to be).
- Added a wire handle to the driver’s hatch.
- Used lead foil strips as tie-downs for the spare track links on the fender, ad the kit parts just snapped in two when trying to bend them into position.
- Attempted to simulate welding along the hull seam with Milliput, but it came out a bit too heavy. Will chalk it up as practice for the next time.
- I added a Verlinden stowage box to the rear of the turret.
I apologize for the less-than-stellar photos. I haven’t had the time nor energy to set up my light kit and tripod, so some point-and-shoot desktop pics are all I have at present. I will be making a vignette base with figures for the model, so will likely take “real” photos when that is finished.
Thanks for looking!
Яusso-Soviэt Forum: Cold War Soviet Armor
For discussions related to cold war era Russo-Soviet armor.
Hosted by Jacques Duquette
T-34/85m Nationalle Volksarmee
Quasimofo
New York, United States
Joined: November 30, 2012
KitMaker: 105 posts
Armorama: 87 posts
Joined: November 30, 2012
KitMaker: 105 posts
Armorama: 87 posts
Posted: Sunday, July 14, 2013 - 02:36 AM UTC
210cav
Virginia, United States
Joined: February 05, 2002
KitMaker: 6,149 posts
Armorama: 4,573 posts
Joined: February 05, 2002
KitMaker: 6,149 posts
Armorama: 4,573 posts
Posted: Sunday, July 14, 2013 - 02:43 AM UTC
Bill- I am not a Soviet armor builder, but your T-34/85 is outstanding. Like the color combination you achieved with the spare track blocs. The chipping and streaks are superb. Great job
DJ
DJ
DerGeist
Ohio, United States
Joined: January 21, 2008
KitMaker: 735 posts
Armorama: 707 posts
Joined: January 21, 2008
KitMaker: 735 posts
Armorama: 707 posts
Posted: Sunday, July 14, 2013 - 02:56 AM UTC
Love it. I love building NVA stuff, I've got 5 NVA AFV's in my collection so far and working on a 6th right now. Do you have any pics of NVA 85M's? I don't think I've ever seen a pic of one. All the ones I have appear to be pre-M models.
Erik
Erik
Gorizont
Sachsen, Germany
Joined: November 28, 2007
KitMaker: 1,462 posts
Armorama: 1,289 posts
Joined: November 28, 2007
KitMaker: 1,462 posts
Armorama: 1,289 posts
Posted: Friday, July 19, 2013 - 05:45 AM UTC
Looks great so far!
Nice details and painting + weathering!
Make a diorama for it!
greetings... Soeren
PS: I´m from eastern germany!
Nice details and painting + weathering!
Make a diorama for it!
greetings... Soeren
PS: I´m from eastern germany!
Tank_builder
Ohio, United States
Joined: January 06, 2012
KitMaker: 394 posts
Armorama: 351 posts
Joined: January 06, 2012
KitMaker: 394 posts
Armorama: 351 posts
Posted: Friday, July 19, 2013 - 06:54 AM UTC
Everything on this build looks amazing. Great overall job.
-Seth
-Seth
pablo_g
Wojewodztwo Slaskie, Poland
Joined: October 21, 2003
KitMaker: 529 posts
Armorama: 500 posts
Joined: October 21, 2003
KitMaker: 529 posts
Armorama: 500 posts
Posted: Friday, July 19, 2013 - 07:53 AM UTC
Your T-34 look very nice, I love it. I like armor behind the Iron Curtain. Details are to die for.
Paweł
Paweł
Quasimofo
New York, United States
Joined: November 30, 2012
KitMaker: 105 posts
Armorama: 87 posts
Joined: November 30, 2012
KitMaker: 105 posts
Armorama: 87 posts
Posted: Sunday, July 21, 2013 - 12:19 PM UTC
Thank you all for the kind words! I am starting to work on some figures to add, just a few crew figures sitting around the tank, probably reading the morning edition of Neues Deutschland.
I've found several photos on the Bundesarchiv site that have given me some ideas.
Quasimofo
New York, United States
Joined: November 30, 2012
KitMaker: 105 posts
Armorama: 87 posts
Joined: November 30, 2012
KitMaker: 105 posts
Armorama: 87 posts
Posted: Sunday, July 21, 2013 - 12:24 PM UTC
Quoted Text
Love it. I love building NVA stuff, I've got 5 NVA AFV's in my collection so far and working on a 6th right now. Do you have any pics of NVA 85M's? I don't think I've ever seen a pic of one. All the ones I have appear to be pre-M models.
Erik
Hi Erik-
Yeah...photos of the NVA T-34/85m seem to not exist. All the ones I found were also pre -M tanks...the only actual -M photos I found were of models that other people had built.
The only T-34/85m photo I have is one I actually took in November 2010 at the Deutsche-Russisches Museum at Berlin-Karlshosrt. They have one at the entrance of the museum. But because I wasn't building models at that time, I only took one quick, touristy picture of it. Now I really wish I taken more.
I have no idea if this was an NVA tank, but I would guess it probably was.
I've also been wanting to build more DDR armor and have a BTR-70 that I'm planning to start soon.
Posted: Sunday, July 21, 2013 - 11:26 PM UTC
Nice T34 Bill. Great job on the interior.
retiredyank
Arkansas, United States
Joined: June 29, 2009
KitMaker: 11,610 posts
Armorama: 7,843 posts
Joined: June 29, 2009
KitMaker: 11,610 posts
Armorama: 7,843 posts
Posted: Monday, July 22, 2013 - 12:57 AM UTC
Superb work! I rarely build Russian armor, but that interior is outstanding! And, with a great exterior to match!
DerGeist
Ohio, United States
Joined: January 21, 2008
KitMaker: 735 posts
Armorama: 707 posts
Joined: January 21, 2008
KitMaker: 735 posts
Armorama: 707 posts
Posted: Monday, July 22, 2013 - 04:53 AM UTC
Quoted Text
Hi Erik-
Yeah...photos of the NVA T-34/85m seem to not exist. All the ones I found were also pre -M tanks...the only actual -M photos I found were of models that other people had built.
The only T-34/85m photo I have is one I actually took in November 2010 at the Deutsche-Russisches Museum at Berlin-Karlshosrt. They have one at the entrance of the museum. But because I wasn't building models at that time, I only took one quick, touristy picture of it. Now I really wish I taken more.
I have no idea if this was an NVA tank, but I would guess it probably was.
I've also been wanting to build more DDR armor and have a BTR-70 that I'm planning to start soon.
Haha I took that exact picture when I was there last summer. I doubt it was an NVA tank, but who knows. I don't think they ever received 34M's though, never seen a picture of one. All the T-34's I've seen in the Bundesarchiv appear to be WWII models. Having never seen a picture of one isn't a good defense though. Someone on another forum was trying to convince me the NVA received ASU-85's and I said the same thing and then he showed me an arms trade ledger and they they were listed as being sold to East Germany. Still don't know if I believe that one...
Anyway, I look forward to future NVA build from you.
Erik
Gorizont
Sachsen, Germany
Joined: November 28, 2007
KitMaker: 1,462 posts
Armorama: 1,289 posts
Joined: November 28, 2007
KitMaker: 1,462 posts
Armorama: 1,289 posts
Posted: Monday, July 22, 2013 - 08:58 AM UTC
Quoted Text
The only T-34/85m photo I have is one I actually took in November 2010 at the Deutsche-Russisches Museum at Berlin-Karlshosrt. They have one at the entrance of the museum. But because I wasn't building models at that time, I only took one quick, touristy picture of it. Now I really wish I taken more.
I have no idea if this was an NVA tank, but I would guess it probably was.
Hi Bill, I don´t think that this T-34 was a german (Nationale Volksarmee) one.
Take a look at the russian insignias, which said to me "for the victory" or something like that.
It´s a russian tank.
greetings...
Soeren
Quasimofo
New York, United States
Joined: November 30, 2012
KitMaker: 105 posts
Armorama: 87 posts
Joined: November 30, 2012
KitMaker: 105 posts
Armorama: 87 posts
Posted: Monday, July 22, 2013 - 02:01 PM UTC
The Russian victory slogan isn't an original, and neither was the paint job on this tank. Standing next to it, you could see It was obviously repainted for display at the museum. That's what makes me think it may have been an NVA tank that was "rescued" from the scrap pile...but who can know for sure.
The IS-2 and SU-85 they had out in back looked to be repainted and restored as well. I really wish I had more pictures of those.
Quasimofo
New York, United States
Joined: November 30, 2012
KitMaker: 105 posts
Armorama: 87 posts
Joined: November 30, 2012
KitMaker: 105 posts
Armorama: 87 posts
Posted: Tuesday, July 23, 2013 - 09:24 AM UTC
Thanks to all for the kind words on this build.
And thanks for the comments on the interior. I'm really happy with how it turned out. Truth be told, it's not as satisfying as the interior from my first attempt at building one of these T-34s. On the first go, I did a scratchbuilt interior that I was really, really happy with. It wasn't exact or 100% accurate by any means, but it had the right look and feel and came out far better than I was expecting. But as sometimes happens, that build turned into a disaster near the end and the whole kit was abandoned and tossed into the spare parts box.
For the second attempt, I opted to go with the resin Verlinden set. I got it for $15 and that seemed a fair price to pay to avoid spending yet another two weeks on scratchbuilding a new interior. I had started the kit while waiting for the new interior set to arrive, and didn't realize that Verlinden has the side fuel tanks as resin pieces that replace some of the kit suspension spring parts. By the time I got the resin set, I'd already had the lower hull well started and couldn't use the Verlindn pieces. So, I ended up scrtachbuilding the side fuel tank section to match the resin pieces as best I could.
I also added a little bit of wiring around the driver's instruments with some bits of solder.