

Hosted by Darren Baker
foamboard and plaster question

LancashireFusilier

Joined: August 24, 2011
KitMaker: 14 posts
Armorama: 13 posts
Posted: Tuesday, October 22, 2013 - 06:21 AM UTC
I am planning on buying some foam board to make a building out of,but was wondering when i apply the plaster to the wall of the building do i take off the paper backing....i'm planning on using plaster of paris...your help in this matter is much appreciated and thanx for any help given

sabre1866

Joined: February 12, 2009
KitMaker: 93 posts
Armorama: 89 posts

Posted: Tuesday, October 22, 2013 - 06:49 AM UTC
Hi Stephen,
I'm not an expert but, beware when the plaster dries it will contract and warp your work and probably render it unusable.
I tried it with 2 inch insulation board, i was thrilled with the result, but when I pulled it off the shelf to use
Arrrgh!. Back to square One
Moral, always experiment to avoid heartache. Hope this helps. Rog.

Marty

Joined: June 16, 2002
KitMaker: 2,312 posts
Armorama: 1,054 posts

Posted: Tuesday, October 22, 2013 - 09:25 AM UTC
Foam board will warp. I would recommend using plaster board instead. In the US we call it sheetrock. You can remove the paper backing and you are left with a nice sheet of plaster.


parrot

Joined: March 01, 2002
KitMaker: 1,607 posts
Armorama: 1,581 posts
Posted: Tuesday, October 22, 2013 - 09:46 AM UTC
Hi Stephen,
I've worked with foamboard most of my adult life.
I constantly use it for buildings since I got back into modelling.
First,always use a sharp tipped blade.It may take a lot of breaking it off,but you get a nice clean cut were a blade getting dull will tend to rip the foamboard.All the cut edges ie:windows and doors should be slightly sanded with fine paper.Don't remove the paper backings.If you do your left with a frail piece of styrofoam.No sense in buying foamboard.
The next and most important is to prime it all with a laytex water based paint completly,all sides and edges.If not all sides it will warp on the painted side and if not water based the paint will eat the inner foam.Once the paint dries your good to add plaster of paris.
Here's some samples all foamboard using polyfilla on the walls.
Hope this helps you out.
Tom  .
.


Sorry about the repeats.Photobucket is starting to be a pain to use.
I've worked with foamboard most of my adult life.
I constantly use it for buildings since I got back into modelling.
First,always use a sharp tipped blade.It may take a lot of breaking it off,but you get a nice clean cut were a blade getting dull will tend to rip the foamboard.All the cut edges ie:windows and doors should be slightly sanded with fine paper.Don't remove the paper backings.If you do your left with a frail piece of styrofoam.No sense in buying foamboard.
The next and most important is to prime it all with a laytex water based paint completly,all sides and edges.If not all sides it will warp on the painted side and if not water based the paint will eat the inner foam.Once the paint dries your good to add plaster of paris.
Here's some samples all foamboard using polyfilla on the walls.
Hope this helps you out.
Tom
.


Sorry about the repeats.Photobucket is starting to be a pain to use.
LancashireFusilier
Joined: August 24, 2011
KitMaker: 14 posts
Armorama: 13 posts
Posted: Tuesday, October 22, 2013 - 09:11 PM UTC
Great...thanks for all the replies...i also read on a website to use a mix of pva glue with the plaster ...does anyone know more about this?...the Iraq diorama looks great by the way
LancashireFusilier
Joined: August 24, 2011
KitMaker: 14 posts
Armorama: 13 posts
Posted: Tuesday, October 22, 2013 - 09:15 PM UTC
Plaster board is something i am still experimenting with ...but unfortunately i've had failed results...every time i do it though i learn something,so i ain't gonna give up on it yet...thanks for the reply

dioman13
Joined: August 19, 2007
KitMaker: 2,184 posts
Armorama: 1,468 posts

Posted: Wednesday, October 23, 2013 - 01:19 AM UTC
Hey Stephen, another way that I use all the time is to pour a plaster block in a desired size cookie pan. Make sure the pan is flat and not buldged out from oven use. I mix a large enough amount of plaster of paris with water, a good amount of white glue and a shot of liquid dish soap. The glue helps hold it together and gives it varying strong bond. Be carefull because the more glue, the harder it becomes, making it harder to cut and scribe into. Been there and done that, so hard I still break peices for debri with a hammer. The dish soap just helps it flow evenly into the cookie sheet. After it dries a day or two, it will pop out but place a used towel under it to avoid contact breakage. Any air bubbles can be smoothed out and filled in with plaster or putty. Then I mark the walls with a small right angle and such and cut them out. Doors and windows are cut out and sanded smooth. Then you can scribe in the stone/brick patterns or give it a light coat of whie glue and sprinkle on baby sand for texture. Baby sand is the type you would use in a sand box for childeren. A real good tacky glue will hold the walls together and on the base. Any gaps between the walls can be filled with a thick mix of plain plaster. If you want a plastered front you can remove a small thickness with sand paper or like I do a small chisel blade and add your stone/brick detail. If you want damage, just break the area like a corner or rough cut holes and then add the detail like mortor joints and stone/brick surface, then glue on baby sand to the edge. You can add cracks with various depths for ths damage look also. Give it all a good base coat because it will suck in the paint, use the water base type that you find on sale real cheap in places like Hobby lobby/Michales, or art stores. After that just paint what you desire and you have a one of a kind building. You will have to make sure you don't fill the cookie sheet all the way so you can keep a proper scale thickness. Just another way for stone buildings which I prefer and works out quite well. I have a dio with two large buildings I have been working on and off for 16 years and have had no breakage of the plaster buildings. Even moved it on the back seat of my car from New York to Indiana with no breaks. Some thick tackey glue will hold on any timber for flooring and roofing. Hope this can be of help for your building of buildings. By the way Tom, real nice results with your buildings. bob d.

Biggles2
Joined: January 01, 2004
KitMaker: 7,600 posts
Armorama: 6,110 posts

Posted: Wednesday, October 23, 2013 - 02:31 AM UTC
It might be a better idea to scribe in the brick or stone courses before the plaster has completely set. It is a lot easier to scribe plaster while the surface is still a little bit soft. "Do it right, or be up all night!" 
parrot
Joined: March 01, 2002
KitMaker: 1,607 posts
Armorama: 1,581 posts
Posted: Wednesday, October 23, 2013 - 09:25 AM UTC
That's a great idea Bob,
I'm going to take a shot at that.
Do you use anything inparticular to cut the windows and doors?
And thanks for the comment.
Tom
I'm going to take a shot at that.
Do you use anything inparticular to cut the windows and doors?
And thanks for the comment.
Tom

adamant

Joined: March 25, 2009
KitMaker: 152 posts
Armorama: 119 posts
Posted: Wednesday, October 23, 2013 - 09:51 AM UTC
I've read of another method where by white clue is used to harden the foamboard before Das clay is used to provide a stuccoed wall or the base on which to scribe brick or stone work. Hope that helps.

exer

Joined: November 27, 2004
KitMaker: 6,048 posts
Armorama: 4,619 posts

Posted: Wednesday, October 23, 2013 - 11:51 AM UTC
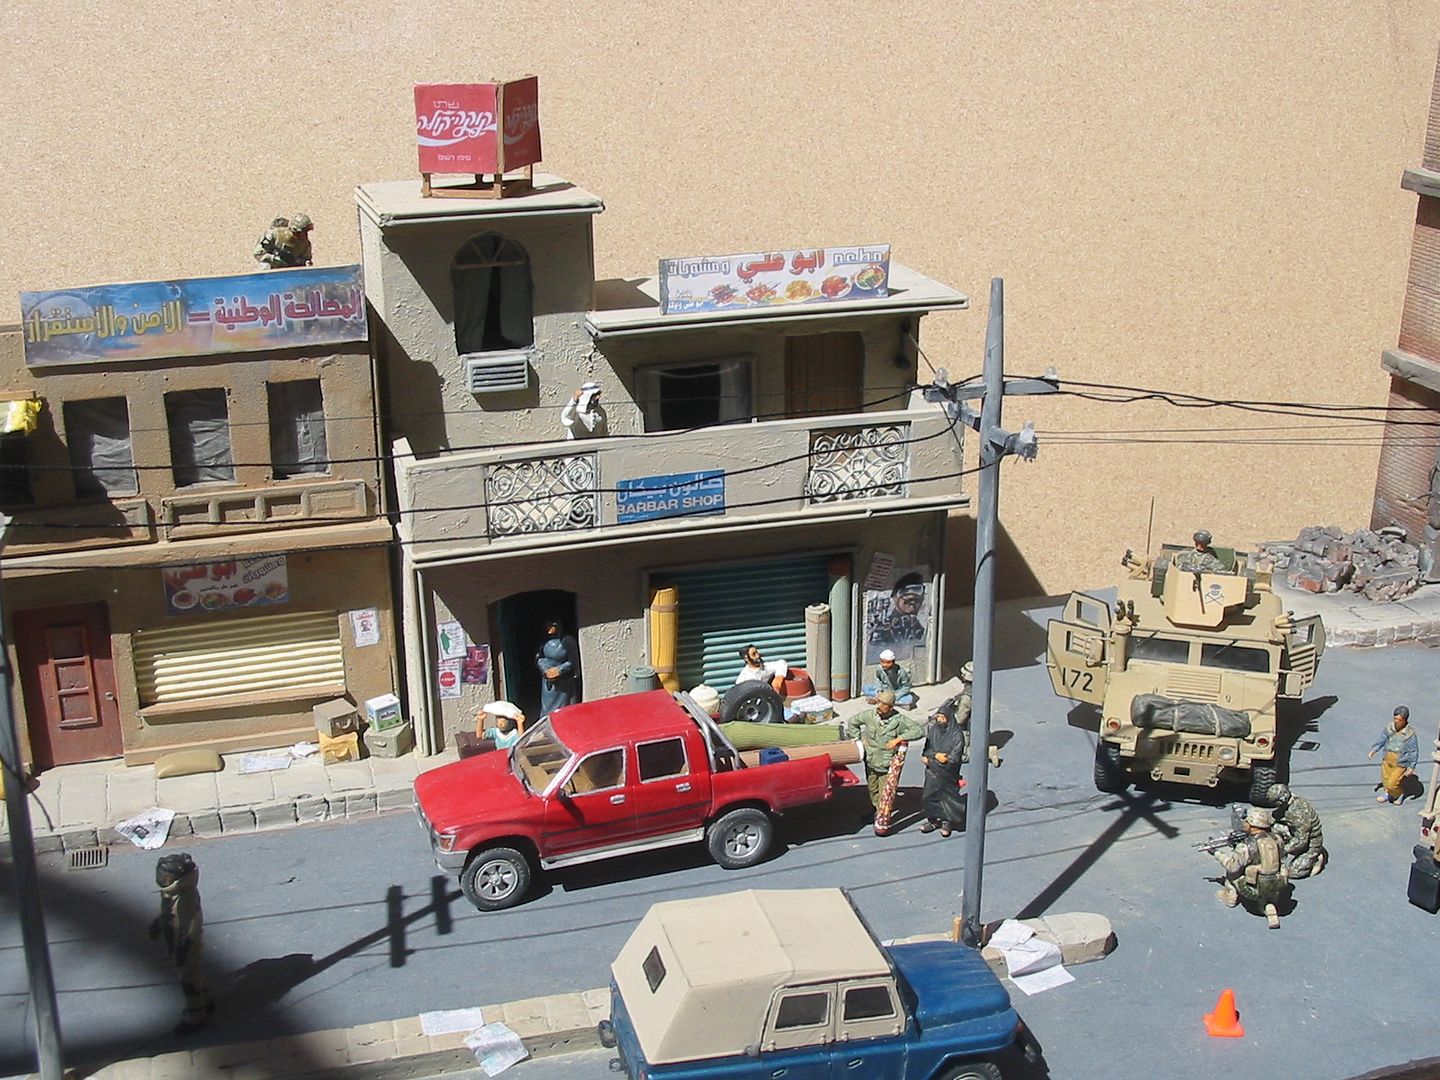
I used a variation of Bob's method for all the walls, buildings and groundwork in this dio


Roll out a sheet of plasticene to about 1/2- 3/4 cm thick cut it to the shape of your wall. Now use a brick shaped object to impress whatever brick or stone pattern you want. I use different sized brick shapes carved from sprue and wood. When you've finished making your pattern build a retaining wall around it. You now have a mould of the brick wall. Mix up some plaster of Paris adding a suitable brick coloured water based paint. Pour the plaster mix into the mould and shake it gently to make any air bubbles rise out. When it dries you can peel off the plasticene and there you have your brick wall. If you're careful you can reuse the mould a few times. The method is adapted from the book "Roy Porter's Model Buildings Masterclass.
Roll out a sheet of plasticene to about 1/2- 3/4 cm thick cut it to the shape of your wall. Now use a brick shaped object to impress whatever brick or stone pattern you want. I use different sized brick shapes carved from sprue and wood. When you've finished making your pattern build a retaining wall around it. You now have a mould of the brick wall. Mix up some plaster of Paris adding a suitable brick coloured water based paint. Pour the plaster mix into the mould and shake it gently to make any air bubbles rise out. When it dries you can peel off the plasticene and there you have your brick wall. If you're careful you can reuse the mould a few times. The method is adapted from the book "Roy Porter's Model Buildings Masterclass.

Biggles2
Joined: January 01, 2004
KitMaker: 7,600 posts
Armorama: 6,110 posts
Posted: Thursday, October 24, 2013 - 03:04 AM UTC
To take the concept further, I used a section of brick embossed plastic sheet to make a silicon mold about 6" x 8". I used Lego bricks to make a shallow mold box. Using enough silicon can be pricey, but you end up with a strong mold which is reusable. By placing window- and door-sized wooden blocks in the mold before pouring plaster, I can pour various wall sections with windows and/or doors, or just plain brick walls. The castings are one-sided, but I got around that by glueing two wall sections back-to-back so there is brick work on both sides. Any failed attempts become battle-damage and rubble. 
 |

WEB HOSTING BY


Copyright ©2021 Armorama and Kitmaker Network, a subsidiary of Silver Star Enterprises
All Rights Reserved. Please read our Conditions of Use and Privacy Policy.
All Rights Reserved. Please read our Conditions of Use and Privacy Policy.