[Picture Links Corrected](started on 09SEP16)
Well, I screwed up. It took me awhile to figure out what I did wrong, but I realized what I did. Actually, a few wrongs.
In June, I masked the Hull and the Hull Top Plate with Silly Putty and wide masking tape for the JGSDF Brown Camouflage pattern following the instructions pattern for Scheme 1 (Schemes 4 & 6 also following the same standard pattern). I tried painters tape, but it wasnt sticking to the Silly Putty (Mistake #1).


I also placed the Road Wheels, Drive Sprocket and Support Rollers that needed to be painted the JGSDF Brown Camouflage on the ends of tooth picks.

So on the morning of a Saturday Club Build Day (04JUN16), I rushed to airbrush the Tamiya JGSDF Brown (XF-72). I thought I was adding my premixed 50/50 Tamiya Lacquer Thinner (X-20A) & commercial Lacquer Thinner, which I had in a clear 35mm case. I added this with the paint and sprayed it onto the masked hull parts. After drying, there were still some shiny spots (Clue #1). Oh well, not that big of problem, since I plan to Flat Coat the model after adding decals and washes.

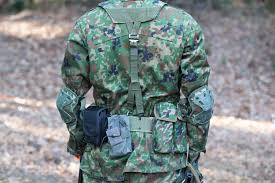
I took my freshly painted model to the Club Build Day, and while there removed the masking tape and Silly Putty. Besides the shiny spots, I also noticed that some of the masked edges of the Brown were thick and raised (Clue #2). I also noticed that the masking tape had left some glue residue, but I figured this can be removed with tacking with tape (like removing lint from cloths). To top it all off, the Silly Putty left a residue mark in the JGSDF Light Green paint, which I had read that its NOT supposed to do. So heres how the hull camo looked:


Needless to say, I was a bit frustrated, so I walked away from the build for a while.
Earlier I forgot to take some pictures of the interior after painting and applying a wash, so here are a few:


Im not trying to make it accurate or even all that realistic, just that you see some details around the figures that will be in the hatches.
After about a month or so, I was looking at something on my MESSY work bench and noticed a clear plastic 35mm Film Canister with a clear liquid in it. And it had 50/50 Thinner Mix marked in it (Clue #3!). Then I suddenly realized, after using my vast set of deductive powers, that the clear plastic 35mm Film Canister containing a clear liquid that I had used to thin the Tamiya JGSDF Brown, was actually my clear plastic 35mm Film Canister containing Pledge Future. #$@#$%#$^!! I didnt THIN the brown paint, I THICKENED it AND made it gloss!

More time to step away and cool off. Almost two more months.
In the middle of September, I was finally ready to take another stab at trying to finish up this LONG build. I have looked at the paint finish, and it appears that the residue mark in the JGSDF Light Green paint seems to have almost disappeared.
I didnt like how the clear plastic that I had glued into the Drivers Goggles using Testors Canopy Glue had turned out (one side was sticking out of the goggles frame), so I removed it to try again.

[BREAK]
Actually, I was mistaken. Its been THREE more months, and Ive done next to nothing on this build, so I obviously wasnt ready to start back on it. I guess Im still kicking myself for making such a dumb mistake after working for so long on this build.
I did purchase a bottle of Deluxe Materials'
Strip Magic to possibly remove the bad sections of paint. Or all of the paint. The main advantage Ive read about for this product is it is a gel consistency that you can apply to specific areas with a q-tip and then remove after a few minutes, thus only stripping targeted areas of paint from the plastic.

What to do, what to do? Have any of you used Strip Magic for a similar situation? Or should I just attempt to sand down the raised edges of brown paint and continue? Im not worried about the gloss, as I plan to use a final spray of Testors Dullcoat.