Hi All,
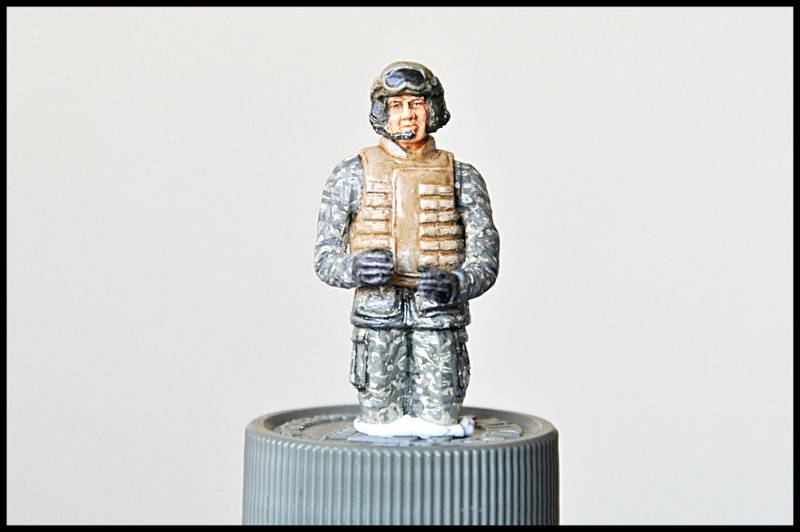
This is my first attempt at painting an ACU uniform in 1/35. My guinea pig is to be the driver of the Stryker M1131 FSV that I am currently building for the Trumpeter Campaign. Given that only his head will stand above the level of the hull, and that will be hidden behind a windshield, he makes a perfect model for my first attempt as he will scarcely be visible in the finished build.
At a loss of how to attempt this I studied the amazing work of Calvin Tan, after which I wasn't so sure if I was inspired or intimidated; perhaps a little of both. I then found Mario Matijasic's fantastic tutorial, which I have attempted here. Although, sad to say, my end result is a very very poor cousin to Mario's (in fact, I am not sure if they are even related). While it is certainly far from great, it does look reasonably convincing from half a metre away, and mercifully will be barely visible once seated in the FSV.
What do you think? How did I do? I'd love to hear your thoughts, criticisms and and suggestions. Any ideas on what I can do to improve the other 2 figures which I will also paint? His two companions will be much more visible and so will hopefully look better than this guy.
I look forward to hearing from you.
Figures
Military figures of all shapes and sizes.
Hosted by Darren Baker, Mario Matijasic
1st attempt at painting ACU
turkeyshot
New South Wales, Australia
Joined: February 06, 2012
KitMaker: 138 posts
Armorama: 133 posts
Joined: February 06, 2012
KitMaker: 138 posts
Armorama: 133 posts
Posted: Saturday, October 26, 2013 - 11:07 AM UTC
HeavyArty
Florida, United States
Joined: May 16, 2002
KitMaker: 17,694 posts
Armorama: 13,742 posts
Joined: May 16, 2002
KitMaker: 17,694 posts
Armorama: 13,742 posts
Posted: Saturday, October 26, 2013 - 11:26 AM UTC
Looks pretty good. One thing though, the US Army doesn't use coyote brown IBAS vests, the USMC uses them. The vest should also be in ACU camo. Also, is the figure actually wearing ACUs? I don't see the upper arm pockets on him.
turkeyshot
New South Wales, Australia
Joined: February 06, 2012
KitMaker: 138 posts
Armorama: 133 posts
Joined: February 06, 2012
KitMaker: 138 posts
Armorama: 133 posts
Posted: Saturday, October 26, 2013 - 07:49 PM UTC
Hey Gino, thanks for your comments. You are right: there are no arm pockets on this figure. Thanks for the heads up on the vest. I wanted to paint it coyote brown to add a little more colour interest and to reduce the amount of camp that I needed to paint, but I do see your point. I might paint the other 2 with ACU vests. I was hoping not to, but for the sake of accuracy...
Cheers.
Cheers.
18Bravo
Colorado, United States
Joined: January 20, 2005
KitMaker: 7,219 posts
Armorama: 6,097 posts
Joined: January 20, 2005
KitMaker: 7,219 posts
Armorama: 6,097 posts
Posted: Sunday, October 27, 2013 - 04:36 AM UTC
First attempt? Hell, that would even be a good fifth attempt for me.
As for the coyote - I would have normally said SF units have always had the coyote body armor, but that really doesn't pertain to your Stryker crewman. Or does it?
AS chance would have it, I had this photo in my collection because of - well let's see if you can see what it is. But it also shows the diversity of what gets worn on the battlefield:
So did you see that it was? The dude's sporting a twenty round mag. Not something you see every day.
At any rate, there or enough instances of non SF coyote body armor and equipment use, I'd say you could go with it, particularly if it breaks up the monotony of the uniform. And since your figure has no upper pockets, as Gino pointed out, for one of your figures you could go with the DCU uniform with the BDU patterned IBA as pictured at the very bottom - arguably much easier to paint.
Posted: Sunday, October 27, 2013 - 05:49 AM UTC
Specialist Burns really has me worried... ( second photo down). Why would you go into combat all high speeded out with an M-4 rockin an ACOG, with the classical TWENTY round mags???? Someone please tell me I am missing something here...?
Jason, your ACU hand painting makes me jealous! aside from the already mentioned uniform ( no ACUs have waist pockets, the figure is molded for BDU or DCUs), I think it looks great, and in the long run, hey, maybe hes Canadian LOL
turkeyshot
New South Wales, Australia
Joined: February 06, 2012
KitMaker: 138 posts
Armorama: 133 posts
Joined: February 06, 2012
KitMaker: 138 posts
Armorama: 133 posts
Posted: Sunday, October 27, 2013 - 09:27 AM UTC
Thanks to all for your responses. I recognise that these guys are not supposed to be sporting ACU (as noted by the lack of pockets on the arms and the inclusion of front pockets), but I think that I'll stick with it nonetheless. I can add the pockets to the sleeves, and given that the figures will all be standing in hatches, you will not see the lower pockets when it is done.
Robert - thanks for the praise and for the excellent photos! Up until seeing those I was a little worried that I was going to have to paint the vests in ACU as well, which, I can assure you would have been a pain in the butt!
Brian - thanks for the kind words and the info mate.
I'll post some more pics once I paint up the other 2.
Cheers.
Posted: Sunday, October 27, 2013 - 10:37 AM UTC
Jason, can you let us in on how you did it? I would like to try and do the same thing here. I have used ACU decals before, but they are not to my satisfaction.
Thai_Brush
Bangkok, Thailand / ไทย
Joined: March 05, 2013
KitMaker: 10 posts
Armorama: 10 posts
Joined: March 05, 2013
KitMaker: 10 posts
Armorama: 10 posts
Posted: Monday, October 28, 2013 - 03:23 AM UTC
well done///
try to get some detail on the uniform.it will look perfect^^
parrot
Ontario, Canada
Joined: March 01, 2002
KitMaker: 1,607 posts
Armorama: 1,581 posts
Joined: March 01, 2002
KitMaker: 1,607 posts
Armorama: 1,581 posts
Posted: Monday, October 28, 2013 - 09:03 AM UTC
Great job,It took me a lot more than once to even come close.Just tried my first set of multi camo.Thought it would be easier,but maybe only by a small amount.
Tom
Tom
turkeyshot
New South Wales, Australia
Joined: February 06, 2012
KitMaker: 138 posts
Armorama: 133 posts
Joined: February 06, 2012
KitMaker: 138 posts
Armorama: 133 posts
Posted: Monday, October 28, 2013 - 11:29 AM UTC
Thanks for the kind words fellas!
Brian - Credit for the technique goes to Mario Matijasic (aka Maki). You can see his excellent tutorial HERE. If you feel that you must attempt ACU, I definitely recommend reading Maki's thread first.
I use Tamiya acrylics for all of my painting. For the base colour I used Deck Tan (XF-55); the first pattern colour was RLM Grey (XF-22); and the darker pattern was a mix of RLM Grey and a little Nato Black (XF-69). I used the smallest brush that I have (5/0) to paint on the patterns and a sharpened toothpick to add the pixels (although I did get a little impatient with this and it would no doubt benefit from more pixelation and patience).
Pung - Thank you.
Tom - Thanks mate, I look forward to seeing your multicam.
1stjaeger
Wien, Austria
Joined: May 20, 2011
KitMaker: 1,744 posts
Armorama: 1,727 posts
Joined: May 20, 2011
KitMaker: 1,744 posts
Armorama: 1,727 posts
Posted: Tuesday, October 29, 2013 - 03:13 AM UTC
Quoted Text
well done///
try to get some detail on the uniform.it will look perfect^^
Great job Jason! Difficult to say the least...but Pung is right (for the other 2 figs f.ex.).
Put in some dark outlines and shadows in judicially placed locations (taking original photos as a ref guide), and if you dare (I don't very often ) you can put in some highlights too (not easy in camo I know ).
All this helps to better define elements (pockets f.ex.) on the uniform
I wish you good luck!
Keep up the great job m8!!
Cheers
Romain