

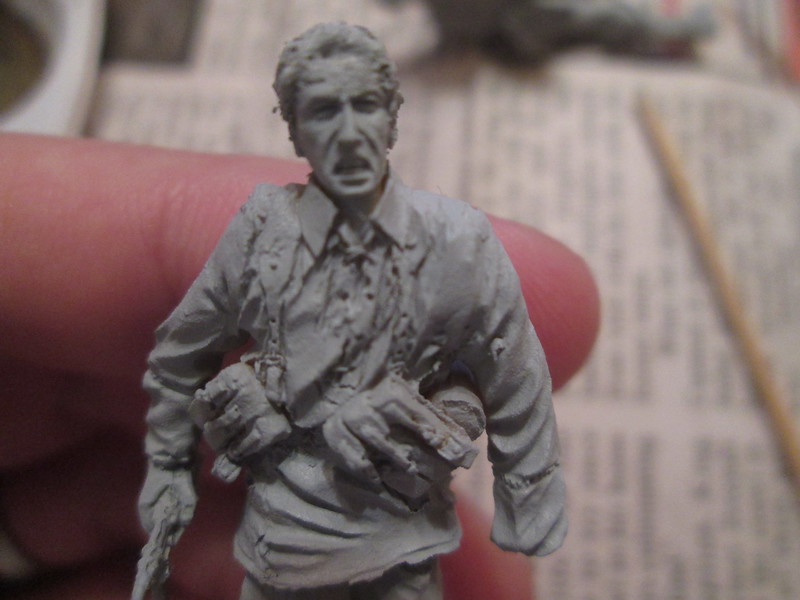
I'm doing a vignette that's got four SS soldiers, 3 in camouflage smocks. I've painted oak leaf a few times before, but I wondered how anyone else does it? The figures are resin and the detail makes me shiver, so I'm terrified I'll foul it up if I'm not careful. So if you've got any tips or a particular way you do it, I'd love to hear about it. Just want to know a few other approaches to it before some new paints arrive in the mail. The paints I'm using are all Vallejo, and I should be covered for any colors I need.
Thanks a lot!
-Conor
AFV Painting & Weathering
Answers to questions about the right paint scheme or tips for the right effect.
Answers to questions about the right paint scheme or tips for the right effect.
Hosted by Darren Baker, Matthew Toms
How do you paint oak leaf?

panzerconor

Joined: February 08, 2012
KitMaker: 1,271 posts
Armorama: 1,253 posts
Posted: Friday, November 01, 2013 - 04:51 PM UTC

rossgary

Joined: July 12, 2011
KitMaker: 184 posts
Armorama: 107 posts

Posted: Friday, November 01, 2013 - 07:18 PM UTC
Hi Conor, this should sort you out: http://www.timelinesforum.com/index.php?page=oakleaf1
Good luck mate!
Gary
Good luck mate!
Gary
SdAufKla
Joined: May 07, 2010
KitMaker: 2,238 posts
Armorama: 2,158 posts

Posted: Saturday, November 02, 2013 - 02:09 AM UTC
Thanks for the link, Gary. That's a nicely done SBS.
Connor, I would add a couple of things to your general technique:
One is to prime your figure with either flat white or a very light gray. Use an airbrush for this primer coat to keep it thin.
Next, when using Vallejo Model Color paints, you need to thin them quite a bit and use two or three coats to get complete coverage. Don't try to use them straight from the bottle or only thinned enough to cover in a single coat. If you do, you'll get a ton of brush marks and the paints will hide the details. This is especially true for camouflage patterns where the spots and blobs can actually build up on top of each other and create a bumpy texture when dry.
For large areas, be sure to let the first coat of paint dry before you add the next, or your brush can pull up spots of the partially dried lower layers making blobs and globs in your finished paint job.
In the SBS, when the painter was talking about adding highlights with a little Sunny Skin Tone mixed with the base colors, these highlights are applied using even thinner paint - thinned almost to the consistency of a heavy wash but only applied with the brush medium wet (not fully loaded) and just to the high points. As soon as these dry, if they're not "contrasty" enough, you can quickly go over them again and again until they are. The fresh acrylic paint will not effect the underlying layers.
I thin my Vallejo's almost 50:50 (with a mix of water and Vallejo thinner). I mix in a a little acrylic flow enhancer and Vallejo Matt MEDIUM (not varnish) to my thinner mix, too. I also use liner brushes with long bristles for most of my acrylic painting.
Keep your brush clean as you paint. As soon as you notice that the paint doesn't want to flow smoothly from the tip of the bristles, give it a good "swishing" in some water or glass cleaner (followed by a swirl in water) to keep the paint from building up in the bristles. This only takes a few seconds, but makes a world of difference in how well the acrylic paints go on.
I use these little paint cups with snap-on lids to mix my acrylic colors in. They're the same kinds that come in the old paint-by-numbers sets, but you can buy them empty in craft stores like Michaels and Hobby Lobby. They're inexpensive, you can wash them out and reuse them, too. If the big strip clutters up your work bench, you can cut it apart and just use as as many cups as you want. I mark the paint mix on the lid with a Sharpie -

The Vallejo paints come in the dropper bottles, so measuring them out by the drop is easy. Use single drops as the base measurement, and mixing up the colors according to the SBS is no problem. To add thinner, I use medicine droppers (eye droppers) from Walmart (in the pharmacy section, just ask if they're hard to find).
HTH,
panzerconor
Joined: February 08, 2012
KitMaker: 1,271 posts
Armorama: 1,253 posts
Posted: Saturday, November 02, 2013 - 02:24 AM UTC
@Gary thank you for that sir, I had actually looked at it earlier yesterday hahaha. It has helped a lot though.
@Mike thanks for all the info. I've really started thinning down my Vallejo paints when I use them. I really should get an eye dropper or something, I've been using my brush to add water to the mix and that's not too reliable. I think I recognize those wheels in the picture...they from the Panther G you built a while back?
My primer is Mr. Surfacer applied via rattle can...think it came out okay though. So far it's the best primer I've worked with.
-Conor
SdAufKla
Joined: May 07, 2010
KitMaker: 2,238 posts
Armorama: 2,158 posts
Posted: Saturday, November 02, 2013 - 02:41 AM UTC
Quoted Text
... My primer is Mr. Surfacer applied via rattle can...think it came out okay though. So far it's the best primer I've worked with. -Conor
That primer looks good, Conor. The point is, I guess, to apply your primer as thin as possible to avoid building up the paint and hiding the details.
In regards to the thinning issue: Painting is like shooting, you want to have consistency in your technique. This way, if something is working well, you can replicate those results later. On the other hand, if something's not working right or giving you the results you want, you can trouble-shoot your technique and make specific changes to fix the problem.
It's not so important that you use the exact same technique as someone else, but that you have consistency in whatever technique you do use.
You could use recycled coffee creamer cups to mix paint in with fat watercolor paint brush to pick up drops of water from rinsing jar to thin with. Just so long as you're consistent you can figure out the exact thinning procedure that works for you and then be able to do that over and over.
Good luck!
(BTW: Yes, those were the wheels from my Panther G project from a couple of years ago. Nice to see someone remembers it!)
panzerconor
Joined: February 08, 2012
KitMaker: 1,271 posts
Armorama: 1,253 posts
Posted: Saturday, November 02, 2013 - 02:14 PM UTC
Thanks Mike. I figured it had gone on alright but your approval is reassuring hahaha. I gave one of the troopers a first layer, a mix of Splinter Blotches II and German Camo Pale Brown for the basecoat, and cut it with water in a 1/3 ratio I think... I haven't payed too close of attention to it. Probably should. I think it came out ok, but it still could have been thinned a bit more.
Try to ignore the face, I'm having trouble with the eyes. They're usually not an issue but the way the face is sculpted makes it difficult, even though it looks like it should be easy in the pictures afterwards!
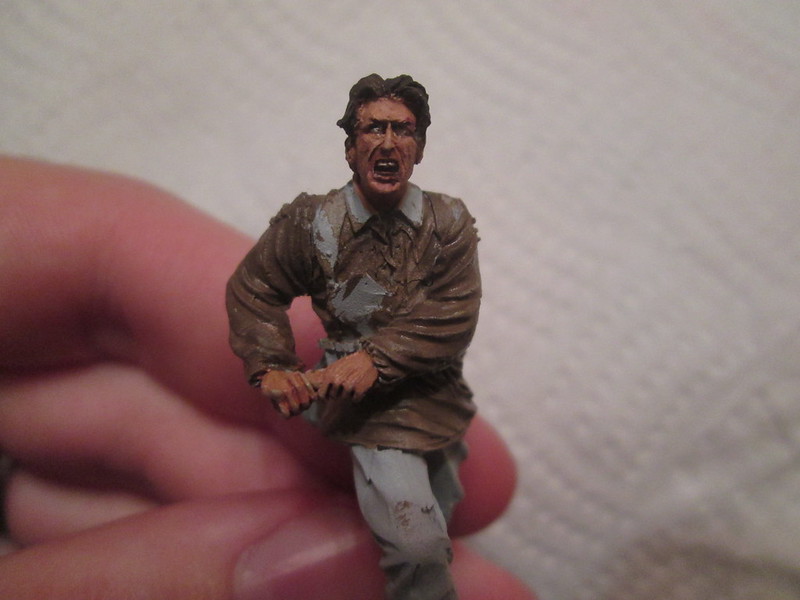
It's really not too noticeable but I did a bit of very subtle highlighting while painting the base coat. It doesn't look like it do to the glare of the wet paint, but I do have full coverage over the whole smock.
Thanks a lot!
-Conor
Try to ignore the face, I'm having trouble with the eyes. They're usually not an issue but the way the face is sculpted makes it difficult, even though it looks like it should be easy in the pictures afterwards!
It's really not too noticeable but I did a bit of very subtle highlighting while painting the base coat. It doesn't look like it do to the glare of the wet paint, but I do have full coverage over the whole smock.
Thanks a lot!
-Conor
 |

WEB HOSTING BY


Copyright ©2021 Armorama and Kitmaker Network, a subsidiary of Silver Star Enterprises
All Rights Reserved. Please read our Conditions of Use and Privacy Policy.
All Rights Reserved. Please read our Conditions of Use and Privacy Policy.