

Hosted by Darren Baker
Build of Merits 1/16th M198 Towed Howitzer

OldWarloke

Joined: October 14, 2012
KitMaker: 2,663 posts
Armorama: 2,649 posts
Posted: Friday, December 13, 2013 - 09:16 PM UTC
Hi Guys,
It has been a couple of months since there was a in box review of this kit. Well since it seams that no one wants to do a build of it I thought that I would.
This is the Box Cover.
OldWarloke
Joined: October 14, 2012
KitMaker: 2,663 posts
Armorama: 2,649 posts
Posted: Friday, December 13, 2013 - 09:21 PM UTC
Here is the right side view of the completed trail arms.
The fit sofar is excelent.
OldWarloke
Joined: October 14, 2012
KitMaker: 2,663 posts
Armorama: 2,649 posts
Posted: Friday, December 13, 2013 - 09:25 PM UTC
This is the view from the left side.

CmdrCody
Joined: June 19, 2005
KitMaker: 152 posts
Armorama: 129 posts
Posted: Saturday, December 14, 2013 - 02:05 AM UTC
I've been eyeballing this kit since it came out. I will be watching your build. Thanks for doing this. Don M.
OldWarloke
Joined: October 14, 2012
KitMaker: 2,663 posts
Armorama: 2,649 posts
Posted: Sunday, December 15, 2013 - 06:17 AM UTC
Well the main part of the frame is together.
OldWarloke
Joined: October 14, 2012
KitMaker: 2,663 posts
Armorama: 2,649 posts
Posted: Sunday, December 15, 2013 - 06:31 AM UTC
This pic shows the trails spread, man this is going to be a REALLY BIG model woth a 21 inch trail spread.
Sofar no really big problems.
Sofar no really big problems.
OldWarloke
Joined: October 14, 2012
KitMaker: 2,663 posts
Armorama: 2,649 posts
Posted: Sunday, December 15, 2013 - 06:49 AM UTC
From what I figure, there should be square locking pins to secure the spades to the trailing arms.I drilled out the square holes and made som pins to secure the spades.
If anyone has any information on this I sure would appriciate it if you could inform me ifthis is correct.
Thanks Donald
OldWarloke
Joined: October 14, 2012
KitMaker: 2,663 posts
Armorama: 2,649 posts
Posted: Monday, December 16, 2013 - 09:21 PM UTC
Well I just finished the major assembly of the GUN .
In transport mode it's about 30 inches long.
This is a real big one.
Now all I have to do is add the details, and then it's off to the paint shop.
I'll have a listing at the end of this build of all the modification that I did .
OldWarloke
Joined: October 14, 2012
KitMaker: 2,663 posts
Armorama: 2,649 posts
Posted: Tuesday, December 17, 2013 - 11:36 PM UTC
I purchased this handy Photo etch bender it's called The Hold and Fold from The Small Shop. Their advertisement is on this sights home page.
It works rearry good especially for long folds like this cover for this kit.
It's off to the paint shop next. I think that I'll do the NATO paint scheme.
Donald
AFVFan
Joined: May 17, 2012
KitMaker: 1,980 posts
Armorama: 1,571 posts
Posted: Tuesday, December 17, 2013 - 11:48 PM UTC
You're going to town on this one, Don. That thing is big! Talk about taking up some major shelf space, especially if you add a prime mover with it.

duttons

Joined: June 16, 2007
KitMaker: 193 posts
Armorama: 184 posts
Posted: Thursday, December 19, 2013 - 02:46 AM UTC
Don
You are correct, the spades are held on by two pins under the trails and that lets the spade swing in the air.
The spade lock pin hold them in the vertical position.
I'm struggling to remember where the pins were stored in transit, I'm thinking on the trails next to the spade transport position but can't remember.
I can ask one of my x gunners if you want more info or I'm sure it is in the Pam but it's at work and I'm away until early January.
This may help http://www.army.mil/article/61079/
Scott ( x reserve battery commander)
OldWarloke
Joined: October 14, 2012
KitMaker: 2,663 posts
Armorama: 2,649 posts
Posted: Saturday, December 21, 2013 - 09:18 PM UTC
OldWarloke
Joined: October 14, 2012
KitMaker: 2,663 posts
Armorama: 2,649 posts
Posted: Saturday, December 21, 2013 - 09:26 PM UTC
OldWarloke
Joined: October 14, 2012
KitMaker: 2,663 posts
Armorama: 2,649 posts
Posted: Saturday, December 21, 2013 - 10:00 PM UTC
OldWarloke
Joined: October 14, 2012
KitMaker: 2,663 posts
Armorama: 2,649 posts
Posted: Saturday, December 21, 2013 - 10:11 PM UTC

redleg12
Joined: March 11, 2007
KitMaker: 872 posts
Armorama: 831 posts
Posted: Sunday, December 22, 2013 - 12:10 AM UTC
Very nice. Great job with the camo. I have done the 1/35 and that is big....at this size I would need a separate room for model display!!
Then again I always like my artillery!! Nice build
Rounds Complete!!
Then again I always like my artillery!! Nice build
Rounds Complete!!

OldWarloke
Joined: October 14, 2012
KitMaker: 2,663 posts
Armorama: 2,649 posts
Posted: Sunday, December 22, 2013 - 02:57 AM UTC
This is a comparison shot of a 1/35th. scale HUMMERcompared to this 1/16th. scale gun. Quite a difference
OldWarloke
Joined: October 14, 2012
KitMaker: 2,663 posts
Armorama: 2,649 posts
Posted: Sunday, December 22, 2013 - 03:00 AM UTC
OldWarloke
Joined: October 14, 2012
KitMaker: 2,663 posts
Armorama: 2,649 posts
Posted: Sunday, December 22, 2013 - 03:06 AM UTC
OldWarloke
Joined: October 14, 2012
KitMaker: 2,663 posts
Armorama: 2,649 posts
Posted: Sunday, December 22, 2013 - 04:56 AM UTC
Here are some thoughts on building this kit.
Step #1 you will have the choice of 3 different positions for the Gun.If you follow the instructions you wont be able to change them.Position #1 Stowed for Lifting or towing. Position #2 Towin with the Gun to the rear. Position #3 Firing
Step #2&3 I opened the square hole in the back of parts A13 & A14 and made 2 square locking pins to hold the spades in place, otherwise you will have to glue them in place.
Step #4 Do not install the main wheel lowering valve lever arma part D39 untill the painting and Decals are finished as it will be almost impossible to use the decals with them in place.
Step #5 I would sudjest holding off on this step until the gun is assembled, then Glue together A7 & A18 the rotating parts and fasten the completed Gun to them then complete the base and trail assembly.
Step #6 Assemble as instructed, The gun breech is operable but lacks in detail on the inside.Paint all parts the base color
Step #7 Complete as instructed filling all the seams and paint the base color. You should hold off on installing the Breach assembly (B-B) until the gun is assembled to the gun mount if you want to be able to open the breach as the fit is not realy great.
Step #8 There will be a lot of seams to fill in this step.
The rubber boots that go on part D43 the upper hyrdolic arms are set for the GUN in the Stowed towing / Lift position and are too long for the other towing position, and Fireing Position.It may be trimmed after assembly but you wont be able to use the Stowed/Lift option.
Step #9 You should paint the parts after assembled or it will be dificult later to do. Be sure to keep the Muzzle Brake level as the locater pins are off a little.
Step #10 I cut the pins off of part A6 and drilled holes through the ends to match the holes in parts D44 this will make it possible to choose either the Towing or Fireing Position for the gun.
Step #11 Assemble as instructed and paint the base color.
Step #12 This is the step where I would recomend installing A7 & A18 the rotating parts of the base, the use the screw to fasten A22 the upper part of the front part of the trail assembly.Now complete Step 5 the assembly of the trail arms to the base.
Step #13 Install all the remaining small parts.
Step #14 Install the small parts to this side and bend the Photoetch Screen Guard to shape. A bending tool is verry usefull in this step.
Step #15 In this step you will assemble the wheels, I would sudjest painting all the parts before assembly.
Step #16 In this step you install the wheel assemblys, you should doallthe finish painting and the Decals before installing the wheels. The Main Wheels are positionable for firing or towing. Iwould sudjest gluing the trail arm wheels in the raised position as they were not used in the Towing/Firing positions. They have to be glued in position as they will not stay on the model otherwise.
Step #17 If you drilled out part A6 you can use A6 as a guide for installing the 2 D7 &E24&E25 pieces on the base.
Step #18 shows the Firing Position, I added security chains to both D1 parts used for locking the trail arms in position.
THIS BUILD IS NOW COMPLETE, YOU MAY USE ANY OF THESE PHOTOS & THIS WRITING TO HELP YOU IF YOU DECIDE TO BUILD THIS KIT.
Donald Ps. I have a Merit 1/16th. German sFH18 155mm. HOWITZER to build next but no space in the Albums section.
I don't know if I will ever be able to post the pictures here.
OldWarloke
Joined: October 14, 2012
KitMaker: 2,663 posts
Armorama: 2,649 posts
Posted: Sunday, December 22, 2013 - 06:24 AM UTC
Hi Guys
Sory for the interuption, I finally figured out how to do this.
I had the previous pictures at too high a reslution.
Every thing is corected now .
Donald
Sory for the interuption, I finally figured out how to do this.
I had the previous pictures at too high a reslution.
Every thing is corected now .
Donald

HeavyArty

Joined: May 16, 2002
KitMaker: 17,694 posts
Armorama: 13,742 posts
Posted: Sunday, December 22, 2013 - 07:05 AM UTC
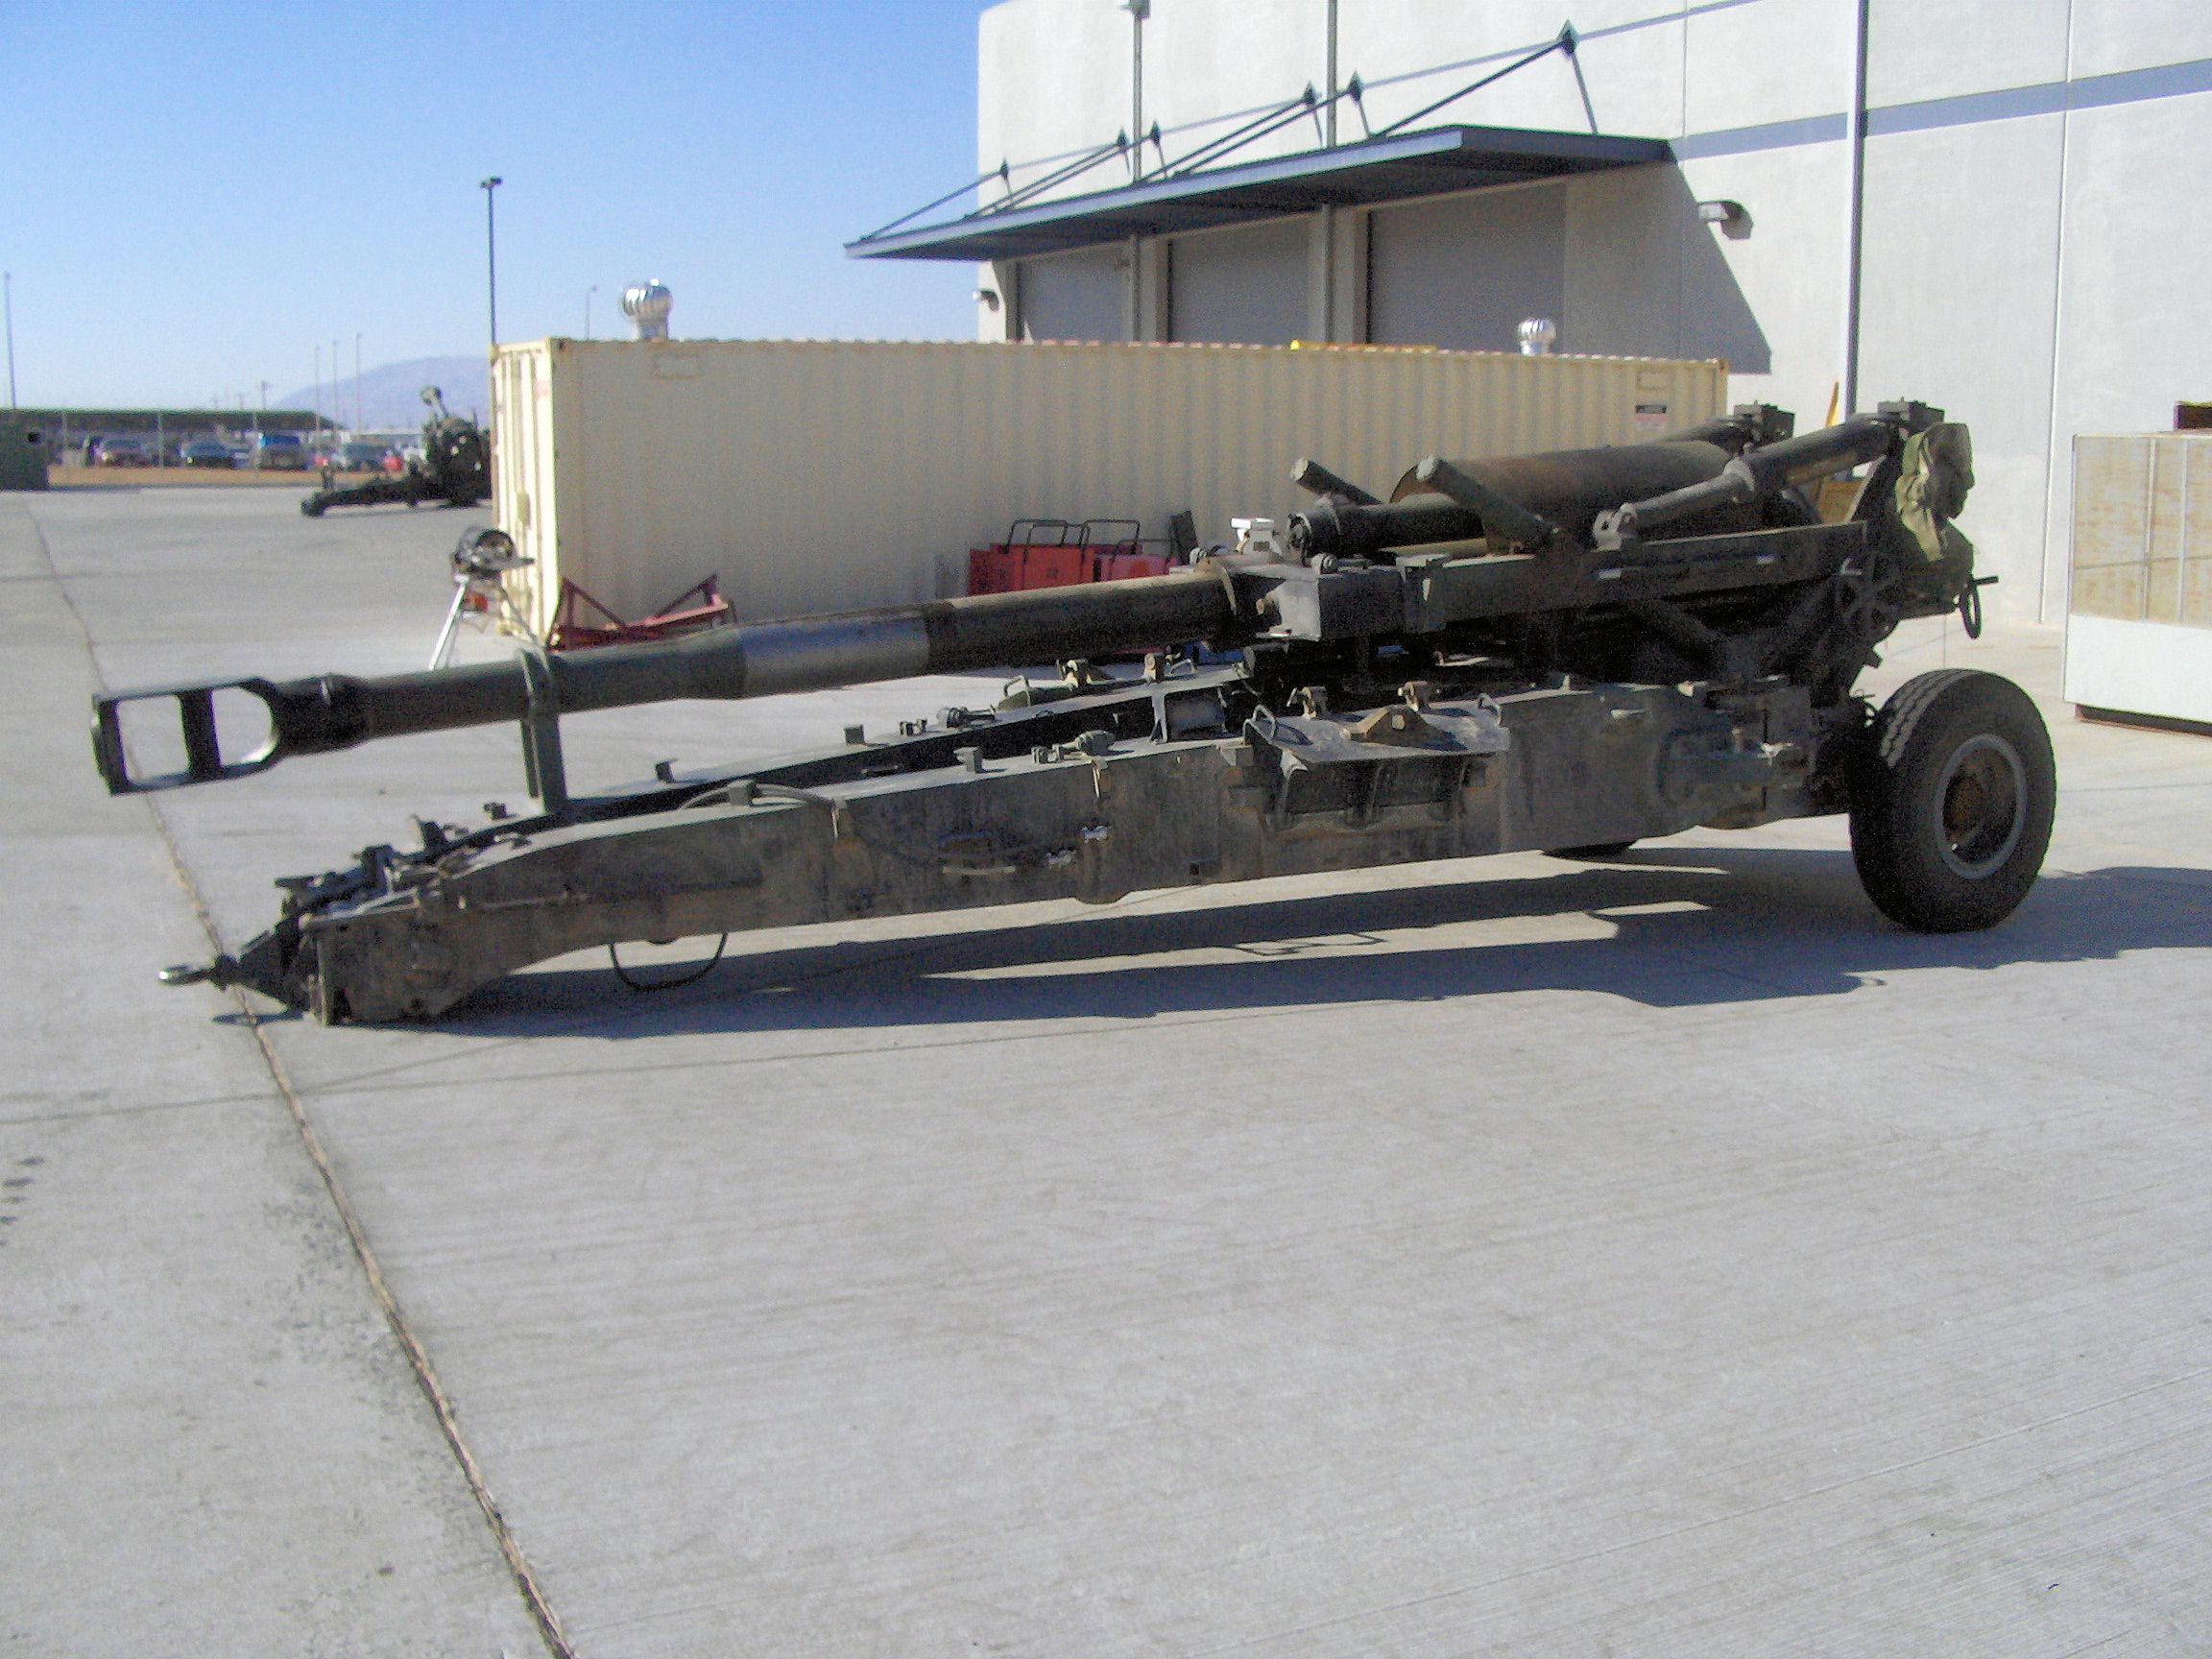
Looks like a nice, big gun. Great job on it. A couple pointers on it. The barrel from just in front of the cradle to the step down, should be bare metal. It is part of the recoil system. Also, the small wheels stowed on the trails were not used on US M198s. You may want to remove them. Lastly, this scale would look great with the air lines added for the brakes. They go on the right side trail. You can see them below, along w/the bare barrel.
_001.jpg&ei=TTe3UpiGB8HesATw-4DoDA&psig=AFQjCNHcszITtSI0EBUCi1BrvqNLqK_zwA&ust=1387825357182974)

OldWarloke
Joined: October 14, 2012
KitMaker: 2,663 posts
Armorama: 2,649 posts
Posted: Sunday, December 22, 2013 - 07:13 AM UTC
Thanks for the picture, It should help others that wish to build this kit.
The side wheels on the trails are just pres fitted , so no problem removing them. Some baremetal foil should fix the bare metal on the Gun Barrel.
Thank You verry Much.
Donald
The side wheels on the trails are just pres fitted , so no problem removing them. Some baremetal foil should fix the bare metal on the Gun Barrel.
Thank You verry Much.
Donald
OldWarloke
Joined: October 14, 2012
KitMaker: 2,663 posts
Armorama: 2,649 posts
Posted: Sunday, August 09, 2015 - 08:49 PM UTC
Link is Gone
 |

WEB HOSTING BY


Copyright ©2021 Armorama and Kitmaker Network, a subsidiary of Silver Star Enterprises
All Rights Reserved. Please read our Conditions of Use and Privacy Policy.
All Rights Reserved. Please read our Conditions of Use and Privacy Policy.