_GOTOBOTTOM
Armor/AFV: Large Scale
1/16 and Larger Armor Modeling
Hosted by Darren Baker
Building A 1/16th. Scale SU-100
OldWarloke
Visit this Community
United States
Joined: October 14, 2012
KitMaker: 2,663 posts
Armorama: 2,649 posts
Posted: Tuesday, January 21, 2014 - 08:20 AM UTC
Well I Finished The Panzer 38 and now Here Is One That Is a Lot More Complicated.
PRESENTING MY BUILD OF TRUMPETERS 1/16th. SCALE SU-100
OldWarloke
Visit this Community
United States
Joined: October 14, 2012
KitMaker: 2,663 posts
Armorama: 2,649 posts
Posted: Tuesday, January 21, 2014 - 08:25 AM UTC
Have the swing arms installed. Had a little trouble with the front ones, they wouldn't hang level with the rest. Had to switch the interior arms where the springs attach to the arms, side to side.


This is problably going to be a long build, as the kit has a complete interior.
I hope that I have enough room in the gallery section, otherwise I'll just have to cut the pictures short.
Donald
LeftyDan
Visit this Community
Illinois, United States
Joined: November 03, 2013
KitMaker: 77 posts
Armorama: 76 posts
Posted: Tuesday, January 21, 2014 - 09:33 AM UTC
I'll be following this build. Should be a beast! I kept seeing the T-34s at my local shop but never anyone actually build one.
Tojo72
Visit this Community
North Carolina, United States
Joined: June 06, 2006
KitMaker: 4,691 posts
Armorama: 3,509 posts
Posted: Tuesday, January 21, 2014 - 09:47 AM UTC
Boy,that is very impressive
Onelson
Visit this Community
Wales, United Kingdom
Joined: January 15, 2006
KitMaker: 14 posts
Armorama: 13 posts
Posted: Tuesday, January 21, 2014 - 09:56 AM UTC
Awesome, they have one in my local hobby shop and I'm very tempted. Can I just ask though, does it have the post war Czech style exhaust hoods on one of the sprues? I'm sure I could see them in some shots I've seen on the web, but I'm not 100% sure. Couldn't see the other parts needed to build a post war version so would still need some scratch building but the hoods would be the hardest part!
Cheers
Owen
OldWarloke
Visit this Community
United States
Joined: October 14, 2012
KitMaker: 2,663 posts
Armorama: 2,649 posts
Posted: Tuesday, January 21, 2014 - 10:08 AM UTC

Quoted Text

Awesome, they have one in my local hobby shop and I'm very tempted. Can I just ask though, does it have the post war Czech style exhaust hoods on one of the sprues? I'm sure I could see them in some shots I've seen on the web, but I'm not 100% sure. Couldn't see the other parts needed to build a post war version so would still need some scratch building but the hoods would be the hardest part!
Cheers
Owen


I don't know if this is what you were refering to, but there are two exhaust options with this kit. One is the standard cover with a round top end and bent pipe. Theother option has a pointy top end and straight pipe.
Hope this helps.
Donald
Onelson
Visit this Community
Wales, United Kingdom
Joined: January 15, 2006
KitMaker: 14 posts
Armorama: 13 posts
Posted: Tuesday, January 21, 2014 - 10:22 AM UTC
Hi Donald
That sounds like it. They look like the covers on the T34/85 towards the bottom of this post over on M-L. Hope it is them, with a bit of scratch building I can turn it into a Syrian vehicle.
http://www.network54.com/Forum/110741/thread/1183260823/EGYPTIAN+T-34-85++1956+FIN
OldWarloke
Visit this Community
United States
Joined: October 14, 2012
KitMaker: 2,663 posts
Armorama: 2,649 posts
Posted: Wednesday, January 22, 2014 - 08:34 AM UTC
Here are the mounts for the drive sprocket.
Trumpeter would have you mount the sprockets before installing the housing to the hull.
If you make a retainer to hold the polly cap you can install the sprockets later. You need the retainer of some kind otherwise the sprocket pin will push the polly cap out of place.
OldWarloke
Visit this Community
United States
Joined: October 14, 2012
KitMaker: 2,663 posts
Armorama: 2,649 posts
Posted: Wednesday, January 22, 2014 - 08:37 AM UTC
Finished the engine today. Painted it with Model Master Steel Metalizer and dusted it with black pastell chalk to grimey it up a bit.

Drilled out the points for the fuel injectors, and used copper wire for the injector fuel lines.
MCR
Visit this Community
Arizona, United States
Joined: July 15, 2004
KitMaker: 464 posts
Armorama: 407 posts
Posted: Wednesday, January 22, 2014 - 09:33 AM UTC

Quoted Text

Hi Donald
That sounds like it. They look like the covers on the T34/85 towards the bottom of this post over on M-L. Hope it is them, with a bit of scratch building I can turn it into a Syrian vehicle.
http://www.network54.com/Forum/110741/thread/1183260823/EGYPTIAN+T-34-85++1956+FIN


The "T34/85" you linked to is actually a fairly early Model '42 from UTZ (and it would be T-34/85 in any case. Yes, the dash counts. ).
The cast exhaust covers were an "early" war variation that the Czechs adopted for their T-34s too.

BUT, you're right in that they'd be less common on a SU during the war.

Mark
MCR
Visit this Community
Arizona, United States
Joined: July 15, 2004
KitMaker: 464 posts
Armorama: 407 posts
Posted: Wednesday, January 22, 2014 - 09:38 AM UTC
If the underside details matter much to you, the two large rectangular covers shouldn't be there:

I have no idea why Trumpeter, et al, think they should be there but they're not on any T-34 or variation that I've seen.

Nice work on the engine, BTW.

Mark
OldWarloke
Visit this Community
United States
Joined: October 14, 2012
KitMaker: 2,663 posts
Armorama: 2,649 posts
Posted: Wednesday, January 22, 2014 - 09:53 AM UTC

Quoted Text

If the underside details matter much to you, the two large rectangular covers shouldn't be there:

I have no idea why Trumpeter, et al, think they should be there but they're not on any T-34 or variation that I've seen.

Nice work on the engine, BTW.

Mark


Thanks for the info, I was wondering about them.
Well at least Ifound out before the painting started.
Also I dod't think Trumpeter is going to be molding any more T34s.
With this kit you can see where they altered the molds. They moved the bottom escape hatch and pluged the old one.
Donald
OldWarloke
Visit this Community
United States
Joined: October 14, 2012
KitMaker: 2,663 posts
Armorama: 2,649 posts
Posted: Thursday, January 23, 2014 - 08:21 AM UTC
This is my progress so far today.
I removed the detail on the two rectangle panels and filled in the panel lines followed by a coat of Mr. Surfacer accrost the whole bottom th keep the texture even.
Donald

OldWarloke
Visit this Community
United States
Joined: October 14, 2012
KitMaker: 2,663 posts
Armorama: 2,649 posts
Posted: Saturday, January 25, 2014 - 09:47 AM UTC
The first part of this post will be text heavy for anyone building this kit. A picture will follow. if you follow the instructions exactly the parts get in eachothers way.
#1 Assemble the floor munitions bracket parts SE22 & SF96 and install on the floor as indicated.
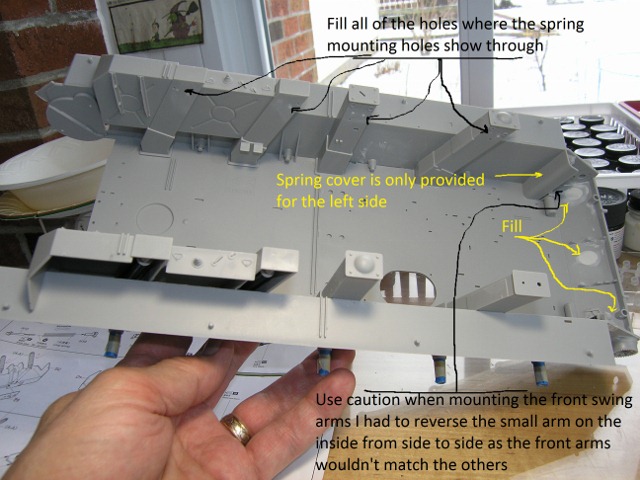
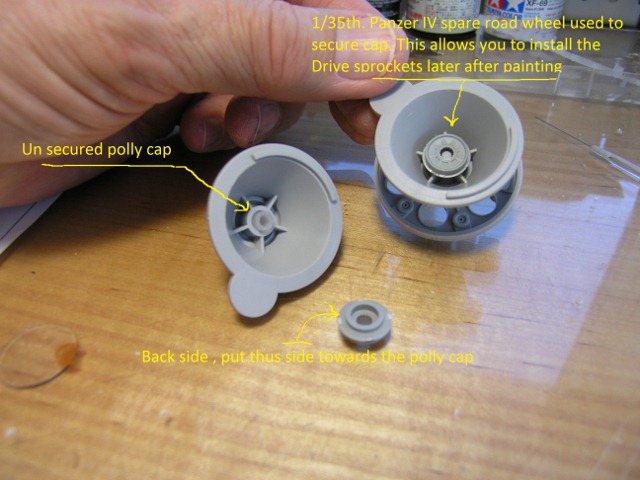
#2 Install 3Ea.parts SG7,& 1Ea. SF77 over the polycaps on the front four suspension arms.
#3 Assemble the shifter that has the ball on top parts SE36,SE6,&SA23 then set aside for later.
#4 Assemble the right controll stick with parts SE56,SD26,SD27,&SD22 them set aside for later.
#5 Install small box with 2 wires part SF29 to the left side wall where indicated.
#6 Assemble SF26&SF37 then install under SF29 so that it touches SF29s bottom.
#7 Install the round munitions storage base part SF36 in the round area on the left side as indicated on the instructions.
#8 Assemble the small instrument cluster part SC37 to SC38 then install on the left cornerof the side as shown.
#9 Assemble a munitions holder clip from parts SF47,SF51,& SF79 then install on the left side wall. allighn with the joint in the suspension spring box with the opening in the clip to the front of the tank.
#10 Assemble the left controll stick from parts SE70,SD22,SD26,&SD27. Them install to the floor.Afterwards install the small storage bracket part SF17 on the side wall slightly above the controllstick so it clears it.
#11 Install the pair of foot pedals part SB2 to the floor then add the conecting rods Parts SE75,&SE76 follow this with the single pedal part SE74 to the right.Install part SE9 over the base of SE74 with round side to the rear.
#12 Assemble the side electrical box, then install it to the sidewall.
#13 Install the controll stick with the ball on top that you assembled previously to the floor between the controll rods of the foot pedals.
#14 Now install the right controll stick.
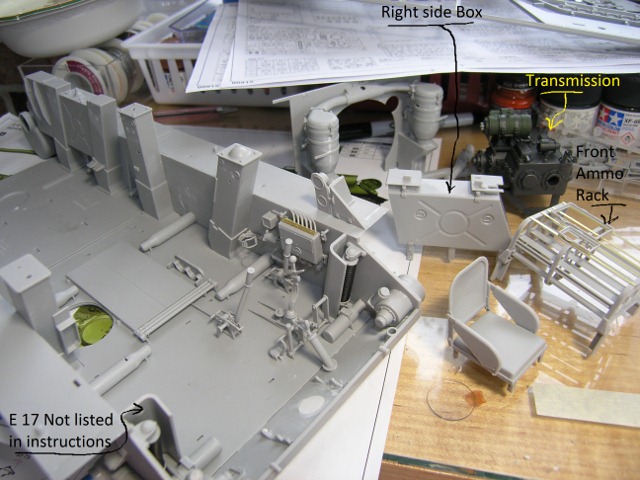
#15 Assemble the storage box / Container that goes on the right side wall from SB46,SA18,SH5,SH3,SH6,&SH2, then set aside untill painted.
#16 Install SB23,&SB24 to inside front areas.
#17 I would recomend assembly of the front munitions storage rack fron step 10 , then add the legs parts SD30,SE16,&SE17 temporary placeing them in position in the hull so the legs are in the right position. Set this asside for painting.
#18 Assemble the hand pump parts SE8,&SE25 then install where indicated allong with 2 munitions storage bases part SD39.
#19 Assemble seat and install after painting.
#20 Assemble the rods and their brackets parts SE12,SE14,SE15,SE54,&SE55 to the floor.Check that the numbers on SE54,&SE55 are not reversed.
#21 Install the flat panel SC34 to the floor.

Following these steps should ease the access on instalation of the parts in this section.
Donald
OldWarloke
Visit this Community
United States
Joined: October 14, 2012
KitMaker: 2,663 posts
Armorama: 2,649 posts
Posted: Friday, January 31, 2014 - 08:48 AM UTC
Hi Guys
Well it has been a while since my last poste.
I have been bust and have most of the interior assembled, (not ready for pics yet) I did finish the AMMO picture below. Please don't tell me about the colors, it's all guess work.
Donald
OldWarloke
Visit this Community
United States
Joined: October 14, 2012
KitMaker: 2,663 posts
Armorama: 2,649 posts
Posted: Tuesday, February 04, 2014 - 08:44 AM UTC
Well I finaly finished the lower part of the hull, and engine compartment. Beloy are two photos of the interior.
donald


You have to be real careful of the clamps that hold the Munitions as they are not all interchangeable.
OldWarloke
Visit this Community
United States
Joined: October 14, 2012
KitMaker: 2,663 posts
Armorama: 2,649 posts
Posted: Tuesday, February 04, 2014 - 08:49 AM UTC
Now we have the engine compartment.
You cant see most of the detail on the engine after it is installed.


I know that some will say that the enging compatrment should be painted white, I think that it is more logical to paint it with a red oxide primer, no one is going to see it and the russians were in more of a hurry to get them out rather than the color.
Donald
pgb3476
Visit this Community
Texas, United States
Joined: March 11, 2007
KitMaker: 977 posts
Armorama: 976 posts
Posted: Tuesday, February 04, 2014 - 08:53 AM UTC
This is looking sweet.

Congrats.

Greg
OldWarloke
Visit this Community
United States
Joined: October 14, 2012
KitMaker: 2,663 posts
Armorama: 2,649 posts
Posted: Tuesday, February 04, 2014 - 08:59 AM UTC
Thanks Greg.
It will probably be a while untill I have more done.
Next I start the interior of the upper hull and gun.
I have to watch the pictures as I'm running out of space in the photo gallery.
Does anyone know how to contact the guys running this sight, as I have a bunch of 1/16th. kits to do yet
Donald
PantherF
Visit this Community
Indiana, United States
Joined: June 10, 2005
KitMaker: 6,188 posts
Armorama: 5,960 posts
Posted: Tuesday, February 04, 2014 - 10:19 AM UTC
This is looking great!


Jeff
OldWarloke
Visit this Community
United States
Joined: October 14, 2012
KitMaker: 2,663 posts
Armorama: 2,649 posts
Posted: Monday, February 10, 2014 - 08:37 AM UTC
Hi Guys
I have the gun finished, man it's BIG.


As you can see in the background I have a lot done on the upper hull, it's just not ready for pictures yut.
Oh well back to work.
Donald
pgb3476
Visit this Community
Texas, United States
Joined: March 11, 2007
KitMaker: 977 posts
Armorama: 976 posts
Posted: Monday, February 10, 2014 - 09:25 AM UTC
Nice progress, really liking this. Are you going to weather/chip the interior any?

Greg
OldWarloke
Visit this Community
United States
Joined: October 14, 2012
KitMaker: 2,663 posts
Armorama: 2,649 posts
Posted: Monday, February 10, 2014 - 09:43 AM UTC

Quoted Text

Nice progress, really liking this. Are you going to weather/chip the interior any?

Greg


I'm planing to age the interior with som grey chalk pastells, it dirtys it up nicely , but not to much.
Donald
OldWarloke
Visit this Community
United States
Joined: October 14, 2012
KitMaker: 2,663 posts
Armorama: 2,649 posts
Posted: Wednesday, February 12, 2014 - 08:53 AM UTC
Got the rear upper hull painted , it still needs weathering. I'll do that in the finishing stages.

Both hatches are hinged, the upper I drilled the hinges out and used wire to make them workable.

This pic showes them closed. I ran fuel lines to the drums and scratch built the drum retaining bands as the photo etch wern't verry good
The last photu for now shows the interior, I filled in all of the pin marks and painted it with the red primer.
Donald
PantherF
Visit this Community
Indiana, United States
Joined: June 10, 2005
KitMaker: 6,188 posts
Armorama: 5,960 posts
Posted: Wednesday, February 12, 2014 - 09:48 AM UTC
Enjoying the you-know-what out of this build, especially since I just bought one 2 days ago!

It might change my mind about RCing it since it's such a beauty and one of my all-time favorites.


Please... bring it on!


Jeff
 _GOTOTOP