_GOTOBOTTOM
Armor/AFV: IDF [Israeli Defense Forces]
Armor and AFVs of the IDF army from 1947-today.
Hosted by Darren Baker
Mekava IIID Early Build Log.
mpkev31b
Visit this Community
United States
Joined: April 29, 2008
KitMaker: 54 posts
Armorama: 51 posts
Posted: Saturday, March 15, 2014 - 05:12 AM UTC
Hey Guys/gals

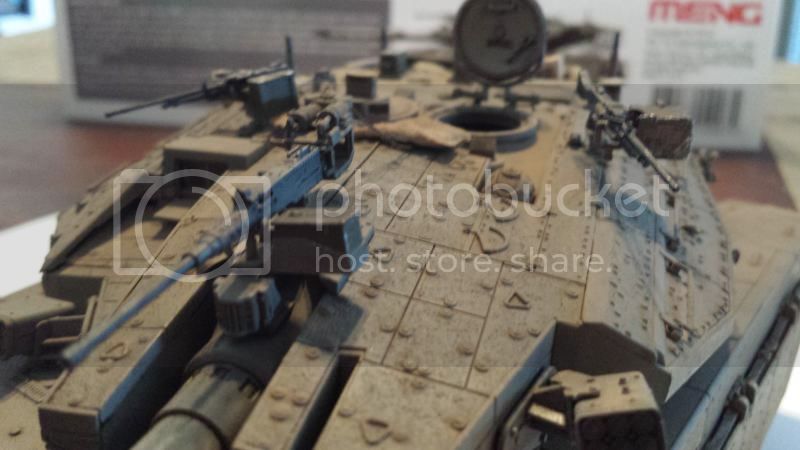
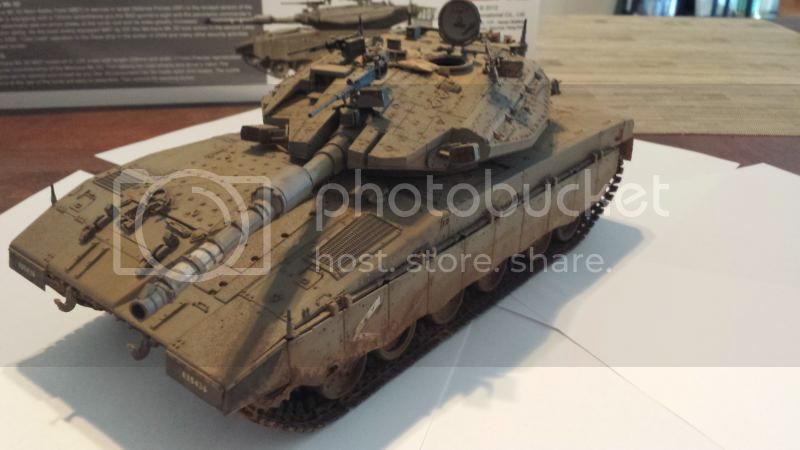
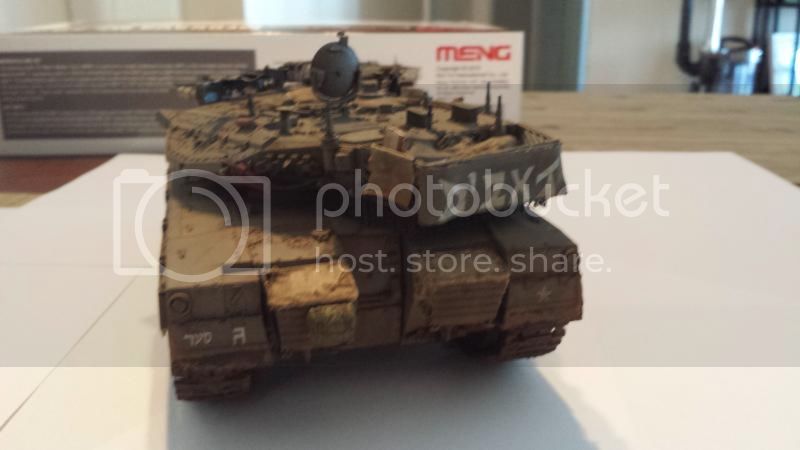
My Meng Merkava IIID Came in the mail yesterday and today i got all day to work on it, starting a build log.

This is a great kit with so much detail, and it so far has been going together like a breeze minus a few issues ive run into mainly the sprue connection to some parts.

this tank will be part of a Diorama which includes this base ive found:

and i purchased the IDF Paint set from MIG AMMO, that has yet to ship... anyone have experience buying straight from MIG AMMO yet? how fast does he ship it to the USA? its been a week since i ordered.

but anyway here were im at so far :


Here you can see the sprue is connected to the drive sprocket in a horrible way. no idea why they did this when the other set of sprockets are reassembled in its own package...


jekrott
Visit this Community
Connecticut, United States
Joined: March 25, 2006
KitMaker: 485 posts
Armorama: 353 posts
Posted: Saturday, March 15, 2014 - 11:46 AM UTC
I ordered from mig ammo not that long ago,came in about 11 days to CT.
TRM5150
Visit this Community
Massachusetts, United States
Joined: January 03, 2010
KitMaker: 2,159 posts
Armorama: 707 posts
Posted: Saturday, March 15, 2014 - 02:31 PM UTC
Off to a great start Kevin! Looking forward to seeing your progress!!
mpkev31b
Visit this Community
United States
Joined: April 29, 2008
KitMaker: 54 posts
Armorama: 51 posts
Posted: Sunday, March 16, 2014 - 01:29 AM UTC
Update:


I dropped the other Rear break Light onto my hard wood floor, Im guessing a 4th Dimension opened up and swallowed my break light. i spent a good hours on my hands and knees last night scouring my kitchen floor and could not find this piece of plastic... im just dumb founded. any ideas on how to scratch build a new break light or what i can do? im lost without it.

TRM5150
Visit this Community
Massachusetts, United States
Joined: January 03, 2010
KitMaker: 2,159 posts
Armorama: 707 posts
Posted: Sunday, March 16, 2014 - 10:17 PM UTC
Hi Kevin,

Looks like you are making some decent progress getting some part glued on…subsequently loosing some too! Sucks, but it happens to us all!! A couple options:

1 – Get back down on your hands and knees, this time with a flashlight. Lay the flashlight on the floor and slightly angle it moving it slowly back and forth like a prisoner camp searchlight (humming the theme song to Hogan’s Heroes if you like). The angle of the light most often than not will catch the edge of the part; be it plastic or PE.
2 – Grab the vacuum. Take a nylon stocking or pair of pantyhose (assuming you may have some in the house somewhere…not judging) and place this over the end of the wand attachment. Vacuum the floor. Before turning off the vacuum, look at the bottom of the wand…the part should be there and not swallowed up by the beast!

3 – Scratch-build one. Take a piece of styrene rod, or similar size sprue tree and pick away at the end to carve out the same design as on the other light…before you slice off the right size piece as it will be easier to hold.

4 – Leave the light out! Fill the rectangular hole and sand it flush, drill a center hole with surrounding mounting holes and stick a couple small gauge wires out it as if the light was removed. Would add a bit of interest to the model when you are done (unless you are going for the clean look!

For reference and discussion purposes only:


Hope one of these helps or someone chimes in having a leftover they might want to share with you!

Good luck!!
mpkev31b
Visit this Community
United States
Joined: April 29, 2008
KitMaker: 54 posts
Armorama: 51 posts
Posted: Sunday, March 23, 2014 - 12:51 PM UTC
Update today, finished some of the turret and added anti skid texture.


corsutton
Visit this Community
Oklahoma, United States
Joined: June 17, 2005
KitMaker: 544 posts
Armorama: 511 posts
Posted: Sunday, March 23, 2014 - 01:25 PM UTC
What did you use for non-skid? It looks pretty good.
mpkev31b
Visit this Community
United States
Joined: April 29, 2008
KitMaker: 54 posts
Armorama: 51 posts
Posted: Sunday, March 23, 2014 - 01:40 PM UTC
Rustoleum multi texture paint
mpkev31b
Visit this Community
United States
Joined: April 29, 2008
KitMaker: 54 posts
Armorama: 51 posts
Posted: Wednesday, March 26, 2014 - 10:32 PM UTC
Turret and build complete with some temp stowage and IDF mre's. Still waiting on mig ammo paint that shipped 2 weeks ago....


gigi63
Visit this Community
Parma, Italy
Joined: February 09, 2014
KitMaker: 241 posts
Armorama: 241 posts
Posted: Thursday, March 27, 2014 - 04:37 AM UTC
Hi Kevin I'm seeing a nice and clean building and I like it.Great job also on the anti skid texture compliments.I will follow with interest this your building.

Cheers Luigi
mpkev31b
Visit this Community
United States
Joined: April 29, 2008
KitMaker: 54 posts
Armorama: 51 posts
Posted: Thursday, March 27, 2014 - 11:22 AM UTC
Thanks luigi!
mpkev31b
Visit this Community
United States
Joined: April 29, 2008
KitMaker: 54 posts
Armorama: 51 posts
Posted: Tuesday, December 16, 2014 - 07:52 PM UTC
All Finished! finally..


rfbaer
Visit this Community
Texas, United States
Joined: June 12, 2007
KitMaker: 1,866 posts
Armorama: 1,696 posts
Posted: Tuesday, December 16, 2014 - 09:44 PM UTC
Looks good.
I see you solved the problem of the missing marker light.
jvazquez
Visit this Community
New Jersey, United States
Joined: September 26, 2006
KitMaker: 857 posts
Armorama: 811 posts
Posted: Tuesday, December 16, 2014 - 11:21 PM UTC
Looks great! Nice work!
mpkev31b
Visit this Community
United States
Joined: April 29, 2008
KitMaker: 54 posts
Armorama: 51 posts
Posted: Thursday, December 18, 2014 - 05:39 AM UTC
Thanks!
 _GOTOTOP