DJ, Viktor;
I'll not be uselessly humble, here (


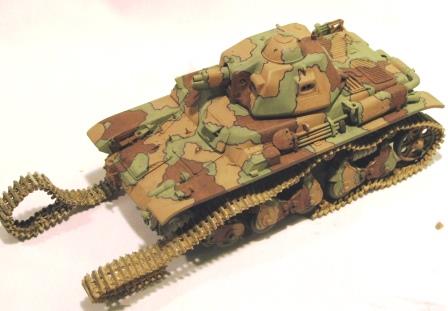
): after a bit of tweaking of a few lines and meets (the mistakes made along the way as I left a few edges under-"cleaned" and poorly-positioned), the BT-42 paint job came out pretty close to the scheme-map provided by Tamiya (it's the Tamiya kit). I DID leave off one "lobe" of brown... so there is frankly a missing piece in the scheme, but pretty much all the other lines are reasonably close to what Tamiya shows in their diagram, and - important to you "hard-edge" fans - almost all are actually very tight.
There are several approaches to masking a paint-scheme. In my case, I "built" my scheme from a base-coat followed by masking on two camo colors in turn. So, my approach is the "additive" one. Another technique many use is to build a complete tape mask "matrix" and paint the tank in complete layers and remove portions and paint again and remove more portions, etc. My approach gets a base-coat and one camo coat only onto any part of the tank.
Here's how I did the BT:
I used Testor's ModelMaster enamels - but any acryls will work at least as well.
I used the cheap kind of "tacky gum" from HobbyLobby. You'll need a fairly fresh packet - avoid dried-out tacky which will cross you badly when you try to make a smooth and tight edge. I put mine in a baggie in a bowl of warm water to warm and soften it a little while keeping it water-free. Knead tacky until pretty soft and pliable. Form softened tacky into a thin rope ca 1/8 - 3/16 inch diam...
1) Base-coat your vehicle. 2) Identify the locations of first camo color on the kit. You can mark the patch pattern with pencil... IF you have a map (like Tamiya's), STUDY your map and keep on hand as you apply the mask. 3) Form the masking sheet (ribbon) by squishing this rope out to form a thin strip ca 1/2 inch wide - the fingers do the work. 4) Apply the ribbon to your kit to OUTLINE paint areas. Use small sections - up to 2 inch long maybe - to keep this easy and controllable. Ribbon pieces overlap nicely, so... Stick the ribbon on LIGHTLY - no need to press it down hard! Form (bend in) the major curves into your ribbon in your hand as you go, and follow the curves penciled onto the kit. Lay the ribbon onto the kit to conform to the OUTSIDE of your pencil lines - you will fill OVER these lines and within them with camo color: "paint over the lines". 5) Be sure to fold or bend ribbon down into all corners and angle-joins as you go. 6) Follow the ribbon - application with a "clean-up" of all edges using a small knife or piece os styrene card - carefully press down all edges to eliminate "overhangs" where paint gets under masking, and to clean up and smooth out all those tiny cracks and divets to make the tight edge you want. This is the CRITICAL masking step! Make sure your tacky is pressed down and cleanly edged into the cracks and folds (down around those fender bins and corners and such). Do this right, and you get the tight, clean pattern you seek.
7) Mask several patches at a run, but NOT the entire camo color "A" masking all at once... (this goes quickly, and in a complex scheme, too much tacky around your kit will over-lap other places you wanted to paint camo A and also get very confusing - at least it does to me!

). Do NOT bother trying to press down all the tacky sheet - it's ONLY the edge which matters!
8) Spray the insides of the masked areas.
9) Remove the tacky as soon as the paint is no longer wet-looking. Re-ball the tacky and make more rope for your next patches!
Tips: Detail features... Tacky will fit over most detail bits - even small PE - The THINNER your ribbon, the easier (and safer) this fit will be. Have the sheet warm and pliable and make little folds as needed to cover over the details. Avoid pressing tacky onto kits more than needed to get it to gently stick - the less the sticky bond, the less potential damage to the base coat. When spraying, keep the AB perpendicular to the surface - paint "straight down" - specially critical when painting around those details you formed the tacky up and over. This means less paint being pushed under possibly "loose" edges and less feathering and run (treat tacky mask like it is a stencil...). Keep your air pressure down and a light touch on the trigger... NO BLASTS of paint, please! Spray LIGHTLY and avoid wet-paint build-up along edges. 2 AB passes with a little dry-time between is MUCH better than 1 heavy pass. Try to avoid spraying more paint onto tacky than you need to actually get the edge. Paint will "foul" the tacky and cut its life short! Remove tacky as soon as you can handle the kit - less tacky-time means less potential to damage the base-coats.
Once all of camo A is done, pencil in camo B pattern, and follow the steps above. Be CAREFUL here, as you will probably be applying tacky mask over previous camo A areas to make contact lines between camo A and B patches - so the first patches need to be fully-dried before you stick tacky onto them. I separated my color runs by a few hours to allow the first color to dry fairly well before masking onto it for the second color.
Sorry if this is long-winded!
I am trying to be pretty complete: Masking and spraying is a detailed process and you want to know all the steps and do them. It is actually very easy and quick once you try it.

Hint: We are all (rightly so, in my case
) nervous when we first try something. So... Mask a little pattern on the bottom of your kit and give this a test run!
It'll be fun! Honest! Go. Try it out. ENJOY!
Bob


 So with that, what can I use to "trace" the pattern before I paint it? Is a pencil safe? Or should I use blu-tack/silly putty to mask the whole thing? Any useful advice and constructive advice would be very appreciated.