_GOTOBOTTOM
Figures
Military figures of all shapes and sizes.
German infantry in the Ukraine, '43
panzerconor
Visit this Community
Massachusetts, United States
Joined: February 08, 2012
KitMaker: 1,271 posts
Armorama: 1,253 posts
Posted: Thursday, April 10, 2014 - 02:44 PM UTC
So instead of potting some sort of diorama I'll probably lose interest with in about a month or two, I'll just go through my figures a few at a time. So here we go:


HE HAS A FLASHLIGHT! I've never seen this come before on 1/35 figures, only added afterwards by you crafty fellas. I thought it was a great touch, and would be cool to see more manufacturers do it. But I digress


The only thing I didn't like was how they came attached to the resin blocks. The placement wasn't too great and as a result I've got some putty to put to use.

I'm working on another 3 figures right now as well, going to try and recreate this photo:


I'm not doing an exact replica, that's too complicated, and I think too gruesome for this site. Maybe later on down the road. I'm switching the beaten up fella and his comrade to his left to panzer crewmen, and the guy in the center won't be in such bad shape. I've got pretty far with them so I'll post some pictures later on.

-Conor
jrutman
Visit this Community
Pennsylvania, United States
Joined: April 10, 2011
KitMaker: 7,941 posts
Armorama: 7,934 posts
Posted: Friday, April 11, 2014 - 02:13 AM UTC
Pretty ambitious,even for you.
J
panzerconor
Visit this Community
Massachusetts, United States
Joined: February 08, 2012
KitMaker: 1,271 posts
Armorama: 1,253 posts
Posted: Saturday, April 26, 2014 - 04:52 PM UTC
Ambitious? Yes. Rubbish? Well, most likely, but here we go.

It took a bit more trial and error than I thought, and my desk resembles Dr. Frankenstein's laboratory. The real pain is the dry fitting, making sure everything fits together. I may glue the soldier with the rifle to the wounded tanker and then paint them, as that would be easier and probably save me some curse words and a headache down the road. It may end up harder to paint, but I can live with that. Right now I've just got a lot of scribing and filling left to do, then it's primer time. Also ordered two more sets of Hornet heads, since I've got a few more figures waiting until these 3 finish construction.


Pics are blurrier than I first thought, but you get the idea, and can see where I've got to fill in and smooth things out. It's actually turned out a bit more like the photo than I initially planned. Which is odd....

More later!

-Conor
1stjaeger
Visit this Community
Wien, Austria
Joined: May 20, 2011
KitMaker: 1,744 posts
Armorama: 1,727 posts
Posted: Saturday, April 26, 2014 - 05:51 PM UTC


You are a courageous man Conor....and doing quite well considering...!!!

Thumbs up!!!

Eager to see more!

Cheers

Romain

panzerconor
Visit this Community
Massachusetts, United States
Joined: February 08, 2012
KitMaker: 1,271 posts
Armorama: 1,253 posts
Posted: Wednesday, April 30, 2014 - 07:43 AM UTC
Courageous, or foolish? Well, right now it's seeming to pay off a little bit in that the 3 figures really are starting to blend with each other. I've started adding some details to the personal gear such as straps and weapons...and hands, although those don't qualify so much as gear. The head bandage is slowly getting ground down to look more like a bandage and not a glob of crap around his forehead. Just got to be careful not sand down on the putty, not the actual face. Still trying to figure out when to set in the left arm.


This is the sit of the gear on the short guy...


The MP-40 is only sitting there, hasn't been glued. So the sit of the strap is still off.


And the AM strap for the Kar98. I used the AM kit for the MP40 as well, but I lost a few of the tiny bits, so that one is not complete.


And these are shots of how they fit in with each other. It's like a house of cards with no glue, so I'm thinking I'll prime an begin some preliminary painting before attaching the other arm and hands.


The gas mask strap is applied wrong, but that's just going to remain as is.


Less gear for this guy, who'll be an NCO later on.

And a teaser for the scene I'm hoping for...


So that's it for now! Hopefully priming and stuff soon.

-Conor
1stjaeger
Visit this Community
Wien, Austria
Joined: May 20, 2011
KitMaker: 1,744 posts
Armorama: 1,727 posts
Posted: Wednesday, April 30, 2014 - 08:18 AM UTC

Hi Conor,

it is moving into the right direction...and is still ambitious (to say the least). Well done to take it to higher levels, even if the risks are considerable!

Be careful with the putty joints! Look at the folds and creases and "continue" them accordingly!

You are aware that higher levels of converting also mean higher levels in painting, don't you!!!!

Prepare for the worst!!!

Good luck m8!!!! You'll manage!!!

Cheers

Romain

jrutman
Visit this Community
Pennsylvania, United States
Joined: April 10, 2011
KitMaker: 7,941 posts
Armorama: 7,934 posts
Posted: Thursday, May 01, 2014 - 01:55 AM UTC
Pretty wild,considering you said you wanted to build a less ambitious piece? Nice work so far. I echo what "Romain the Wise" said about the putty.
J
panzerconor
Visit this Community
Massachusetts, United States
Joined: February 08, 2012
KitMaker: 1,271 posts
Armorama: 1,253 posts
Posted: Monday, May 05, 2014 - 04:53 PM UTC
Thanks fellas, nice to have the watchful eyes of the masters looking down upon my feeble workbench. Really starting to look like Frankenstein's lab now I've done some work on continuing the folds and consistencies to the tunics, but once I prime them I'll be able to see exactly where I gotta focus things.

But like all great geniuses (or is that teenagers?) I am a procrastinator of sorts. I've been sanding and filing away at the resin StuG III driver's compartment from CMK. I hate it. The kit is great, but I can't stand the big chunks of resin that I gotta waste so much time sanding and cutting away at. But it should work out, even though even less of it will be visible than I had thought

But in between fits of rage, swearing and dry-fitting, I've started chugging away at 3 other figures. Again, the 3 will be "interlocked" so to speak, but not quite as much.

The NCO;


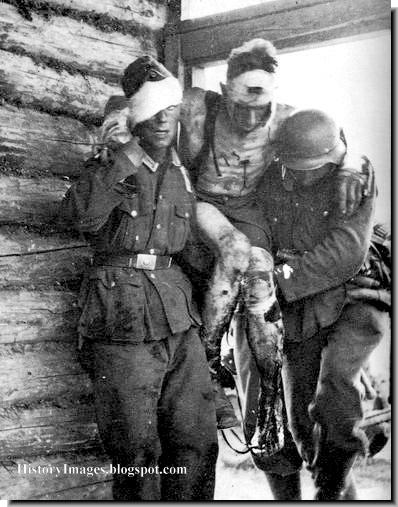
I wanted him to have a stern, almost Clint Eastwood-like appearance, keeping a cool head when the world is coming apart. He'll be 1 of 2 grenadiers calming down a hysterical schutze, a replacement, to put it simply. I want him to appear to be saying something like "For God's sake kid, you'll get your head taken off if you keep that up." I want the guy to appear relax, as opposed to...


him.


They'll be sort of like the ying and yang of the trio. I snapped a pic of the soldiers' gear on the both of them to try and convey their "sit." Like the ammo pouches, bayonet, etc. Jerry, in one of those build logs of yours, or in a comment on one of mine you made a point of mentioning the "sit" of the individual gear. Ever since then I've made a point of checking that and photographing it

And finally, Frankenstein.

I bought the Gen2 mine sweepers set to mainly raid for the high quality bits and the great personal gear in them. And according to that pretext, I took this figure:


And stole his legs and bottom of his tunic. I clipped the legs around the knees and re-positioned them a bit. After letting them sit to really firm up over the weekend, I got a jump on the torso:


The Gen2 bottom worked great for getting the hang of the end of the tunic. I'll have to filled the gaps with putty, but that's on the lower end of my worriers. I think...

After that was finished, I carved out the inside of the collar on the torso for the placement of the Hornet head.


After taking that picture I did more carving and work on the head's neck to make him looking up.


The head isn't my first choice, but I think it'll do? Impulsively, I added his grenade and ammo pouches as well:


And lastly, a rough mock up of the positioning of the 3 amigos:


The center figure will be trying to get to the other 3 figures from earlier, jumping up from his cover, while the other 2 try to restrain him. My big headache here will probably be the arms. I really want to try the AM Y-straps on the center figure, having the cool-headed NCO grabbing them, but that might be too ambitious for me. We'll see.

Until next time

-Conor
jrutman
Visit this Community
Pennsylvania, United States
Joined: April 10, 2011
KitMaker: 7,941 posts
Armorama: 7,934 posts
Posted: Tuesday, May 06, 2014 - 01:57 AM UTC
Lots of great work so far. I like the choices for heads that you made. Good expressions and they make sense. Thank goodness for Hornet. They make me look good.
J
panzerconor
Visit this Community
Massachusetts, United States
Joined: February 08, 2012
KitMaker: 1,271 posts
Armorama: 1,253 posts
Posted: Thursday, May 08, 2014 - 03:35 PM UTC
Thanks Jerry, I was kinda skeptical about it but I'll take your word of approval over my skepticism any day.

Got my big ceramic base out for a mock up. Actually got me a bit stumped as the set up won't work exactly as I hoped... If it had been as wide as it is long, then I'd be fine.


The bloke with the brown torso may or may not end up in the final product. I just threw him on it to see how he fit, and I think the figure really conveys a sense of movement very well. If included he'll be closer to the building foundation though.

Another issue is eye contact. It might sound strange, but I want the prone-ish soldier getting restrained to be locking eyes with the NCO holding the tanker's leg. I think I can manage that, however the soldier with the K98 is sort of staring out into space...may work out though, as if he's just in a sort of daze.

This is nagging at me though:


Empty space. You can see it's on the right hand side of the two figures, the factory foundation. I'm thinking of buying one of TANK's dead panzer crewmen, and placing him in there with a stressed out medic or something. I just think I should try to fill the space.

I've also primed those two soldiers from the very start of the post...Not sure if they'll fit in this scene anymore, but I'm still going to plug away at them. I'm going to try to get in some time to prime the trio with the wounded panzer crewman. The only thing that's really keeping me from making more progress there is figuring out the sit of them all. So I think I'll prime and do some painting on the rifleman and panzerman then glue them, finish painting them and the NCO, then apply and paint the arm on the crewman.

Have I given you a headache?

-Conor

Oh, and happy V.E. day, even though I'm posting this a bit early
jrutman
Visit this Community
Pennsylvania, United States
Joined: April 10, 2011
KitMaker: 7,941 posts
Armorama: 7,934 posts
Posted: Friday, May 09, 2014 - 03:10 PM UTC
If I remember correctly didn't you say this was going to be a small,short time project?
J
panzerconor
Visit this Community
Massachusetts, United States
Joined: February 08, 2012
KitMaker: 1,271 posts
Armorama: 1,253 posts
Posted: Friday, May 09, 2014 - 04:09 PM UTC
Well sort of. The figures were supposed to be hahaha but I've derailed that goal altogether. Too much conversion. The StuG and diorama base are separate projects, but yes, the ultimate goal is all 3 coming together in one. I find that I'm much better at smaller scenes, but the ceramic base is immaculate, so it'll be used. Most likely my end product will be pretty different hahaha.

On a side note, I picked up this figure set, a real steal for 10 bucks:


But I'll try to let it wait, even though I really want to try to match the kit figures posture with the artwork.

Long story short, yes this was intended to be small hahaha. But short time, no, only because every project I do gets dragged out, with the 1 exception of my diorama at AMPS.

My problem is I've always got a diorama in mind I suppose

-Conor
jrutman
Visit this Community
Pennsylvania, United States
Joined: April 10, 2011
KitMaker: 7,941 posts
Armorama: 7,934 posts
Posted: Saturday, May 10, 2014 - 02:34 AM UTC
Yes,I know.....so many dios...so little time.
J
panzerconor
Visit this Community
Massachusetts, United States
Joined: February 08, 2012
KitMaker: 1,271 posts
Armorama: 1,253 posts
Posted: Monday, July 07, 2014 - 05:01 PM UTC
Remember this thread? I don't.

Anyways, I've really been trying to get the modelling bug to bite me over the past month or so (I did get bit a lot of times, but those were by mosquitoes...A different bug). Finally though I binge painted the faces on the figures from here. I tried a very dark base for a change, not sure how I feel about it. They seem a bit too tan maybe? Then again, this is summer, but I'm not convinced.


Some touch ups on the eyes of the last 2 are in order judging by the photos, but I think the eyes themselves were some of the better ones I've painted.

But now I'll turn to over to you guys while I try to find time to keep painting..and painting...and painting

-Conor
jrutman
Visit this Community
Pennsylvania, United States
Joined: April 10, 2011
KitMaker: 7,941 posts
Armorama: 7,934 posts
Posted: Tuesday, July 08, 2014 - 02:01 AM UTC
The two things that I see improvement on are the putty joints and the painting. The painting more so,I think. Your faces are light years ahead of where they were when you first posted. Those eyes are your best so far and no vestige remains of the infamous "pop-eyed" look.
I don't think the tan is too dark,you could even accent it more in the creases and add some darker tones around the eye sockets. Remember these guys lived outside for months more or less and got very weather beaten.
I really like how you pay attention to the "drama" aspect of things.
J
panzerconor
Visit this Community
Massachusetts, United States
Joined: February 08, 2012
KitMaker: 1,271 posts
Armorama: 1,253 posts
Posted: Thursday, July 10, 2014 - 10:27 AM UTC
Got the first figure 3/4 of the way done. All that's left is the left arm which will go on last, and the fix up the paint job here and there. Mike Roof made the great point a while ago that what I need to do is thin my paints more, but that's a gradual learning process. Until then I've just got to fix little chips here and there until they stop showing up.

I mixed Vallejo Dark skin tone and generic red for the bloody nose/face on this poor chap, and used AK water effects to make it look wet/runny. Otherwise it looked plain and dried. I gave it a shot using some of their engine oil paint effect as well, but I think that's more suited for the vehicles (duh?), also I don't think my painting really goes with the look of the oil. Anyways, enough introspective BS:

This first one was a dry fit, and also showed me where I need touch ups. I just did a couple more highlights and washes to fix them.


Then the more up to date showing:


Not sure if I fixed up the hair before or after the picture taking. Pretty sure it was after so just ignore that

His right foot area is a tad gruesome, but I think I did it well enough, without making it too intense or nasty.

I'm going to go back and redo the buttons on his shirt as well, because those barely show up at all in the photos. I used German Camo Beige for those, so I might use that, only a bit brightened, or a totally new color.

This tanker really is in rough shape, but the good news is that his comrades did get him to the field hospital in time, no worries.

-Conor
1stjaeger
Visit this Community
Wien, Austria
Joined: May 20, 2011
KitMaker: 1,744 posts
Armorama: 1,727 posts
Posted: Saturday, July 12, 2014 - 07:27 AM UTC

Hi Conor,

somehow lost track of this thread!!??

I fully agree with Jerry....your painting has improved enormously!! Those eyes now look the part!!
And I would not change the skin tone! It is meant to be summer!

The putty parts can still benefit from a little more subtlety!

I am not sure about the camo harness on the one helmet. I doubt they were still in use by then, but I'm not an expert!

And don't forget to close the gap between the shoulders and the hanky on the other fig!! It's things like that I often tend to forget!

Those Gen2 figures are a source of constant amazement to me!! Partly the additional detail is convincing, partly it's total rubbish IMHO!

What's the use of splitting the head vertically! It means more work, that's all! And most of us end up using Hornet heads anyway!

And the trigger guard of the K98 looks massive..while we're at it!!

Great show so far on a complex and ambitious project!!

Cheers m8!

Romain
 _GOTOTOP