_GOTOBOTTOM
Figures
Military figures of all shapes and sizes.
"All Gave Some...Some Gave All." Vietnam Fig
ReconTL3-1
Visit this Community
Texas, United States
Joined: June 07, 2006
KitMaker: 726 posts
Armorama: 687 posts
Posted: Monday, May 05, 2014 - 11:30 AM UTC
Hello All,

It's been a while since I have completed any projects. The Tulsa Figure Show is coming up and I wanted to have something new to display, so this is what evolved from several ideas over the last few months. I also wanted to build something for the new Armorama Bimonthly Figure Contest. This build log is going to be a little backwards since I was trying to get this project completed and did not have time to post my progress as I went along. I am going to show the final result and over the next few days go over what I did to get this final result along with pictures I had taken at various intervals.

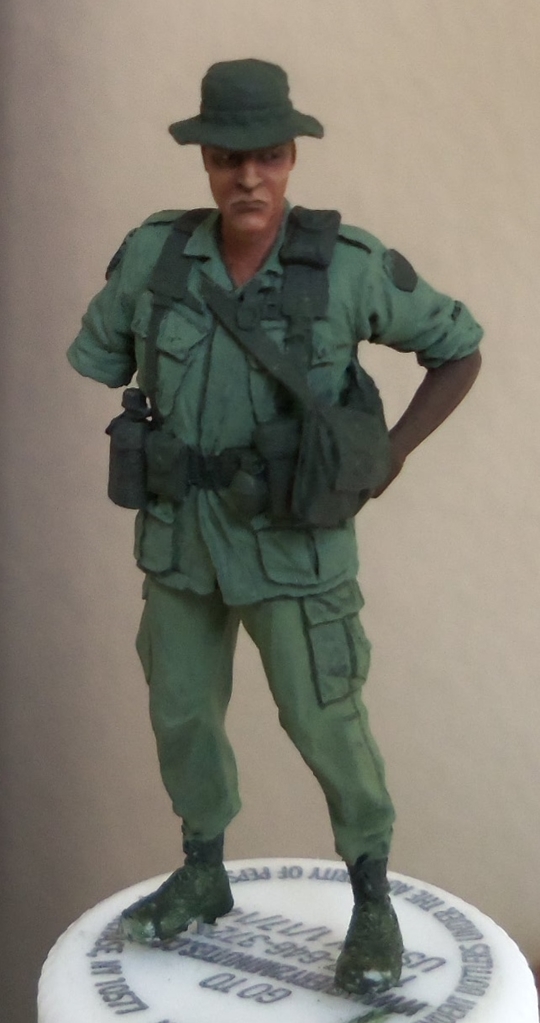
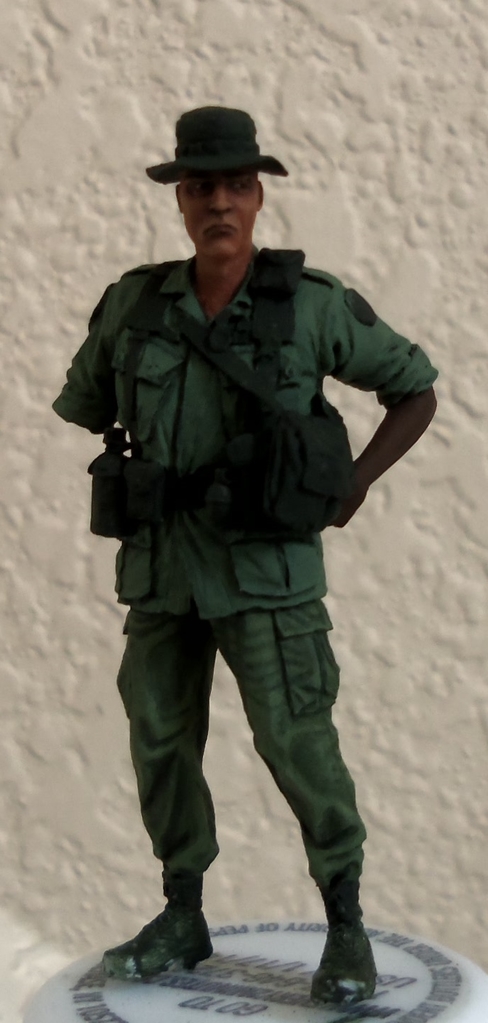
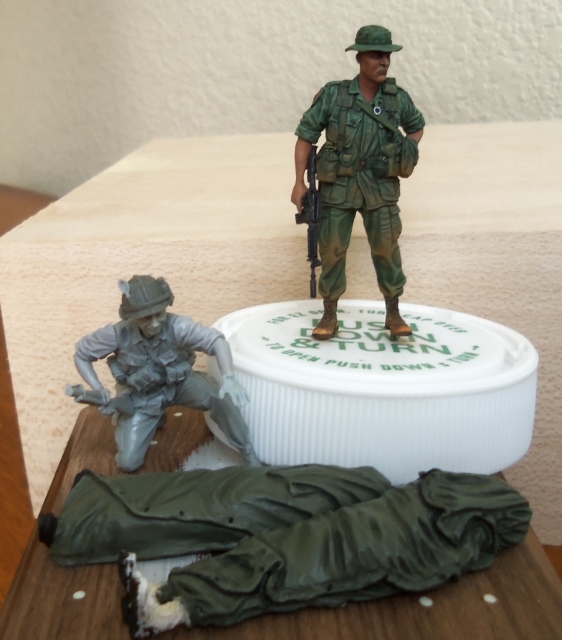
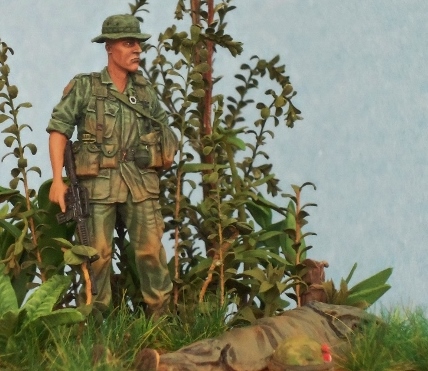
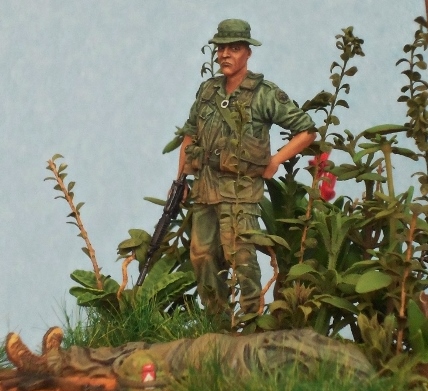
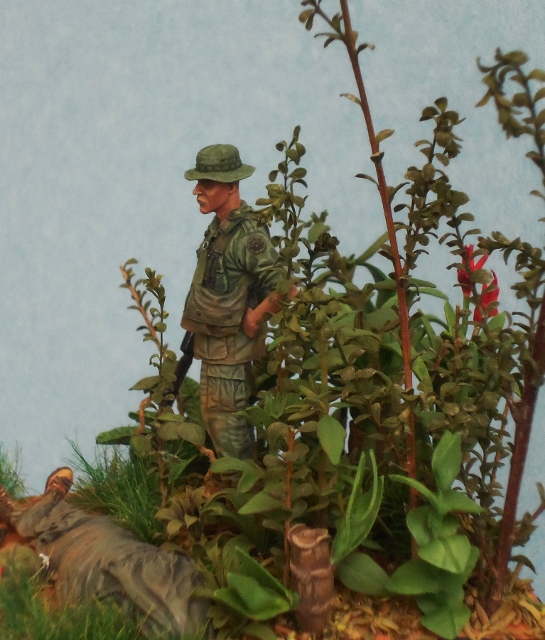
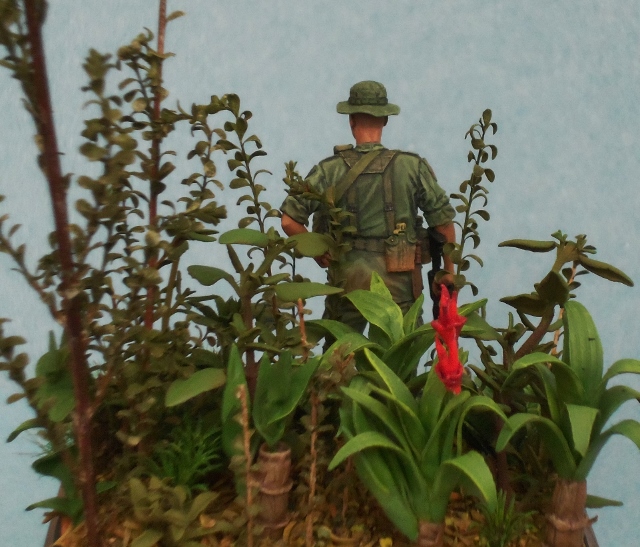
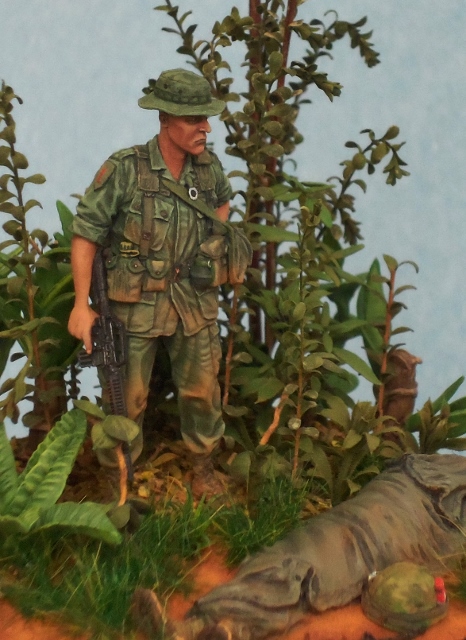
The vignette depicts a senior NCO from 2d Battalion 47th Infantry (Mechanized) 9th Infantry Division in Long An Province, Republic of Vietnam in October 1967 awaiting the evacuation of a Soldier who was killed in action and contemplating the loss. He is wearing a first pattern Jungle Fatigue shirt with his nametape, US Army tape, and CIB on his chest along with a 1st Infantry Division patch indicating a previous tour of duty in Vietnam and a 9th Infantry Division patch signifying his current assignment. He is not wearing the large chevrons on his sleeves as he learned during his first tour that they attracted the attention of enemy snipers so the shirts he wears in the field are without them. The main figure is a conversion of several Bravo 6 pieces. The torso is from the Green Beret Colonel, the legs from the officer of the Field Briefing kit, right forearm from the Dog Handler kit, boonie hat from that kit, canteens from the canteen kit, and then the head is from Hornet and the ammo pouch is from Verlinden's LAW gunner. The Soldier wrapped in the poncho is from CMK's Marines in Vietnam kit. I scraped off the excess wrinkles in the poncho to make it look more realistic. The senior NCO was painted with acrylics as was the Soldier wrapped in the poncho. I used a semi-gloss color for the rubber sheen of the poncho.

The plants are a mixture of dried plants from craft stores, clay dollhouse plants that I bought off of e-bay when I was in Afghanistan, and some plants that I preserved myself in glycerine.

I hope you enjoy the pictures. If you have any questions or comments, please give them.


Thanks for looking.
Cheers,
James
Tankrider
Visit this Community
Oklahoma, United States
Joined: October 07, 2002
KitMaker: 1,280 posts
Armorama: 1,208 posts
Posted: Monday, May 05, 2014 - 11:48 AM UTC
James,
Outstanding. It is great to see this come together in its final version. "Sarge" continues to intimidate and looks quite pissed that he lost one of his Soldiers. Great work in painting the uniforms as well as the scuffed boots. You need to talk about adding the foliage on Wednesday...

John
dioman13
Visit this Community
Indiana, United States
Joined: August 19, 2007
KitMaker: 2,184 posts
Armorama: 1,468 posts
Posted: Monday, May 05, 2014 - 12:10 PM UTC
Hey James, I must say a moving and very emotional piece of art. We try to tell a story that envoles peoples minds and emotions and you hit the nail dead on with this one. As a builder of vignt's. and the occasional dio, I try to give the viewer what you have created. This is the reallity that most public people don't see, nor modelers show. I have a very soft spot for our Nam vets along with the vets from Korea. Both very unpopular wars that had to be fought but not understood by most people. Your piece shows a resect most wont show. This is what we as story tellers should show more of. If we don't, then the cost that these guys paid will be forgotten. It;s not all about shinny planes or the perfect made German tank or finely made ships sailing on blue seas. Dio/vign builders have to tell a story that is clear to the point no matter how ugly it may seem. You might say it's our responceability to not let them be forgotten. I breezed over the ground work and found it well thought out and done. But the figures are what stayed in my mind. Very well done.
jrutman
Visit this Community
Pennsylvania, United States
Joined: April 10, 2011
KitMaker: 7,941 posts
Armorama: 7,934 posts
Posted: Tuesday, May 06, 2014 - 01:59 AM UTC
Can't say much about this. All I can say is....freekin awesome!!!!
J
ReconTL3-1
Visit this Community
Texas, United States
Joined: June 07, 2006
KitMaker: 726 posts
Armorama: 687 posts
Posted: Tuesday, May 06, 2014 - 05:56 AM UTC
Thanks for the positive comments.

John, I look forward to discussing the foliage at the meeting tomorrow.

Bob, I agree with you about vignettes needing to tell a story. I try to tell some sort of story honoring those who have fought our wars with every vignette and diorama I build. I build mostly Vietnam stuff in honor of my dad and his buddies and because I am not able to build stuff from my wars quite yet. Perhaps some day.

Now I have to get of my but and write up the build log part of this thread.

Cheers,
James
Karl187
#284
Visit this Community
Northern Ireland, United Kingdom
Joined: October 04, 2006
KitMaker: 3,094 posts
Armorama: 2,942 posts
Posted: Tuesday, May 06, 2014 - 10:21 PM UTC
I'm looking forward to reading the build log of this awesome scene. It tells a particularly emotional story as Bob pointed out. The painting, weathering, groundwork and composition of the whole scene is really top-drawer.
1stjaeger
Visit this Community
Wien, Austria
Joined: May 20, 2011
KitMaker: 1,744 posts
Armorama: 1,727 posts
Posted: Wednesday, May 07, 2014 - 06:58 AM UTC


Top drawer indeed!!

Superb show Sir!!

Cheers

Romain
AlanL
Visit this Community
England - East Anglia, United Kingdom
Joined: August 12, 2005
KitMaker: 14,499 posts
Armorama: 11,675 posts
Posted: Wednesday, May 07, 2014 - 07:17 AM UTC
Excellent work James. Bob sums it up nicely.

Cheers

Al
rogerjo1
Visit this Community
Västra Götaland, Sweden
Joined: November 12, 2010
KitMaker: 950 posts
Armorama: 905 posts
Posted: Wednesday, May 07, 2014 - 07:17 AM UTC
Very good looking diorama, it shows that war is cruel and sad for the brave soldiers out there... But the diorama looks very good...
Fenbeiduo
Visit this Community
Jiangsu, China / 简体
Joined: April 05, 2014
KitMaker: 103 posts
Armorama: 90 posts
Posted: Wednesday, May 07, 2014 - 07:37 AM UTC
A-mazing! foliage just looks life like.Hope you can upload some pics in progress
Graywolf
Staff MemberSenior Editor
HISTORICUS FORMA
Visit this Community
Izmir, Turkey / Türkçe
Joined: December 01, 2001
KitMaker: 6,405 posts
Armorama: 1,850 posts
Posted: Wednesday, May 07, 2014 - 07:46 AM UTC
Excellent scene James.congrats
Mark
Visit this Community
Noord-Brabant, Netherlands
Joined: February 07, 2003
KitMaker: 554 posts
Armorama: 461 posts
Posted: Wednesday, May 07, 2014 - 09:42 AM UTC
a little piece of groundwork, some foliage and two figures tell more than a thousand words. war.....

very well done, I love it in all it's simplicity and power

Mark
Jedge3
Visit this Community
Michigan, United States
Joined: July 17, 2010
KitMaker: 258 posts
Armorama: 208 posts
Posted: Wednesday, May 07, 2014 - 04:13 PM UTC
Very nice work. The figures are great. I really like the foilage, it is amazing. So life like, and the shades of green in the leaves make them pop.
Stefan1580
Visit this Community
Berlin, Germany
Joined: November 20, 2006
KitMaker: 360 posts
Armorama: 354 posts
Posted: Wednesday, May 07, 2014 - 07:22 PM UTC
Hi James,

great job on that vignette. The heavily converted U.S. Figure is awsome. The little Details you added are well done and the paintjob looks really nice with the highlights and shadows. The head with that facial expression is a perfect choice for that idea. The old CMK Figue is a nice addition and made for such scene. Also the vegetation looks very nice and gives a good background.

Very well done James.

It´s always a pleasure to open one of your Threads. There is always an masterpiece hidden.

Bye, bye

Stefan
ReconTL3-1
Visit this Community
Texas, United States
Joined: June 07, 2006
KitMaker: 726 posts
Armorama: 687 posts
Posted: Thursday, May 08, 2014 - 11:36 AM UTC
Thank you, everyone, for your positive comments about this vignette. I really try to tell a story with each of my works that honors those who served in Vietnam.

I guess I should start the build log. Although I took a few in-progress photos, there are not as many as I would like as I was not really intending to enter this contest when I was making it. I found out about it shortly before I completed the vignette.

The way this work started was that I've been working on various figures and had several ideas for various scenes working at the same time. I was tossing around these various ideas and trying to match figures to those ideas. When I made the conversion of the main figure from this vignette, I was trying to figure out how I could best display him as I though he was the best figure I have completed up to this time. The original idea for this scene, which I will add a photo of the planning phase later on, included several figures. As I started putting the scene together and thought about it more, I decided that the additional figures detracted from the message I was trying to get across to the audience. That is how this project evolved from a 5 or 6 figure scene to a two figure scene. On the next post, I will start with the creation of the converted main figure.

Cheers,
James
ReconTL3-1
Visit this Community
Texas, United States
Joined: June 07, 2006
KitMaker: 726 posts
Armorama: 687 posts
Posted: Thursday, May 08, 2014 - 12:07 PM UTC
The main figure is a conversion consisting of the torso from the Bravo 6 Green Beret Colonel kit, the legs of the officer from the Bravo 6 Field Briefing kit, right forearm from the Bravo 6 Dog Handler, Bravo 6 canteens, boonie hat, and claymore bag, Verlinden ammo pouch from the LAW Gunner, and a Hornet head. Needless to say, Bravo 6 figures are awesome and Vladimir Demchenko does an excellent job paying attention to the small details in the uniforms and equipment. His poses are also quite realistic. If you haven't tried building and painting Bravo 6 figures for a diorama or vignette, you are missing out.

As I was working on figures for another project, I was looking through my figures that were waiting to be built and thought that I could use the torso from the Green Beret Colonel kit to create a pretty cool figure. I didn't want to just cut off the head and go with that because I had done that already for the platoon sergeant in my "Just Another Morning in Vietnam" diorama a couple of years ago. Personally, I like the 1st and 2d pattern jungle fatigue shirts but don't like the 1st pattern trousers. The trousers of the officer in the Field Briefing kit looked nice, so I decided to cut the two figures in half and put those two parts together. I filled in the gaps with putty. I found a Hornet head that I really liked that had an expression on his face of anger, disappointment, and/or sadness. I cut the top part of his head off and placed a boonie hat on his head and then placed the head in the hole I had made where the original figure head had once been. I used putty to fill in the gaps and smoothed it out. Due to personal experience in a jungle environment, I am not a big fan of wearing the issue style watch on my wrist because once you sweat, the watchband starts to stink. I decided to use a photoetched watch from Eduard's M274 MULE set and placed it where it would go through the top buttonhole which was a common practice. I cut off the ammo pouches that were on the torso and placed a canteen and first aid pouch on the right side and an ammo pouch with a grenade on it on the left. I made the stabilizing strap from the ammo pouch with some lead foil and the buckles were sculpted in with putty. I added a claymore mine bag of spare magazines that came from a Bravo 6 figure (I don't remember which one I cut it off of) using paper with an adhesive backing for the strap. I then used the left arm from the original kit. I chose the forearm from the Bravo 6 dog handler. When handling it, I accidentally broke the barrel and replaced the foregrip and barrel with one from Trumpeter. I painted the right forearm and XM177E2 separately. I wanted this figure to depict a senior NCO who had at least one previous tour in Vietnam, so I used some putty to form the 1st Infantry Division patch on the right arm and the 9th Infantry Division patch on his left arm. I also added a small strip above the US Army tape to replicate a Combat Infantryman's Badge.

Prior to painting, I washed the figure with soap and water to remove any mold release solvents and the oils from my fingers. Once dry, I placed pins in the feet and mounted the figure to a used pill bottle as a platform for painting. I then primed the figure with Tamiya primer. Once dry, I looked the figure over for any construction flaws. I found a few places that I needed to scrape away mold seams or excess putty marks. Then I painted the skin parts with Reaper Dark Skin Shadow and the clothing and equipment with Reaper Black Green. Once dry, I painted the eyes and then the face using Reaper colors. The main colors I used were Reaper Sunburn Flesh, Suntan Flesh, and Tanned Skin Shadow along with Vallejo Shadow Flesh. For the uniform, I used two different base shades consisting of Reaper Military Green and Highland Moss. Shading was done with Black Green and highlights were the base color with some Vallejo Sunny Skintone added. The web gear was painted Reaper Olive Drab with highlights of the base color with sunny skintone added and shading with Black Green. The canvas of the jungle boots was painted the same way but with the nylon parts painted Vallejo US Dark Green. The leather parts were Vallejo Black with scuffing created with sunny skintone. I used MIG Vietnam Dirt pigment to make the uniform, boots, and gear dirty.

Photos will follow soon.
ReconTL3-1
Visit this Community
Texas, United States
Joined: June 07, 2006
KitMaker: 726 posts
Armorama: 687 posts
Posted: Thursday, May 08, 2014 - 12:38 PM UTC
Here are some in-progress photos of the figure. They are not the greatest, but gives you an idea.

Here is a shot of the face after it had been painted. Note the clothing and equipment only has the Black Green coat of paint.


The base colors of the clothing are now painted.


Shading begins. For some reason, I usually start the shading of the trousers. First I outline the pockets and seams with Black Green, then I start successive layers of dilutted Black Green to create the shadows, using straight Black Green for the darkest shadows.


The equipment and patches are painted. The boots have yet to be completed.


The completed figure with weathering.


ReconTL3-1
Visit this Community
Texas, United States
Joined: June 07, 2006
KitMaker: 726 posts
Armorama: 687 posts
Posted: Thursday, May 08, 2014 - 12:58 PM UTC
Once I got the figure completed, I tried to incorporate him into scenes that I had planned with other figures I had recently built and painted. He just didn't seem to fit in with those diorama ideas. So, I thought, since he is a senior NCO, most likely a platoon sergeant, he could be involved with a casualty collection point which led to me wanting to to do a scene showing the cost of combat. I originally was going to use this figure, two Soldiers wrapped in ponchos, and a sad Soldier reaching out to his fallen buddy.


The Soldiers wrapped in ponchos were from Belgo and CMK. The feet from the figure from CMK were positioned unnaturally for a dead person, so I cut them off and used some boots from Legend and glued them on at the appropriate angle. I also scraped off the excess folds and wrinkles on the poncho because the original had way too many to be realistic. The M79 gunner is a conversion of the Bravo 6 M79 gunner.

I then thought I might want to add another figure, so I looked to see how the addition of an RTO would look.


After looking these pictures over and thinking about the message I wanted to get across to the viewer, I decided that the scene would be more effective with the platoon sergeant and only one fallen Soldier. I emailed some of my friends telling them of my idea and with a list of possible titles for the vignette. One suggested "All Gave Some...Some Gave All." and I thought it was more effective than the others, so that became the title.

I then went to work on the base. First I collected the vegetation that I would use. I had some German Tyme plants and some weeds that my wife and I had picked at our house that I had experimented with to preserve with glycerine. They were in the process for over a month by the time I decided on doing this vignette. They turned out well, but the process causes the leaves to turn brown, so I had to paint them green. Other items I used were some clay doll house plants that I had bought on ebay while I was deployed to Afghanistan. Those had to be taken out of their pots and painted. Other plants came from craft stores. The two tree-like structures are from a wreath that I had bought at a Ben Franklin's Craft Store in Fairbanks, Alaska when I was stationed there in the late 1990's. The groundwork is Terra Cotta Miliput. There is some jungle floor scatter that are dried plants that I scraped off of their stems. While the putty was still wet, I placed a section of track from a M113 to make the impression of the track. This is a photo of the progress prior to me adding grass clumps from Joefix.


And that is how this vignette was made. If you have any specific questions about any part of this process, I will try to answer them the best I can.

THANKS FOR LOOKING.

jrutman
Visit this Community
Pennsylvania, United States
Joined: April 10, 2011
KitMaker: 7,941 posts
Armorama: 7,934 posts
Posted: Friday, May 09, 2014 - 01:20 AM UTC
Like I said before,this is very very good in all aspects. What really stands out for me though amoungst all the other great work are the boots. Having worn jungle boots in the 504PIR for years you really captured the look of what happens during an extended stay in the field. Black areas worn down to the untreated leather. Very nice attention to detail. You must be a fellow jumpmaster.
J
ReconTL3-1
Visit this Community
Texas, United States
Joined: June 07, 2006
KitMaker: 726 posts
Armorama: 687 posts
Posted: Friday, May 09, 2014 - 06:00 AM UTC
Glad you liked the way I scuff up the jungle boots. I am Airborne qualified and served in a jump billet in a Deep Reconnaissance Platoon as a Recon Marine from 1988-1996. Haven't jumped since I've been in the Army though. However, I have spent many years wearing the green jungle boots and had plenty of pairs that were all scuffed up.

Cheers,
James
Fenbeiduo
Visit this Community
Jiangsu, China / 简体
Joined: April 05, 2014
KitMaker: 103 posts
Armorama: 90 posts
Posted: Saturday, May 10, 2014 - 06:52 AM UTC
So they are real plants?
ReconTL3-1
Visit this Community
Texas, United States
Joined: June 07, 2006
KitMaker: 726 posts
Armorama: 687 posts
Posted: Sunday, May 11, 2014 - 02:24 AM UTC

Quoted Text

So they are real plants?


Some of them are. There are five that are made out of colored clay and then the grass clumps are from Joefix.
ReconTL3-1
Visit this Community
Texas, United States
Joined: June 07, 2006
KitMaker: 726 posts
Armorama: 687 posts
Posted: Friday, May 30, 2014 - 02:16 AM UTC
Since the Tulsa Figure Show got cancelled, I will be displaying this vignette at the IPMS Scalefest in Grapevine, Texas this weekend. I hope to see some of you there.

Cheers,
James
justsendit
Visit this Community
Colorado, United States
Joined: February 24, 2014
KitMaker: 3,033 posts
Armorama: 2,492 posts
Posted: Saturday, May 31, 2014 - 01:17 AM UTC
James,
Very touching subject matter done well. Nice job.

To all the fallen Comrades.

Peace, Brother,
--mike
jrutman
Visit this Community
Pennsylvania, United States
Joined: April 10, 2011
KitMaker: 7,941 posts
Armorama: 7,934 posts
Posted: Saturday, May 31, 2014 - 04:03 AM UTC
I know I commented already but have to weigh in again here. Now that you've posted bigger pics I am very impressed with the way you brought out the contrasts and differences in the monochrome pallet that was the VietNam era jungles and LCE. Remarkable and it brings back boo-koo memories for this old grunt.
Nice to see the old style gear and equipment. Like seeing old buddies after a long break.
Wally must be sh--ting bricks over this one!!!
J
 _GOTOTOP