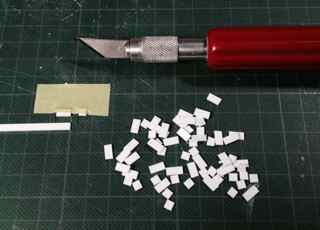
I am wondering if anyone here has a good idea/technique for installing "glass" in MiniArt windows. I purchased very thin clear plastic sheet with the hope that I could just cut out small squares and glue them into place. Sadly, I have found the whole process very frustrating and slow going. Would it make sense to make some sort of a jig to speed up the process and keep the dimensions uniform?
Any suggestions on what I can do to get through this?
Hosted by Darren Baker
Installing "glass" in windows
Marty
Massachusetts, United States
Joined: June 16, 2002
KitMaker: 2,312 posts
Armorama: 1,054 posts
Joined: June 16, 2002
KitMaker: 2,312 posts
Armorama: 1,054 posts
Posted: Saturday, May 31, 2014 - 05:53 AM UTC
retiredyank
Arkansas, United States
Joined: June 29, 2009
KitMaker: 11,610 posts
Armorama: 7,843 posts
Joined: June 29, 2009
KitMaker: 11,610 posts
Armorama: 7,843 posts
Posted: Saturday, May 31, 2014 - 05:58 AM UTC
White school glue works well.
justsendit
Colorado, United States
Joined: February 24, 2014
KitMaker: 3,033 posts
Armorama: 2,492 posts
Joined: February 24, 2014
KitMaker: 3,033 posts
Armorama: 2,492 posts
Posted: Saturday, May 31, 2014 - 06:07 AM UTC
Hi Martin,
I'm curious; which MiniArt kit?
I just use plastic packaging material; it's free! Since model building; I can never throw anything away!
Repetitive action x tedium x boredom = jig. I did something similar recently for scratch-building bricks.
--mike
I'm curious; which MiniArt kit?
I just use plastic packaging material; it's free! Since model building; I can never throw anything away!
Repetitive action x tedium x boredom = jig. I did something similar recently for scratch-building bricks.
--mike
Marty
Massachusetts, United States
Joined: June 16, 2002
KitMaker: 2,312 posts
Armorama: 1,054 posts
Joined: June 16, 2002
KitMaker: 2,312 posts
Armorama: 1,054 posts
Posted: Saturday, May 31, 2014 - 06:22 AM UTC
Quoted Text
Hi Martin,
I'm curious; which MiniArt kit?
It's their kit # 35540 - North African House
justsendit
Colorado, United States
Joined: February 24, 2014
KitMaker: 3,033 posts
Armorama: 2,492 posts
Joined: February 24, 2014
KitMaker: 3,033 posts
Armorama: 2,492 posts
Posted: Saturday, May 31, 2014 - 06:42 AM UTC
That's not so bad -- 21 squares and 3 wedge-shaped. I thought you were building some sort of huge factory building with hundreds of windows! The MiniArt 'Russian Street' uses the same window frames; I just affixed the pieces of plastic (some shards) to the backsides with CA Glue.
PS: I recently received some 'Gator's Glue' (regular and thin). I haven't tried it yet but I hear it's pretty good stuff.
--mike
PS: I recently received some 'Gator's Glue' (regular and thin). I haven't tried it yet but I hear it's pretty good stuff.
--mike
DKdent
Rheinland-Pfalz, Germany
Joined: November 27, 2005
KitMaker: 182 posts
Armorama: 180 posts
Joined: November 27, 2005
KitMaker: 182 posts
Armorama: 180 posts
Posted: Saturday, May 31, 2014 - 08:18 AM UTC
Hello Martin,
you could use Testors Window Maker for example. It is, in general, a clear parts glue which also works in creating thin, transparent films. I have used it several times and it works. It of course depends on the size of your windows but the advantage is that you can create a window without any regard of its shape.
Best Regards
Dennis
jrutman
Pennsylvania, United States
Joined: April 10, 2011
KitMaker: 7,941 posts
Armorama: 7,934 posts
Joined: April 10, 2011
KitMaker: 7,941 posts
Armorama: 7,934 posts
Posted: Sunday, June 01, 2014 - 01:41 AM UTC
The answer is simple if you don't plan to finish off the interior of the building. Sand the back of the whole window flat. Then glue a piece of clear over the whole back using white glue. Presto!!! If you want the window panes to be old looking glass then apply some white glue to the front as well. When it dries it will give a wavy look,just like old glass.
J
J
Marty
Massachusetts, United States
Joined: June 16, 2002
KitMaker: 2,312 posts
Armorama: 1,054 posts
Joined: June 16, 2002
KitMaker: 2,312 posts
Armorama: 1,054 posts
Posted: Monday, June 02, 2014 - 05:20 AM UTC
Quoted Text
That's not so bad -- 21 squares and 3 wedge-shaped. I thought you were building some sort of huge factory building with hundreds of windows!
Yes, this particular building doesn't have too many windows but I have a few more kits so the number will increase. I am hoping to work out a good technique so I can apply it going forward.
Thanks
Marty
Massachusetts, United States
Joined: June 16, 2002
KitMaker: 2,312 posts
Armorama: 1,054 posts
Joined: June 16, 2002
KitMaker: 2,312 posts
Armorama: 1,054 posts
Posted: Monday, June 02, 2014 - 05:21 AM UTC
Quoted Text
The answer is simple if you don't plan to finish off the interior of the building. Sand the back of the whole window flat. Then glue a piece of clear over the whole back using white glue. Presto!!! If you want the window panes to be old looking glass then apply some white glue to the front as well. When it dries it will give a wavy look,just like old glass.
J
Yes, I have thought about doing that but I will be finishing the interior so that's not going to work.
Thanks
Marty
Massachusetts, United States
Joined: June 16, 2002
KitMaker: 2,312 posts
Armorama: 1,054 posts
Joined: June 16, 2002
KitMaker: 2,312 posts
Armorama: 1,054 posts
Posted: Monday, June 02, 2014 - 05:24 AM UTC
Quoted Text
Hello Martin,
you could use Testors Window Maker for example. It is, in general, a clear parts glue which also works in creating thin, transparent films. I have used it several times and it works. It of course depends on the size of your windows but the advantage is that you can create a window without any regard of its shape.
Best Regards
Dennis
I've never tried this product but I suspect that it meant for very small windows. I am not sure the film would stretch enough for the size of windows I am working with. Still, I may give it a try.
Thanks
justsendit
Colorado, United States
Joined: February 24, 2014
KitMaker: 3,033 posts
Armorama: 2,492 posts
Joined: February 24, 2014
KitMaker: 3,033 posts
Armorama: 2,492 posts
Posted: Monday, June 02, 2014 - 05:46 AM UTC
Martin,
Back to a simple jig: You can use the grid pattern on your cutting mat for reference and squaring; tape-down your material securely; use a metal cutting edge and fresh X-Acto blades. Score the plastic sheet carefully as you go.
Here's what I did for cutting bricks; it went really fast once I was set up.
I look forward to seeing your project!
--mike
parrot
Ontario, Canada
Joined: March 01, 2002
KitMaker: 1,607 posts
Armorama: 1,581 posts
Joined: March 01, 2002
KitMaker: 1,607 posts
Armorama: 1,581 posts
Posted: Monday, June 02, 2014 - 09:55 AM UTC
[I've never tried this product but I suspect that it meant for very small windows. I am not sure the film would stretch enough for the size of windows I am working with. Still, I may give it a try.
Thanks[/quote]
I use Testors for applying clear parts, but haven't had much luck for windows. Yes it's OK for very small ones, but takes a lot of time. You have to apply the glue around the window and then slowly pull it together to fill it.Can be extremely frustrating. In the past, if I'm going to do the interior, I cut the clear acrylic to the size and apply to the back of the window. Then add either balsa or styrene to match the front using the Testors clear glue. Still a lot of work, but not near the time to make a window out of it.
Tom
justsendit
Colorado, United States
Joined: February 24, 2014
KitMaker: 3,033 posts
Armorama: 2,492 posts
Joined: February 24, 2014
KitMaker: 3,033 posts
Armorama: 2,492 posts
Posted: Thursday, June 05, 2014 - 02:20 AM UTC
Hi again Martin,
I finally got around to trying out the Gator's Glue that I mentioned earlier; both regular and thin compounds. It seems to work fairly well; it can be brushed on, gives ample time to move things around, it dries clear and it's water soluble. I would definitely recommend the Thin Blend for your window project.
http://www.gatorsmask.com/gatorglueorder1.html
--mike
Posted: Thursday, June 05, 2014 - 02:26 AM UTC
Martin
You can still sand the window flat on the backside. Use it as a template to cut a pane the same size as the windowframe and refinish it with a few strips of Evergreen styrene on the inside so it looks like you have windowframe on the inside as well.