_GOTOBOTTOM
Dioramas
Do you love dioramas & vignettes? We sure do.
there's a tank parked outside my house and...
comebackmodeler
Visit this Community
Quebec, Canada
Joined: January 16, 2014
KitMaker: 30 posts
Armorama: 30 posts
Posted: Thursday, June 19, 2014 - 02:13 PM UTC
After my shot Kal build I am more confident and it's time to start something new Always been keen on Shermans as well as the Canadian armoured corps.
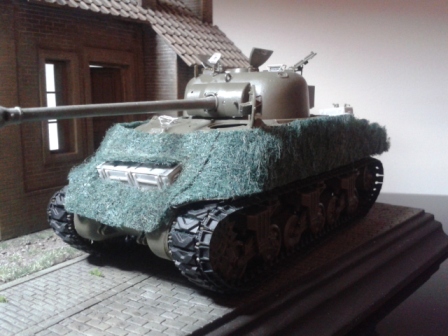
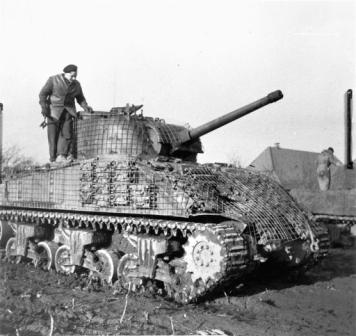
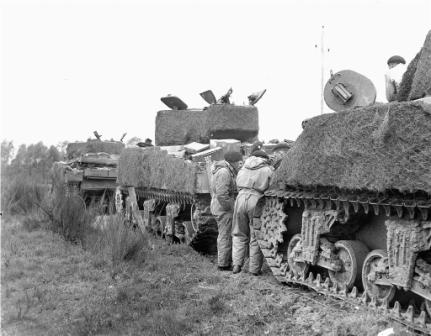
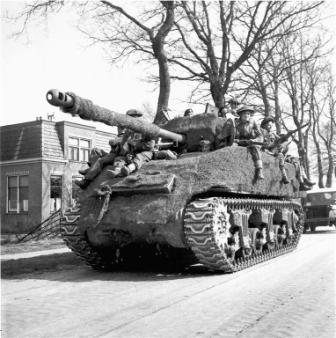
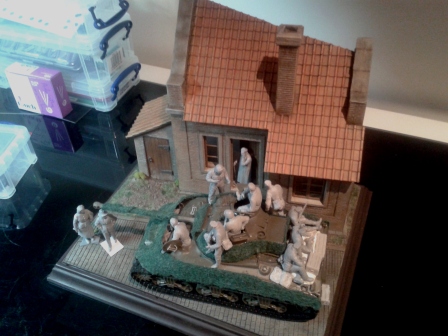
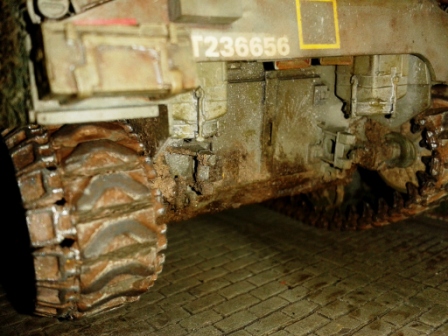
This project will depict a Fort Garry horse Sherman carrying infantry on the approach to Groningen.
Another one of My '' Canadian Interludes '' this has been an ongoing series of mini Dioramas started some while back.

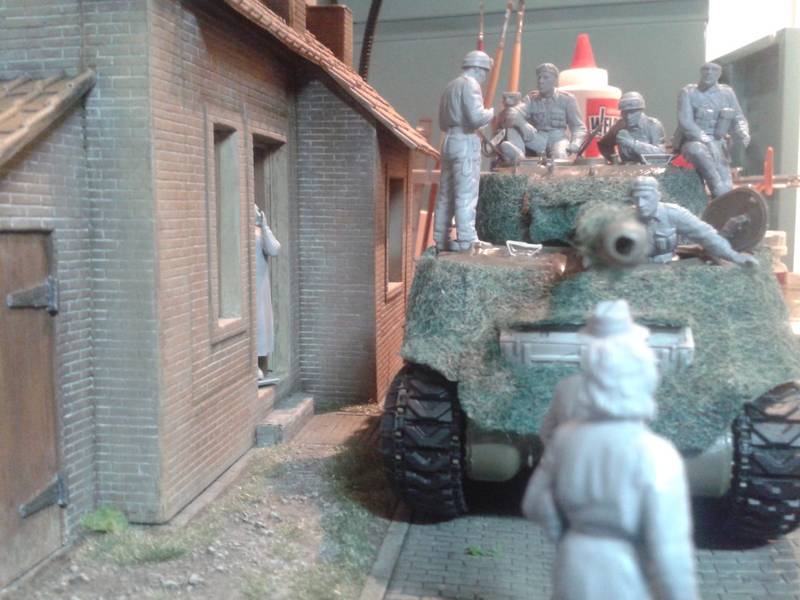
The scene is set and the title OMG there is a tank parked outside my house... and it's not German seems fitting.

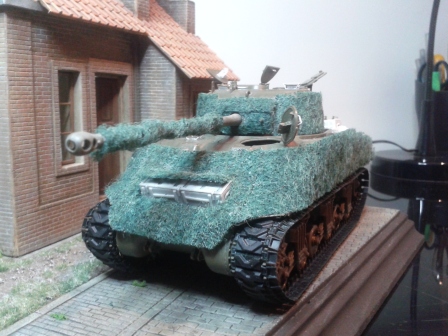
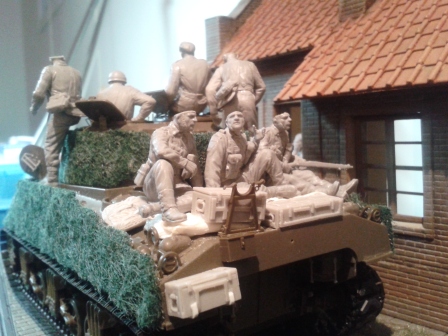
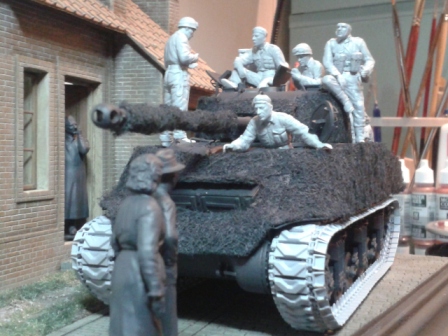
The Sherman is the beautifull Tasca Hybrid Firefly. All the figures are stock Miniart and I will not be changing the heads for aftermarket figures it wil be a test to see how good these really are the poses are wonderfull and the faces look very good for plastic figures. The setting is also Miniart Dutch village diorama. Building this vac form house was a first for me and I will discuss this later all I can say for now is it was not that simple but we shall see how it turns out.
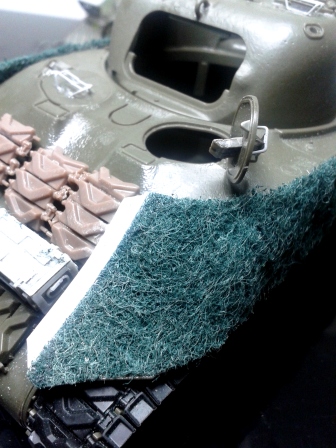
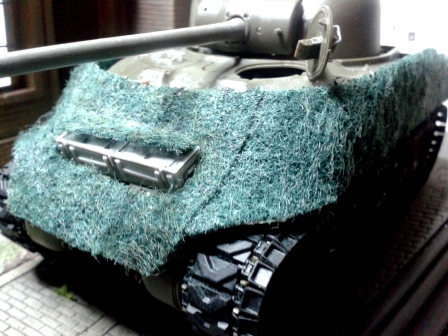
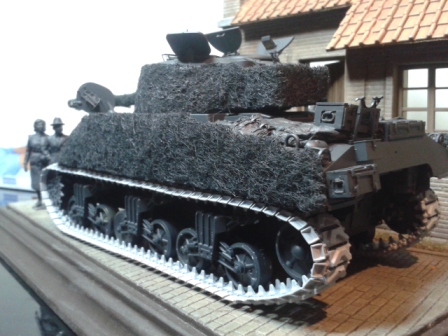
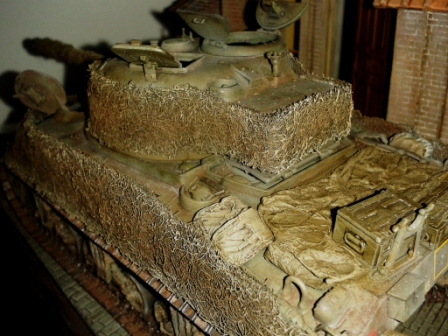
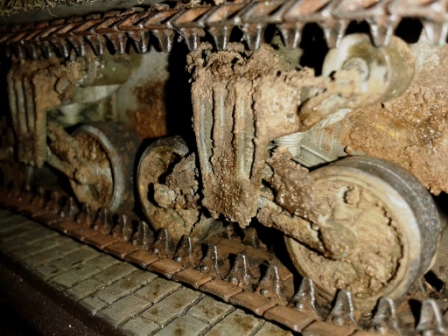
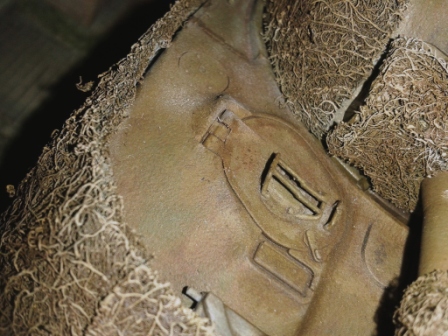
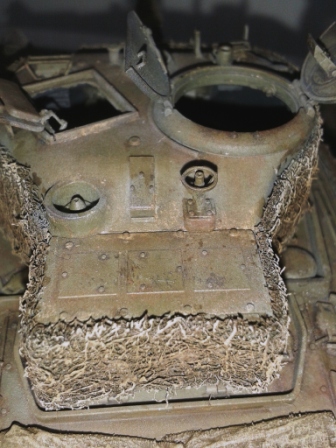
The tank will be stock as well need to add stowage will be putting aftermarket tracks although the tasca tracks are still nice. The tank will be extensively camouflaged with horse hair or steel wool like type fuzzy stuff and thanks to Mr Gosford the fort Garry historian I know how this stuff was installed ( i will post pictures later on this subject

comebackmodeler
Visit this Community
Quebec, Canada
Joined: January 16, 2014
KitMaker: 30 posts
Armorama: 30 posts
Posted: Monday, July 14, 2014 - 01:57 PM UTC
Started working on this Diorama I decided to start with the house and scenery was curious about the possible end result of a Miniart building. Well it wasn't the easiest of tasks putting it together but I really enjoyed painting this
Started with spraying on different shades of Vallejo colors then different oil washes for the mortar in between the brick I used a very light grayish beige color all of that was rubbed of with a slightly moistened rag. this was done randomly so a very uneven effect would be achieved. The same was done to the pavement section with different grayish tones here are a few wip photos


Next step is to finish the house details so the scenery and I will be painting the 3 civilian characters of this scene before moving on to the tank and it's figures.

sorry it is taking more time than I expected but hey it's summertime
Cheers all
1stjaeger
Visit this Community
Wien, Austria
Joined: May 20, 2011
KitMaker: 1,744 posts
Armorama: 1,727 posts
Posted: Monday, July 14, 2014 - 09:33 PM UTC

Hi Brian,

if I understand correctly, the house is entirely MiniArt, right!??
I must admit I'm not an expert for their houses, (rather for their accessories sets ).

I'm not sure, but I assume the colours in your photos are different in real life, am I right!?

Lighting for photos is a tricky business for sure!

Basically your palette looks good....but the 1st and the last pic show almost the same tone for walls and roof! That would not be recommended!

But as I said, the photo might be to blame here!

Anyway, dutch brick houses are top quality and thus have dark and almost uniform brickwork!! This is not MidEast or even Italy where the bricks are generally lighter in tone and vary quite a bit inbetween themselves.

The roof tiles would also be good quality (i.e. rather uniform), but here you can play with dirt staines etc.!!

Overall, this is going to be nice!! I'm looking forward to seeing progress!!

Cheers

Romain

P.S.: one more thing....that chimney seems oddly placed!!!

comebackmodeler
Visit this Community
Quebec, Canada
Joined: January 16, 2014
KitMaker: 30 posts
Armorama: 30 posts
Posted: Friday, October 17, 2014 - 03:43 PM UTC
Summer is over the MGB is gone to storage time to get back to modeling
I have a few details to finish on the building, but after a lot of pondering on how I would simulate that weird camo on Fort Garry Horse Shermans during the last weeks of the war I came up with Scotch Brite pads glued to scale photo etch chicken wire in sections then glued to hull. I started with the lower hull and so far the effect I wanted I got. Will see when painted but I think it will have the proper scale effect
Here are photos of where I am at right now
ps anybody out there that can give me an idea of what the real materiel was and what color because from what I have seen there is quite a strong contrast in color between the camo and the olive green of the tank
Next step camo on gun barrel mantlet and turret
See you then


1stjaeger
Visit this Community
Wien, Austria
Joined: May 20, 2011
KitMaker: 1,744 posts
Armorama: 1,727 posts
Posted: Friday, October 17, 2014 - 09:20 PM UTC


Hi Brian,

could you show us a reference picture of the real thing!!

This scotchbrite pad looks a little odd I'm afraid!

I'm totally at a loss what it should represent!!?

Cheers

Romain

PrickleHead
Visit this Community
Western Australia, Australia
Joined: December 31, 2013
KitMaker: 338 posts
Armorama: 121 posts
Posted: Friday, October 17, 2014 - 10:35 PM UTC


This the kind of thing you are talking about?
comebackmodeler
Visit this Community
Quebec, Canada
Joined: January 16, 2014
KitMaker: 30 posts
Armorama: 30 posts
Posted: Saturday, October 18, 2014 - 02:15 AM UTC
here are some photos that were provided to me by the curator of the Fort Garry Horse museum.
according to him fencing materiel was first welded to hulls and turrets then packing added he was not sure if it was steel wool or some horse hair ammunition crate packing if anybody really knows I would appreciate it.


comebackmodeler
Visit this Community
Quebec, Canada
Joined: January 16, 2014
KitMaker: 30 posts
Armorama: 30 posts
Posted: Saturday, October 18, 2014 - 02:35 AM UTC
Dear PrickleHead yeah something like that but The Fort Garry's where much more elaborate and seemed to go quite heavy on the effect
There is a site called battlefield tours it's a Dutch site and they have quite a few interesting photos of Canadian Shermans in Groningen at the end of the war with this weird camo
Here are a couple of interesting links
http://www.saak.nl/
check out the maple leaf up section
also this site
http://saak.nl/groningen1940-1945/groningen%201940-1945%20en.htm#.VEJ59vl5NCg
here is the photo section from battlefield tours
http://www.battlefieldtours.nu/pictures/

You might have to copy paste but a lot of not to common photos on those sites
Cheers
Brian
jrutman
Visit this Community
Pennsylvania, United States
Joined: April 10, 2011
KitMaker: 7,941 posts
Armorama: 7,934 posts
Posted: Saturday, October 18, 2014 - 02:51 AM UTC
Brian,
Nice start to your dio. I like the kits that you have chosen and the figs.
The building looks very good and is well painted and weathered. I would have to agree about the color of the roof as Romain pointed out. Maybe some more contrast with the walls? Middle European roof tiles seem to be a lot more red than we in North America realize.
I read that the cammo material you are modeling was similar to steel wool. Hopefully more knowledgeable people will weigh in?
J
Sean50
Visit this Community
Manche, France
Joined: March 20, 2007
KitMaker: 340 posts
Armorama: 328 posts
Posted: Saturday, October 18, 2014 - 03:05 AM UTC
Hello there,

Interesting work with the camouflage. Not seen it done before.
To echo the comments about the roof tiles, look on Google Earth and you'll get the idea how bright a colour they are (making obvious allowances for the fact it's a satellite photo on a computer screen )

Cheers,

Sean
comebackmodeler
Visit this Community
Quebec, Canada
Joined: January 16, 2014
KitMaker: 30 posts
Armorama: 30 posts
Posted: Sunday, October 19, 2014 - 02:33 PM UTC
Well a busy weekend Camo pretty much done a few touch ups.
I took your advise and started re tinting the roof in a more reddish orange terracotta give a nicer contrast.Still some weathering to do.
Test fitted the figures a lot to do yet in the area of figures but I do like the overall composition of the scene and the fact that it is quite congested. Not bad for a scene incorporating Miniart stock figures I can only imagine what the cost would have amounted to if I would have searched for resin offerings. I am quite gratefull that Miniart really have a knack for doing so many neet figure sets.
Here are some of the latest shots


1stjaeger
Visit this Community
Wien, Austria
Joined: May 20, 2011
KitMaker: 1,744 posts
Armorama: 1,727 posts
Posted: Sunday, October 19, 2014 - 07:38 PM UTC

Highly informative this camo thing!! I know why I love this forum!!

The figures look basically fine too. It's a bit early, as they are neither fully assembled nor painted, but I like them already! Great choice IMHO!

The whole scene is beginning to look good!!

One suggestion maybe: a little "civilised" vegetation would do the Miniart house good! Think about it! It would look less "impersonal".

I will watch progress with great interest!!!

Well done Sir!!

Cheers

Romain

comebackmodeler
Visit this Community
Quebec, Canada
Joined: January 16, 2014
KitMaker: 30 posts
Armorama: 30 posts
Posted: Tuesday, October 21, 2014 - 02:28 PM UTC
more progress
Tank primed with vallejo surface primer as well as civilian figures. to the house a little aging to the roof and thicker layers of static grass to the base.
Now that the tank is primed it looks better still have to fix camo at front end but that will be done during final assembly stage

all for now now let's paint this tank OD


ps Romain thanks for your keen observations!
justsendit
Visit this Community
Colorado, United States
Joined: February 24, 2014
KitMaker: 3,033 posts
Armorama: 2,492 posts
Posted: Tuesday, October 21, 2014 - 03:30 PM UTC
Great concept and it's coming together very nicely! Watching with interest.

—mike
66fastback
Visit this Community
Oregon, United States
Joined: June 20, 2013
KitMaker: 65 posts
Armorama: 61 posts
Posted: Tuesday, October 21, 2014 - 07:16 PM UTC
This starts to look great, funky cammo I never seen it before.
And as far as the color of your roof tiles go; it seems to be spot on. That is, if you want to take a born and raised dutch guy's word for it.

Eric
comebackmodeler
Visit this Community
Quebec, Canada
Joined: January 16, 2014
KitMaker: 30 posts
Armorama: 30 posts
Posted: Thursday, November 20, 2014 - 09:46 AM UTC
tank finished painting and weathering a few brush details to do periscopes and pioneer tools the rest is done, weathering done with different filters washes pin washes pigments and a bit of drybrushing always trying to not get to monochromatic sorry for the picture quality my camera is my cell. santa if you here me I need a good camera for Xmas

here are the latest pics


On to next phase finish house
Glue tracks down on suspension components and last but not least de figures

I will be back soon by for now
B
1stjaeger
Visit this Community
Wien, Austria
Joined: May 20, 2011
KitMaker: 1,744 posts
Armorama: 1,727 posts
Posted: Thursday, November 20, 2014 - 12:07 PM UTC
Hi Brian,

good to "have you back" on this dio!

Now, it probably is the camera+lighting, but the tank looks indeed a tad "monochromatic" to me, meaning...the tank itself, the tarpaulin and boxes on the back and the camo look almost like spray-painted from the same rattle can.

You could bring more life into the thing by modifying the colours of the elements a bit IMHO.

Your mud effect is nice! Well done that!!!

Just don't push it! If this is Market Garden, the tanks hardly left the dyke road (one of the major problems)

Just my 2c worth!

Apart from that..it's getting hotter!!

Cheers

Romain

callmehobbes
Visit this Community
England - North West, United Kingdom
Joined: April 17, 2005
KitMaker: 751 posts
Armorama: 740 posts
Posted: Thursday, November 20, 2014 - 03:57 PM UTC
Hi. Have you got any photos of the house interior? I'm looking for some inspiration. I agree with Romain, the composition is well done but a few tweaks with the paint job will really improve it. Thanks for sharing.
jrutman
Visit this Community
Pennsylvania, United States
Joined: April 10, 2011
KitMaker: 7,941 posts
Armorama: 7,934 posts
Posted: Thursday, November 20, 2014 - 08:25 PM UTC
Wow!! Lots of work done since your last post. Looks good. I really like this topic and nice to see you tackled that strange cammo method. I saw pics of this years ago but never saw many guys try to accomplish it in scale.
J
comebackmodeler
Visit this Community
Quebec, Canada
Joined: January 16, 2014
KitMaker: 30 posts
Armorama: 30 posts
Posted: Thursday, November 20, 2014 - 11:30 PM UTC
Thanks to all that have been following.
Tank is less drab and monochromatic than it appears in photos been taking pictures with cell under a daylight work lamp not the best results.actually there are quite a few different shades of greens and browns on the vehicle a little subtle but under good lighting it's better. The only way to tweak the paint job at this stage would be to add filters, maybe a sepia base filter, not sure about it I do not want to darken it too much, on the other hand it would blend in a lttle more the different shades already on
Timeframe for this Diorama is April 45 so a lot of mud caught up in suspension road wheels and lower hull that is what I concluded from checking out photos of shermans around Groningen.

As far as the camo I have been wanting to do this type for a long time scale effect is quite pleasing I really was not sure how to go about it but doing the dishes with a scotch brite one evening clicked.

Back soon I hope with more of this project
Brian
1stjaeger
Visit this Community
Wien, Austria
Joined: May 20, 2011
KitMaker: 1,744 posts
Armorama: 1,727 posts
Posted: Friday, November 21, 2014 - 12:07 AM UTC

Oh, it's early 45 then, not Market Garden! Well, that's different of course!

As I guessed, it's the camera+lighting that mainly produces the monochromatic effect!

Well done anyway!!!

Godd luck with further steps (figgies above all )

Cheers

Romain

 _GOTOTOP