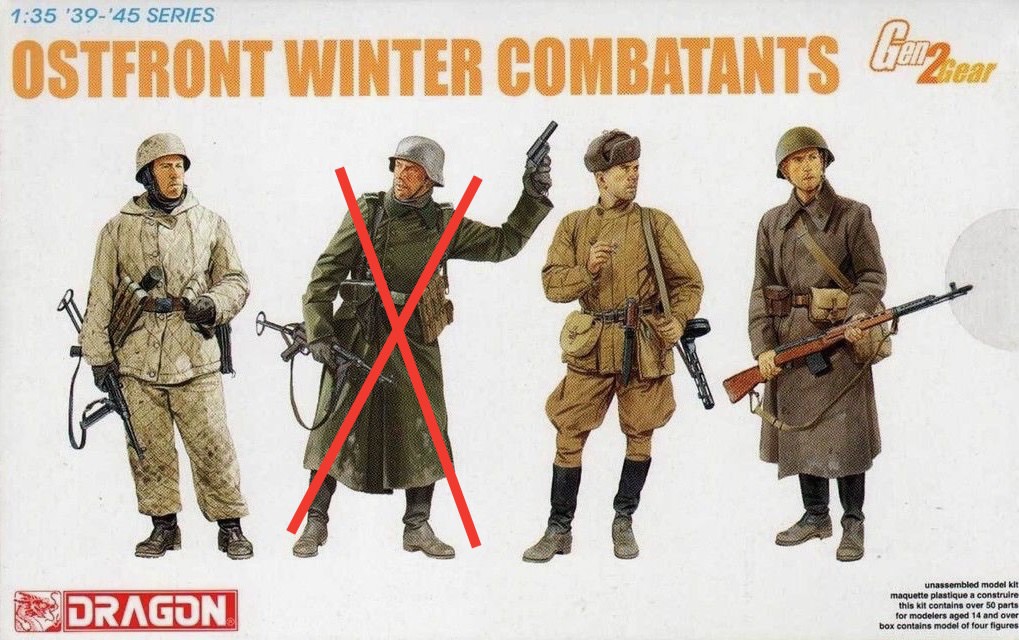
_GOTOBOTTOM
Figures
Military figures of all shapes and sizes.
Figures: practice, practice, practice ...
justsendit
Visit this Community
Colorado, United States
Joined: February 24, 2014
KitMaker: 3,033 posts
Armorama: 2,492 posts
Posted: Wednesday, October 01, 2014 - 06:34 AM UTC
I’ve decided to put a hold on forcing my terrible figures into dioramas and focus more on trying to get them right for a change ... or as close as I can, anyway. Therefore, I’ve started some stand-alone figures for practicing technique.

I’m using three of the four figures in Dragon’s ‘Ostfront Winter Combatants’ kit that I had laying around in the stash. The static poses are not generally what I’m used to but the details in this kit look pretty good.

I’ve exclusively worked with acrylics thus far but unless I can acheive acceptable results with painting faces, blending highlights/shadows, I may, however reluctantly convert to oils.

So here we go. … Three guys walk into a bar …

Initial assembly (figures 01, 03 and 04).


Tamiya Putty (white) to fill-in gaps and joints, then some sanding.


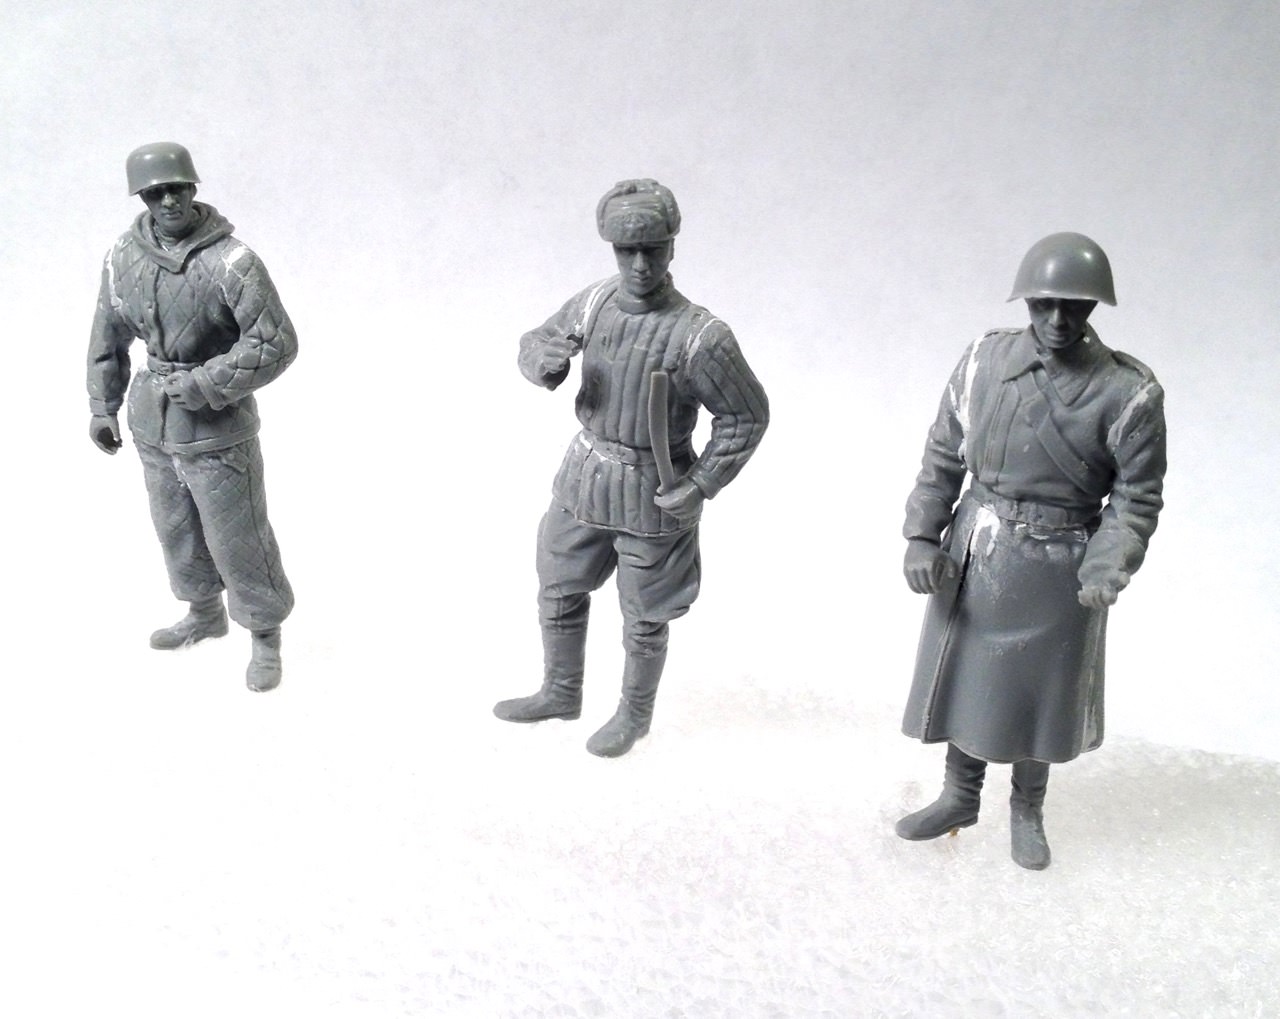
Airbrushed with Vallejo Grey Surface Primer (73.601).


That was the easy part! To be continued.

Comments and critique are welcome.

—mike
panzerconor
Visit this Community
Massachusetts, United States
Joined: February 08, 2012
KitMaker: 1,271 posts
Armorama: 1,253 posts
Posted: Wednesday, October 01, 2014 - 07:33 AM UTC
What do you do your faces with? There's a few color sets out there now, but I think Vallejo Skin tones (base, highlights, and shadow) are really the best stand alone bottles. I throw in a tint of terra cotta or other red-ish colors to replicate the "cold" look of skin. Blending and mixing with those 3 colors is great. I don't pre-shade, but I give it the flesh base, then either do highlights then shadows, or vice versa.

These figures were a bit rushed, but you get the idea:


It's all about blending and mixing for faces. Thin coats build up into great stuff. Take a look at Calvin Tan's work, it's really really drawn out, but the result is great. I don't have any type of patience or skill for that level of work, but it's a good plan to follow.

The figures look good so far! Best of luck.

-Conor
1stjaeger
Visit this Community
Wien, Austria
Joined: May 20, 2011
KitMaker: 1,744 posts
Armorama: 1,727 posts
Posted: Wednesday, October 01, 2014 - 09:55 AM UTC

Hi Mike,

great start!

Now is the "last" chance to see flaws (forgotten seam lines, dirt specs caught under the colour coat, o.s.) ...and then you start painting these beauties!!!

Good luck!!

Cheers

Romain

justsendit
Visit this Community
Colorado, United States
Joined: February 24, 2014
KitMaker: 3,033 posts
Armorama: 2,492 posts
Posted: Wednesday, October 01, 2014 - 11:19 AM UTC

Quoted Text

What do you do your faces with? There's a few color sets out there now, but I think Vallejo Skin tones (base, highlights, and shadow) are really the best stand alone bottles. I throw in a tint of terra cotta or other red-ish colors to replicate the "cold" look of skin. Blending and mixing with those 3 colors is great. I don't pre-shade, but I give it the flesh base, then either do highlights then shadows, or vice versa.


Conor,

Oddly enough, this feels like makeup school! So here's what I have in my makeup kit!

Vallejo Dark Flesh (70.927), Basic Skintone (70.815), Highlights Flesh (70.342), Shadows Flesh (70.343).


Quoted Text

Now is the "last" chance to see flaws (forgotten seam lines, dirt specs caught under the colour coat, o.s.).


Romain, you're right. I always find things at this stage — especially when inspecting the photographs. Usually, I rush to get done but this time there's no need to, so I'll try to RELAX! ... and try to apply myself instead.

So ... Three guys walk into a beauty parlor ...

Thanks for the comments guys!

—mike
panzerconor
Visit this Community
Massachusetts, United States
Joined: February 08, 2012
KitMaker: 1,271 posts
Armorama: 1,253 posts
Posted: Thursday, October 02, 2014 - 04:21 PM UTC
Perfect! I haven't got that last color actually. I feel as though I need it now. That FJ's outfit with the pattern on it, just a tip on that. Once you've got all it's colors done (ie base, highlights, shadows, etc) give it a very diluted dark wash. Not pure black, but maybe a greyish mix? (I'm assuming you're using white hahaha) That will really make the pattern stand out and the outfit will "pop" very nicely. The same goes for the Russian officer as well.

I've done that before, and the best advice I can give is to start small hahaha. You don't want to go too heavy first and potentially ruin your work.

I've actually got a set on deck that's got that same diamond and square pattern:


Now let's see some paint!

-Conor
Stickframe
#362
Visit this Community
California, United States
Joined: December 01, 2013
KitMaker: 1,661 posts
Armorama: 1,202 posts
Posted: Thursday, October 02, 2014 - 04:47 PM UTC
Hi Mike -

Thanks a lot for this!! I'm in the same boat - practicing to get better!!! And, so far, I'm sticking with acrylics - I say so far only because I've still got a way to go just getting the basics down with them. I've had results ranging from bad to acceptable, and even a few pretty good, but they are getting less bad. So far, my biggest challenge with the acrylics is in achieving subtlety - I can stay in the lines, and get basic tones - but NO nuance at all!!! If I get better, that is more confidence, I'd like to try oils. That said, many on the forum get great results with acrylics.

Like you I use a vallejo primer, and for now I'm using Scalecolor Scale 75 for skin tones. I had weird results with the AK skin set - but, I'll bet that was on me and not the paint. I've read many like Lifecolor paints too - and, of course Vallejo too - I just can't buy that much paint!!!

Keep posting!! I'm interested in what you find out, and if all goes according to plan, you'll figure out a good approach I can follow! Also Connor and Romain - their tips can go a long way!!! We need to hear from Jerry next!

Cheers
Nick
mwells63
Visit this Community
Gauteng, South Africa
Joined: July 03, 2014
KitMaker: 82 posts
Armorama: 77 posts
Posted: Thursday, October 02, 2014 - 06:25 PM UTC
Greetings Mike
40 years plus in this hobby and still on a learning curve. I started way back with enamels but could never achieve the effect I wanted. I latter tried acrylics with mixed results, fast drying times being the biggest obstacle on a figure. I finally jumped off the deep end and tried oils. Needles to say I never looked back. Some modellers think of oil's as old school, but acrylics cannot match the subtle blending and highlight effects of oil's. Drying times are a drawback, but that also makes it easier to correct any mistakes. I now use acrylics only for base coats on figures. Oils require practice and perseverance but can produce stunning effects. Having said that, this is only my personal opinion. Experiment and find your own cup of tea. Best of luck and hope to see more of your work.
cheers
jrutman
Visit this Community
Pennsylvania, United States
Joined: April 10, 2011
KitMaker: 7,941 posts
Armorama: 7,934 posts
Posted: Friday, October 03, 2014 - 02:14 AM UTC
Don't depend on me as I suck at painting!
I took a 10 year break from painting while I had my resin parts biz because I only built master patterns and never painted anything. So I am playing catch up.
I now use a base coat of acrylic(lifecolor) and then oils on top but am experimenting with just using straight Lifecolor paints. I used them on my last few guys like"Kinny"
J
Giovanni1508
Visit this Community
Napoli, Italy
Joined: April 17, 2014
KitMaker: 652 posts
Armorama: 600 posts
Posted: Friday, October 03, 2014 - 02:59 AM UTC

Hi Mike,

So far so good... go ahead !
1967er
Visit this Community
Nordrhein-Westfalen, Germany
Joined: March 12, 2012
KitMaker: 224 posts
Armorama: 201 posts
Posted: Friday, October 03, 2014 - 03:50 AM UTC
Hi,

if you need some advice on figure painting this blog is a major source:

http://www.massivevoodoo.blogspot.de

Here you find tons of tutorials and examples on how to get a better figure painter. I find inspiration here anytime...

Cheers
Thomas
Motives
Visit this Community
Stockholm, Sweden
Joined: October 15, 2013
KitMaker: 444 posts
Armorama: 428 posts
Posted: Sunday, October 05, 2014 - 10:28 PM UTC
Maybe we should do a "practice your figure painting" Campaign??

I would sign up
justsendit
Visit this Community
Colorado, United States
Joined: February 24, 2014
KitMaker: 3,033 posts
Armorama: 2,492 posts
Posted: Monday, October 06, 2014 - 05:23 AM UTC

Quoted Text

Maybe we should do a "practice your figure painting" Campaign??

I would sign up


Sure, why not? ... Great idea!
melonhead
Visit this Community
Wisconsin, United States
Joined: July 29, 2010
KitMaker: 662 posts
Armorama: 457 posts
Posted: Monday, October 06, 2014 - 05:49 AM UTC

Quoted Text

What do you do your faces with? There's a few color sets out there now, but I think Vallejo Skin tones (base, highlights, and shadow) are really the best stand alone bottles. I throw in a tint of terra cotta or other red-ish colors to replicate the "cold" look of skin. Blending and mixing with those 3 colors is great. I don't pre-shade, but I give it the flesh base, then either do highlights then shadows, or vice versa.

These figures were a bit rushed, but you get the idea:


It's all about blending and mixing for faces. Thin coats build up into great stuff. Take a look at Calvin Tan's work, it's really really drawn out, but the result is great. I don't have any type of patience or skill for that level of work, but it's a good plan to follow.

The figures look good so far! Best of luck.

-Conor


i couldnt agree more. calvin tan has a great tutorial on his blog. i use it religiously. in fact, i have it printed out as a reference. he uses specific colors/mixtures, but you dont necessarily have to. the vellejo color line that you have, i also have, and use. its great if you dont want to mix colors to get the proper color that you are wanting. You will just have to decide what order you want to use them in, and how to apply them.
with acrylics, it is all about layers, and building them up over time. small figures are definately harder than larger figures.
andyevans
Visit this Community
England - East Midlands, United Kingdom
Joined: October 04, 2008
KitMaker: 369 posts
Armorama: 249 posts
Posted: Monday, October 06, 2014 - 07:25 AM UTC

Quoted Text

small figures are definately harder than larger figures.


Yup. Optivisor, every time !
justsendit
Visit this Community
Colorado, United States
Joined: February 24, 2014
KitMaker: 3,033 posts
Armorama: 2,492 posts
Posted: Monday, October 06, 2014 - 09:58 AM UTC

Quoted Text


Quoted Text

small figures are definately harder than larger figures.


Yup. Optivisor, every time !


The eyewear kit!

ejhammer
Visit this Community
Michigan, United States
Joined: June 10, 2008
KitMaker: 230 posts
Armorama: 34 posts
Posted: Monday, October 06, 2014 - 11:25 AM UTC

Quoted Text


Quoted Text

Maybe we should do a "practice your figure painting" Campaign??

I would sign up


Sure, why not? ... Great idea!


Me too. Got some 1/35 sailors to do for a diorama and have never done figures before. Would be a great learning tool.

EJ
Motives
Visit this Community
Stockholm, Sweden
Joined: October 15, 2013
KitMaker: 444 posts
Armorama: 428 posts
Posted: Tuesday, October 07, 2014 - 04:55 AM UTC
I can make a thread in the campaigns section and we'll see what happens!
Charlie-66
#186
Visit this Community
Texas, United States
Joined: May 24, 2006
KitMaker: 771 posts
Armorama: 750 posts
Posted: Tuesday, October 07, 2014 - 05:06 AM UTC
I'm anxious to follow this. I've always done my figures with oils for the face and hands (the old Sheppard Paine method for those who remember) and then acrylics for everything else.
nng-nng
Visit this Community
Bayern, Germany
Joined: October 22, 2013
KitMaker: 380 posts
Armorama: 376 posts
Posted: Tuesday, October 07, 2014 - 06:05 AM UTC
Good luck with the German in his white suit... I´ve tried painting him, but white is pretty unvorgiving....
The smoking russian is perfect for some tests with oil, as there is so much structure were you can let washes and filters do the work for you.

I´d be in in this campaign, have to practice some cammo....
Motives
Visit this Community
Stockholm, Sweden
Joined: October 15, 2013
KitMaker: 444 posts
Armorama: 428 posts
Posted: Tuesday, October 07, 2014 - 06:18 AM UTC
http://armorama.kitmaker.net/forums/227061&page=1#1913525

Sign up if you feel like it!
justsendit
Visit this Community
Colorado, United States
Joined: February 24, 2014
KitMaker: 3,033 posts
Armorama: 2,492 posts
Posted: Tuesday, October 07, 2014 - 06:56 AM UTC

Quoted Text

Good luck with the German in his white suit... I´ve tried painting him, but white is pretty unvorgiving....
The smoking russian is perfect for some tests with oil, as there is so much structure were you can let washes and filters do the work for you.

I´d be in in this campaign, have to practice some cammo....


Fabian!

I agree ... and then there are the dirty regions on that white suit — one of the reasons I chose this kit. Also, note the diversity between the four uniforms. Overall, I think these will be great practice for me. As far as paints, I've got tons of acrylics to play with and no oils yet, so I decided to stick with acrylics for now.


I should have saved these guys for the figure campaign which seems to be gaining some momentum ... but that's how it goes. No worries though, I've got more figures in the stash that need to get done. ... I'm so in if the campaign takes off.

To all, Thanks for the comments!

—mike
wedgetail53
Visit this Community
Queensland, Australia
Joined: October 02, 2008
KitMaker: 658 posts
Armorama: 629 posts
Posted: Tuesday, October 07, 2014 - 06:50 PM UTC
G'day gents

A little trick I learned the other day when using acrylics, which I always use for figures (always Vallejo)and it addresses the fast drying time of acrylics.

Get a very shallow tray (only needs to be a couple of millimetres deep) - the lid of a plastic takeaway food box is ideal, and just cover the surface with a millimetre or two of water.

Place some folded paper towel in the water so that it's sopping wet. Cover this with a piece of non-stick baking paper. In Australia it's marketed as Glad Bake - don't know what it's called elsewhere.

Mix your colours on top of the paper. the theory is that the molecules of paint are too big to go through the bake paper from above, but the water can get through from below, keeping the acrylic paint moist.

Regards

Rob
1967er
Visit this Community
Nordrhein-Westfalen, Germany
Joined: March 12, 2012
KitMaker: 224 posts
Armorama: 201 posts
Posted: Tuesday, October 07, 2014 - 07:59 PM UTC
Hi rob,

what you describe is the "wet-palette" which nearly every figure painter is using with acrylic paints.

Important is to thin the color 1:2 up to 1:4 to achieve transparent color layers - called glazes. Its like washes for your armored vehicles.

Regarding white on clothes - that's really difficult if it should look "clean".
But a dirty winter suite should be easier.
Start with very light grey, paint white lights on all surfaces that are directly lighted (mostly sunlight from directly above - called zenital light) and use light brown-grey washes for the shadow areas.
Right now I am experimenting with "Worn Patina 1" from the range of "True Earth" - I you like I will post a picture in this thread.

Cheers
Thomas
justsendit
Visit this Community
Colorado, United States
Joined: February 24, 2014
KitMaker: 3,033 posts
Armorama: 2,492 posts
Posted: Wednesday, October 08, 2014 - 05:23 AM UTC
@ Rob. Thanks! Yes, that's the way to go when painting with acrylics (Wet Palette). Since I started using this method, my painting frustrations have gone from fighting with acrylics always drying out, to taking my time and having a lot more fun.

For those who would like more info. on how to make a Wet Palette, here are a couple of helpful YouTube videos. I've been using the shallow tray version for several months now. However, the deeper version looks very good for longer-term storage.

HOWTO: The Wet Palette and How to make a wet palette


@ Thomas. Thanks for the "white on clothes" advice. Please feel free to post your image.

@ All. Thanks for the comments and advice. The notes are piling up next to my workbench for handy reference.

@ Self. Step away from the "Time Eraser" (computer) and start applying some of these techniques! LOL!

—mike
easyco69
Visit this Community
Ontario, Canada
Joined: November 03, 2012
KitMaker: 2,275 posts
Armorama: 2,233 posts
Posted: Wednesday, October 08, 2014 - 05:42 AM UTC
I have those Vallejo & Panzer Aces flesh colors. I realized that they tend to look different dry compared to wet. So , what I did was make a color swatch of each on spare piece of 2"x2" grey plastic...now I know what each color will be when dry. It helps. Oil paints are the same way.
My problem seems to be blending....I also can not find a good brush that will hold a good point. I also have to force myself to concentrate ...what I want to do is come up with a pattern that works for me. Like a template. Or better yet..a sequence of steps that I can memorize & call my own to achieve great results. I tend to rush into it & end up redoing stuff a lot because I lack discipline.
But, I know I can do this, I have confidence to be good at this but..there again...comes patience.
 _GOTOTOP