

If anyone has some ideas for replicating dust on vehicles I would like to know how.
I have seen some good dusty vehicles online and I would deeply appreciate some help.
J
AFV Painting & Weathering
Answers to questions about the right paint scheme or tips for the right effect.
Answers to questions about the right paint scheme or tips for the right effect.
Hosted by Darren Baker, Matthew Toms
Adding dust

jrutman

Joined: April 10, 2011
KitMaker: 7,941 posts
Armorama: 7,934 posts
Posted: Thursday, October 23, 2014 - 03:07 AM UTC
pseudorealityx
Joined: January 31, 2010
KitMaker: 2,191 posts
Armorama: 1,814 posts

Posted: Thursday, October 23, 2014 - 03:29 AM UTC
Jerry,
I use a pretty simple and quick method that utilizes enamel based 'washes'. I typically use the AK products, but only because I have them. You could certainly use your own mixes.
It sounds really silly, but basically I pick a few different colors, and apply an overall wash, varying the colors I'm using. Except for instead of attempting to get a perfectly even coat everywhere trying to accentuate detail, I'm doing the opposite and trying to vary colors and coverage to break up the color with different variations, tones, etc. Basically using 'bad' technique. Let the colors mix together a bit around the edges. Use a brush damp with thinner to push around the various colors and just kinda 'play' with it.
I did a little demo at our local AMPS meeting last month, although I don't have any photos.
2 examples of the results.
Here's my Matilda
http://armorama.com/forums/216132#1815627
And my M109A2. This was done with a lighter touch, and I did also use a very thinned layer of thinner mixed with just a few drops of a dust color airbrushed along the lower hull.
http://armorama.com/forums/217085#1824378

panzerbob01
Joined: March 06, 2010
KitMaker: 3,128 posts
Armorama: 2,959 posts
Posted: Thursday, October 23, 2014 - 03:39 AM UTC
Jerry;
Pretty much the way to get something looking genuinely dusty... is to add real dust!
I like my panzers dusty, so, after the paint-job, I spray a light wash of appropriate light earth colors on the lower parts where dust and dirt will be really heavy - a sort of fixed dust zone...
And I then follow up with finely-powdered colored artists chalks brushed on and off and pushed around as needed. I blend browns and buffs and grays and yellows to get the "right dust color" and work it on. It will eventually fall off if the kit is handled much, but does fine on the shelf! Very simple, quick, and easy, and if you don't like it... wash or blow it off and redo it!
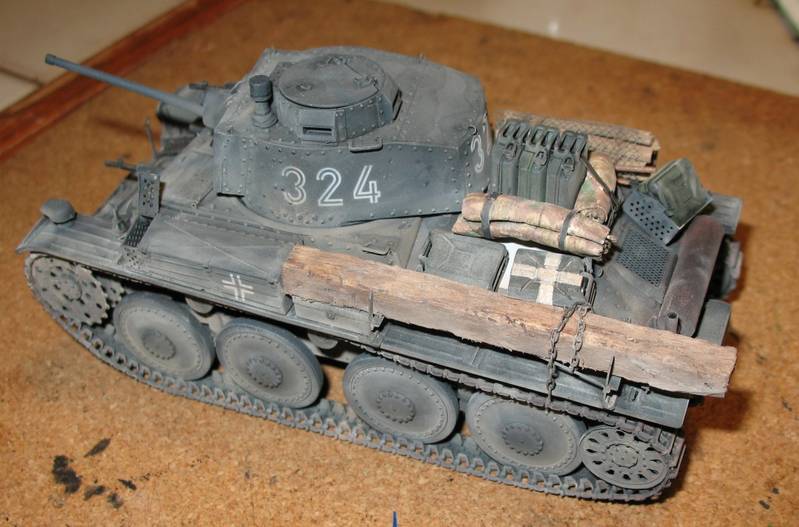
Here's an example - Pz 38(t) E from Russia, 1941.
Cheers!
Bob
Pretty much the way to get something looking genuinely dusty... is to add real dust!
I like my panzers dusty, so, after the paint-job, I spray a light wash of appropriate light earth colors on the lower parts where dust and dirt will be really heavy - a sort of fixed dust zone...
And I then follow up with finely-powdered colored artists chalks brushed on and off and pushed around as needed. I blend browns and buffs and grays and yellows to get the "right dust color" and work it on. It will eventually fall off if the kit is handled much, but does fine on the shelf!
Very simple, quick, and easy, and if you don't like it... wash or blow it off and redo it!Here's an example - Pz 38(t) E from Russia, 1941.
Cheers!
Bob
Belt_Fed
Joined: February 02, 2008
KitMaker: 1,388 posts
Armorama: 1,325 posts

Posted: Thursday, October 23, 2014 - 03:58 AM UTC
I'm thinking about writing an article about adding dust to models. There are many ways to do it, so here are what works best for me.
One easy way is to mix pigments with AK or Ammo dust washes and apply them to the verticle surfaces of models, allowing the wash to accumulate in details. You should also spray just the wash color in verticle streaks on the horizontal panels of the model, as well as a subtle gradient on the lower portions of these panels.
Tamiya enamel s work very well for dust washes. I get mine from lucky model. They are pretty cheap. Thin them about 80% or so with their own enamel thinner and smear it on surfaces. Then Take a cotton swab damp with thinner and remove areas that are too heavy. On verticle surfaces, paint verticle lines with the enamel s unthinned from the bottle and blend with a brush damp with thinner.
Stickframe

#362
Joined: December 01, 2013
KitMaker: 1,661 posts
Armorama: 1,202 posts

Posted: Thursday, October 23, 2014 - 04:27 AM UTC
Hi Jerry,
I use Lifecolor Dust 1 or 2. I'm not sure I use a wash in the technical definition of one. I pour some of the paint into one of those plastic painters trays - right next to some water. Then, dip the brush into the paint then water and so on to apply the diluted color - then work across the vehicle, or structure. By not using a uniform wash, you get some nice variety, pools, streaking etc. The end result is also flat which I like. This topcoat also seems to work well in blending chips, rust, etc so the look like part of the build and not something on top of the build - finally, you can add enamel detail colors (grime etc) over bolts seams etc if you wish.
Cheers
Nick
jrutman
Joined: April 10, 2011
KitMaker: 7,941 posts
Armorama: 7,934 posts
Posted: Thursday, October 23, 2014 - 07:41 AM UTC
Keep em comin' guys as I am getting some really good intel here for sure. Thanks!!!
J
J
 |

WEB HOSTING BY


Copyright ©2021 Armorama and Kitmaker Network, a subsidiary of Silver Star Enterprises
All Rights Reserved. Please read our Conditions of Use and Privacy Policy.
All Rights Reserved. Please read our Conditions of Use and Privacy Policy.