

AFV Painting & Weathering
Answers to questions about the right paint scheme or tips for the right effect.
Answers to questions about the right paint scheme or tips for the right effect.
Hosted by Darren Baker, Matthew Toms
Mud

Jared185

Joined: February 14, 2015
KitMaker: 13 posts
Armorama: 13 posts
Posted: Tuesday, February 17, 2015 - 09:12 PM UTC
Ok I have been posting like crazy though doing my first project in forever. Ok I decided to strip paint from the tamiya 1/48 m4 Sherman. So I stripped using windes and toothbrush and reprimed everything. And today it's almost fully assembled and ready for paint. My thing is I'm not going to assemble suspension till I get mid effects on there. Now I was told to use flower or and and mix with sand or mud colored paint and then add white glue to the mix and apply to sides and let dry a few hours is this true. And thanks for any replies you all have been very helpful.

Delta42
Joined: August 27, 2002
KitMaker: 616 posts
Armorama: 511 posts
Posted: Tuesday, February 17, 2015 - 09:20 PM UTC
Hey Jared,
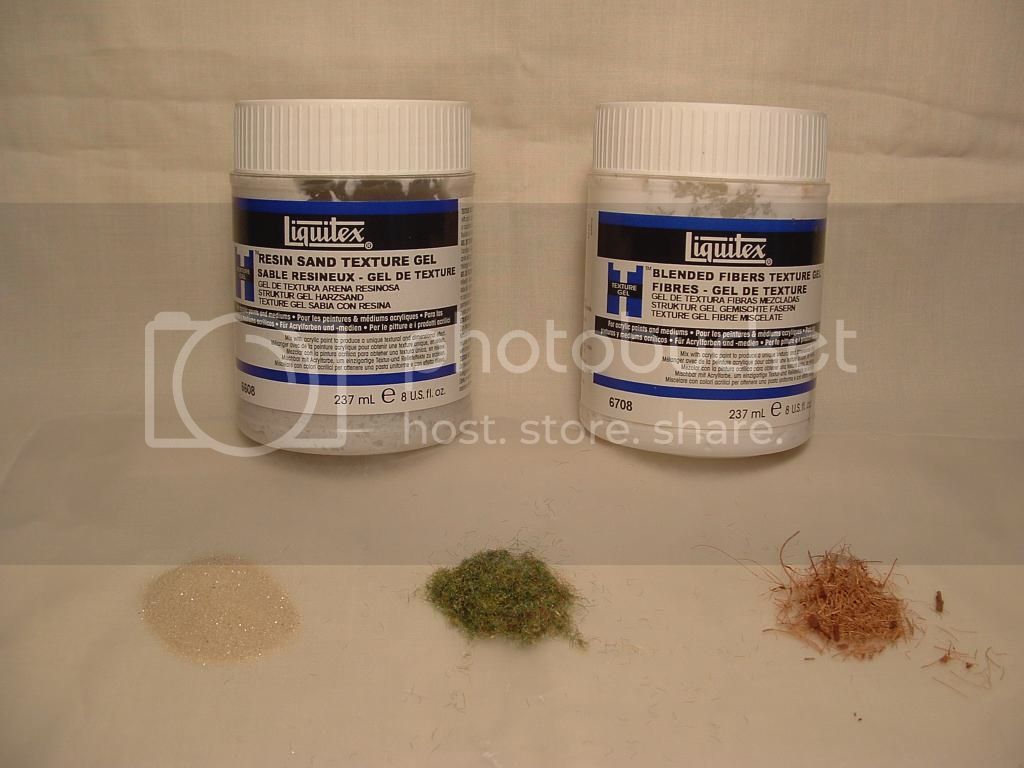
I have always used Liquitex Resin medium with sand, static grass and coconut fibers. The Liquitex and coconut fiber can be obtained at Michael's or Hobby Lobby. The beauty of this mixture is that it can be tinted with acrylic paint or pigments, and it stays workable for several hours. Water will clean it up.
Dave
Viper_msk

Joined: February 14, 2015
KitMaker: 53 posts
Armorama: 53 posts
Posted: Tuesday, February 17, 2015 - 10:36 PM UTC
Hi Jared,
one learning that I had from trying to apply mud "by the book" (= with acrylic resin or plaster) is that it is VERY easy to overdo it. Very easy to put on a layer of mud that would be WAY too think and would cover the entire lower hull.
Thus, I am trying to avoid adding plaster or resin to pigments at all. Just dropping the pigments with a tip of the knife (just as if you're adding salt while cooking) and blending them a bit with a brush should be enough. The key to generating volume (not a huge mud-ball, but a scale volume) is to use a dropper to apply pigment fixer (so that it wets the pigments without blurring them with a paintbrush).
Belt_Fed
Joined: February 02, 2008
KitMaker: 1,388 posts
Armorama: 1,325 posts

Posted: Tuesday, February 17, 2015 - 11:23 PM UTC
There are several billion ways of adding mud to models. Some are easier than others, and the technique you use will greatly depend on the materials you have available.
Method 1- Putty. This technique is pretty easy, and you probably have all the tools you need to do it. Simply take some modeling putty and thin it down a little bit with Acetone or Lacquer thinner. Then, using a stiff, nylon brush, stipple this mix onto your model BEFORE painting. As you paint your model, airbrush/ brush it with earth tones. Its simple, easy, and cheap. Make sure you apply it in a well ventilated area.
Method 2- Paint and plaster. Another easy method, mix plaster with some earth tones into a thickish paste and stipple that on with a stiff brush. Use a variety of tones, and you can add sand or gravel to the mix to achieve greater texture.
Method 3- My preferred method. This requires more specific materials- Pigments, flat varnish, and gravel/sand/ texture medium. Simply mix the pigments and sand/ gravel with the matte varnish until you get a sticky paste. The, stipple that onto your model

TankSGT
Joined: July 25, 2006
KitMaker: 1,139 posts
Armorama: 946 posts
Posted: Wednesday, February 18, 2015 - 05:21 PM UTC
Don't use flour it may evenually spoil and attracts mold. i did once and my tank started to stink.
I made up a mixture that I'm happy with ground up florists foam, static grass, white glue, water and water based paint. I actually keep it premixed adding to it as needed. Being water based its easy to remove if over done. I add my mud like it occurs on a real tank after its painted.
This is my AA Conqueror with the mud coming off the track on to the inner side skirt.

Tom

Jared185
Joined: February 14, 2015
KitMaker: 13 posts
Armorama: 13 posts
Posted: Thursday, February 19, 2015 - 05:53 PM UTC
Welli went to the only hobby shop in my area and just my luck they don't carry mig pigments or liquitex or anything that's going to make a grimy mud look. And I don't trust ordering online bc I've had identity stolen. So he sold me a tamiya master weathering kit which isn't for the mud of course. And some mud acrylic paint that's made to replicate mud on models but it has a flat look not like mig pigments any ideas to make the acrylic mud look more realistic
Alystyr
Joined: June 17, 2014
KitMaker: 146 posts
Armorama: 88 posts
Posted: Thursday, February 19, 2015 - 06:27 PM UTC
I've used talcum powder or baking soda mixed with paint when doing bases for gaming miniatures. Both gave a pretty good impression of bare, torn-up ground, IMO. Should work pretty well for mud too, since it's easy to change the "coarseness" by varying the amount/type of filler.
iowabrit
Joined: November 06, 2007
KitMaker: 585 posts
Armorama: 557 posts

Posted: Thursday, February 19, 2015 - 08:05 PM UTC
I normally use an acrylic medium mixed with real dirt (just go to the kerbside and collect some. I use an old sieve to remove the larger bits of grit) and acrylic paint and/or pigments to get the colour I want. I found the acrylic medium at Hobby Lobby but I expect Michaels stock it too.

jhoenig
Joined: December 29, 2011
KitMaker: 343 posts
Armorama: 313 posts
Posted: Friday, February 20, 2015 - 12:31 AM UTC
Jared send me a PM with your address and I'll send you a sample, specify wet or dry look.
- John
- John
Jared185
Joined: February 14, 2015
KitMaker: 13 posts
Armorama: 13 posts
Posted: Friday, February 20, 2015 - 05:17 PM UTC
Thanks guys for the help. I just finished the m4 Sherman last night. Well it's almost done just need to paint tool handles and put clear on it. I figure I'd try something and use it on spare part to see how it would turn out and the mud effect was amazing. Even surprised myself. I used the mud acrylic paint, contractor sand, and white glue. Mixed to the consistency I like and applied. It really worked well for me. And that tamiya weathering kit added realism as well. Made it look 10000 times more realistic
M4A3E8Easy8
Joined: February 04, 2006
KitMaker: 302 posts
Armorama: 300 posts

Posted: Sunday, February 22, 2015 - 03:03 PM UTC
Quoted Text
Jared send me a PM with your address and I'll send you a sample, specify wet or dry look.
- John
I have used John's wet mud and let me say it is the cats meow... actually it sort of crushed me as well. everybody I show the tank two ask about and swoons all over the mud. The want to touch it and ask how I did it.. the !@$!@ mud took 15 mins to do.. the tank took a month.. Ignore the mud people look at all the hard work..
OOPS.. off the topic.. Like I said John's stuff is top notch and is simple to use. 10 out of 10 from me


Armored76

Joined: September 30, 2013
KitMaker: 1,615 posts
Armorama: 1,500 posts
Posted: Sunday, February 22, 2015 - 03:20 PM UTC
What exactly is "John's wet mud" if yo don't mind me asking?
Thanks!
Thanks!

Namabiiru

#399
Joined: March 05, 2014
KitMaker: 2,888 posts
Armorama: 1,920 posts

Posted: Sunday, February 22, 2015 - 03:52 PM UTC
I'll echo Christian's question as well as someone else's earlier observation that there are several billion ways to do mud.
My first-ever attempt at mud was on an a Tamiya M3 Stuart. I had a bottle of flat earth paint that had basically turned into a bottle of settled pigment, and after slathering it on pretty thick that little tank looked just like it had driven out of a mud bog. Granted, it would have been a training field mud bog since the color was pretty uniform, but nevertheless it was quite convincing (at least to my teenage eyes). I think it makes a pretty good (read easy & inexpensive) starting point for a new mudder. Add some dirt to the mix for extra texture, and finish with some washes of varying colors, and Bob's your uncle!

My first-ever attempt at mud was on an a Tamiya M3 Stuart. I had a bottle of flat earth paint that had basically turned into a bottle of settled pigment, and after slathering it on pretty thick that little tank looked just like it had driven out of a mud bog. Granted, it would have been a training field mud bog since the color was pretty uniform, but nevertheless it was quite convincing (at least to my teenage eyes). I think it makes a pretty good (read easy & inexpensive) starting point for a new mudder. Add some dirt to the mix for extra texture, and finish with some washes of varying colors, and Bob's your uncle!

airborne1

Joined: April 15, 2006
KitMaker: 915 posts
Armorama: 797 posts

Posted: Sunday, February 22, 2015 - 04:29 PM UTC
wall filler , bird sand and cheap acrylic paints .
apply with paint brush and water .Keeps the Brush clean and not too clogged up when applying onto the tracks .
Add pigments or acrylic gloss as needed to get the wet effect


better images here of finished unit
http://www.puttyandpaint.com/projects/5841
Michael
apply with paint brush and water .Keeps the Brush clean and not too clogged up when applying onto the tracks .
Add pigments or acrylic gloss as needed to get the wet effect


better images here of finished unit
http://www.puttyandpaint.com/projects/5841
Michael
M4A3E8Easy8
Joined: February 04, 2006
KitMaker: 302 posts
Armorama: 300 posts
Posted: Sunday, February 22, 2015 - 05:24 PM UTC
Quoted Text
What exactly is "John's wet mud" if yo don't mind me asking?
Thanks!
Here is a pic of Johns wet mud. He has a nice video of how to use it. I was not kidding about 15 mins to use it.

oh Yeah there is a tank in that picture
Armored76
Joined: September 30, 2013
KitMaker: 1,615 posts
Armorama: 1,500 posts
Posted: Sunday, February 22, 2015 - 05:43 PM UTC
Thanks for the image. it indeed looks good for wet mud.
Is this some kind of a commercially available product? Is John selling this mix? Is this just about his method?
Thanks!
Cristian
Is this some kind of a commercially available product? Is John selling this mix? Is this just about his method?
Thanks!
Cristian
M4A3E8Easy8
Joined: February 04, 2006
KitMaker: 302 posts
Armorama: 300 posts
Posted: Monday, February 23, 2015 - 07:56 AM UTC
Quoted Text
Thanks for the image. it indeed looks good for wet mud.
Is this some kind of a commercially available product? Is John selling this mix? Is this just about his method?
Thanks!
Cristian
It is a commercially available product John sells
http://www.thescenicfactory.com/category_s/1867.htm
 |

WEB HOSTING BY


Copyright ©2021 Armorama and Kitmaker Network, a subsidiary of Silver Star Enterprises
All Rights Reserved. Please read our Conditions of Use and Privacy Policy.
All Rights Reserved. Please read our Conditions of Use and Privacy Policy.