

hello a newbie here
my question is when to paint , on the frames or when the model is complete. as I am getting myself a dragon sd.kfz.164 nashorn and as it is not a cheap model I want to do the best job I can on it , any tips please
AFV Painting & Weathering
Answers to questions about the right paint scheme or tips for the right effect.
Answers to questions about the right paint scheme or tips for the right effect.
Hosted by Darren Baker, Matthew Toms
when to paint

funster63

Joined: March 26, 2015
KitMaker: 8 posts
Armorama: 8 posts
Posted: Thursday, March 26, 2015 - 01:52 AM UTC

SgtRam

#197

Joined: March 06, 2011
KitMaker: 3,971 posts
Armorama: 2,859 posts

Posted: Thursday, March 26, 2015 - 02:33 AM UTC
Painting can be a personal approach for a lot. For me, it depends on the kit and/or vehicle. For truck,jeeps, etc, I tend to paint frame before mounting body, for open top AFV's, I build and paint interior before completing assembly and painting exterior. For tank I build minus the wheels and track, paint, then attach wheels and tracks for weathering.
You need to find what works for you.
You need to find what works for you.
funster63
Joined: March 26, 2015
KitMaker: 8 posts
Armorama: 8 posts
Posted: Thursday, March 26, 2015 - 03:01 AM UTC
thanks for the reply
I have seen pics where people have wheels etc on stakes and paint them individually so not sure what will be best
I have seen pics where people have wheels etc on stakes and paint them individually so not sure what will be best

DaGreatQueeg

Joined: August 01, 2005
KitMaker: 1,049 posts
Armorama: 841 posts

Posted: Thursday, March 26, 2015 - 03:51 AM UTC
Hi Steve,
With the Dragon Nashorn you've picked a reasonably difficult kit to start with as depending on whether you brush or spray it might be difficult to get to some of the fighting compartment.
As Kevin suggested, assembling in stages might work best, painting each stage. Some things can certainly be painted on the sprue and touched up later, just be sure to scrape paint off any joints requiring glue.
I'd also suggest searching the build logs on this site (and the web - google is your friend) to see how others have done it, it's always useful to see how someone else has tackled the same kit.
cheers
Brent

retiredyank

Joined: June 29, 2009
KitMaker: 11,610 posts
Armorama: 7,843 posts
Posted: Thursday, March 26, 2015 - 04:01 AM UTC
Painting is one reason I don't do many/any open top vehicles or interiors. Kevin and Brent are correct to paint assemblies IMHO. Another option is to join the assembled hull and upper superstructure, with white glue. This is easy to remove, after painting and leaves you with a clean edge for cement. Leaving the wheels off makes them easier to spray. If you are doing it by brush, they can be assembled, first. I recommend painting the tracks, before joining them to the running gear. It is much easier, this way. One option to clean surfaces for cement does have some risk involved. I dampen(note: "dampen" not "soak") a q-tip, with lacquer thinner. Gently swab the paint off of joints. It should only take a few passes. Bare plastic, ready for cement will be revealed.

KevPak
Joined: June 04, 2014
KitMaker: 137 posts
Armorama: 128 posts
Posted: Thursday, March 26, 2015 - 05:11 AM UTC
Having made the Dragon Hornisse model I can speak from experience. First, if your tracks are the individual links I would assemble the drivers, idlers and running gear around the lower chassis then fit the tracks, in small sections, around the running gear and wheels. This should be done BEFORE fitting the fenders as it takes the patience of Job to get the little links fitted snugly onto each other between the fenders and the running gear!
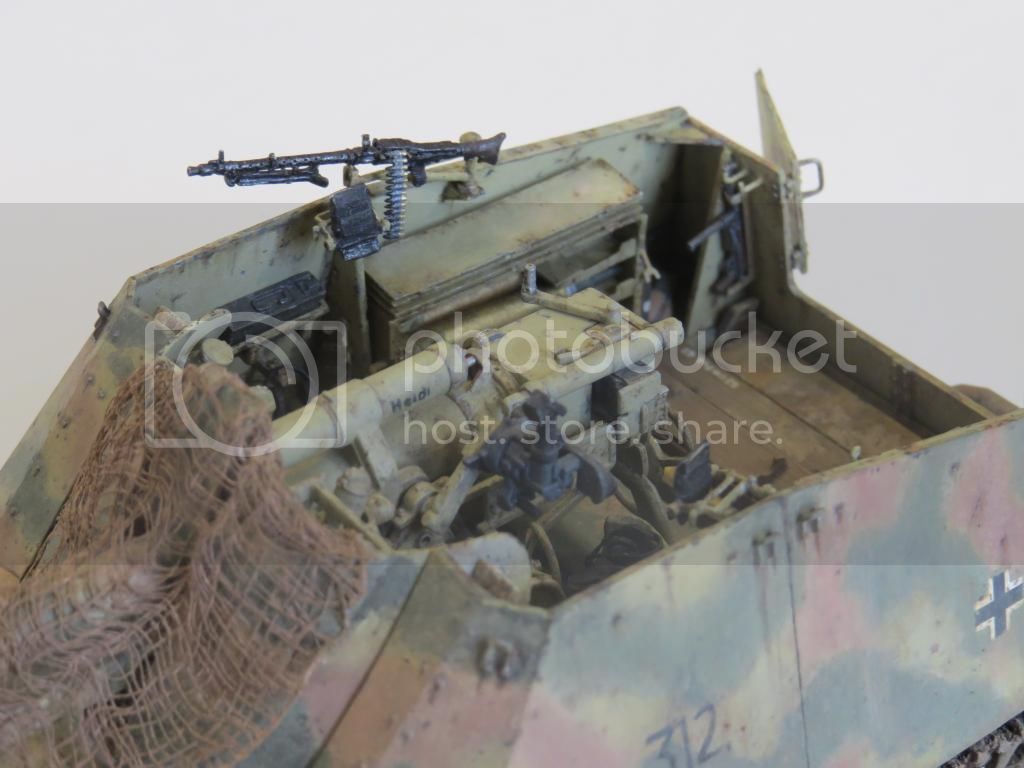
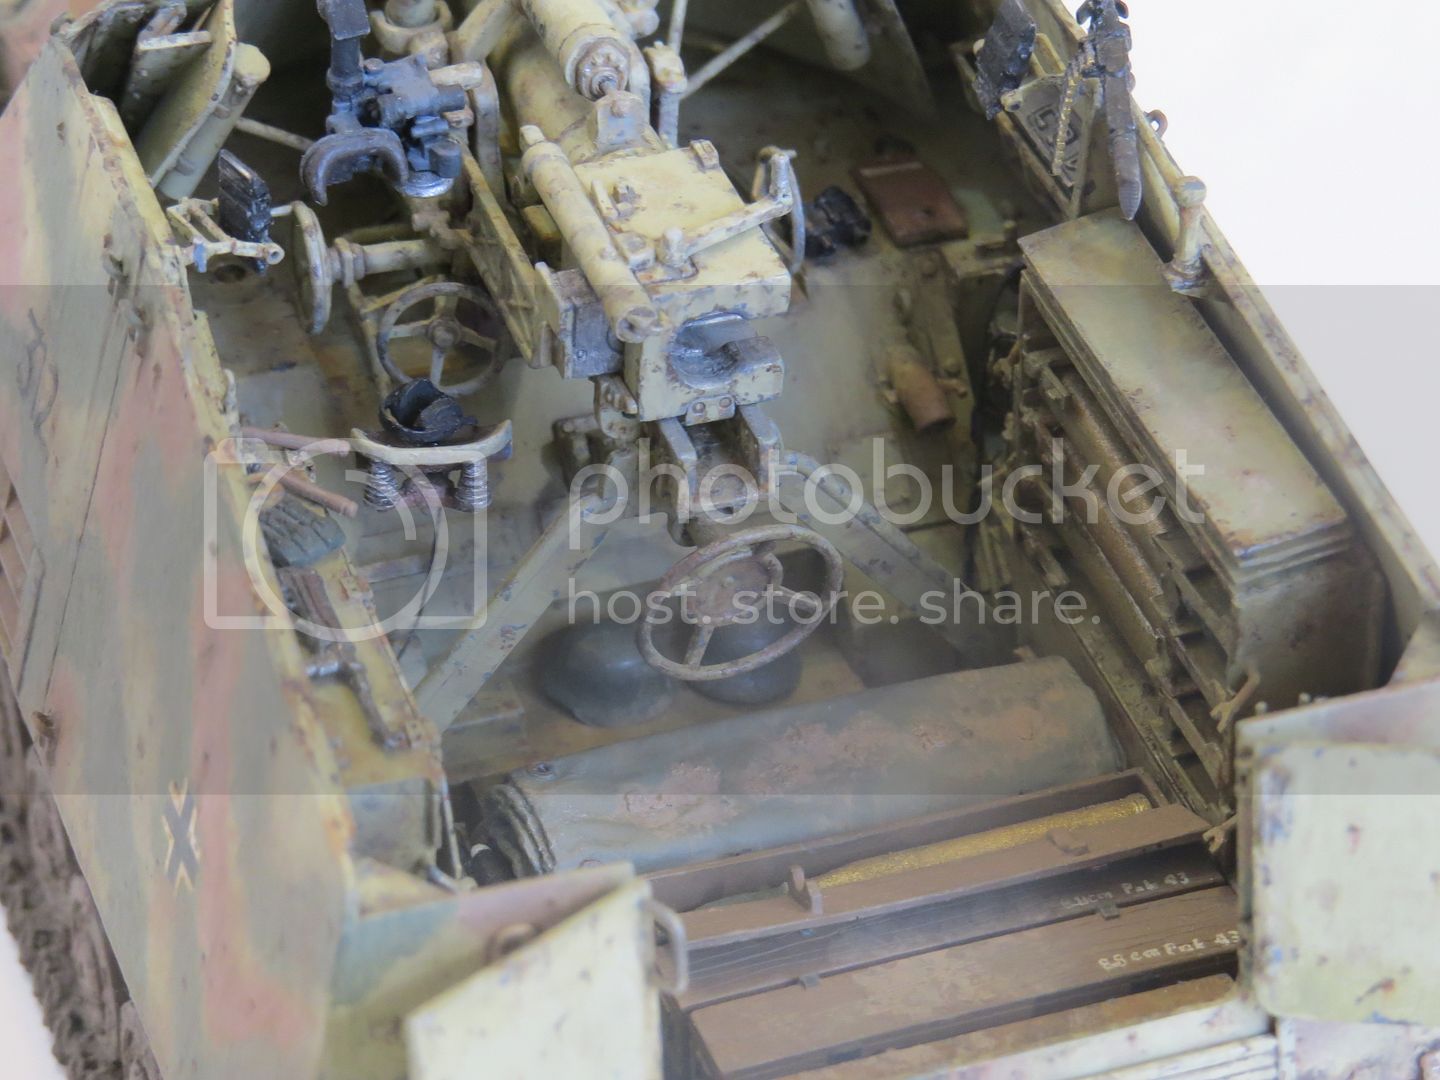
Second, I would construct the rest of the vehicle in terms of subassemblies. The interior especially - always think one step ahead and ask yourself "how easy will this be to paint once it is glued onto the model?" In particular, the ammo bins should be assembled and painted (including weathering) BEFORE gluing into the interior. Same with the gun and all the little pieces of equipment (MP 40s, personal equipment such as canteens, water bottles, canvas, etc). I constructed and painted the interior completely before I ever put any paint on the exterior.
Here's a couple of shots of the completed interior, as constructed using the outline above:


Good luck!
Second, I would construct the rest of the vehicle in terms of subassemblies. The interior especially - always think one step ahead and ask yourself "how easy will this be to paint once it is glued onto the model?" In particular, the ammo bins should be assembled and painted (including weathering) BEFORE gluing into the interior. Same with the gun and all the little pieces of equipment (MP 40s, personal equipment such as canteens, water bottles, canvas, etc). I constructed and painted the interior completely before I ever put any paint on the exterior.
Here's a couple of shots of the completed interior, as constructed using the outline above:
Good luck!
funster63
Joined: March 26, 2015
KitMaker: 8 posts
Armorama: 8 posts
Posted: Saturday, March 28, 2015 - 02:48 AM UTC
Thanks for all the great tips i knew i would get some sense on here from all the pros
cheers
cheers
brekinapez
Joined: July 26, 2013
KitMaker: 2,272 posts
Armorama: 1,860 posts
Posted: Saturday, March 28, 2015 - 04:04 AM UTC
Having just about completed a Dragon Nashorn I can second the statement that you need to assemble the track before the fenders are in place as there is no room to work them in later without difficulty.


The teeth on the sprocket leave no wiggle room to get them in there and then work them onto the wheel without risk of breaking something and causing you to rage-quit.
The teeth on the sprocket leave no wiggle room to get them in there and then work them onto the wheel without risk of breaking something and causing you to rage-quit.
KevPak
Joined: June 04, 2014
KitMaker: 137 posts
Armorama: 128 posts
Posted: Saturday, March 28, 2015 - 06:36 AM UTC
Sorry - I recently reorganized all my photos into separate albums and didn't realize, that in doing so, I would delete the images from my post. Here they are reposted, with an overhead shot to give a sense of the entire model.


brekinapez
Joined: July 26, 2013
KitMaker: 2,272 posts
Armorama: 1,860 posts
Posted: Saturday, March 28, 2015 - 09:14 AM UTC
Kevin -
That's a nice job. My kit is the old #6001. Did you do any scratching or aftermarket because you seem to have some bits my kit did not have, like the brace underneath the breech.
OP, which kit do you have?
Removed by original poster on 03/29/15 - 16:13:55 (GMT).
funster63
Joined: March 26, 2015
KitMaker: 8 posts
Armorama: 8 posts
Posted: Saturday, March 28, 2015 - 09:18 PM UTC
Kevin
great looking model paint job looks amazing, thanks for the pics and ideas.
Been a long time since i did models as a kid but always wanted to get back into it got a tamiya kit and was disappointed with the detail i knoe it was a cheap model that is why i want a bronco or dragon kit because the detail looks great . Even been out and got mysrlf a airbrush , just keep your fingers crossed for me hahaha
KevPak
Joined: June 04, 2014
KitMaker: 137 posts
Armorama: 128 posts
Posted: Saturday, March 28, 2015 - 09:27 PM UTC
Shell-
My kit was the old Dragon Hornisse model. The Hornisse was the early variant of the Nashorn and had the internal barrel lock and some other minor differences (tailpipe configuration, rear mudguards) compared to the Nashorn, per se. Nevertheless, I did do an extensive amount of scratchbuilding as well as pirating parts from other kits and the scrapbox - the holders for the MP 40s (rear plate), periscope frames, MG 34, storage box on right fender, antenna and a few others. If I had to do it over I would get the Dragon/DML Nashorn 3 in 1 kit.
My kit was the old Dragon Hornisse model. The Hornisse was the early variant of the Nashorn and had the internal barrel lock and some other minor differences (tailpipe configuration, rear mudguards) compared to the Nashorn, per se. Nevertheless, I did do an extensive amount of scratchbuilding as well as pirating parts from other kits and the scrapbox - the holders for the MP 40s (rear plate), periscope frames, MG 34, storage box on right fender, antenna and a few others. If I had to do it over I would get the Dragon/DML Nashorn 3 in 1 kit.
 |

WEB HOSTING BY


Copyright ©2021 Armorama and Kitmaker Network, a subsidiary of Silver Star Enterprises
All Rights Reserved. Please read our Conditions of Use and Privacy Policy.
All Rights Reserved. Please read our Conditions of Use and Privacy Policy.