_GOTOBOTTOM
Armor/AFV: Axis - WWII
Armor and ground forces of the Axis forces during World War II.
Hosted by Darren Baker
SdKfz 251/17 diorama
cheswickthecat
Visit this Community
Washington, United States
Joined: October 13, 2007
KitMaker: 212 posts
Armorama: 208 posts
Posted: Thursday, August 27, 2015 - 03:58 PM UTC
Gabriel, your painting is fabulous! Especially the dashboard panel and the radio stack. Really fantastic job overall.
Terry
Szmann
Visit this Community
Netherlands Antilles
Joined: September 02, 2014
KitMaker: 1,977 posts
Armorama: 305 posts
Posted: Friday, August 28, 2015 - 12:48 AM UTC
@ Terry: you are too kind, sir. Thank you very much. I will try to do a tutorial as requested by Collin. Just need more time.

Thanks again,
Gabriel
Stoottroeper
Visit this Community
Noord-Brabant, Netherlands
Joined: June 10, 2007
KitMaker: 1,107 posts
Armorama: 95 posts
Posted: Friday, August 28, 2015 - 12:55 AM UTC
Hi Gabriel,

That is an astonishing paintjob.
About the MG's, you have placed the magazines backward. The broadest part should be nearest to the gunner.

Peter
Szmann
Visit this Community
Netherlands Antilles
Joined: September 02, 2014
KitMaker: 1,977 posts
Armorama: 305 posts
Posted: Monday, August 31, 2015 - 07:04 AM UTC
@ Peter: Excellent intervention, Peter. Certainly you saved me from some embarrassment - I was just about the send a feature for publishing.

I operated the errors (for which I have no excuse) as it can be seen here:


Thanks again, Peter.

Gabriel
Szmann
Visit this Community
Netherlands Antilles
Joined: September 02, 2014
KitMaker: 1,977 posts
Armorama: 305 posts
Posted: Monday, August 31, 2015 - 07:09 AM UTC
Meanwhile, I have finished building the flak: just couple of small details trailing behind:


We can have a peak at yet-to-be-finished assembly. Something like that it will look the head of the column in the diorama.


Thanks for following - I'll keep you updated.

Gabriel
Hwa-Rang
Visit this Community
Kobenhavn, Denmark
Joined: June 29, 2004
KitMaker: 6,760 posts
Armorama: 1,339 posts
Posted: Monday, August 31, 2015 - 10:50 AM UTC
Beautiful work.
Szmann
Visit this Community
Netherlands Antilles
Joined: September 02, 2014
KitMaker: 1,977 posts
Armorama: 305 posts
Posted: Monday, August 31, 2015 - 11:41 PM UTC
Thank you, Jesper.

Gabriel
Szmann
Visit this Community
Netherlands Antilles
Joined: September 02, 2014
KitMaker: 1,977 posts
Armorama: 305 posts
Posted: Tuesday, September 01, 2015 - 06:53 AM UTC
Hi again, guys.

Small details were addressed, such as license plates... no need to bother you with more photos just yet.

I moved to figures: my stash is quite thin in figures. I robbed couple of figures from a Tamiya kit and modified them slightly.
Let carnage begin!


By the end of this week I should have a full feature describing the whole building process on SdKfz 251/17 and attached FlaK 38.

After that, I will announce the next kit out of four being summoned for the diorama, as well as the diorama general plan.

See you soon!

Gabriel
Szmann
Visit this Community
Netherlands Antilles
Joined: September 02, 2014
KitMaker: 1,977 posts
Armorama: 305 posts
Posted: Tuesday, September 22, 2015 - 03:24 AM UTC
Hi, guys!

Figure update:
I carried on a little work on the figures. I found a couple of suitable ones in a Tamiya kit. They still needed some minor work in order to improve the stance in relation with the scene.

First, the schutze / radio operator:
Is made from a single styrene character, but i needed to twist the angle between the upper and lower body as much as possible, given the cramped position and the center of the scene:

The arms position have to be a little adjusted. Here temporarily held in place by blue-tac:

Finally, the position of the right hand was adjusted by rapport to forearm, to achieve a more natural fit with the carbine. The picture shows the issue, not the solution. Meanwhile, the problem was solved. Unfortunately, I took no photo and now the figures are in painting stage:


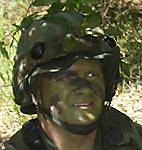
The vehicle commander is bashed from two characters, both Tamiya. In fact, only the head is changed (the original is wearing a helmet):

Two issues I addressed here: I gave a little tilt to the head (almost imperceptible, but changes significantly the stoned Tamiya stance) and the position of the right hand, which I had to cut it and twist it from vertical to horizontal, according to my needs:


Thank you for following, commenting and constructive criticism.

Gabriel
Szmann
Visit this Community
Netherlands Antilles
Joined: September 02, 2014
KitMaker: 1,977 posts
Armorama: 305 posts
Posted: Saturday, September 26, 2015 - 09:34 PM UTC
Hi, guys.

Because is weekend, there is update

I promise you I will announce the next model of this dio.
The model was comprehensively reviewed by Jim: https://armorama.kitmaker.net/review/10937. There is no need to add anything more about the kit.

There is the kit:


and there I've got some job done:


Not too big of a fitting issue, but there is a part which does not fit in place according to the manual drawings. I'm going to see later how it will interfere with the building process.

Cheers, Gabriel
Szmann
Visit this Community
Netherlands Antilles
Joined: September 02, 2014
KitMaker: 1,977 posts
Armorama: 305 posts
Posted: Wednesday, September 30, 2015 - 08:29 AM UTC
Hi, guys.

An excellent feature of Zvezda instructions manual is the left hand side sub-assembly inserts. Excellent for my work style, especially after Dragon experience.

I found another fitting issue on the lover body: between the floor and chassis the alignment pins are too long and create a gap. Easy to fix but still annoying. Some other minor fitting issues also encountered but not big dramas.

Primed sub-assemblies, ready for detailing.


Cheers, Gabriel.
Szmann
Visit this Community
Netherlands Antilles
Joined: September 02, 2014
KitMaker: 1,977 posts
Armorama: 305 posts
Posted: Saturday, October 10, 2015 - 03:02 AM UTC
Hi, Guys.

Update time:

Dashboard almost completed:


Floor and benches:


Detailing finished on the dashboard and floor; more sub-assemblies primed:


Side panels and upper body painted from the inside:


The worst problem so far: end plate damaged, together with the door support. I spent two punishing hours to fix that, keeping the doors moveable:


Interior and body complete:


Some filler needed for the body:


Body construction finished, ready for priming:


Primed body:


DRY FIT _ OK


Steel Dandelion - decadent art:


Thanks for following. Soon more updates.

Gabriel
Szmann
Visit this Community
Netherlands Antilles
Joined: September 02, 2014
KitMaker: 1,977 posts
Armorama: 305 posts
Posted: Thursday, October 15, 2015 - 05:51 AM UTC
Hi, Guys.

Time for another update:

The first coat of paint and small parts coming closer to final assembly:


Decals applied without incident:


Thank you for following. More updates soon.

Cheers, Gabriel
WXerock
#450
Visit this Community
California, United States
Joined: July 19, 2015
KitMaker: 672 posts
Armorama: 668 posts
Posted: Thursday, October 15, 2015 - 06:25 AM UTC
That is one of the cleanest looking instrument clusters I have ever seen. Your metal accents are perfect. Do you have a technique you can share here?

Regards,

Eric
Szmann
Visit this Community
Netherlands Antilles
Joined: September 02, 2014
KitMaker: 1,977 posts
Armorama: 305 posts
Posted: Friday, October 16, 2015 - 01:15 AM UTC

Quoted Text

That is one of the cleanest looking instrument clusters I have ever seen. Your metal accents are perfect. Do you have a technique you can share here?

Regards,

Eric


To replicate metallic parts I generally use the following steps:
1. Priming with a metallic enamel - usually aluminum from Testors range;
2. Painting with a mix of acrylics made of gloss black and silver. Attention here: just a tiny-tiny bit of silver. The paint thinned to the consistency of a wash.
3. If I need more shine, I dry-brush VERY lightly with silver, usually acrylic.
All above steps are done by brush.
Thank you for following.
Cheers, Gabriel
Szmann
Visit this Community
Netherlands Antilles
Joined: September 02, 2014
KitMaker: 1,977 posts
Armorama: 305 posts
Posted: Sunday, November 01, 2015 - 03:24 AM UTC
Hi, Guys.

After significant delay, I managed to finish the second 251/1 in this diorama:


I saved some unused parts as stowage for another model in this diorama:


My invasion army is gathering. The Soviets are in trouble (at least for now):


Two more vehicle will be added: a staff car and a truck.

The diorama lay-out will be revealed soon. The only trouble is I have to finish a campaign and I received a commissioned work to complete... hopefully I'll be back with the new year.

Thank you for following, posting and constructive criticism.

Cheers,
Gabriel
bill_c
Staff MemberCampaigns Administrator
MODEL SHIPWRIGHTS
Visit this Community
New Jersey, United States
Joined: January 09, 2008
KitMaker: 10,553 posts
Armorama: 8,109 posts
Posted: Monday, November 02, 2015 - 01:43 AM UTC
I hate to see such modeling excellence dragged down by inferior Tamiya figures. But if you must use them, I strongly urge you to get some Hornet heads and hands. They add a LOT to even Tamiya figures, much less Dragon or other brands.

They're no substitute for resin ones, but still will go a long way to improving this excellent build. Hope I don't sound harsh, I just feel very strongly about having the "right" touches on any build.
Szmann
Visit this Community
Netherlands Antilles
Joined: September 02, 2014
KitMaker: 1,977 posts
Armorama: 305 posts
Posted: Monday, November 02, 2015 - 07:01 AM UTC
Thank you, Bill, for the appreciative comments.
Regarding the figures: I am compelled in using what I can gather from the kits in my stash. I give preferrence to Dragon ones but I have only four. I completrly agree with you: the poses of old Tamiya figures are not so good. I chopped and twisted them as much the common sense allows, except the motorcycle rider.

Thank you again for your support,
Gabriel.
Szmann
Visit this Community
Netherlands Antilles
Joined: September 02, 2014
KitMaker: 1,977 posts
Armorama: 305 posts
Posted: Sunday, May 01, 2016 - 05:06 PM UTC
OK, folks, back in business!

Last few months I've been busy building a Flying Fortress. By now I reached the point where I have to watch the paint dry. To make the best out of my time, I am fiddling with details to be incorporated in this dio.

I finished the engine provided by Zvezda:


Nice detail but I'm not going any further except washes, because it will be a secondary item.

The engine (in new state) will be displayed with another piece of equipment on a scratch build pallet:


I also found a little time for figures (two of the many) which are now almost finished:


I followed Bill's advice and I bought some four figure sets from MB and Dragon (one more set on the way). Unfortunately, he is right about Tamiya ones; hopefully, a mix of 'good' and 'bad' ones will improve the overall looks of the dio. For instance, the seated fellow will be well hidden inside the 251/17, barely visible from any angle.

Thank you for following,

Cheers!
Gabriel
yeahwiggie
Visit this Community
Dalarnas, Sweden
Joined: March 24, 2006
KitMaker: 2,093 posts
Armorama: 1,359 posts
Posted: Sunday, May 01, 2016 - 07:24 PM UTC
With some good painting, even Tamiya figures can be made presentable. And then there's that technique jerry Rutman uses. He calls it undercutting and that really brings out details.
And finally there might be dimensional issues between different brand figures. Of course in real life people come in all different sizes and shapes, but personal gear not so much. Something to keep in mind.
Szmann
Visit this Community
Netherlands Antilles
Joined: September 02, 2014
KitMaker: 1,977 posts
Armorama: 305 posts
Posted: Sunday, May 01, 2016 - 07:37 PM UTC

Quoted Text

With some good painting, even Tamiya figures can be made presentable. And then there's that technique jerry Rutman uses. He calls it undercutting and that really brings out details.
And finally there might be dimensional issues between different brand figures. Of course in real life people come in all different sizes and shapes, but personal gear not so much. Something to keep in mind.


Good point. I've seen the undercutting technique already, but I never practice. I think the time has come, because I have a truckload of Fliegers from Tamiya molded in so-so detail. Some four vehicles in this dio are Luftwaffe operated.

Thank you,
Cheers!
Gabriel
 _GOTOTOP