_GOTOBOTTOM
Armor/AFV: Axis - WWII
Armor and ground forces of the Axis forces during World War II.
Hosted by Darren Baker
Building - Tamiya King tiger
roland97
Visit this Community
Zala, Hungary
Joined: July 29, 2015
KitMaker: 18 posts
Armorama: 18 posts
Posted: Wednesday, July 29, 2015 - 03:06 AM UTC
I started this project some months ago, you can see the progress in the pictures. After the weathering I plan to do a burnout effect on the turret.

Here is the basic kit, with some P.E., later I still bought the Front and back fenders kit from ABER and a track set from Friulmodel.


And here is some photos from the building:


And the paintjob:


And here is the current status:


I think when I'll end with the King tiger I'll do a diorama with some figures who are standing on the KT.
EHAM0624
Visit this Community
Noord-Holland, Netherlands
Joined: January 27, 2014
KitMaker: 200 posts
Armorama: 95 posts
Posted: Wednesday, July 29, 2015 - 03:24 AM UTC
Hi Roland, that's awesome! I have the same in the stash awaiting a good campaign to fit it in and I hope to have it anything looking like yours, great!
roland97
Visit this Community
Zala, Hungary
Joined: July 29, 2015
KitMaker: 18 posts
Armorama: 18 posts
Posted: Wednesday, July 29, 2015 - 03:49 AM UTC
Hi, I'm glad you like it and good luck for your build!
retiredyank
Visit this Community
Arkansas, United States
Joined: June 29, 2009
KitMaker: 11,610 posts
Armorama: 7,843 posts
Posted: Wednesday, July 29, 2015 - 05:43 AM UTC
Great looking KT!
roland97
Visit this Community
Zala, Hungary
Joined: July 29, 2015
KitMaker: 18 posts
Armorama: 18 posts
Posted: Wednesday, July 29, 2015 - 09:06 PM UTC
Thank you, Matt!
CMOT
Staff MemberEditor-in-Chief
ARMORAMA
Visit this Community
England - South West, United Kingdom
Joined: May 14, 2006
KitMaker: 10,954 posts
Armorama: 8,571 posts
Posted: Wednesday, July 29, 2015 - 09:13 PM UTC
Very nice work Roland, I would like to run a feature on this one.
roland97
Visit this Community
Zala, Hungary
Joined: July 29, 2015
KitMaker: 18 posts
Armorama: 18 posts
Posted: Wednesday, July 29, 2015 - 10:05 PM UTC

Quoted Text

Very nice work Roland, I would like to run a feature on this one.


Thank you! And of course, it's okay for me.
SDavies
Visit this Community
England - South East, United Kingdom
Joined: January 09, 2010
KitMaker: 979 posts
Armorama: 959 posts
Posted: Wednesday, July 29, 2015 - 10:42 PM UTC
Very well done
Mendes
Visit this Community
Parana, Brazil
Joined: April 19, 2012
KitMaker: 182 posts
Armorama: 181 posts
Posted: Thursday, July 30, 2015 - 12:36 AM UTC
Great work!
roland97
Visit this Community
Zala, Hungary
Joined: July 29, 2015
KitMaker: 18 posts
Armorama: 18 posts
Posted: Thursday, July 30, 2015 - 01:34 AM UTC
Thank you Steven, and Cesar!


The weathering is almost finished - except the mud effects. In the continue I'll do the burnout surface on the turret.


Here I added some streaking effects:


And some dust; I used acrylic paints, applied with airbrush and brush, and then I applied some pigments.


roland97
Visit this Community
Zala, Hungary
Joined: July 29, 2015
KitMaker: 18 posts
Armorama: 18 posts
Posted: Wednesday, August 05, 2015 - 07:04 PM UTC
Hi,

I finished the weathering on the hull and I've just made the burnout effect. The next step is to apply the mud effects. And here is the pictures:

First of all, the finished weathering, before the burnout:


And after the burnout:


Yesterday, the Friul tracks arrived, so I started to piece together it.


And about the diorama; here is the composition, what I imagined:


This is the first time when I tried to sclupt a figure, so far I'm proud for myself The figures made from Milliput.


Roland
Platycqb
Visit this Community
Indiana, United States
Joined: June 15, 2015
KitMaker: 76 posts
Armorama: 72 posts
Posted: Wednesday, August 05, 2015 - 07:10 PM UTC
Nice job on the King Tiger!
And the figures look good too.
roland97
Visit this Community
Zala, Hungary
Joined: July 29, 2015
KitMaker: 18 posts
Armorama: 18 posts
Posted: Thursday, August 06, 2015 - 01:17 AM UTC

Quoted Text

Nice job on the King Tiger!
And the figures look good too.


Thank you, Thomas I try to do my best!
dwg73076
Visit this Community
Wisconsin, United States
Joined: August 10, 2015
KitMaker: 11 posts
Armorama: 8 posts
Posted: Monday, August 10, 2015 - 08:49 AM UTC
wow, level expert has been achieved! all of your effects are incredible.

may i ask what type of putty you used to create your casting effects. did you have to add any hardeners to the putty?

thank you.
pablo_g
Visit this Community
Wojewodztwo Slaskie, Poland
Joined: October 21, 2003
KitMaker: 529 posts
Armorama: 500 posts
Posted: Monday, August 10, 2015 - 11:55 AM UTC
Amazing job Roland, I love weathering and burnout effect.

Paweł
roland97
Visit this Community
Zala, Hungary
Joined: July 29, 2015
KitMaker: 18 posts
Armorama: 18 posts
Posted: Monday, August 10, 2015 - 05:32 PM UTC

Quoted Text

wow, level expert has been achieved! all of your effects are incredible.

may i ask what type of putty you used to create your casting effects. did you have to add any hardeners to the putty?

thank you.


Thank you I used "Mr. White putty" from Mr. Hobby and I didn't add anything to it. However, few days ago I tried Milliput on a piece of plastic to create the same casting effects, and I found it good, too.
roland97
Visit this Community
Zala, Hungary
Joined: July 29, 2015
KitMaker: 18 posts
Armorama: 18 posts
Posted: Monday, August 10, 2015 - 05:33 PM UTC

Quoted Text

Amazing job Roland, I love weathering and burnout effect.

Paweł


Thank you, I'm glad you like it
FD3S20B
Visit this Community
California, United States
Joined: April 27, 2011
KitMaker: 255 posts
Armorama: 250 posts
Posted: Monday, August 10, 2015 - 05:40 PM UTC
Nice work
dwg73076
Visit this Community
Wisconsin, United States
Joined: August 10, 2015
KitMaker: 11 posts
Armorama: 8 posts
Posted: Tuesday, August 11, 2015 - 07:41 AM UTC
thank you for your reply sir. i have a few heavy tanks on my "to do" list. most of the time kit manufacturers just don't include enough texture detail on the hulls and i'm very excited to try this technique.
roland97
Visit this Community
Zala, Hungary
Joined: July 29, 2015
KitMaker: 18 posts
Armorama: 18 posts
Posted: Tuesday, August 11, 2015 - 03:48 PM UTC

Quoted Text

thank you for your reply sir. i have a few heavy tanks on my "to do" list. most of the time kit manufacturers just don't include enough texture detail on the hulls and i'm very excited to try this technique.


Yes, that's true - on a Tamiya kit too, who is one of the best manufacturer.
But this is not a difficult technique, you can reach a good result after some practise And here is a picture - from Adam Wilder -, I used a similar tool to sclupt the putty. You can make it on your own from a piece of metal rod and secure it in a pin vice.

Gewehr43
Visit this Community
Michigan, United States
Joined: May 12, 2014
KitMaker: 105 posts
Armorama: 68 posts
Posted: Tuesday, August 11, 2015 - 09:10 PM UTC

Quoted Text

Hi,
And after the burnout:


Wow. This is really top-notch work, Roland. Can you tell a little about how you achieved the burnout effects? I'd like to replicate something like that on a piece I'm working on.

TopSmith
Visit this Community
Washington, United States
Joined: August 09, 2002
KitMaker: 1,742 posts
Armorama: 1,658 posts
Posted: Thursday, August 13, 2015 - 01:43 AM UTC
Stop, stop, stop! You are doing all sorts of things I want to do! The photo's are fantastic! However the lack of describing what you did and why in each photo is killing me! It is like watching the new Star Wars movie with no sound. If you added text we could make this a tutorial.
alewar
Visit this Community
Canelones, Uruguay
Joined: December 27, 2006
KitMaker: 773 posts
Armorama: 765 posts
Posted: Thursday, August 13, 2015 - 04:23 AM UTC
I agree!, we need text !!!!!

Regards from the south

Alvaro
roland97
Visit this Community
Zala, Hungary
Joined: July 29, 2015
KitMaker: 18 posts
Armorama: 18 posts
Posted: Sunday, August 16, 2015 - 01:35 PM UTC
Sorry guys, in the last few days I couldn't see the forum, I wasn't at home.

About the burnout effect: it's not a difficult technique, you can do it easily. I used Mig Jimenez's video like a basic tutorial, and here you can find it:

https://www.youtube.com/watch?v=SEVBp530bEU
And the second part: https://www.youtube.com/watch?v=aV3MFIHr62o

It's a good and understandable presentation. I changed only a few things: I used traditional oil paints instead of Ammo rust effects, I applied only a very little amount of pigments: light rust and light earth pigments.

And here is some photo (with text ) that I took during the painting.

1. Here I applied the rust tones: Medium and Light rust.


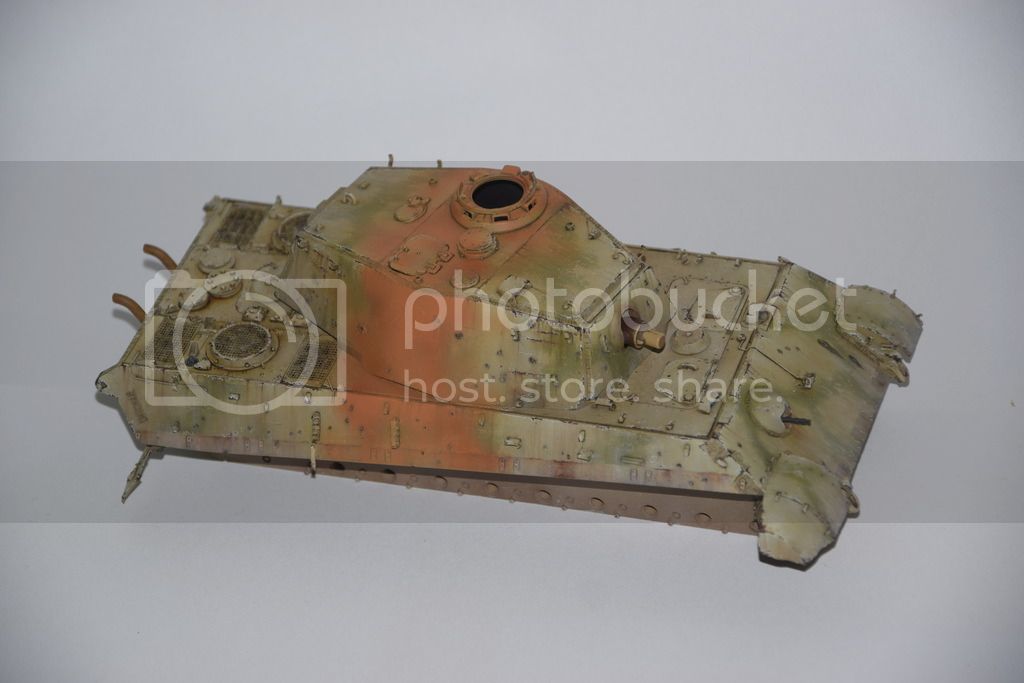
2. After that I painted some chips, using a very light buff tone.


3. And here I used oil paints to create more effects.


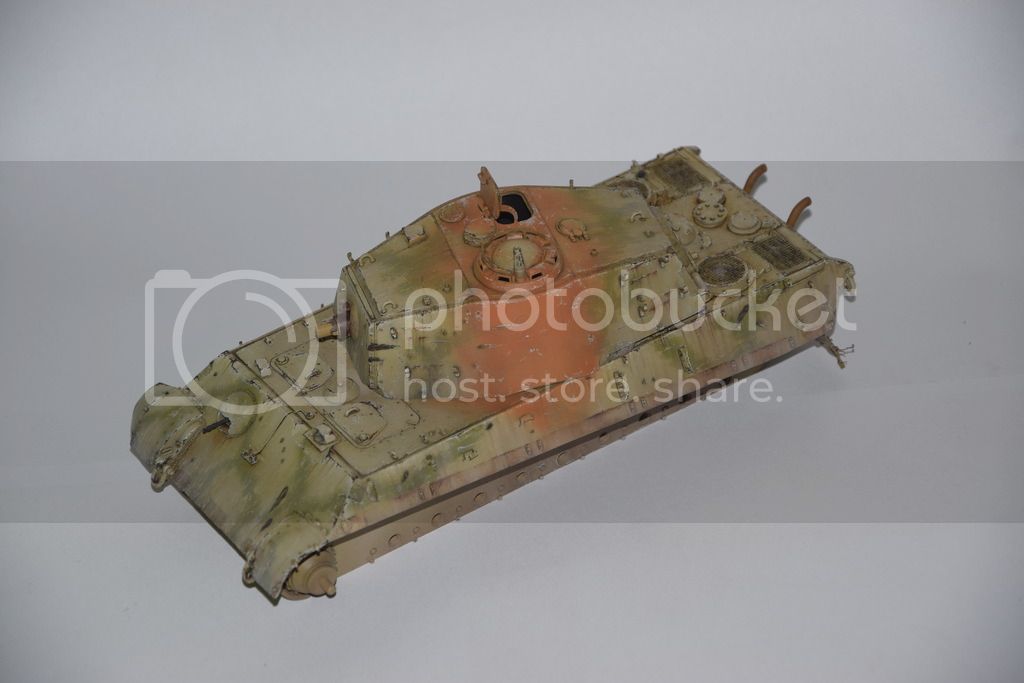
4. The next step was to apply the black smoke effects, I used Humbrol black with hairspray technique.

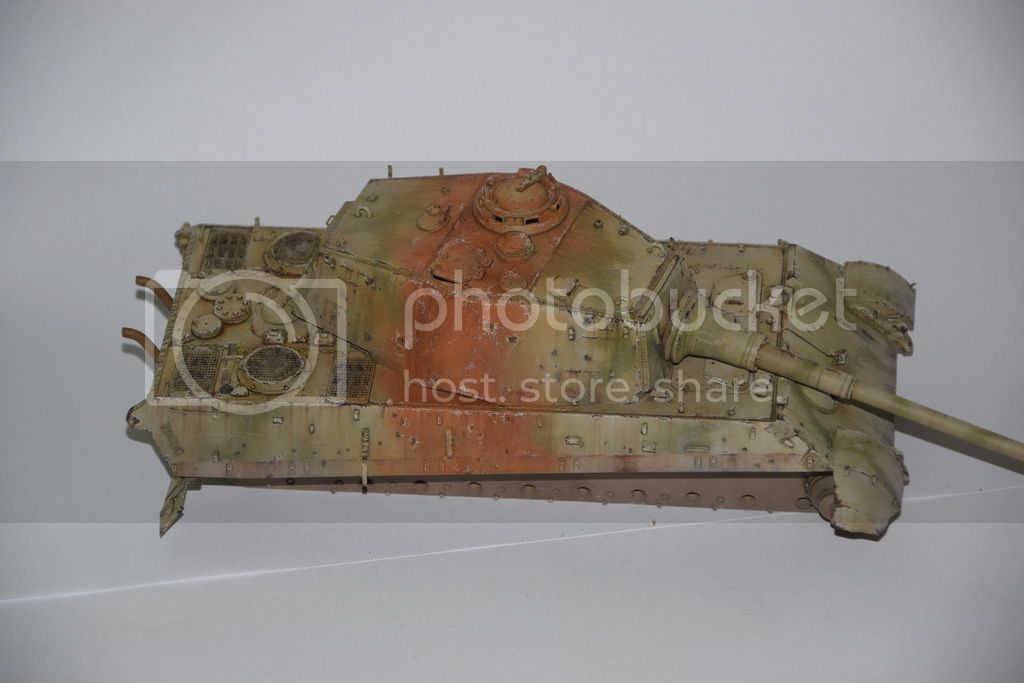
5. And lastly I added the pigments.


I think the video that I linked with the text is understandable, but if you still have a question, ask it!
Gewehr43
Visit this Community
Michigan, United States
Joined: May 12, 2014
KitMaker: 105 posts
Armorama: 68 posts
Posted: Sunday, August 16, 2015 - 04:14 PM UTC
Excellent. Thank you, Roland!
 _GOTOTOP