

Great update. What are you going to use for the tow cable clamp on the left rear? Also, here's a detail that will excite you: additional casting numbers on the rounded lower left corner of the hull rear of an FMC M4A3 that I photographed. The casting says "GA: D50105"
http://i45.photobucket.com/albums/f74/ericadeane/Posting%20Album/DSC00920_zpschnbhfac.jpg
http://i45.photobucket.com/albums/f74/ericadeane/Posting%20Album/DSC00917_zpsvndyosta.jpg
More can be found here http://toadmanstankpictures.com/m4a375.htm
Hosted by Darren Baker
M4A3 DV Dry 75mm

ericadeane

Joined: October 28, 2002
KitMaker: 4,021 posts
Armorama: 3,947 posts
Posted: Friday, August 28, 2015 - 07:00 PM UTC

OddBall84

Joined: May 20, 2015
KitMaker: 335 posts
Armorama: 266 posts
Posted: Friday, August 28, 2015 - 07:51 PM UTC
This one
http://rs45.pbsrc.com/albums/f74/ericadeane/Posting%20Album/DSC00920_zpschnbhfac.jpg?w=480&h=480&fit=clip
And whaddayaknow I spy a cover on the sponson plate, can't make out a weld though.
Hang on is this really an M4A3 as rounded rear hull valance?
http://rs45.pbsrc.com/albums/f74/ericadeane/Posting%20Album/DSC00920_zpschnbhfac.jpg?w=480&h=480&fit=clip
And whaddayaknow I spy a cover on the sponson plate, can't make out a weld though.
Hang on is this really an M4A3 as rounded rear hull valance?
gastec

Joined: February 03, 2014
KitMaker: 1,042 posts
Armorama: 871 posts
Posted: Saturday, August 29, 2015 - 08:38 AM UTC
Rear tow cable clamp is added using ET model PE and a Bronco IM wing nut....

The exhaust deflector is fitted and missing details added using brass tube and rod. Rear fenders are courtesy of Aber....

Gary
The exhaust deflector is fitted and missing details added using brass tube and rod. Rear fenders are courtesy of Aber....
Gary
gastec
Joined: February 03, 2014
KitMaker: 1,042 posts
Armorama: 871 posts
Posted: Saturday, August 29, 2015 - 08:54 AM UTC
Quoted Text
Hi Gary,
This is looking great already, I would love to know how you do the footmans loops as it would have been great to add to a build I have just primed...bloody murphies law!! LOL
Cheers Mike
Mike
Here is a cross section representation of how I make my footman loops...

Tow small holes are drilled though the deck plate and 5 amp fuse wire (annealed first) is passed through so it forms a loop. This is then flattened at the top and then pulled back through so the wire sits proud of the surface leaving the required gap. The ends under the hull are then flattened to each side and secured with CA gel. I then add a pair of punched lead foil discs to each side (represented by the green) which are fixed in place again using CA gel.
I find that they look much better than PE parts as they have the correct round profile. Also, they won't get knocked off and when adding straps to the tools, they will stay in place!
HTH
Gary
HDSC2D
Joined: March 12, 2013
KitMaker: 170 posts
Armorama: 141 posts
Posted: Saturday, August 29, 2015 - 09:00 AM UTC
Quoted Text
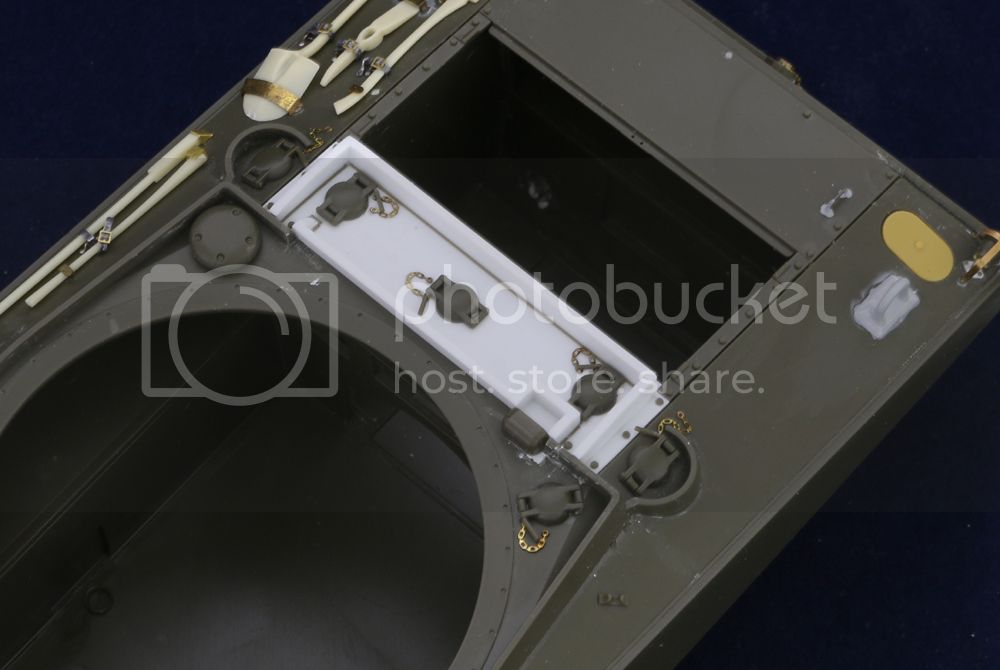
Small hatch A3s had an extra 2 filler caps which were protected by a splash guard. This was scratch built using styrene strip with stock Tasca/Asuka filer caps....
With hatches dry fitted....
Gary
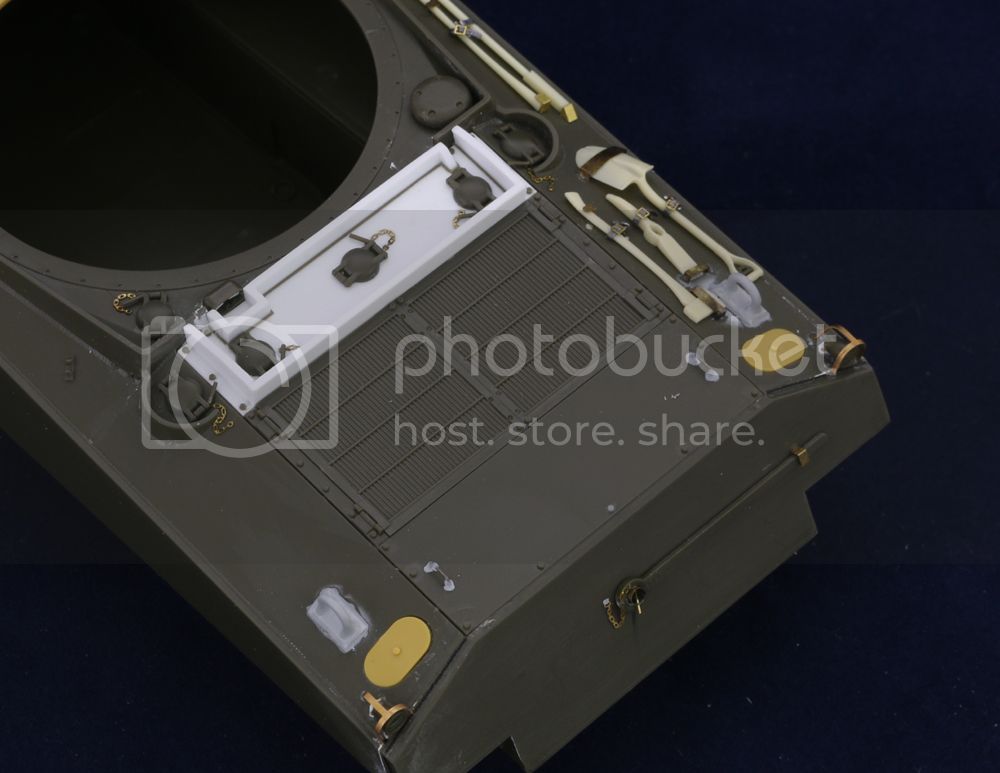
For those of you who want to replicate some of Gray's work Click2detail.com has the engine deck conversion: http://www.click2detail.com/store/p102/1%3A35_Small_Hatch_M4A3_Engine_Deck.html
gastec
Joined: February 03, 2014
KitMaker: 1,042 posts
Armorama: 871 posts
Posted: Saturday, August 29, 2015 - 02:18 PM UTC
Onto the turret next. Early type needed here and I'll be using a Tasca/Asuka one as the base....

The 3 'set up' pads on the top are removed along with the searchlight mount and the hole for the sighting vane is filled. I then added a cast texture using a burr attached to a Dremel set to low speed. The rest of the construction was pretty straightforward using parts from the spares box along with casting details from Archer. Main gun mount rotor D50880 is used with a D51288 rotor shield with side armour sections and the early style 'flared' 75mm barrel. Turned brass .30 cal barrel and .50 cal travel lock is from ET Model along with a Lion Roar SRC610 wireless station aerial mount....


And fitted to the hull....

Gary
The 3 'set up' pads on the top are removed along with the searchlight mount and the hole for the sighting vane is filled. I then added a cast texture using a burr attached to a Dremel set to low speed. The rest of the construction was pretty straightforward using parts from the spares box along with casting details from Archer. Main gun mount rotor D50880 is used with a D51288 rotor shield with side armour sections and the early style 'flared' 75mm barrel. Turned brass .30 cal barrel and .50 cal travel lock is from ET Model along with a Lion Roar SRC610 wireless station aerial mount....
And fitted to the hull....
Gary
gastec
Joined: February 03, 2014
KitMaker: 1,042 posts
Armorama: 871 posts
Posted: Sunday, August 30, 2015 - 02:02 PM UTC
I wanted to use some typical Ford cast D47366A drive sprockets with their distinctive 'dimples' but had nothing in my stash. So, instead, I'm copying another version used by FMC on some of their early M4A3s. They had fewer dimples and are easier to create using standard Tasca/Asuka parts as seen below...

And open spoke idlers too...

Gary
And open spoke idlers too...
Gary

KurtLaughlin
Joined: January 18, 2003
KitMaker: 2,402 posts
Armorama: 2,377 posts
Posted: Sunday, August 30, 2015 - 03:19 PM UTC
Quoted Text
Also, here's a detail that will excite you: additional casting numbers on the rounded lower left corner of the hull rear of an FMC M4A3 that I photographed. The casting says "GA: D50105"
That's
GAD
D50105
GAD was Ford's casting symbol, as seen on many bogie brackets and other small armor parts. "GA" must have been their prefix for Government projects, e.g. GAA, GAD, GAF, GAN.
KL
OddBall84
Joined: May 20, 2015
KitMaker: 335 posts
Armorama: 266 posts
Posted: Sunday, August 30, 2015 - 03:21 PM UTC
So if GAA was attached to the Ford V8 engine what does this mean? Also did they really make any rounded hull M4A3's?
gastec
Joined: February 03, 2014
KitMaker: 1,042 posts
Armorama: 871 posts
Posted: Monday, August 31, 2015 - 07:33 AM UTC
While I'm on leave this week, progress will be a little slow and bitty as I'm spending most of the day redecorating the bathrooms. This is prior to us renting our current place and moving into our new house next month which is being built at the moment.
Suspension - always fun....

Especially when you choose to use the C85163 'Stamped Spoke' wheels which require 12 tiny rivets around the inside rim....

Gary
Suspension - always fun....
Especially when you choose to use the C85163 'Stamped Spoke' wheels which require 12 tiny rivets around the inside rim....
Gary
gastec
Joined: February 03, 2014
KitMaker: 1,042 posts
Armorama: 871 posts
Posted: Monday, August 31, 2015 - 02:07 PM UTC
Volute suspension arms and wheels complete....

Gary
Gary
gastec
Joined: February 03, 2014
KitMaker: 1,042 posts
Armorama: 871 posts
Posted: Tuesday, September 01, 2015 - 01:48 PM UTC
Suspension units awaiting their track skids. Note the addition of the bracket plugs for the spring tensioners on top of each unit. Missing bolt heads have also been added for the track support roller bracket and the mounting holes on the opposite face are also added...

Gary
Gary
KurtLaughlin
Joined: January 18, 2003
KitMaker: 2,402 posts
Armorama: 2,377 posts
Posted: Tuesday, September 01, 2015 - 03:13 PM UTC
Quoted Text
So if GAA was attached to the Ford V8 engine what does this mean? Also did they really make any rounded hull M4A3's?
GAA was their internal project code. "G" might have stood for Government, but that's pure speculation.
Do you mean cast hull M4A3s? No.
KL
gastec
Joined: February 03, 2014
KitMaker: 1,042 posts
Armorama: 871 posts
Posted: Thursday, September 03, 2015 - 10:22 AM UTC
Track skids in place. These are the earlier ET Model offering so need the trailing edges cut at an angle. This was done to clear the bolt heads at the top of the return roller bracket. There is also a slight raised machined ridge on top at each end which I've replicated (just at the front as the rear is covered by the roller arm) with a thin strip of styrene...

And the VVSS units in place....

Gary
And the VVSS units in place....
Gary
gastec
Joined: February 03, 2014
KitMaker: 1,042 posts
Armorama: 871 posts
Posted: Thursday, September 03, 2015 - 01:21 PM UTC
For no other reason than this is what's available in my stash....

Gary
Gary
M4A1Sherman
Joined: May 02, 2013
KitMaker: 4,403 posts
Armorama: 4,078 posts
Posted: Thursday, September 03, 2015 - 02:18 PM UTC
Quoted Text
Track skids in place. These are the earlier ET Model offering so need the trailing edges cut at an angle. This was done to clear the bolt heads at the top of the return roller bracket. There is also a slight raised machined ridge on top at each end which I've replicated (just at the front as the rear is covered by the roller arm) with a thin strip of styrene...
And the VVSS units in place....
Gary
NICE!!! Very similar to my 56-degree hulled M4A3 VVSS 75mm (Dry)... I elected to build a slightly later version without Direct Vision. Otherwise, my 56-degree M4A3 is very nearly the same as yours, including the aftermarket parts. I also elected to use DRAGON "DS" T49 Rubber Chevron Tracks...
I also used an RB MODELS metal "early" 75mm Gun, welded spoke road wheels and rear idler, and a DRAGON "Gen 2" M2 .50 cal, with an RB metal barrel and cooling sleeve, and detailed it with an ABER .50 cal PE set. PE parts for my build came from ABER and VOYAGER. Resin bits and pieces for stowage came from BLACK DOG, BLAST, and VERLINDEN. Turret, Trans/Final Drive cases tools, came from TMD and FORMATIONS, with markings, part number & foundry castings from ARCHER... .30 cal barrels also came from RB...
I'm watching your build very closely, as all things "Sherman" interest me to no end!!!

gastec
Joined: February 03, 2014
KitMaker: 1,042 posts
Armorama: 871 posts
Posted: Thursday, September 03, 2015 - 02:42 PM UTC
Thanks Dennis. Did you blog your build anywhere?
While SWMBO spent the last couple of hours watching some period drama on TV that she'd recorded, I thought I'd put that time to better use :lol:

Gary
While SWMBO spent the last couple of hours watching some period drama on TV that she'd recorded, I thought I'd put that time to better use :lol:
Gary
gastec
Joined: February 03, 2014
KitMaker: 1,042 posts
Armorama: 871 posts
Posted: Friday, September 04, 2015 - 05:04 AM UTC
Progressing well...

Gary
Gary
gastec
Joined: February 03, 2014
KitMaker: 1,042 posts
Armorama: 871 posts
Posted: Friday, September 04, 2015 - 06:23 AM UTC
Build stage: Done....


Gary
Gary
M4A1Sherman
Joined: May 02, 2013
KitMaker: 4,403 posts
Armorama: 4,078 posts
Posted: Friday, September 04, 2015 - 04:54 PM UTC
Quoted Text
Thanks Dennis. Did you blog your build anywhere?
While SWMBO spent the last couple of hours watching some period drama on TV that she'd recorded, I thought I'd put that time to better use :lol:
Gary
Hi, Gary! Sorry, I don't have a digital camera... Yet... I'm going to need to buy one pretty soon, because I have a whole boatload of 1/48 aircraft and 1/35 afvs & softskins (I want to hold on to my US/Allied stuff) that I want to sell. I need to "thin out" my collection of un-built kits- I'll NEVER have the time to build them all, anyway...

Anyway, it kind of surprises me that no model manufacturer has everdone a specifically dedicated kit of a 1/35 "early" 56-degree hulled M4A3 VVSS 75mm (Dry) Medium! A "standard" M4 is easy to convert, but still, a plastic kit would be nice...
It's nice to see that I'm not alone in building US/Allied subjects. All those Tigers, Panthers and T-34s are getting really old, as far as I'm concerned...
M4A1Sherman
Joined: May 02, 2013
KitMaker: 4,403 posts
Armorama: 4,078 posts
Posted: Friday, September 04, 2015 - 05:05 PM UTC
Quoted Text
Progressing well...
Gary
Re: Link-to-link tracks!!! Oh, MAN! Such drudgery! I've been down THAT road enough times!!!

M4A1Sherman
Joined: May 02, 2013
KitMaker: 4,403 posts
Armorama: 4,078 posts
Posted: Tuesday, September 08, 2015 - 04:01 PM UTC
Quoted Text
So if GAA was attached to the Ford V8 engine what does this mean? Also did they really make any rounded hull M4A3's?
No... The "rounded cast hull" M4-series tanks were still referred to as M4A1s, whether they were the "Dry" 56-degree glacis-design or were the later 47-degree glacis types; also irrespective of whether they were equipped with 75mm or 76mm main guns, T-23 turrets, or even the later HVSS suspensions...
M4A1Sherman
Joined: May 02, 2013
KitMaker: 4,403 posts
Armorama: 4,078 posts
Posted: Tuesday, September 08, 2015 - 04:03 PM UTC
Quoted Text
Build stage: Done....
Gary
This build warms a "Shermaholic's" heart...
M4A1Sherman
Joined: May 02, 2013
KitMaker: 4,403 posts
Armorama: 4,078 posts
Posted: Saturday, September 12, 2015 - 04:58 PM UTC
Quoted Text
Build stage: Done....
Gary
Have you taken any photos of your build "in paint"?

JPTRR

#051

Joined: December 21, 2002
KitMaker: 7,772 posts
Armorama: 2,447 posts
Posted: Saturday, September 12, 2015 - 05:17 PM UTC
Quoted Text
Yee gads and holy catfishes, I love this kind of modeling.
Me too! Gary, it looks great!

 |

WEB HOSTING BY


Copyright ©2021 Armorama and Kitmaker Network, a subsidiary of Silver Star Enterprises
All Rights Reserved. Please read our Conditions of Use and Privacy Policy.
All Rights Reserved. Please read our Conditions of Use and Privacy Policy.