_GOTOBOTTOM
Dioramas
Do you love dioramas & vignettes? We sure do.
Fallschirmjäger with Kettenkrad, Crete 1941
Molentik
Visit this Community
Noord-Brabant, Netherlands
Joined: May 22, 2012
KitMaker: 112 posts
Armorama: 97 posts
Posted: Tuesday, October 20, 2015 - 06:56 AM UTC
Hello all,

I am currently starting a new project; a vignette of a Fallschirmjager in Crete in 1941. I thought it would be nice to make this a build log because I'm still learning and this way I can incorporate tips and advice during my build.

The idea is to have have the FJ leaning against his Kettenkrad and taking a smoking break. I will use Dragon's early Kettenkrad (box 6341) that is sadly not an early one but mid/late war. This means I'll have to backdate some of the features like the air intake in the back and making the holes in the roadwheels bigger. Behind the Kettenkrad will be a double axle trailer that I will have to scratchbuild, that is something new for me so I'm quite excited! I will probably be asking a lot of questions during this project, so please bear with me!


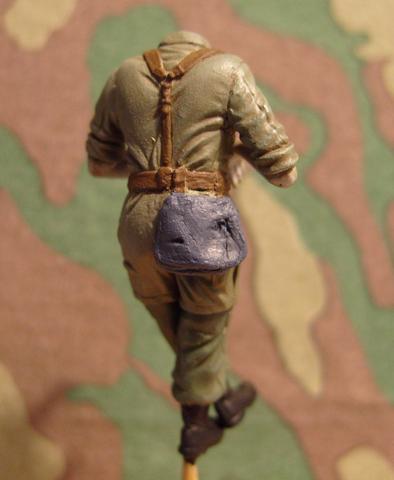
This is the photo that served as the inspiration for this project.

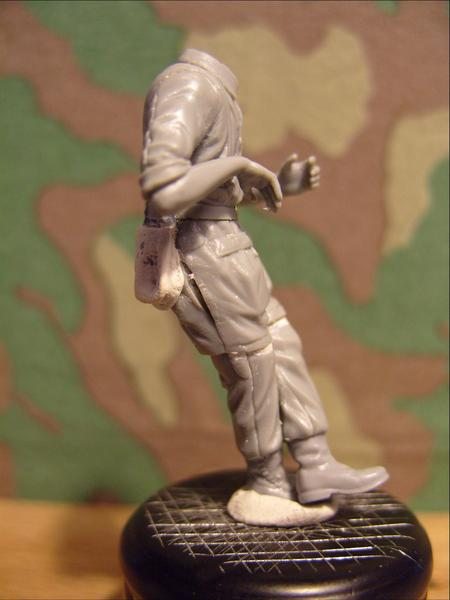
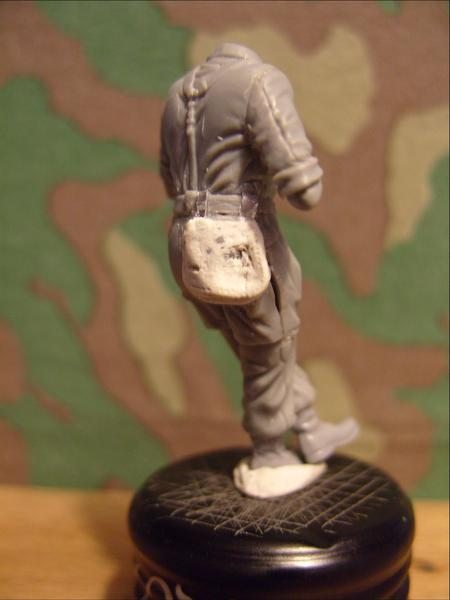
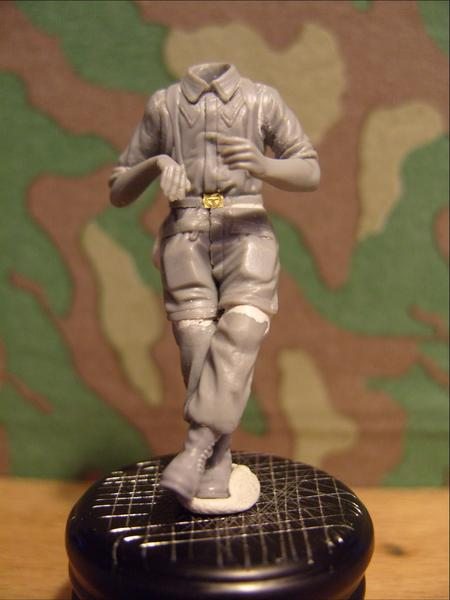
Because I am still sourcing some parts for the Kettenkrad and trailer I've started with the figure. I am trying to get the little guy more to resin standard by undercutting details like the sleeves, pocket flaps, Y-straps etc.


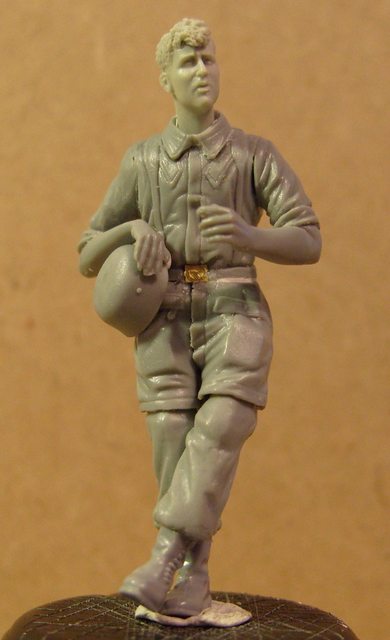
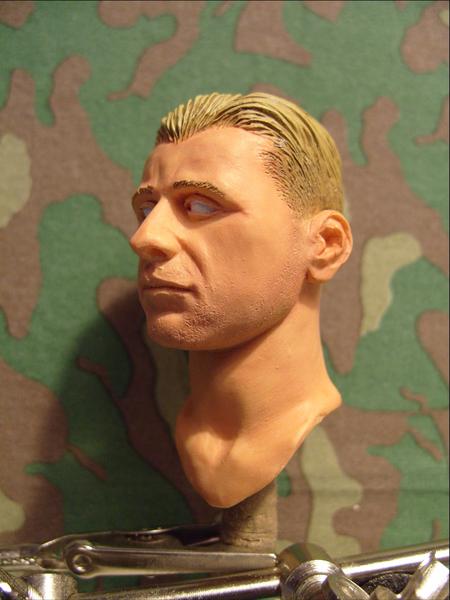
This is my first properly kitbashed figure, taking parts from 4 different plastic figures, plus a Hornet head.


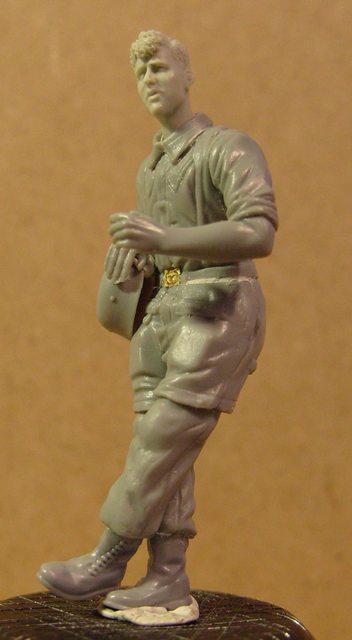
The body is a Dragon Gen2 figure from kit 6373, with arms from two different figures from Dragon box 6456.


The head and helmet are tacked on at the moment so I can paint them easier.


The 1st pattern jumpboots are from Zvesda's box 3628, I still have to tone down the laces as they are a little bit too pronounced at the moment imo.


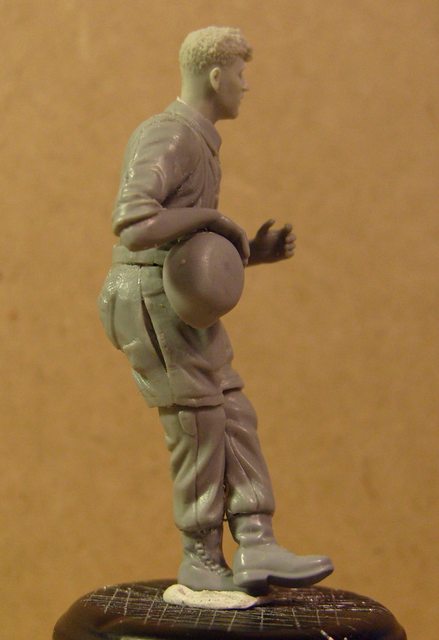
As you can see I still have some work to do before the figure is ready for painting; there is still a gap between the body and left arm, I want to clean up the hands a bit better and I want to make a breadbag from Milliput so it will fit the body properly and the canteen will sag into it nicely.

I've spend about 10 hours on the figure so far and I'm liking where it's going, but any observations or tips are more than welcome. I'm trying to push my modeling skills to the limit here!

Next up; Finishing the figure and starting the painting progress.

Thanks for looking!

chazman
Joined: October 24, 2005
KitMaker: 88 posts
Armorama: 85 posts
Posted: Tuesday, October 20, 2015 - 10:05 AM UTC
So far, so good!
jrutman
Visit this Community
Pennsylvania, United States
Joined: April 10, 2011
KitMaker: 7,941 posts
Armorama: 7,934 posts
Posted: Tuesday, October 20, 2015 - 06:37 PM UTC
Very nice beginnings here brother! I like the way he looks so far. A tip for the undercutting. It is looking good so far but... always keep in mind the forges of gravity. The leg portion of his smock looks much better now that you undercut but the front should lay more against his leg than the back...gravity! Think about weight. I know the helmet is not attached yet but maybe a bit of sanding with a round sandpaper covered dowel under the hand to get it to "sit" on the helmet better?
As far as the boot laces,I would keep them as is because paint will take away some of the relief and they will look better. Anyway,tips for what they are worth!
Nice to see you stretch your limits. Keep going!
J
Molentik
Visit this Community
Noord-Brabant, Netherlands
Joined: May 22, 2012
KitMaker: 112 posts
Armorama: 97 posts
Posted: Tuesday, October 20, 2015 - 07:40 PM UTC

Quoted Text

Very nice beginnings here brother! I like the way he looks so far. A tip for the undercutting. It is looking good so far but... always keep in mind the forges of gravity. The leg portion of his smock looks much better now that you undercut but the front should lay more against his leg than the back...gravity! Think about weight. I know the helmet is not attached yet but maybe a bit of sanding with a round sandpaper covered dowel under the hand to get it to "sit" on the helmet better?
As far as the boot laces,I would keep them as is because paint will take away some of the relief and they will look better. Anyway,tips for what they are worth!
Nice to see you stretch your limits. Keep going!
J


Tips from the maestro, what more could I want? Your figures are the reason I decided to bite the bullet and start customising figures myself, so thanks for that!:D

The undercuts on the pants are courtesy of the Dragon Gen2 figure I used for the body. What would be a good way to fix the upper parts? I was thinking of filling them with Milliput and then re-scribing the border between the leg and fabric so there will be some definition but not he big gap as it is now. The only other filling material I have at hand at the moment is the Vallejo plastic putty, and that stuff REALLY doesn't like to get scribed, it just crumbles...

Good point on the helmet. I was thinking of sanding the body a bit so the rim would fall into his smock a bit better and coupled with sanding his arm a bit like you suggested it would fit very well. This will also save me from having to make some of the chin-straps you would be able to see if there is a big gap between the helmet and body.

One more question I hope you or somebody else can answer; I'd like to detail the bottom of the left shoe because the first pattern jumpboots had a quite distinct pattern on the soles. How would I best do this? I was thinking of cutting thin strips of winebottle foil and gluing it on the soles. I think this would look nicer than scribing the detail in the sole because I would keep the thickness of the sole itself. Any tips or suggestions there are much appreciated!

Thanks!

jrutman
Visit this Community
Pennsylvania, United States
Joined: April 10, 2011
KitMaker: 7,941 posts
Armorama: 7,934 posts
Posted: Tuesday, October 20, 2015 - 08:08 PM UTC
I would sand down the front part of the smock on the legs so it is flush and then re-scribe the edge.
If you want to keep the thickness of the boot sole then maybe some thin polystyrene strips? Glue on then sand to thickness?
You are really going full tilt on this one aren't you!! Good spirit!
J
rossgary
Visit this Community
England - North East, United Kingdom
Joined: July 12, 2011
KitMaker: 184 posts
Armorama: 107 posts
Posted: Wednesday, October 21, 2015 - 06:15 AM UTC
Hi Robbert,
As Jerry says, remember gravity! I would suggest using putty to build up the front of the trouser where it meets the leg of the knochensack. If you use Milliput (or Milliput/ Green stuff mixed), you can use a small brush to smooth the putty and also create a realistic undercut.
As regards the boot sole, I would recommend scribing. I've attached a pic below to illustrate what can be done with this method.


Hope this helps,
Gary
Molentik
Visit this Community
Noord-Brabant, Netherlands
Joined: May 22, 2012
KitMaker: 112 posts
Armorama: 97 posts
Posted: Wednesday, October 21, 2015 - 07:30 AM UTC
Thanks Gary! Your idea for the Milliput is exactly how I spend my evening tonight. I've filled in the part of the leg where the smock meets and smoothed it out a bit. When it's hardened tomorrow I'll clean it up and take a few pictures.

I've also made the bread bag from Milliput so it will form nicely to the body. I took one of my 1/6 figures to serve as a model. That's my tip of the day by the way They come in really handy, especially when painting camouflage clothing or sculpting. Just dress the figure in the equipment and clothing you want to paint or sculpt and you can get a very good 360 degree look!

For the soles I've been experimenting a bit; first I tried Jerry's suggestion and use tiny plastic strips (on a spare boot of course), but I couldn't get the finesse of the pattern that I'm looking for. After that I tried to glue aluminium foil (that I folded a few times for thickness and glued together with CA glue) to the boot, and then tried to cut the pattern into it. Unfortunately this didn't work because CA glue is too brittle and the layers foil separate. Aluminium foil + CA glue takes sanding very well though!

Now I'm trying the same but instead of CA glue I'm using 'Pattex 100%' which dries more flexible, almost like silicon kit. I use it for 1/6 stuff regularly, it has a good bond on most materials while staying very flexible. But if that fails I'll bite the bullet and do the scribing method.

http://www.pattex.co.za/en/products/100-percent-glue1/100percent-repair-gel1.html (South African link to show the product information in English)

Thanks!
jrutman
Visit this Community
Pennsylvania, United States
Joined: April 10, 2011
KitMaker: 7,941 posts
Armorama: 7,934 posts
Posted: Wednesday, October 21, 2015 - 06:27 PM UTC
Hey!! Whatever works best for you is the way to go. Can't wait to see what you come up with . It's all good plus....we got to see one of Garys' excellent vignettes. I don't think I had the chance to see this one till now.
J
Molentik
Visit this Community
Noord-Brabant, Netherlands
Joined: May 22, 2012
KitMaker: 112 posts
Armorama: 97 posts
Posted: Thursday, October 22, 2015 - 03:47 AM UTC
Here are some photos of the corrected figure. Still need to do a little smoothing and cleanup, but most of the little granules will be washed off if I wash the figure to prepare for painting.


The breadbag looks a bit rough but that will be fixed with a little paint I think. The impression on the right is from the canteen. After making the photos I noticed that the breadbag's straps are a tad too large, bit in real life it isnt as obvious thankfully, Macro Kills!
jrutman
Visit this Community
Pennsylvania, United States
Joined: April 10, 2011
KitMaker: 7,941 posts
Armorama: 7,934 posts
Posted: Thursday, October 22, 2015 - 05:25 AM UTC
Big improvement to my eye! Specially the front of the bonesack at the legs. Nice natural pose.
J
Molentik
Visit this Community
Noord-Brabant, Netherlands
Joined: May 22, 2012
KitMaker: 112 posts
Armorama: 97 posts
Posted: Thursday, October 22, 2015 - 06:07 PM UTC
Thank you! I just scribed the soles on the boot, and while it gives the right impression, I'm not totally satisfied. Thankfully with painting and weathering it wouldn't really be seen.

Now I'm thinking of how to mount the helmet; front up or front down? I have no experience with hanging a helmet of my belt, especially not a FJ helmet, so what would be more logical? Of course taking in account the extra step behind the ear that the FJ helmet had. I'm leaning towards front up, but maybe that would have made the helmet tilt outwards or would not be logical regarding the ease of pulling the chinstrap under the belt and fastening it with the other side? Something to think about...

I've also decided to kitbash a second figure, based on one of the 'FJ on the back of a tank in the Ardennes' kit from Dragon with MiniArt shoes and arms, but more on that later!

(I think I've got the kitbashing and customizing figures bug!)

Thanks!
jrutman
Visit this Community
Pennsylvania, United States
Joined: April 10, 2011
KitMaker: 7,941 posts
Armorama: 7,934 posts
Posted: Thursday, October 22, 2015 - 06:20 PM UTC
Front up! It rides better.
J
Molentik
Visit this Community
Noord-Brabant, Netherlands
Joined: May 22, 2012
KitMaker: 112 posts
Armorama: 97 posts
Posted: Saturday, October 24, 2015 - 12:52 AM UTC
Small update, started blocking in the colour of the uniform plus some very slight highlights.


Colours I used were Vallejo German Uniform for the trousers, Green Grey for the smock, Field Blue for the breadbag and German Cam. Medium Brown for the straps and belt.

I like to do the flesh colours last using the 'Tony Barton' method, where you wet the surface with an acrylic matt medium first and then 'flow' the colours into the still wet medium the effect is very subtle as you can see on this 1/6 headschulpt I'm working on at the moment


I had some problems airbrushing the Vallejo primer, thats why it shows a bit grainy on the photos (and the .jpg compression doesnt help either ). The more I use this the more I dislike it. It peels off if you even look at it funny and I find it hard to spray. Any recommendations for a good airbrushable primer (that can be cleaned with water)?

Thanks!

jrutman
Visit this Community
Pennsylvania, United States
Joined: April 10, 2011
KitMaker: 7,941 posts
Armorama: 7,934 posts
Posted: Saturday, October 24, 2015 - 05:28 AM UTC
Sorry,I use Tamiya primer in a rattle can. Curious as to why you chose brown for the belt and straps?
J
J
Molentik
Visit this Community
Noord-Brabant, Netherlands
Joined: May 22, 2012
KitMaker: 112 posts
Armorama: 97 posts
Posted: Saturday, October 24, 2015 - 02:27 PM UTC
The Tamiya rattle can might be a good option, I've heard nothing but good things about it! I'm just scared that the rattlecan gives me less control about he amount of paint I spray on the subject...

I chose brown for the straps and belt because the FJ, especially early in the war, used brown leather for their equipment like Y-straps, belts and pistol holsters. The FJ used the light weight Y-straps. you can tell because the 'light weight' Luftwaffe Y-straps didn't have the extra straps to the side to attach the (Mp-40) magazines to. Later in the war the increasing material shortage made the Luftwaffe use black leather as well.

Apart from the historical correctness, I also used brown to get more variations of colour on the figure.

Another detail to keep in mind is that until/after Crete the FJ didn't have bayonets. They were only issued bayonet later in 1942 in Russia!
Molentik
Visit this Community
Noord-Brabant, Netherlands
Joined: May 22, 2012
KitMaker: 112 posts
Armorama: 97 posts
Posted: Saturday, October 31, 2015 - 08:36 AM UTC
OK, today I learned a very good lesson; don't experiment with new techniques on a projects you've invested a lot of time in!

After finishing painting the clothing I wanted to basecoat the arms in a light flesh colour. To protect the clothing I had the great idea to use my shiny new bottle of Vallejo's liquid mask to mask off the clothing so I wouldn't have to touch up any mistakes.

Well, as it turned out my last wash wasnt 100% dry, so the still wet recessed lines sucked up the liquid mask all around the figure... Took me a few hours cleaning up with one of those soft rubber brushes painters use to texture wet paint.

So in the end I spend quite a bit longer cleaning up the liquid mask then just patching up a few spots if I'd do it the normal way. Thankfully the paintjob wasn't affected apart from a small scratch on the knee thats easily patched up!
Stojkovic1987
Visit this Community
Wojewodztwo Slaskie, Poland
Joined: March 26, 2015
KitMaker: 255 posts
Armorama: 254 posts
Posted: Saturday, October 31, 2015 - 12:08 PM UTC
Hey Robert!

Great thread so far. Fallchirmjagers in Crete are my biggest subject in modeling hobby, so You can count on me here.

What set is this figure You actualy make? Miniart, Dragon or MB? Never seen it before?

Modelrob
Visit this Community
Arizona, United States
Joined: October 20, 2015
KitMaker: 304 posts
Armorama: 293 posts
Posted: Saturday, October 31, 2015 - 03:10 PM UTC
Your work is great I can't wait to see the final product.
Molentik
Visit this Community
Noord-Brabant, Netherlands
Joined: May 22, 2012
KitMaker: 112 posts
Armorama: 97 posts
Posted: Saturday, October 31, 2015 - 04:14 PM UTC
Thanks for the comments gents!

@ Łukasz; I build the figure from Dragon and Zvesda parts. The body is from the Dragon kit of the FJ with the small mortar, and the arms come from two figures of Dragon's 'German Officers at Kursk' kit. The shoes are from a Zvesda FJ figure, because the Dragon figure had the 'normal' laced boots and not the 'side laced' ones.
 _GOTOTOP