

Hi Gino,
I echo what the others have said, such a great build and all your effort has paid out!
I have one question regarding the base coat. Is the tamiya Desert Yellow appropriate or is too dark? I am thinking of grabbing the suggested colour, Vallejo 71.028 sand yellow, but since I've got a couple of pots of Tamiya's desert yellow, I thought I should ask.
Thanks
Christos
Hosted by Darren Baker
2 BDE, 3 ID, OIF 1 M2A2 ODS - Meng backdate

Oblivion

Joined: April 04, 2015
KitMaker: 195 posts
Armorama: 191 posts
Posted: Wednesday, March 09, 2016 - 07:53 PM UTC

HeavyArty


Joined: May 16, 2002
KitMaker: 17,694 posts
Armorama: 13,742 posts
Posted: Wednesday, March 09, 2016 - 09:02 PM UTC
Thanks Christos. It is going along well and I hope to have an update/completed model soon. I added all the gear and started weathering last night.
As to the paint, I think the Tamiya Desert Yellow is too dark. I have heard of people mixing it w/Buff to lighten it, but that seems like a pain to me to try and get the right color, plus, I don't like Tamiya paints. I would just go with the correct Vallejo color.
As to the paint, I think the Tamiya Desert Yellow is too dark. I have heard of people mixing it w/Buff to lighten it, but that seems like a pain to me to try and get the right color, plus, I don't like Tamiya paints. I would just go with the correct Vallejo color.
Oblivion
Joined: April 04, 2015
KitMaker: 195 posts
Armorama: 191 posts
Posted: Wednesday, March 09, 2016 - 09:43 PM UTC
Cool, thanks!

Thirian24
Joined: September 30, 2015
KitMaker: 2,493 posts
Armorama: 2,344 posts
Posted: Thursday, March 10, 2016 - 12:05 AM UTC
Excellent work. I can't wait to see the finished product.
Where can I find a picture of the Bradley you did for the Museum?
Cheers,
Dustin
Where can I find a picture of the Bradley you did for the Museum?
Cheers,
Dustin
HeavyArty
Joined: May 16, 2002
KitMaker: 17,694 posts
Armorama: 13,742 posts
Posted: Thursday, March 10, 2016 - 03:58 AM UTC
Thanks Dustin. Here is the 3 ID Museum M7A2 BFIST.
Thirian24
Joined: September 30, 2015
KitMaker: 2,493 posts
Armorama: 2,344 posts
Posted: Thursday, March 10, 2016 - 04:39 AM UTC
Thanks for the link, Gino.
That's a beautiful Bradley. Probably very gratifying to have it on display at a museum.
That's a beautiful Bradley. Probably very gratifying to have it on display at a museum.
HeavyArty
Joined: May 16, 2002
KitMaker: 17,694 posts
Armorama: 13,742 posts
Posted: Friday, March 11, 2016 - 08:15 AM UTC
Thanks again Dustin. The BFIST was fun to build too. Hopefully it will be available for all to see soon. The museum is still finishing up the display for over 30 models we have built from the 1st Thunder Run on 5 APR 03. I can't wait to see them all.
HeavyArty
Joined: May 16, 2002
KitMaker: 17,694 posts
Armorama: 13,742 posts
Posted: Friday, March 18, 2016 - 07:13 AM UTC
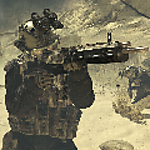
I have finally completed R65, C Co, 3-15 IN, 2 BDE, 3ID, an OIF 1 M2A2 ODS Bradley. I weathered it with acrylic craft paints using a burnt umber pin wash, a yellow-sandy color overall wash, then selective chipping with a graphite pencil.
Here is the finished product.


Interior details.


Here is the finished product.
Interior details.
Thirian24
Joined: September 30, 2015
KitMaker: 2,493 posts
Armorama: 2,344 posts
Posted: Friday, March 18, 2016 - 07:48 AM UTC
Killer job, sir!
If I may ask, how did you do the straps on the front?
If I may ask, how did you do the straps on the front?

amoz02t

#192
Joined: November 25, 2009
KitMaker: 1,383 posts
Armorama: 1,281 posts

Posted: Friday, March 18, 2016 - 07:51 AM UTC
Wow Gino! Great work and I learned a lot from your posts. Thank you for sharing. I like it!

MikeBrindos
Joined: November 11, 2015
KitMaker: 59 posts
Armorama: 58 posts
Posted: Friday, March 18, 2016 - 08:34 AM UTC
Gah! Gino, you are a modelling Demi-God. This one really blows me away.  Cheers bud.
Cheers bud.
Karl187
#284

Joined: October 04, 2006
KitMaker: 3,094 posts
Armorama: 2,942 posts

Posted: Friday, March 18, 2016 - 04:36 PM UTC
Hey Gino- I don't reckon you could pack any more detail or stowage into this one!! I think you've got every rack and surface packed with something. Its also great to see all the hatches open and the fact you can open and close the tail-gate to show off the fully finished and stowed interior. This is a real show-stopper of a build.


panamadan
Joined: July 20, 2004
KitMaker: 1,513 posts
Armorama: 1,449 posts
Posted: Friday, March 18, 2016 - 07:16 PM UTC
Great job!
Dan

Dan
HeavyArty
Joined: May 16, 2002
KitMaker: 17,694 posts
Armorama: 13,742 posts
Posted: Friday, March 18, 2016 - 10:55 PM UTC
Thanks all. It was a fun and rewarding build. I really enjoyed this one.
Dustin - the straps are strips of masking tape, cut thin and painted OD green. The buckles are rectangles of sheet styrene, painted black. It is an effective way to make straps.
Dustin - the straps are strips of masking tape, cut thin and painted OD green. The buckles are rectangles of sheet styrene, painted black. It is an effective way to make straps.

stef29
Joined: October 10, 2012
KitMaker: 124 posts
Armorama: 102 posts
Posted: Thursday, April 14, 2016 - 03:28 PM UTC
Just caught up on this build, amazing work Gino!

Armorsmith
Joined: April 09, 2015
KitMaker: 1,063 posts
Armorama: 1,000 posts
Posted: Thursday, April 14, 2016 - 03:49 PM UTC
Outstanding work Gino. Lots of detail, very nice weathering and overall finish.
HeavyArty
Joined: May 16, 2002
KitMaker: 17,694 posts
Armorama: 13,742 posts
Posted: Thursday, April 14, 2016 - 04:33 PM UTC
Thanks Bill and Dana. It was a really fun and rewarding build. I thoroughly enjoyed it.

youngtiger1
Joined: May 14, 2008
KitMaker: 534 posts
Armorama: 344 posts

Posted: Sunday, April 24, 2016 - 10:20 AM UTC
Gino buddy...just saw your Bradley and it looks awesome. You know this might be first armor build of yours I've seen. Very informative 
So, what's next on the bench?
So, what's next on the bench?
HeavyArty
Joined: May 16, 2002
KitMaker: 17,694 posts
Armorama: 13,742 posts
Posted: Tuesday, April 26, 2016 - 06:23 AM UTC
Thanks Mike. I actually do mostly armor. Next up should be a build review of the Dragon M48A1.
tankerken6011
Joined: December 04, 2013
KitMaker: 84 posts
Armorama: 81 posts
Posted: Tuesday, April 26, 2016 - 07:15 AM UTC
I've looked at several of your Brads, they look great.
Ken.
Ken.

dexter059

Joined: July 28, 2005
KitMaker: 1,569 posts
Armorama: 1,385 posts
Posted: Tuesday, April 26, 2016 - 07:23 AM UTC
Great looking Bradley Gino, besides all scratch work you did I really like the way you placed all the stowage.
Cheers
Cheers
HeavyArty
Joined: May 16, 2002
KitMaker: 17,694 posts
Armorama: 13,742 posts
Posted: Tuesday, April 26, 2016 - 04:23 PM UTC
Thanks Ken and Klaus. It was a fun build.
SpaceXhydro

Joined: March 13, 2015
KitMaker: 418 posts
Armorama: 235 posts
Posted: Tuesday, April 26, 2016 - 04:54 PM UTC
i enjoyed seeing this interesting project. thank you for sharing this with us.
HeavyArty
Joined: May 16, 2002
KitMaker: 17,694 posts
Armorama: 13,742 posts
Posted: Tuesday, April 26, 2016 - 08:38 PM UTC
Thanks Hyder. Glad you like it.

stufer

Joined: May 25, 2003
KitMaker: 416 posts
Armorama: 342 posts

Posted: Tuesday, April 26, 2016 - 09:16 PM UTC
Fantastic work Gino,excellent details and shows what can be done with what's out there.Love all the little technical explanations as to what should be where on the ODS version and what changed along the way
One small nitpick though......now you've done all the hard work I don't see anyone bringing out an M2A2 ODS any time soon,us mere mortals can't be expected to do such involved building!
Good Work Fella!
One small nitpick though......now you've done all the hard work I don't see anyone bringing out an M2A2 ODS any time soon,us mere mortals can't be expected to do such involved building!
Good Work Fella!
 |

WEB HOSTING BY


Copyright ©2021 Armorama and Kitmaker Network, a subsidiary of Silver Star Enterprises
All Rights Reserved. Please read our Conditions of Use and Privacy Policy.
All Rights Reserved. Please read our Conditions of Use and Privacy Policy.