Kildare, Ireland
Joined: November 21, 2007
KitMaker: 3,212 posts
Armorama: 2,807 posts
Posted: Tuesday, January 12, 2016 - 01:41 PM UTC
I only got to send the photos of the Pro Art components to Pete last night, so the delay is mine, not Petes. He's going to use those photos to show what gets connected to what
It's not easy get clear photos of stuff that small in white


Kildare, Ireland
Joined: November 21, 2007
KitMaker: 3,212 posts
Armorama: 2,807 posts
Posted: Sunday, January 17, 2016 - 03:21 PM UTC
Just a quick update on the wiring diagrams for the radios following a chat with Pete this morning. Firstly, Pete has expanded the scope to a bit more than drawing up some wiring diagrams: he's going to do a full tutorial. That's the good news. The bad news is that because of the expanded scope and some laptop issues he's having it's going to take a few days longer than he planned. But it is on the way....watch this space! And a big "Thank You" to Pete/Epi for this.
Kildare, Ireland
Joined: November 21, 2007
KitMaker: 3,212 posts
Armorama: 2,807 posts
Posted: Wednesday, April 13, 2016 - 12:31 AM UTC
Västra Götaland, Sweden
Joined: November 12, 2010
KitMaker: 950 posts
Armorama: 905 posts
Posted: Wednesday, April 13, 2016 - 12:42 AM UTC
Looking good Sean

California, United States
Joined: November 19, 2010
KitMaker: 798 posts
Armorama: 797 posts
Posted: Wednesday, April 13, 2016 - 12:54 AM UTC
Hi, Sean
Good built, I don't know how you went through this kit, I almost give up.......Congrats.
Jay
Kildare, Ireland
Joined: November 21, 2007
KitMaker: 3,212 posts
Armorama: 2,807 posts
Posted: Wednesday, April 13, 2016 - 01:05 PM UTC
Thanks Roger.
Quoted Text
Hi, Sean
Good built, I don't know how you went through this kit, I almost give up.......Congrats.
Jay
Thanks Jay. It's not an easy kit and does require lots of time and patience and dry-fitting and fileing and drilling and sanding and more dry-fitting but I'm actually quite happy with how it's turning out
Kildare, Ireland
Joined: November 21, 2007
KitMaker: 3,212 posts
Armorama: 2,807 posts
Posted: Sunday, April 24, 2016 - 03:47 PM UTC
Not getting much time but started preparing the stowage as I grab a few minutes here and there....

Västra Götaland, Sweden
Joined: November 12, 2010
KitMaker: 950 posts
Armorama: 905 posts
Posted: Sunday, April 24, 2016 - 10:49 PM UTC
Looking good

Virginia, United States
Joined: May 06, 2003
KitMaker: 55 posts
Armorama: 53 posts
Posted: Saturday, April 30, 2016 - 07:09 AM UTC
Sean... Having built one of Panda's M-ATVs, I can unequivocally say you have done a great job. Reviewers say it is a tough kit to build; but sometimes a tough kit is just what you need. There are plenty of "shake and Bake" kits out there. This one challenges the builder... and you took it on and it looks great. Can't wait to see it through to the end.
Hous
Kildare, Ireland
Joined: November 21, 2007
KitMaker: 3,212 posts
Armorama: 2,807 posts
Posted: Saturday, May 21, 2016 - 04:23 AM UTC
Thank you Gents!
Door, mirrors, aerials and wheels on. All decaled too so just a light weathering to finish

Pennsylvania, United States
Joined: April 09, 2015
KitMaker: 1,063 posts
Armorama: 1,000 posts
Posted: Saturday, May 21, 2016 - 07:01 AM UTC
Looking good. My build is on hold as I get a bit frustrated working with the difficult fit etc. Hope mine turns out half as nice as yours.
"No plan survives contact with the enemy." Helmuth von Moltke the Elder
California, United States
Joined: November 19, 2010
KitMaker: 798 posts
Armorama: 797 posts
Posted: Saturday, May 21, 2016 - 07:40 AM UTC
Same here, building this model made me so frustrated

. Good work Sean
Västra Götaland, Sweden
Joined: November 12, 2010
KitMaker: 950 posts
Armorama: 905 posts
Posted: Saturday, May 21, 2016 - 02:55 PM UTC
Very nice Sean
Warszawa, Poland
Joined: December 17, 2014
KitMaker: 448 posts
Armorama: 448 posts
Posted: Sunday, May 22, 2016 - 09:31 PM UTC
Wojewodztwo Slaskie, Poland
Joined: February 18, 2007
KitMaker: 978 posts
Armorama: 977 posts
Posted: Sunday, May 22, 2016 - 11:05 PM UTC
Sean, I remember Your first Humvee models (6 yrs ago or somehow). Great progress, man! Keep on doing good job and finish this beast
Kildare, Ireland
Joined: November 21, 2007
KitMaker: 3,212 posts
Armorama: 2,807 posts
Posted: Monday, May 23, 2016 - 01:06 AM UTC
Ha ha, that's going back a bit Kuba. I was hoping no one would remember them

But cameras have improved since 😀
Kildare, Ireland
Joined: November 21, 2007
KitMaker: 3,212 posts
Armorama: 2,807 posts
Posted: Saturday, May 28, 2016 - 08:43 PM UTC
Texas, United States
Joined: December 22, 2001
KitMaker: 3,586 posts
Armorama: 2,556 posts
Posted: Sunday, May 29, 2016 - 12:03 AM UTC
As Tony The Tiger would say, "IT'S GGGGGRRRRREEEEEEAAAAATTTTTTT!"

Pete Becerra, Jr. SGT(RET)
HHC, 71st BfSB - TEXAS
HHB, 36th ID DIVARTY -TEXAS
B Co.(-), 949 FSB, 56th BCT, 36th ID - TEXAS
B Co., 324th FSB, 3rd Brigade, 24th INF DIV(MECH)
563rd ORD Co. - GERMANY
Kildare, Ireland
Joined: November 21, 2007
KitMaker: 3,212 posts
Armorama: 2,807 posts
Posted: Sunday, May 29, 2016 - 01:36 AM UTC
Thanks Tony, sorry, I mean Pete 😄
Kildare, Ireland
Joined: November 21, 2007
KitMaker: 3,212 posts
Armorama: 2,807 posts
Posted: Sunday, May 29, 2016 - 03:05 PM UTC
Västra Götaland, Sweden
Joined: November 12, 2010
KitMaker: 950 posts
Armorama: 905 posts
Posted: Sunday, May 29, 2016 - 03:28 PM UTC
Looking very good Sean
thanks for showing your build here
Wojewodztwo Slaskie, Poland
Joined: February 18, 2007
KitMaker: 978 posts
Armorama: 977 posts
Posted: Sunday, May 29, 2016 - 03:31 PM UTC
Nice one
There are some areas without wash, in some places wash isn't removed perfectly, but generally - i like this model very much. As I wrote some days ago - great progress, I'm anxious to see Your next one.
There is a handle between doors missing, isn't it? And I guess the CROWS monitor has strange angle of mounting inside. Both things are visible at the last photo.
Myanmar
Joined: March 05, 2004
KitMaker: 4,011 posts
Armorama: 1,498 posts
Posted: Sunday, May 29, 2016 - 09:04 PM UTC
That looks great. A very neat-o vehicle as well

i watched a scale plastic figure crawl along the edge . . . of an exacto blade . . . that's my dream , it's my nightmare . . . . . . . crawling , slithering . . . . . along the edge . . . . . . of an exacto . . . . . blade . . . . and surviving
Kildare, Ireland
Joined: November 21, 2007
KitMaker: 3,212 posts
Armorama: 2,807 posts
Posted: Sunday, May 29, 2016 - 10:32 PM UTC
Thanks Gents 😀 And yes washes are not my strong point.
Not got to check the carpet monster for that missing handle....
Milano, Italy
Joined: April 11, 2008
KitMaker: 146 posts
Armorama: 126 posts
Posted: Saturday, February 04, 2017 - 04:24 PM UTC
Quoted Text
Give me a day or 2 and I will have some good wiring diagrams drawn up along with pictures.
Don't go by the pictures of the Pro Art set. It is all wrong. I haven't seen what the instructions show, so I don't know if it right on them.
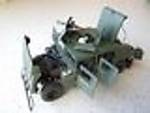
What comes in the Pro Art set is a AN/VRC-110 with 2 AN/PRC-152 in it. I will start with that first. The picture below shows what comes in the Maxx Pro kit and it doesn't have the PRC-152 mounted.

So guys, gather up your fine wire or solder wire, go through your spares box for extra "hand mikes," and I will get back with you guys shortly.
Pete,
are the wiring diagrams that you mention in this post available somewhere ?
After almost one year of stop I'm back on the M-ATV build and I really would like to wire all the communication equipments.
Thanks