England - East Midlands, United Kingdom
Joined: January 17, 2006
KitMaker: 1,694 posts
Armorama: 1,584 posts
Posted: Monday, May 02, 2016 - 07:33 AM UTC
Nothing is so exhilarating in life as to be shot at with no result.
- Winston Churchill
North-West, South Africa
Joined: September 12, 2012
KitMaker: 88 posts
Armorama: 49 posts
Posted: Tuesday, May 03, 2016 - 03:42 PM UTC
Hi
My entry to the build

England - East Midlands, United Kingdom
Joined: January 17, 2006
KitMaker: 1,694 posts
Armorama: 1,584 posts
Posted: Friday, May 06, 2016 - 07:03 PM UTC
Welcome on board Rob. Look forward to see this being built. If I get time I may build another track for the campaign from the stash. I'm leaning towards the DML 251/9 as I've got a few of their 3 in 1 kits which are pretty good.
Nothing is so exhilarating in life as to be shot at with no result.
- Winston Churchill
North Carolina, United States
Joined: January 21, 2004
KitMaker: 803 posts
Armorama: 740 posts
Posted: Saturday, May 07, 2016 - 06:21 AM UTC
Progress Photos


Sorry for the photo quality. I'm still trying to work it out. Adjusting ISO, Fstop, Shutter Speed, macro mode, but not having much luck with the depth of field that I want.
England - East Midlands, United Kingdom
Joined: January 17, 2006
KitMaker: 1,694 posts
Armorama: 1,584 posts
Posted: Saturday, May 07, 2016 - 08:22 AM UTC
Years ago I could have helped you out with that Joe as I worked in a camera shop but I can't remember any of it now lol. It is tricky when using an SLR which is why automatic cameras took over. Your 251's coming on well. Which make is it? The grab rails on the top of the hull are a nice addition in kits these days but they're just so fragile. I've broken a couple getting them off sprues when I've been trying to be careful. I like the way you've used the storage boxes on the side of the hull and put all sorts of bits of kit in there. I think it adds something extra and makes them look lived in.
Nothing is so exhilarating in life as to be shot at with no result.
- Winston Churchill
North Carolina, United States
Joined: January 21, 2004
KitMaker: 803 posts
Armorama: 740 posts
Posted: Saturday, May 07, 2016 - 05:31 PM UTC
Thanks Karl. I think that lighting may have something to do with it as well. I'm in the basement with all kinds of lamps. The grab handles are stretched sprue and bits of evergreen. And I've already had to replace one-silly sausage fingers!
Ontario, Canada
Joined: May 16, 2003
KitMaker: 250 posts
Armorama: 36 posts
Posted: Saturday, May 14, 2016 - 05:18 AM UTC
Hello everyone

After going through this thread, I am not sure if I made a good decision to join this campaign. I lurk mainly on AeroScale and build winged things. I would like to join you guys with the Tamiya Sdkfz251/1. See if I can do some justice to it.
Classic Box Shot.

May even try my hand at a figure or 2 while I am at it.
Cheers
Ted

England - East Midlands, United Kingdom
Joined: January 17, 2006
KitMaker: 1,694 posts
Armorama: 1,584 posts
Posted: Saturday, May 14, 2016 - 05:44 PM UTC
Welcome on board Ted. Glad to have you with us. You'll find that everyone on here's of a friendly disposition so if you have any questions feel free to ask and we'll endeavour to help you out.
Nothing is so exhilarating in life as to be shot at with no result.
- Winston Churchill
Armed Forces Pacific, United States
Joined: June 10, 2006
KitMaker: 149 posts
Armorama: 73 posts
Posted: Saturday, May 14, 2016 - 05:52 PM UTC
Hi all, been slowly working on my Dragon 250 Neu, doing it straight out of the box.. I built the "cabin area" in a few hours, then had to take a break before painting. Masters degree, work, family responsibilities, but now taking a week off from work and skipping a term for classes so I can decompress a bit and finish this build this week.

the date stamp

About 4 hours of work

first layers of paint, trying my hand at the salt method.
Hope I can do it some justice.
Dan
England - East Midlands, United Kingdom
Joined: January 17, 2006
KitMaker: 1,694 posts
Armorama: 1,584 posts
Posted: Thursday, May 19, 2016 - 02:56 PM UTC
Nothing is so exhilarating in life as to be shot at with no result.
- Winston Churchill
Pennsylvania, United States
Joined: April 10, 2011
KitMaker: 7,941 posts
Armorama: 7,934 posts
Posted: Thursday, May 19, 2016 - 06:19 PM UTC
The 250 looks great!! Really really crowded in there with the three guys.
J
Virginia, United States
Joined: February 05, 2002
KitMaker: 6,149 posts
Armorama: 4,573 posts
Posted: Thursday, May 19, 2016 - 06:33 PM UTC
Karl-- figures and model are superb! Great job
DJ
DJ Judge
COL (R), USA
"Tanker Boots do not a Tanker Make."
North-West, South Africa
Joined: September 12, 2012
KitMaker: 88 posts
Armorama: 49 posts
Posted: Thursday, May 19, 2016 - 06:36 PM UTC
England - East Midlands, United Kingdom
Joined: January 17, 2006
KitMaker: 1,694 posts
Armorama: 1,584 posts
Posted: Friday, May 20, 2016 - 12:42 AM UTC
Thanks guys. Glad everyone approves :-) . Will have alook through the stash later for my next project as I want a few half tracks for the dio I've got planned. Having said that the amount of completed vehicles I've got now means it's getting bigger and bigger lol
Nothing is so exhilarating in life as to be shot at with no result.
- Winston Churchill
Namabiiru
 Associate Editor
#399
Rhode Island, United States
Joined: March 05, 2014
KitMaker: 2,888 posts
Armorama: 1,920 posts
Posted: Friday, May 20, 2016 - 02:42 AM UTC
Construction phase complete:
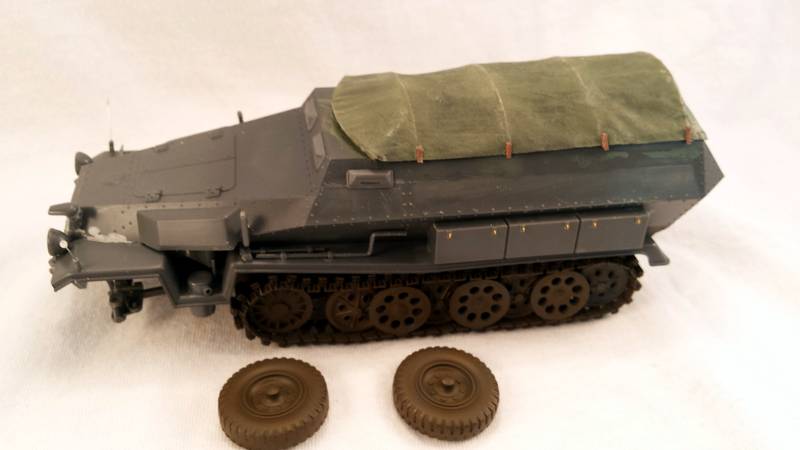
The under carriage has already been given a muddy basecoat. Next will be priming and painting the rest of it. The canvas cover was just laid on for the photo. It will be permanently attached after the rest of the model is painted.
tatbaqui
News Writer #040
Metro Manila, Philippines
Joined: May 06, 2007
KitMaker: 2,713 posts
Armorama: 2,451 posts
Posted: Friday, May 20, 2016 - 04:03 AM UTC
I like the tatp Mark. Is it paper, plastic.

Cheers,
Tat
Namabiiru
Associate Editor #399
Rhode Island, United States
Joined: March 05, 2014
KitMaker: 2,888 posts
Armorama: 1,920 posts
Posted: Friday, May 20, 2016 - 02:50 PM UTC
Tat,
It is tissue paper treated with acrylic caulk using Vinnie Branigan's method for
realistic tarps. I then used iso alcohol to wet and soften it in order to form it to the model.
tatbaqui
News Writer #040
Metro Manila, Philippines
Joined: May 06, 2007
KitMaker: 2,713 posts
Armorama: 2,451 posts
Posted: Friday, May 20, 2016 - 07:52 PM UTC
Thanks for the link Mark!
#186
Texas, United States
Joined: May 24, 2006
KitMaker: 771 posts
Armorama: 750 posts
Posted: Thursday, May 26, 2016 - 12:45 AM UTC
Pennsylvania, United States
Joined: April 10, 2011
KitMaker: 7,941 posts
Armorama: 7,934 posts
Posted: Thursday, May 26, 2016 - 05:16 AM UTC
Quoted Text
Construction phase complete:
The under carriage has already been given a muddy basecoat. Next will be priming and painting the rest of it. The canvas cover was just laid on for the photo. It will be permanently attached after the rest of the model is painted.
I really like this tarp. One of the best I have seen. It has a perfect shape and th painting and accents are spot on.
J
Namabiiru
Associate Editor #399
Rhode Island, United States
Joined: March 05, 2014
KitMaker: 2,888 posts
Armorama: 1,920 posts
Posted: Thursday, May 26, 2016 - 06:05 AM UTC
Thanks, Jerry! Really was not sure I'd be able to pull it off. We'll see how the final assembly goes...
England - East Midlands, United Kingdom
Joined: January 17, 2006
KitMaker: 1,694 posts
Armorama: 1,584 posts
Posted: Saturday, May 28, 2016 - 03:44 PM UTC
The tarps texture actually looks like it does in real life. What I especially like are the areas where it has worn and faded. Looks exactly as I remember them from my time in the army. Superb job on that. How did you do it?
Nothing is so exhilarating in life as to be shot at with no result.
- Winston Churchill
Namabiiru
Associate Editor #399
Rhode Island, United States
Joined: March 05, 2014
KitMaker: 2,888 posts
Armorama: 1,920 posts
Posted: Saturday, May 28, 2016 - 04:26 PM UTC
Thanks for the kind words, Karl.
I started with Vinnie Branigan's technique for making
tarps and laid that material over the frame. Next I used alcohol to soften the material and get it to conform to the shape I wanted. Once dry and after carefully cutting it to shape I started painting with standard automotive primer in a rattle can(probably didn't need this step, but I thought it would help the whole thing hold it's shape) then brush painted with Tamiya Field Grey. I highlighted the high areas with AV Hemp heavily thinned with AV Glaze Medium for transparency, and finally dry-brushed the spots that would have gotten lots of wear (e.g.: where the canopy was ran over the stretchers and in the corners) with Tamiya Field Grey lightened with Buff. The tie-downs are small strips of tarp material painted with Tamiya Red Brown. Last step was to shoot the whole thing with AV Matt Varnish to get rid of any trace of shine.
Have not yet applied any washes--not decided whether I want to go there or not.
Hope this helps.
In the meantime, my first attempt with camo on the vehicle turned out pretty sketchy so going to paint over it and try again today:

England - East Midlands, United Kingdom
Joined: January 17, 2006
KitMaker: 1,694 posts
Armorama: 1,584 posts
Posted: Saturday, May 28, 2016 - 04:38 PM UTC
Mark, thanks for the heads up. I may give that a try. It's really hard deciding on a pattern isn't it. I did exactly the same with my 250. I didn't think it looked right so repainted the dunkel gelb and redid it lol. Probably did look okay but I was convinced it didn't.
Nothing is so exhilarating in life as to be shot at with no result.
- Winston Churchill
Dalarnas, Sweden
Joined: March 24, 2006
KitMaker: 2,093 posts
Armorama: 1,359 posts
Posted: Saturday, May 28, 2016 - 05:50 PM UTC
Some very good progress here!
I really like that tarp. Thanks for the explanation!
And that 250... Love it, but it looks like the fitting of the hull halves will be a challenge.... as we are used to with Dragonkits of that era.
Working on:
Reworking Italeri/Zvezda T 34/76
http://scalemodelling-by-ron.blogspot.se/


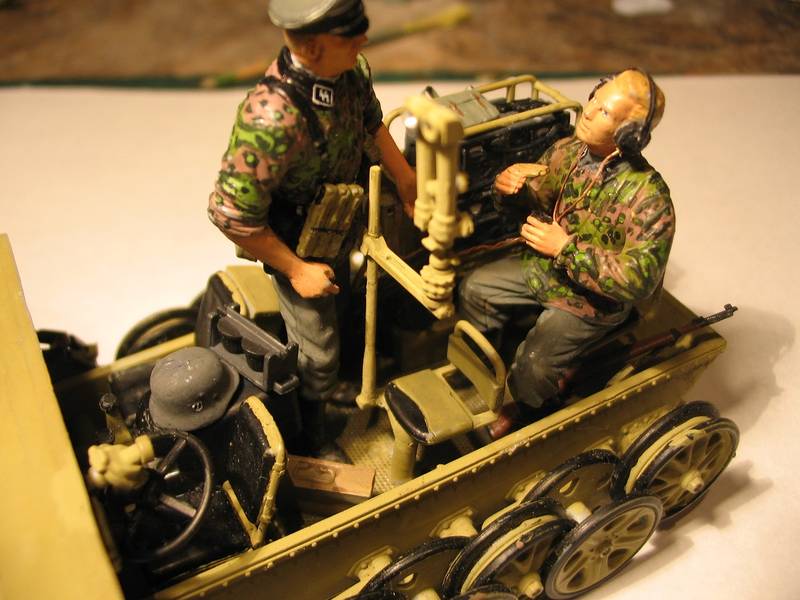
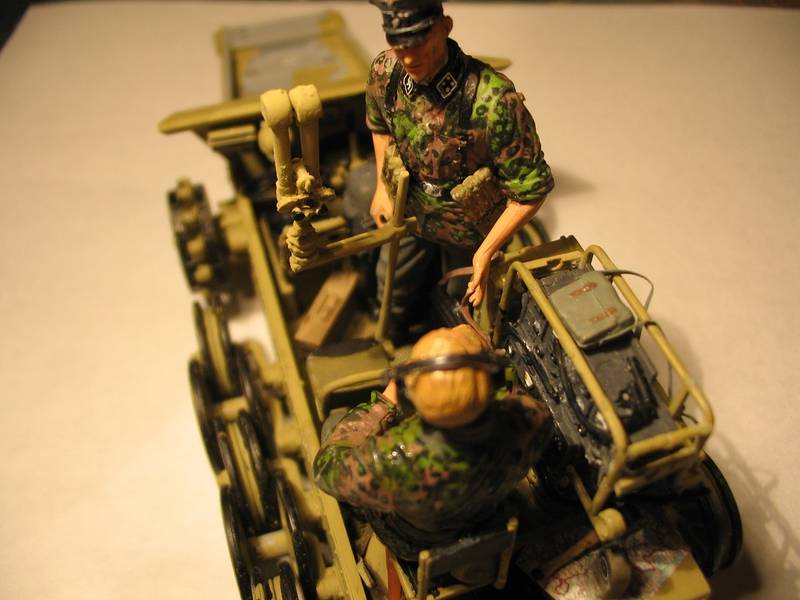
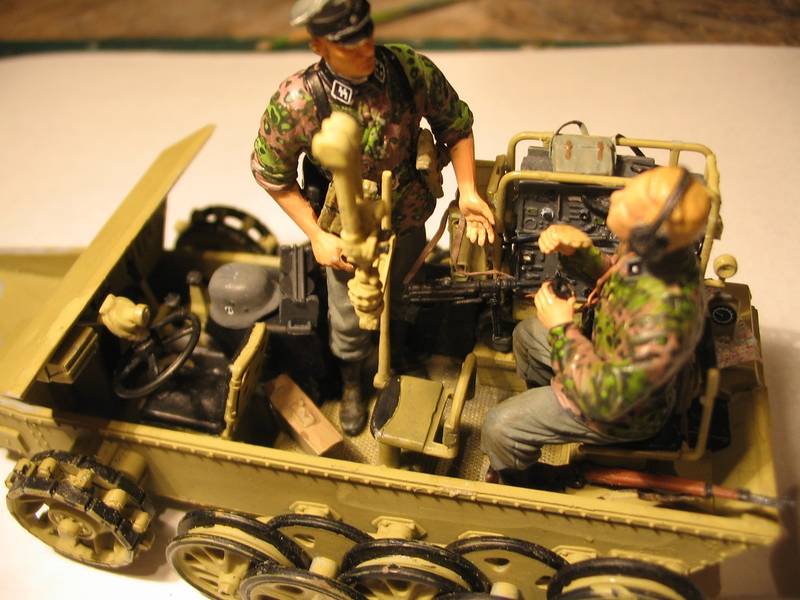
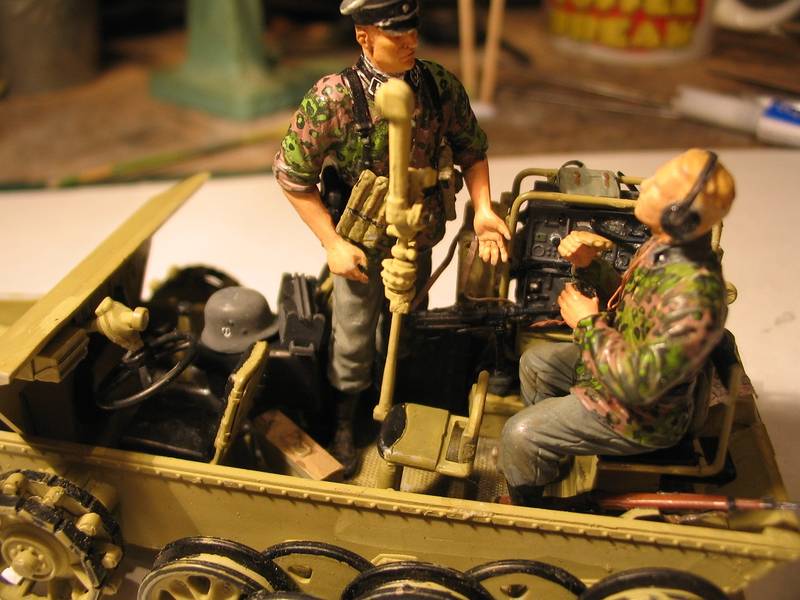
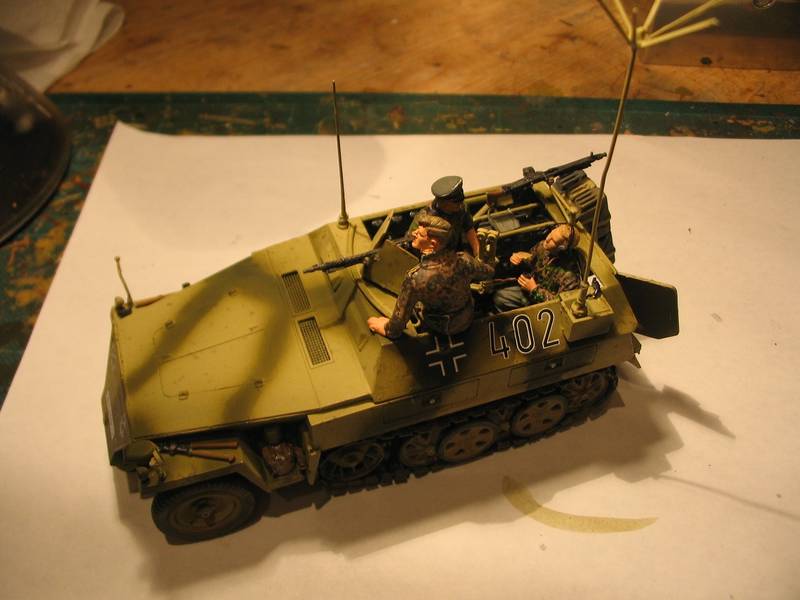
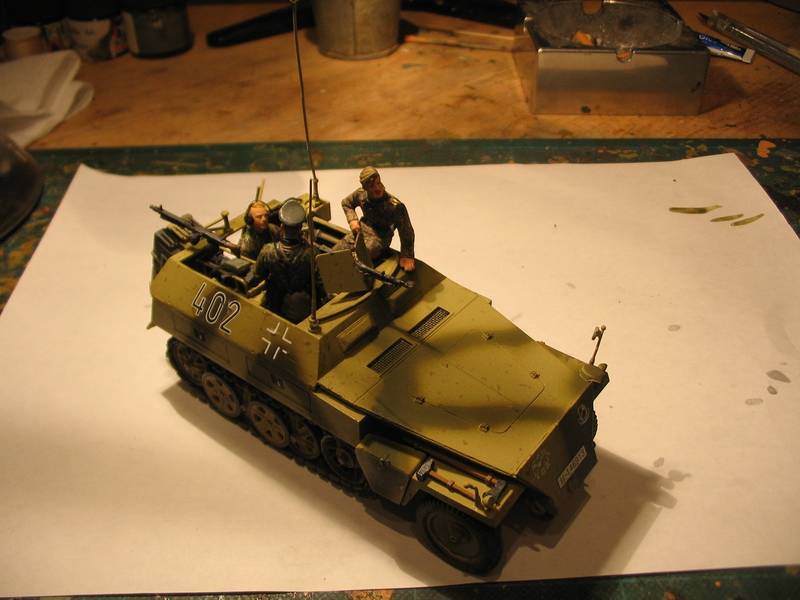
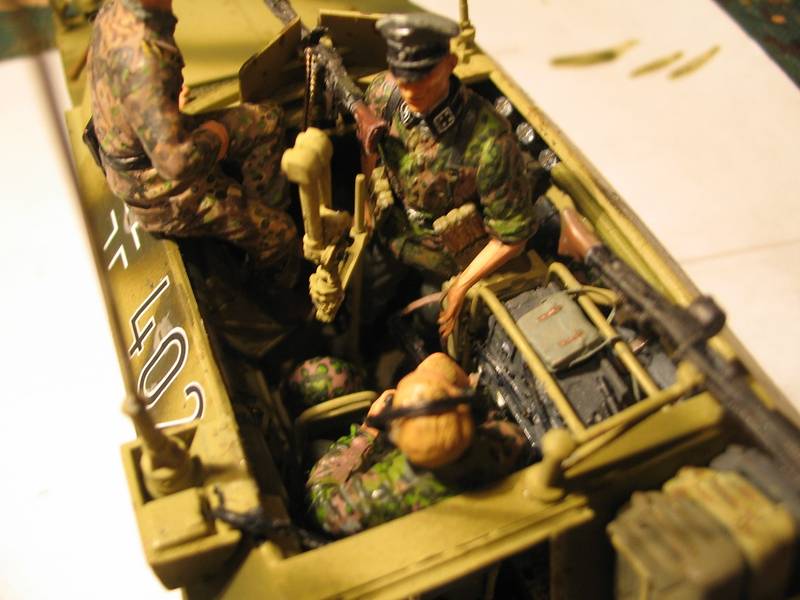
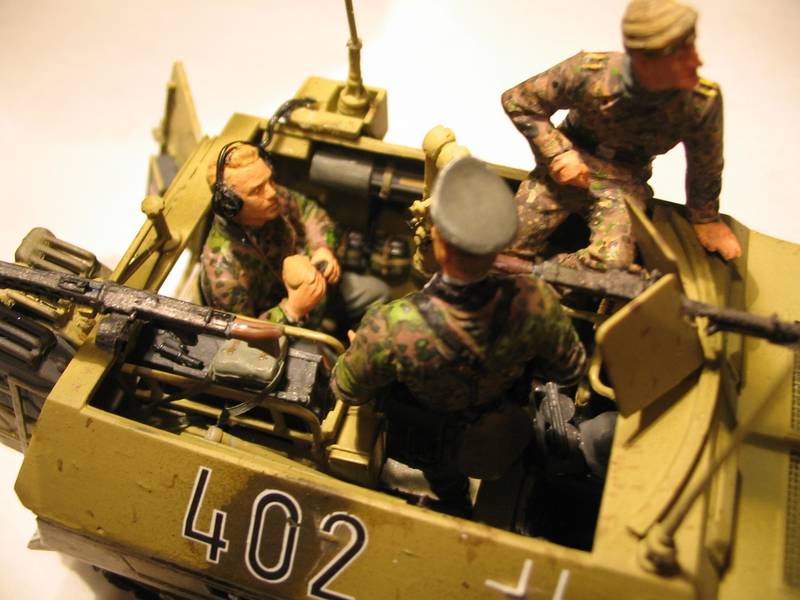
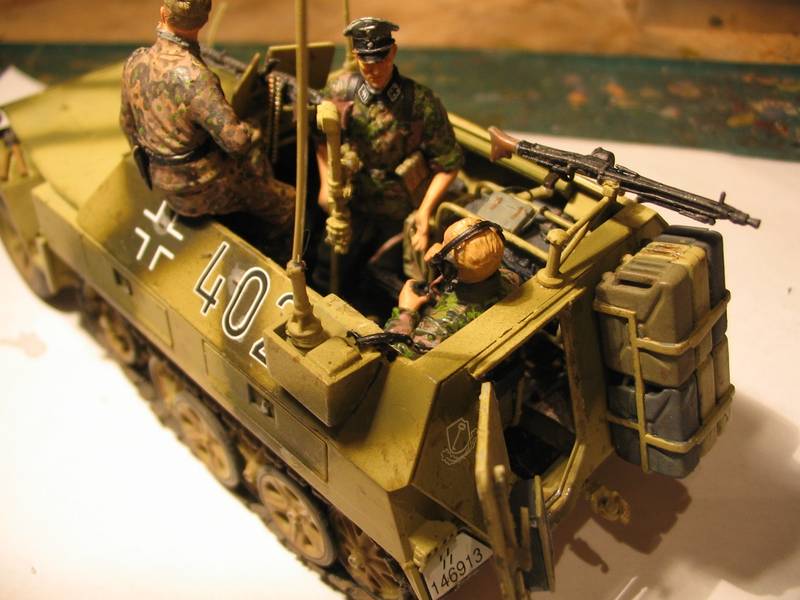
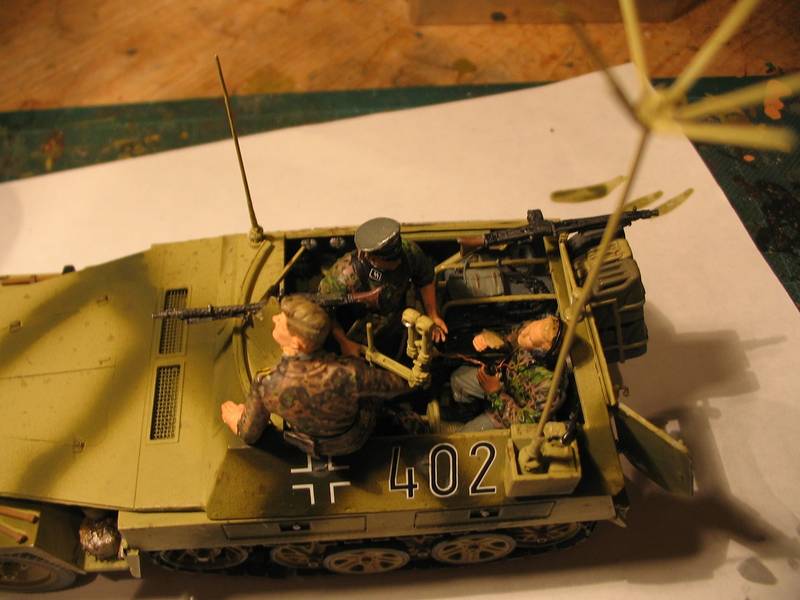
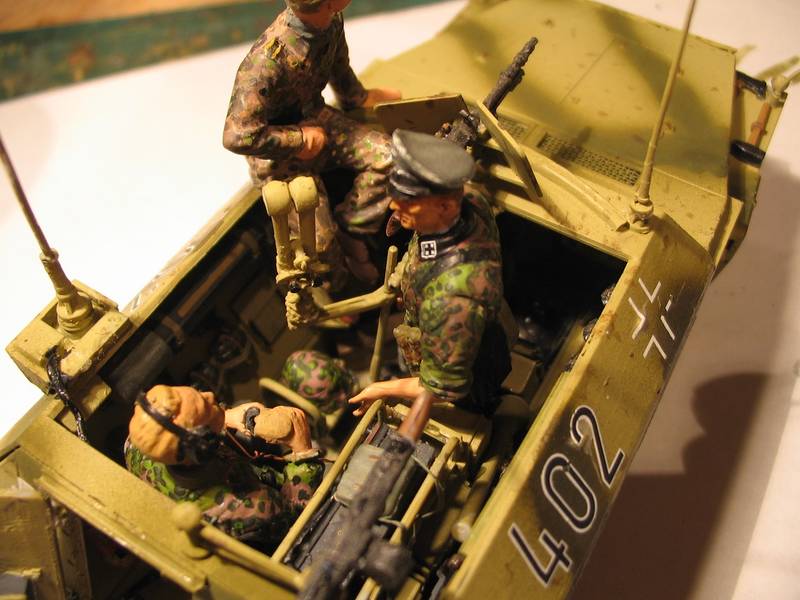
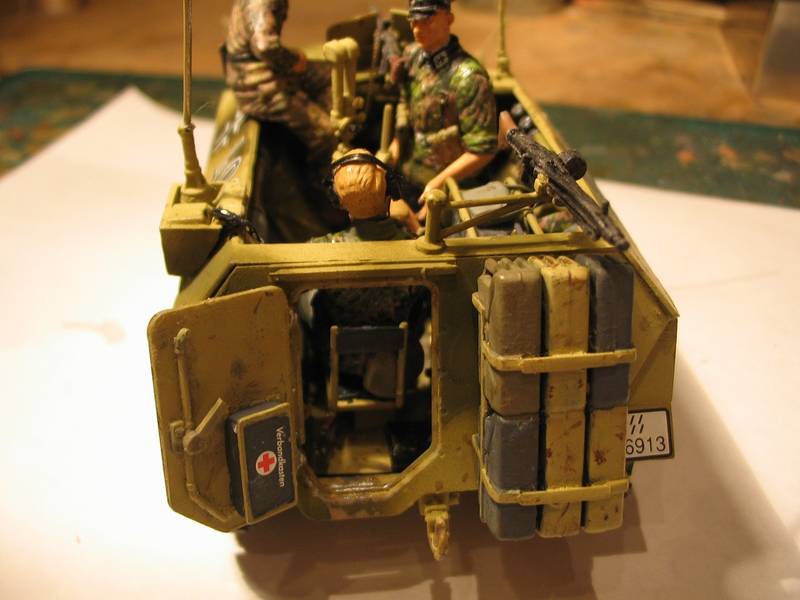
 I've got a cupboard with about 100 unopened DML figure boxes inside (mainly Germans). I pick them up when I see a bargain but without any idea what I am actually going to use them for. I eventually find a use for them though lol. If I'm honest I forget what I've got so now if I'm thinking of a project I consult the cupboard first. More often than not there's some figures in there that fit what I'm up to. Having said that I've got two boxes of the half track crew and they're too bloody big! Oh well...here's where I'm up to now.