_GOTOBOTTOM
Dioramas: Large Scale
Dioramas with large scale (1/16 plus) subjects.
Hosted by Darren Baker
Anyone Know whose work this is?
ahandykindaguy
Visit this Community
Alberta, Canada
Joined: August 20, 2008
KitMaker: 1,295 posts
Armorama: 1,191 posts
Posted: Thursday, January 21, 2016 - 08:54 AM UTC


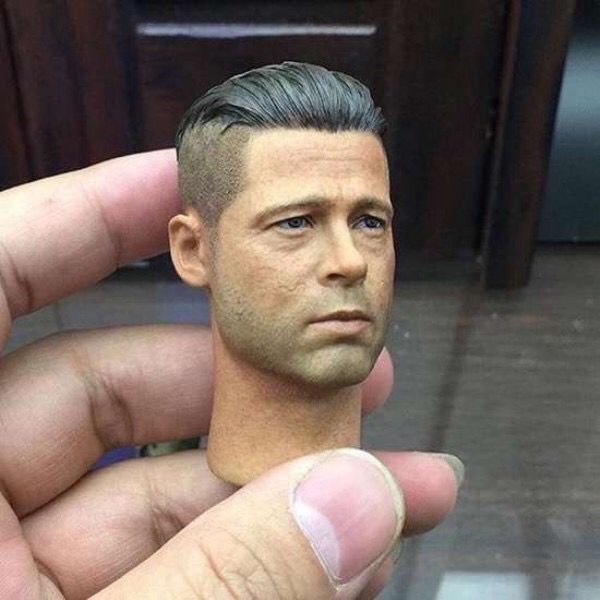
Found this photo on a website today... Unreal! Probably 1/9th scale? Not sure.

No idea who it was who is responsible for this work of art, but someone must know, right guys?

TAFFY3
Visit this Community
New York, United States
Joined: January 21, 2008
KitMaker: 2,531 posts
Armorama: 859 posts
Posted: Thursday, January 21, 2016 - 09:14 AM UTC
Looks like the base figure could be this one from Young Miniatures. It's 1/10th scale.


They list it as "Hell on Wheels" 2nd Armored Division, but it's pretty obvious that it's Brad Pitt's War Daddy character from Fury. Don't know who the painter is but he's darn good. Al
brekinapez
Visit this Community
Georgia, United States
Joined: July 26, 2013
KitMaker: 2,272 posts
Armorama: 1,860 posts
Posted: Thursday, January 21, 2016 - 09:45 AM UTC
I painted that...


...in my dreams.
ahandykindaguy
Visit this Community
Alberta, Canada
Joined: August 20, 2008
KitMaker: 1,295 posts
Armorama: 1,191 posts
Posted: Thursday, January 21, 2016 - 10:05 AM UTC
Tell me if I'm wrong guys, but doesn't it also look like the face has a layer of pigments too? Especially the 5 o'clock shadow area?
wowcool
Visit this Community
Solomon Islands
Joined: September 26, 2015
KitMaker: 113 posts
Armorama: 106 posts
Posted: Thursday, January 21, 2016 - 10:12 AM UTC
Made by el1ev1en I believe, here's the instagram account: https://www.instagram.com/el1ev1en/
hutch2336
Visit this Community
England - North, United Kingdom
Joined: May 22, 2011
KitMaker: 73 posts
Armorama: 54 posts
Posted: Thursday, January 21, 2016 - 10:53 AM UTC
Packing up my brushes and paint, I will never be that good
ahandykindaguy
Visit this Community
Alberta, Canada
Joined: August 20, 2008
KitMaker: 1,295 posts
Armorama: 1,191 posts
Posted: Thursday, January 21, 2016 - 10:56 AM UTC

Quoted Text

Made by el1ev1en I believe, here's the instagram account: https://www.instagram.com/el1ev1en/


That's the guy for sure!!!! Thanks Zec....this guy is seriously talented!

Hwa-Rang
Visit this Community
Kobenhavn, Denmark
Joined: June 29, 2004
KitMaker: 6,760 posts
Armorama: 1,339 posts
Posted: Thursday, January 21, 2016 - 12:05 PM UTC
Looks like a 1/6 scale action figure head.
M4A1Sherman
Visit this Community
New York, United States
Joined: May 02, 2013
KitMaker: 4,403 posts
Armorama: 4,078 posts
Posted: Thursday, January 21, 2016 - 01:15 PM UTC

Quoted Text

Packing up my brushes and paint, I will never be that good


This "head" is VERY NICELY DONE!!!

Steve- DON'T pack up your brushes and paint! And YES, you CAN get that good! It took me about FOUR MONTHS OF STEADY FIGURE PAINTING before I reached the same level of work. I put all my other model-projects aside to concentrate on improving my skills, and I did nothing else but practice and try to improve my work every night that I wasn't working at my part-time job after school (or chasing girls!) before I achieved that level of work- I was 17 years old when I first started painting figures properly. If you're really serious about getting to that level, may I suggest the OSPREY "Bill Horan's Figure Painting Masterclass" book? (Sorry, I don't have the book in my hands, so the title above is in-exact) This book is a real "How To" manual, and is absolutely LOADED with color photos.

There are NINE to TWELVE STEPS in just painting a face, alone. With practice, after a while it just comes naturally. You'll come unto your own once you've mastered BLENDING your colors so that there is not a "too stark" of a contrast between shades. The key, if you're using oils with enamels, that is, is to wait a bit between colors, and then use just a tiny (almost dry) bit of turps (mineral spirits) on the brush that you're doing your blending with. I dip my brush in clean turps, and wipe the bristles on an old cotton T-shirt or a paper towel, leaving just a residue of turps on my brush. It's almost like "dry-brushing"...

Another thing to remember with the smaller scales, such as 1/35, 1/48, and 54mm, is NOT to use White for your eyeballs. This non-use of White will avoid that "pop-eyed" look that many modellers find themselves trapped into. In the daylight, even on cloudy days, people tend to squint, so the White isn't really necessary. A more convincing "eyeball" can be achieved by just using a Light Flesh color, and by "narrowing" the inside-horizontal dimension of the eyelids, after you've painted the iris and pupil of the eyeball. Mr. Horan goes into much more detail on this subject in his book, when explaining how to do the facial details realistically. There is a lot more to be learned than what I just mentioned above...

The key is PRACTICE!!!

PS- You'd be surprised how handy the proper colors of Weathering Powders are, which can be used to very good effect in creating different nuances of facial colors AND on hands and clothing, as well...
jrutman
Visit this Community
Pennsylvania, United States
Joined: April 10, 2011
KitMaker: 7,941 posts
Armorama: 7,934 posts
Posted: Thursday, January 21, 2016 - 08:20 PM UTC

Quoted Text


Quoted Text

Packing up my brushes and paint, I will never be that good


This "head" is VERY NICELY DONE!!!

Steve- DON'T pack up your brushes and paint! And YES, you CAN get that good! It took me about FOUR MONTHS OF STEADY FIGURE PAINTING before I reached the same level of work. I put all my other model-projects aside to concentrate on improving my skills, and I did nothing else but practice and try to improve my work every night that I wasn't working at my part-time job after school (or chasing girls!) before I achieved that level of work- I was 17 years old when I first started painting figures properly. If you're really serious about getting to that level, may I suggest the OSPREY "Bill Horan's Figure Painting Masterclass" book? (Sorry, I don't have the book in my hands, so the title above is in-exact) This book is a real "How To" manual, and is absolutely LOADED with color photos.

There are NINE to TWELVE STEPS in just painting a face, alone. With practice, after a while it just comes naturally. You'll come unto your own once you've mastered BLENDING your colors so that there is not a "too stark" of a contrast between shades. The key, if you're using oils with enamels, that is, is to wait a bit between colors, and then use just a tiny (almost dry) bit of turps (mineral spirits) on the brush that you're doing your blending with. I dip my brush in clean turps, and wipe the bristles on an old cotton T-shirt or a paper towel, leaving just a residue of turps on my brush. It's almost like "dry-brushing"...

Another thing to remember with the smaller scales, such as 1/35, 1/48, and 54mm, is NOT to use White for your eyeballs. This non-use of White will avoid that "pop-eyed" look that many modellers find themselves trapped into. In the daylight, even on cloudy days, people tend to squint, so the White isn't really necessary. A more convincing "eyeball" can be achieved by just using a Light Flesh color, and by "narrowing" the inside-horizontal dimension of the eyelids, after you've painted the iris and pupil of the eyeball. Mr. Horan goes into much more detail on this subject in his book, when explaining how to do the facial details realistically. There is a lot more to be learned than what I just mentioned above...

The key is PRACTICE!!!


PS- You'd be surprised how handy the proper colors of Weathering Powders are, which can be used to very good effect in creating different nuances of facial colors AND on hands and clothing, as well...


Yeah! What HE said!
Perfect explanation.
I saw this modelers' stuff on FB for a while now and he gets these results a lot! With the roper blocking and background there is no way to tell this apart from reality.
J
ahandykindaguy
Visit this Community
Alberta, Canada
Joined: August 20, 2008
KitMaker: 1,295 posts
Armorama: 1,191 posts
Posted: Thursday, January 21, 2016 - 09:25 PM UTC
Looking at his instagram page,it would not surprise me in the least if he does this professionally for the industry....they all look like they could be used in filming and such.....

Boy that would be a cool gig....

M4A1Sherman
Visit this Community
New York, United States
Joined: May 02, 2013
KitMaker: 4,403 posts
Armorama: 4,078 posts
Posted: Friday, January 22, 2016 - 03:32 PM UTC

Quoted Text


Quoted Text


Quoted Text

Packing up my brushes and paint, I will never be that good


This "head" is VERY NICELY DONE!!!

Steve- DON'T pack up your brushes and paint! And YES, you CAN get that good! It took me about FOUR MONTHS OF STEADY FIGURE PAINTING before I reached the same level of work. I put all my other model-projects aside to concentrate on improving my skills, and I did nothing else but practice and try to improve my work every night that I wasn't working at my part-time job after school (or chasing girls!) before I achieved that level of work- I was 17 years old when I first started painting figures properly. If you're really serious about getting to that level, may I suggest the OSPREY "Bill Horan's Figure Painting Masterclass" book? (Sorry, I don't have the book in my hands, so the title above is in-exact) This book is a real "How To" manual, and is absolutely LOADED with color photos.

There are NINE to TWELVE STEPS in just painting a face, alone. With practice, after a while it just comes naturally. You'll come unto your own once you've mastered BLENDING your colors so that there is not a "too stark" of a contrast between shades. The key, if you're using oils with enamels, that is, is to wait a bit between colors, and then use just a tiny (almost dry) bit of turps (mineral spirits) on the brush that you're doing your blending with. I dip my brush in clean turps, and wipe the bristles on an old cotton T-shirt or a paper towel, leaving just a residue of turps on my brush. It's almost like "dry-brushing"...

Another thing to remember with the smaller scales, such as 1/35, 1/48, and 54mm, is NOT to use White for your eyeballs. This non-use of White will avoid that "pop-eyed" look that many modellers find themselves trapped into. In the daylight, even on cloudy days, people tend to squint, so the White isn't really necessary. A more convincing "eyeball" can be achieved by just using a Light Flesh color, and by "narrowing" the inside-horizontal dimension of the eyelids, after you've painted the iris and pupil of the eyeball. Mr. Horan goes into much more detail on this subject in his book, when explaining how to do the facial details realistically. There is a lot more to be learned than what I just mentioned above...

The key is PRACTICE!!!


PS- You'd be surprised how handy the proper colors of Weathering Powders are, which can be used to very good effect in creating different nuances of facial colors AND on hands and clothing, as well...


Yeah! What HE said!
Perfect explanation.
I saw this modelers' stuff on FB for a while now and he gets these results a lot! With the roper blocking and background there is no way to tell this apart from reality.
J


Thank You, Jerry!

In any case, that head is MASTERFULLY DONE!

I used to do work on a "custom-order" basis- For the last 20 years or so, I've been modelling strictly for my own pleasure. I work with my own time schedule, which is to say that I build what I want, when I feel like it...
Precious_rob
Visit this Community
United States
Joined: March 09, 2009
KitMaker: 206 posts
Armorama: 183 posts
Posted: Friday, January 22, 2016 - 05:54 PM UTC
Judging by the style and seeing dozens of similar pictures on Facebook, I believe this is by Hot Toys, a Hong Kong based company that specializes in limited run sixth scale action figures. Didn't know they did anything non-comic book-y, but their style and quality of their work is unbelievable. I wish I could learn even a quarter of what they do to use on my figures
 _GOTOTOP