

I apologize if I am posting a redundant question but I am a newbie when it comes to water.
I am planning a beach front diorama of a tank on the shoreline and need to replicate the water washing up onto the beach.
Is there a tutorial on this somewhere? The look is a little foam and some uneven water line with just a few inches of ocean showing... Water would be about 12" by 5" most in front of the subject...
All help appreciated and thanks in advance!
Dioramas
Do you love dioramas & vignettes? We sure do.
Do you love dioramas & vignettes? We sure do.
Hosted by Darren Baker, Mario Matijasic
Simulating shore line water

pnance26

Joined: January 22, 2016
KitMaker: 766 posts
Armorama: 518 posts
Posted: Saturday, January 23, 2016 - 10:40 PM UTC

TAFFY3
Joined: January 21, 2008
KitMaker: 2,531 posts
Armorama: 859 posts
Posted: Saturday, January 23, 2016 - 11:14 PM UTC
Something like this?

There are several ways to go. A lot depends on how deep you want the water to be. Woodland Scenics makes a product called 'Realistic Water'. It would be the easiest to use. Then there is two-part resin, which is better for filling larger, deeper areas.

Note that the water comes up much higher in the second photo.The downside to resin is that it generates heat while curing and can damage the model. You need to pour it in thin layers, about 1/8 inch, and allow it to cure thoroughly before pouring the next layer. Both materials will dry level, so you will need to build up the waves. You can use acrylic artist's gel for this. Both the Realistic Water, resin and the acrylic gel can be tinted. The resin will darken with age so go lighter than what you want the final color to be. Hope this helps. Al
Al 
There are several ways to go. A lot depends on how deep you want the water to be. Woodland Scenics makes a product called 'Realistic Water'. It would be the easiest to use. Then there is two-part resin, which is better for filling larger, deeper areas.
Note that the water comes up much higher in the second photo.The downside to resin is that it generates heat while curing and can damage the model. You need to pour it in thin layers, about 1/8 inch, and allow it to cure thoroughly before pouring the next layer. Both materials will dry level, so you will need to build up the waves. You can use acrylic artist's gel for this. Both the Realistic Water, resin and the acrylic gel can be tinted. The resin will darken with age so go lighter than what you want the final color to be. Hope this helps.
Al pnance26
Joined: January 22, 2016
KitMaker: 766 posts
Armorama: 518 posts
Posted: Sunday, January 24, 2016 - 05:50 AM UTC
That is very much like the look only the vehicle will be on the dry area with the water in front as if the vehicle were looking out to sea.
Thank you for your help.
Thank you for your help.
TAFFY3
Joined: January 21, 2008
KitMaker: 2,531 posts
Armorama: 859 posts
Posted: Sunday, January 24, 2016 - 08:46 AM UTC
Glad to help and I'll answer any questions that I can. Al
Alpnance26
Joined: January 22, 2016
KitMaker: 766 posts
Armorama: 518 posts
Posted: Sunday, January 24, 2016 - 09:57 PM UTC
Al, I realize that I will need to make the offshore end lower than the onshore side... that makes sense.
But how do I do two things: 1) make waves such as yours in the photo and 2) simulate the wet water line where the wave came ashore and then receded.
I work mostly in planes and automobiles so this is a new one for me. I try to do something different so...
Does the layout of the scene make sense? I am trying to go for a rusted out Type 2 with one pontoon that has fallen off and is half buried on shore with the cannon pointed out to sea as if it were turned around to use as a shore battery. There will be some old camo netting draped across the back as if it had fallen in years ago with the uprights for the netting maybe laying across the rear deck. I want to expose one of the props and have some shovels in the sand as if someone is digging out the tank. I am also going to have some buckets and a shaker screen on scene and maybe a table with some artifacts on it. I will also try to add some palm trees to a hillock off to the right of the scene.
Does all this make sense? I have foam carving experience and doing the sand seems pretty easy. Challenges for me are the water and the trees and vegetation.
Please let me know you thoughts...
Does that
pnance26
Joined: January 22, 2016
KitMaker: 766 posts
Armorama: 518 posts
Posted: Sunday, January 24, 2016 - 09:58 PM UTC
Also getting the water colored such as yours... I am not sure if it will be clearer with more blue..
Thanks in advance!
Thanks in advance!
TAFFY3
Joined: January 21, 2008
KitMaker: 2,531 posts
Armorama: 859 posts
Posted: Sunday, January 24, 2016 - 10:18 PM UTC
The waves are built up using Acrylic Artist's Gel (Medium) by Liquitex. You can get it at any art supply place like Michaels', HobbyLobby, or AC Moore. It is a white cream but dries clear and can be tinted using any acrylic paint. It will shrink a little as it dries, so you may have to add more to achieve the height that you want. The receding water line was achieved by darkening the sand color to simulate wet sand and then pouring some of the Realistic Water from Woodland Scenics (in the model RR section of any hobby shop or Hobby Lobby) over part of it and letting it flow back down to the deeper waters edge. Make sense? I'll clarify anything that I haven't explained well enough if need be. Al
Alpnance26
Joined: January 22, 2016
KitMaker: 766 posts
Armorama: 518 posts
Posted: Monday, January 25, 2016 - 03:30 AM UTC
I think I need to delete my threads in other posts and stick with you!
If I am reading correctly, I would use an acrylic gel with kind of a rough nature (Liquitex Resin Sand) to simulate the sand going to the waterline and then a finer acrylic gel for the beach sand itself? Step two would be to seal the acrylic, right? Or do I need to do that? And then pour the Realistic water medium in layers over that in decreasing blue to get the colored layers? Am I getting it correct?
What do you use to simulate the wet sand where the water recently came ashore and then receded?
I know I am peppering several forums with these questions but I really want to do this correctly. I get how to make the gentle waves that would lap on the water's edge...
Am I on the right track?
TAFFY3
Joined: January 21, 2008
KitMaker: 2,531 posts
Armorama: 859 posts
Posted: Monday, January 25, 2016 - 05:35 AM UTC
I use Durham's Water Putty (a fine powder that you mix with water to the consistency desired) mixed with Model RR Ballast for my ground work. You can find Durham's at your local hardware store. The Durham's dries rock hard and isn't affected by the water materials. You can press the vehicle into the ground work before it sets up completely, or you can build up the ground work to suit by adding more of the mixture. The Durham's/Ballast mixture can be tinted before hand or painted after. The Ballast comes in several colors (including a beige)and different degrees of coarseness. As I said I darken the sand where the water has receded and use either the Realistic Water, or Microscale Micro Gloss, to make the sand 'wetter' where the water is still receding. As to the color of the water, It wouldn't be too deep that close to shore, so it would be pretty clear, unless the bottom was stirred up by something, or someone. Al
Alpnance26
Joined: January 22, 2016
KitMaker: 766 posts
Armorama: 518 posts
Posted: Tuesday, January 26, 2016 - 09:20 PM UTC
Still not clear on darkening the sand where the water would have just receded... is that done with the gel or with clear gloss?
TAFFY3
Joined: January 21, 2008
KitMaker: 2,531 posts
Armorama: 859 posts
Posted: Wednesday, January 27, 2016 - 04:27 AM UTC
[quote]Still not clear on darkening the sand where the water would have just receded... is that done with the gel or with clear gloss?
[QUOTED]
I darkened the sand with thinned paint first, then used either the gloss or the Realistic Water, or a combination of both. The gloss just makes the sand look wet, The Realistic Water, being thicker, I used for the receding water. Al
[QUOTED]
I darkened the sand with thinned paint first, then used either the gloss or the Realistic Water, or a combination of both. The gloss just makes the sand look wet, The Realistic Water, being thicker, I used for the receding water.
Alpnance26
Joined: January 22, 2016
KitMaker: 766 posts
Armorama: 518 posts
Posted: Thursday, January 28, 2016 - 02:37 AM UTC
Ah... was the color sand with a little brown or black?
pnance26
Joined: January 22, 2016
KitMaker: 766 posts
Armorama: 518 posts
Posted: Thursday, January 28, 2016 - 02:49 AM UTC
Al, I am kind of limited in using acrylics (bottle and spray). What is a good base color for the Kami and then a recommended IJN green? I don't see anything for an undercoat except gun metal and there is no IJN green listed.
Any suggestions?
I also can go with any other brand of acrylic... suggestions?
Any suggestions?
I also can go with any other brand of acrylic... suggestions?

sdk10159
Joined: December 08, 2005
KitMaker: 556 posts
Armorama: 433 posts

Posted: Thursday, January 28, 2016 - 05:17 AM UTC
pnance26
Joined: January 22, 2016
KitMaker: 766 posts
Armorama: 518 posts
Posted: Thursday, January 28, 2016 - 10:12 PM UTC
Thanks for the link, Steve.
I am looking to create a beach scene but without a vehicle in the water. My vehicle will be on the shoreline pointed out to sea as if being used for a shore battery.
The scene will depict a Japanese Type 2 Ka-Mi tank that came ashore with pontoons and was immediately turned around to fire out to sea. The tank will have been covered with blowing sand and is being excavated. Part of the hull will have rusted and one pontoon will be falling off... there will be camo netting and dead palm fronds scattered across the exposed portion of the tank. The tank will be above the waterline...
Make sense? So I just want gentle water lapping up on the shoreline...
TAFFY3
Joined: January 21, 2008
KitMaker: 2,531 posts
Armorama: 859 posts
Posted: Saturday, January 30, 2016 - 03:32 AM UTC
Quoted Text
Ah... was the color sand with a little brown or black?
I often like to use acrylic craft paints, like Folkart, available in the craft section of AC Moore, Michaels, or Hobbylobby. They have a lot of different colors, and variations, including several different tan shades. Some are perfect for sand, and I'll add a little brown to darken it. In particular a shade called 'Mississippi Mud', a kinda grayish medium brown.
Alpnance26
Joined: January 22, 2016
KitMaker: 766 posts
Armorama: 518 posts
Posted: Wednesday, February 17, 2016 - 04:27 AM UTC
x
pnance26
Joined: January 22, 2016
KitMaker: 766 posts
Armorama: 518 posts
Posted: Wednesday, February 17, 2016 - 07:04 AM UTC
I thought I could edit out the x... sorry about that...
First the images and then questions....
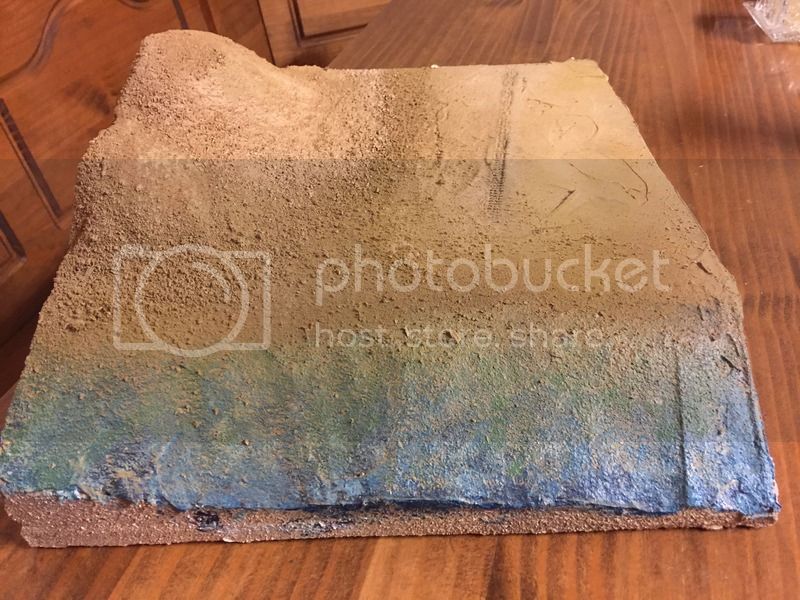

Now the questions... this is acrylic paint over drywall compound over foam. I am not sure that the drywall compound covered the foam 100%. Do I need to seal the acrylic paint with something like Liquitex acrylic gel?
Also, I know I need to build a dam around the edge of the diorama until the water (resin/RS whatever) sets. I was planning on using cardboard. Should I cover the cardboard in plastic wrap that has been sprayed with something like cooking oil to prevent the resin from sticking to the cardboard?
TAFFY3
Joined: January 21, 2008
KitMaker: 2,531 posts
Armorama: 859 posts
Posted: Thursday, February 18, 2016 - 05:31 PM UTC
Now the questions... this is acrylic paint over drywall compound over foam. I am not sure that the drywall compound covered the foam 100%. Do I need to seal the acrylic paint with something like Liquitex acrylic gel? [Quoted]
I assume that you mean where you're going to pour your water? If so, I'd say the resin will generate heat as it sets up and you want to protect the foam from melting from direct contact with the resin.
Also, I know I need to build a dam around the edge of the diorama until the water (resin/RS whatever) sets. I was planning on using cardboard. Should I cover the cardboard in plastic wrap that has been sprayed with something like cooking oil to prevent the resin from sticking to the cardboard? [Quoted]
Have never used a removable dam to contain the resin, always used a permanent containment. But, I'd say that you would need something to keep the resin from sticking. Also you might want to consider using something stiffer than cardboard to make your dam. Be sure to seal it tight whatever you use to prevent leakage. Al
I assume that you mean where you're going to pour your water? If so, I'd say the resin will generate heat as it sets up and you want to protect the foam from melting from direct contact with the resin.
Also, I know I need to build a dam around the edge of the diorama until the water (resin/RS whatever) sets. I was planning on using cardboard. Should I cover the cardboard in plastic wrap that has been sprayed with something like cooking oil to prevent the resin from sticking to the cardboard? [Quoted]
Have never used a removable dam to contain the resin, always used a permanent containment. But, I'd say that you would need something to keep the resin from sticking. Also you might want to consider using something stiffer than cardboard to make your dam. Be sure to seal it tight whatever you use to prevent leakage.
Alpnance26
Joined: January 22, 2016
KitMaker: 766 posts
Armorama: 518 posts
Posted: Thursday, February 18, 2016 - 11:41 PM UTC
Will Liquitex seal the paint well enough to shield it from resin? I did a white glue last night...
So I guess I need to build a box of 1" x material that will fit around the base unit... hmmm... I can do that. I guess adding a bottom to it wouldn't be so hard either with the seams all sealed...
I am a carpenter from a former life... so...
Thanks, Al!
So I guess I need to build a box of 1" x material that will fit around the base unit... hmmm... I can do that. I guess adding a bottom to it wouldn't be so hard either with the seams all sealed...
I am a carpenter from a former life... so...
Thanks, Al!
 |

WEB HOSTING BY


Copyright ©2021 Armorama and Kitmaker Network, a subsidiary of Silver Star Enterprises
All Rights Reserved. Please read our Conditions of Use and Privacy Policy.
All Rights Reserved. Please read our Conditions of Use and Privacy Policy.