Bending Evergreen plastic rods
Colorado, United States
Joined: February 06, 2002
KitMaker: 1,526 posts
Armorama: 1,294 posts
Posted: Friday, January 29, 2016 - 01:45 AM UTC
Hi everyone,
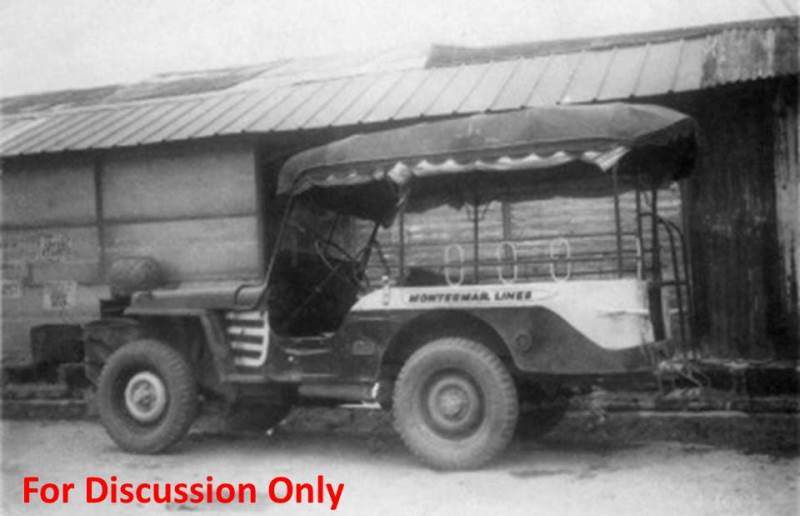
I have an Academy 1/35 IED humvee guntruck and wanted to build it like the image below:

However, I am having issues with bending the evergreen plastic rods to simulate the bars for the canvas cover(?). What techniques do you use to bend plastic rods without breaking them? I do not want to resort to using metal rods because I want to stay in the same medium for ease of gluing purposes.
Thanks.
James
Happy modeling!
Warning: possible addiction may occur.
Currently on the bench: Maquette T-34/76
California, United States
Joined: February 01, 2010
KitMaker: 551 posts
Armorama: 543 posts
Posted: Friday, January 29, 2016 - 01:55 AM UTC
Well, err, I use wire! Never been able to successfully bend EG rod 90 degrees...
I have used heat - candle flame - to bend sprue 90 degrees, but it is hard to a) get it neat and b) not melt it completely!

#384
Nevada, United States
Joined: August 23, 2005
KitMaker: 1,426 posts
Armorama: 1,316 posts
Posted: Friday, January 29, 2016 - 01:56 AM UTC
Easy, hot water, bend it to where you want it then cool it down with cold water. I've made a quick and dirty jig to hold stuff in place while doing this a few times too
Florida, United States
Joined: May 16, 2002
KitMaker: 17,694 posts
Armorama: 13,742 posts
Posted: Friday, January 29, 2016 - 01:58 AM UTC
Bend slowly using heat from hour fingers to soften it. Once in the shape you want it, dip in boiling water or hold near a flame to set the plastic into that shape.
Field Artillery --- The KING of BATTLE!!!
"People sleep peaceably in their beds at night only because rough men stand ready to do violence on their behalf." -- George Orwell
Showcase
Skåne, Sweden
Joined: May 14, 2010
KitMaker: 749 posts
Armorama: 743 posts
Posted: Friday, January 29, 2016 - 02:35 AM UTC
Hi James,
I hold the rod with tools (or my fingers) a small distance away from the intended bend area. That way, when you start bending the rod, the plastic normally does not break.
If you try to bend it right at the point where the tool is gripping it (which would be quite normal procedure when bending metal/brass rod) then the plastic almost always breaks.
Sorry, its easier to demonstrate this than write about it, hope this can help :-)
varanusk
 Managing Editor
Santa Cruz de Tenerife, Spain / España
Joined: July 04, 2013
KitMaker: 1,288 posts
Armorama: 942 posts
Posted: Friday, January 29, 2016 - 02:37 AM UTC
You can also try a drop of glue on the joint. It will soften the plastic so you can bend it. Just have to experiment a bit with quantity of glue and time to wait until it is soft enough.
barkingdigger
 Associate Editor
#013
England - East Anglia, United Kingdom
Joined: June 20, 2008
KitMaker: 3,981 posts
Armorama: 3,403 posts
Posted: Friday, January 29, 2016 - 03:14 AM UTC
Whatever you do, don't add glue at the bend! The plastic is stressed at that point, and if you add glue it splits at the corner. Best to make a jig to hold the part and dip it in hot water to set the bend - I boil a kettle and fill a tea mug for this. You need to keep the piece bent until it cools to lock in the new shape.
"Glue, or Glue Not - there is no Dry-Fit" - Yoda (original script from Return of the Jedi...)
Al Qahirah, Egypt / لعربية
Joined: July 23, 2004
KitMaker: 6,856 posts
Armorama: 6,363 posts
Posted: Friday, January 29, 2016 - 03:22 AM UTC
With this thickness, you should be able to bend it without any heat.. I just bent these 1mm thick Evergreen rods when I read your thread.. you just have to be a little careful and do it slowly, kind of coaxing it into shape

Hisham
Ontario, Canada
Joined: March 01, 2002
KitMaker: 1,607 posts
Armorama: 1,581 posts
Posted: Friday, January 29, 2016 - 03:25 AM UTC
Quoted Text
Bend slowly using heat from hour fingers to soften it. Once in the shape you want it, dip in boiling water or hold near a flame to set the plastic into that shape.
Take Gino's advise.slowly use your fingers as heat and bend.
May take a little time,but won't break.
also Hisham.He beat me to the post by seconds.
Tom
Arkansas, United States
Joined: June 29, 2009
KitMaker: 11,610 posts
Armorama: 7,843 posts
Posted: Friday, January 29, 2016 - 04:45 PM UTC
You may also use a blow dryer to heat the plastic at the intended bend point. Once bent, submerge it in cold water.
Ideals are peaceful. History is violent.
England - South West, United Kingdom
Joined: September 02, 2013
KitMaker: 93 posts
Armorama: 91 posts
Posted: Friday, January 29, 2016 - 05:26 PM UTC
I do a lot of modelling making masters for Resicast, bending plastic rod is a problem, the suggestions offered are very good and work. One method I have used it to make a former, as it will ensure the parts are all the same. You can use a wood or metal "roller" to create the bend. Place the roller at the centre of the bend and carefully roll it on a soft surface....the rubber blade from a window squeegee is a cheap option for this. I appreciate you do not want to use metal, but aluminium tube (smallest diameter) is good as is brass wire....the aluminium tube folds easier if a fine brass rod is inserted, it has the advantage that the ends can be flattened...I use some "Evergreen" channel glued on the ends....superglue or the "Gorilla" glue works well. The channel can then be attached to the model in the conventional way.
George.
Oregon, United States
Joined: January 08, 2012
KitMaker: 520 posts
Armorama: 516 posts
Posted: Friday, January 29, 2016 - 05:37 PM UTC
WhoooHooo! this is the stuff I love .
...and hope for 7,000 views
(sorry LHS thread ...lol )
Life,, IS, unfortunately...
measured by the number of breaths we take,
but the moments that take our breath away,
are the moments that we wish;.,.,
Eternity remembers Of us.
tatbaqui
 News Writer
#040
Metro Manila, Philippines
Joined: May 06, 2007
KitMaker: 2,713 posts
Armorama: 2,451 posts
Posted: Friday, January 29, 2016 - 07:09 PM UTC
Fine timing for this thread as I need some bent plastic rods for a campaign build. Have tried on a 1mm round rod, and it works!

Colorado, United States
Joined: February 06, 2002
KitMaker: 1,526 posts
Armorama: 1,294 posts
Posted: Friday, January 29, 2016 - 11:32 PM UTC
Wow, these are some excellent tips! I definitely need to try all and figure out which works the best for me. Thank you all!
Happy modeling!
Warning: possible addiction may occur.
Currently on the bench: Maquette T-34/76
tatbaqui
 News Writer
#040
Metro Manila, Philippines
Joined: May 06, 2007
KitMaker: 2,713 posts
Armorama: 2,451 posts
Posted: Monday, February 08, 2016 - 11:15 AM UTC
Hello,
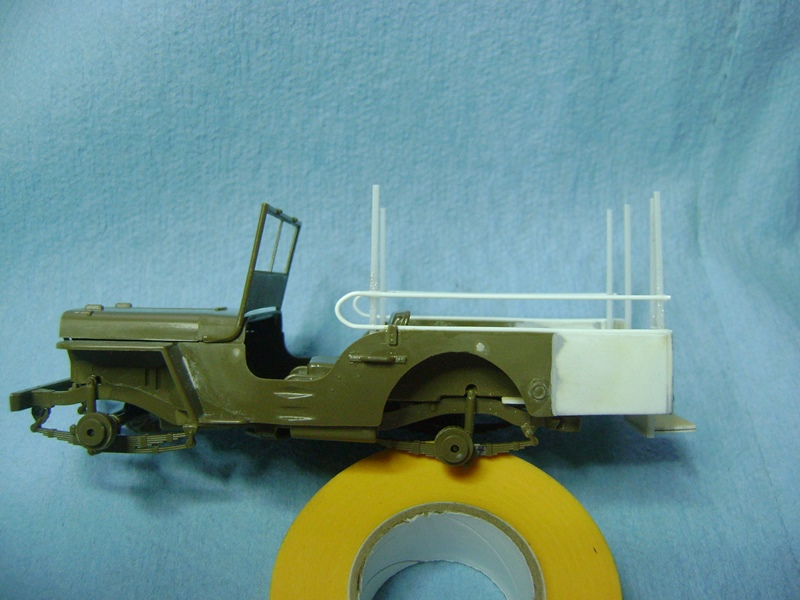
Just wanted to share what I was able to do after reading thru this thread:

As I am not that keen on working with wire, this tip surely helped me move on with my current build.
Cheers,
Tat
Auckland, New Zealand
Joined: February 03, 2014
KitMaker: 1,042 posts
Armorama: 871 posts
Posted: Monday, February 08, 2016 - 11:45 AM UTC
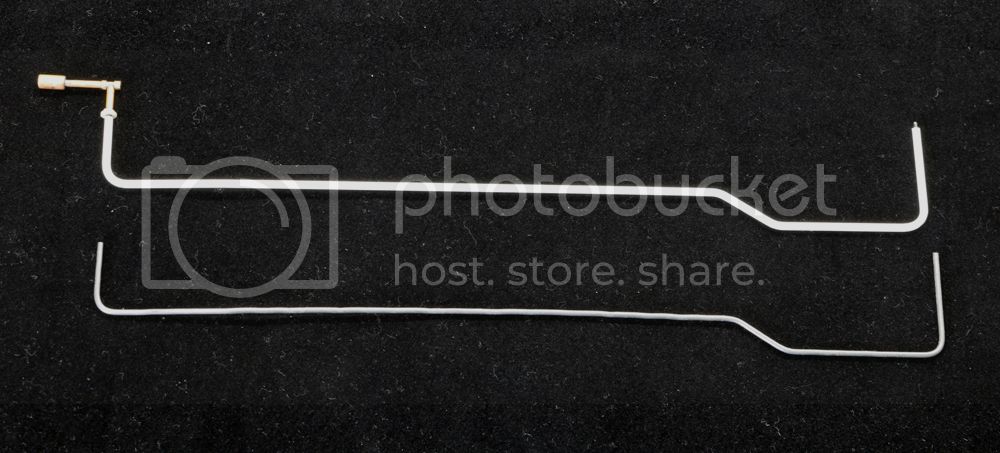
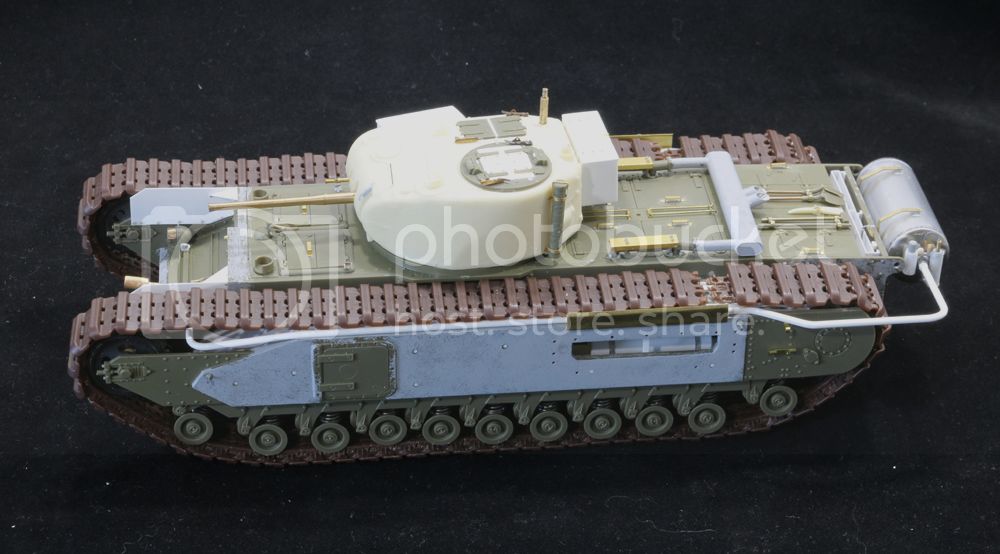
Another option is plastic coated steel wire. Comes in various sizes and is easy to bend. Used this material for a recent Churchill build to recreate the external fuel pipe.
After making a template using lead wire, I copied the shape with the plastic coated wire...


Gary

#159
Massachusetts, United States
Joined: April 07, 2008
KitMaker: 803 posts
Armorama: 564 posts
Posted: Monday, February 08, 2016 - 05:33 PM UTC
anyone ever try using a hair dryer?
Membership Secretary
www.amps-armor.org
Florida, United States
Joined: May 16, 2002
KitMaker: 17,694 posts
Armorama: 13,742 posts
Posted: Monday, February 08, 2016 - 07:47 PM UTC
The hairdryer doesn't work well since it blows heat in a wide swath and heats the whole rod, turning it into a wet spaghetti noodle. This is not good since you can't really control it and isolate just the place you want to bend. Slight pressure and finger heat are usually sufficient to get any bends you need.
Field Artillery --- The KING of BATTLE!!!
"People sleep peaceably in their beds at night only because rough men stand ready to do violence on their behalf." -- George Orwell
Showcase
Quebec, Canada
Joined: January 01, 2004
KitMaker: 7,600 posts
Armorama: 6,110 posts
Posted: Monday, February 08, 2016 - 07:59 PM UTC
Quoted Text
Hello,
Just wanted to share what I was able to do after reading thru this thread:
Cheers,
Tat
Are you building a jeepny?

Washington, United States
Joined: September 21, 2010
KitMaker: 1,846 posts
Armorama: 1,509 posts
Posted: Monday, February 08, 2016 - 08:24 PM UTC
If you are doing multiple like your post suggests, then a jig would be best and use the hot water trick. Most reliable, you won't over heat the plastic or catch it on fire and you can always re heat without issue.
On the workbench:
Trumpeter Faun SLT 56
Tamiya A- 10 1/48
Academy 1/700 USS KITTY HAWK
Indiana, United States
Joined: June 10, 2005
KitMaker: 6,188 posts
Armorama: 5,960 posts
Posted: Tuesday, February 09, 2016 - 12:04 AM UTC
Back in the old days when we didn't have brass, carbine fiber or even evergreen to help us out we made everything from spare styrene sprues.
Just like antennas... over a candle flame! Practice makes perfect!

Jeff
tatbaqui
 News Writer
#040
Metro Manila, Philippines
Joined: May 06, 2007
KitMaker: 2,713 posts
Armorama: 2,451 posts
Posted: Tuesday, February 09, 2016 - 04:06 AM UTC
Quoted Text
Quoted Text
Hello,
Just wanted to share what I was able to do after reading thru this thread:
Cheers,
Tat
Are you building a jeepny? 
You're spot on Biggles2! Trying to do something like this for the Civils campaign:

Cheers,
Tat
tatbaqui
 News Writer
#040
Metro Manila, Philippines
Joined: May 06, 2007
KitMaker: 2,713 posts
Armorama: 2,451 posts
Posted: Tuesday, February 09, 2016 - 04:14 AM UTC
Quoted Text
Another option is plastic coated steel wire. Comes in various sizes and is easy to bend. Used this material for a recent Churchill build to recreate the external fuel pipe.
After making a template using lead wire, I copied the shape with the plastic coated wire...


Gary
Gary, what comes to mind are those multi-colored plastic coated paper clips. I only know of two sizes which are off in terms of scale, and sadly these do not come as long and straight as I would like.
You mention yours come in various sizes, where do you get them -- office, hardware stores? Might try and look if such are available here.
Cheers,
Tat
United Kingdom
Joined: November 30, 2010
KitMaker: 126 posts
Armorama: 102 posts
Posted: Tuesday, February 09, 2016 - 06:15 PM UTC
Ontario, Canada
Joined: November 03, 2012
KitMaker: 2,275 posts
Armorama: 2,233 posts
Posted: Tuesday, February 09, 2016 - 07:04 PM UTC
First thing, take a scrap piece of sprue , heat it & stretch it to the right diameter you need. Make a bunch in case you mess up.
Next ,measure the distances you need. Grab a piece of pine wood that is a few inches larger then your measurements. Nail down 4 nails , your making a "jig" & will be working with the wood facing flat on the table with 4 nails in a square pattern.You may have to secure the wood to the edge of your work bench with C Clamps to stop it from moving around.
Place the stretched sprue over the top 2 nails...take a heat gun & heat up the corners...slowly bend them around . You want your other 2 nails marked farther then what you actually need. When the top bend is correct..heat the other end & wrap it around the lower nail. After your done both bends & both ends are wrapped on lower nails...cut it to correct length.
Hope you can understand what I mean?
You can try a heat gun or hair dryer because the plastic is going to be thin.
Use Dragon plastic ..seems to be more elastic then say ..ICM's or MiniArts.
PS---Boiling water may also work.


