Hosted by Darren Baker
Back to modern tanks

Wolverine2

Joined: April 07, 2006
KitMaker: 64 posts
Armorama: 62 posts

Posted: Thursday, March 24, 2016 - 08:33 PM UTC
Your Merk is looking fantastic, nice progress.
andromeda673

Joined: July 30, 2013
KitMaker: 584 posts
Armorama: 525 posts

Posted: Wednesday, April 13, 2016 - 06:54 PM UTC
looking really good!!!!
Humvee's can wait!it's main battle tank time!
Humvee's can wait!it's main battle tank time!
hliu24

Joined: November 19, 2010
KitMaker: 798 posts
Armorama: 797 posts

Posted: Tuesday, May 10, 2016 - 12:09 AM UTC
Quoted Text
Jay - great tanks, but... what about Your Humvees?
Hi Buddy, Will go back to the Humvees after I finish those tanks! Jay
hliu24

Joined: November 19, 2010
KitMaker: 798 posts
Armorama: 797 posts

Posted: Tuesday, May 10, 2016 - 12:09 AM UTC
Quoted Text
Your Merk is looking fantastic, nice progress.
Thanks Carlos! Jay
hliu24

Joined: November 19, 2010
KitMaker: 798 posts
Armorama: 797 posts

Posted: Tuesday, May 10, 2016 - 12:10 AM UTC
Quoted Text
looking really good!!!!
Humvee's can wait!it's main battle tank time!
Thanks man! Jay
hliu24

Joined: November 19, 2010
KitMaker: 798 posts
Armorama: 797 posts

Posted: Tuesday, May 10, 2016 - 12:12 AM UTC
hliu24

Joined: November 19, 2010
KitMaker: 798 posts
Armorama: 797 posts

Posted: Monday, May 16, 2016 - 10:53 PM UTC
hliu24

Joined: November 19, 2010
KitMaker: 798 posts
Armorama: 797 posts

Posted: Tuesday, May 17, 2016 - 10:46 PM UTC
Meng Leopard 2 a7 open box, looks nice. My order from Hobbyeasy should arrive in 2 weeks hopefully.
http://www.moxdao.com/thread-14250-1-1.html
http://www.moxdao.com/thread-14250-1-1.html
hliu24

Joined: November 19, 2010
KitMaker: 798 posts
Armorama: 797 posts

Posted: Wednesday, May 18, 2016 - 02:11 AM UTC
hliu24

Joined: November 19, 2010
KitMaker: 798 posts
Armorama: 797 posts

Posted: Wednesday, May 18, 2016 - 11:32 PM UTC
I guess meng is recalling those PE parts, Email them to get the replacement if the new parts are not included. 

hliu24

Joined: November 19, 2010
KitMaker: 798 posts
Armorama: 797 posts

Posted: Sunday, May 22, 2016 - 09:24 PM UTC
Hellrabbit

Joined: June 28, 2015
KitMaker: 139 posts
Armorama: 139 posts
Posted: Monday, May 23, 2016 - 01:58 AM UTC

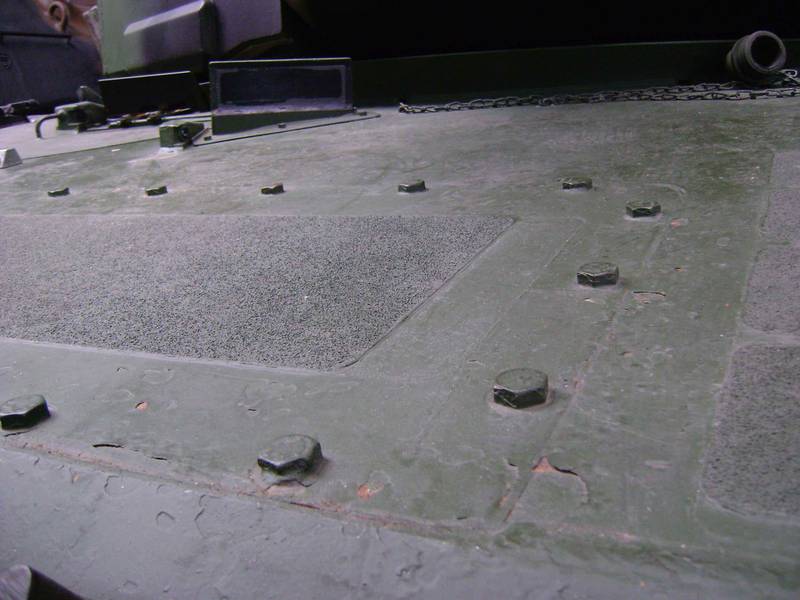
weird...inside the red circle they give you a detail belong to upgraded version of those Leopard. Here is the thing. Tamiya one gives you a version which is belong to "late version" of that maintain window. which is welded structure. at the very beginning that area is sealed by bolts, in later upgrade those early version(which sealed by bolts) on that area were all welded base on the existed structure, so the bolts are still there. these maybe right since those A7 are upgraded from A6NL and A6M, However, these feature also appeared on their batch 8 Leopard 2 A4 Kit....
hliu24

Joined: November 19, 2010
KitMaker: 798 posts
Armorama: 797 posts

Posted: Monday, May 23, 2016 - 03:11 AM UTC
hliu24

Joined: November 19, 2010
KitMaker: 798 posts
Armorama: 797 posts

Posted: Monday, May 23, 2016 - 06:27 AM UTC
If any of you are looking for walk arounds, Hans has a wonderful site for it.
http://www.panzer-modell.de
Jay
http://www.panzer-modell.de
Jay
mshackleton

Joined: December 16, 2007
KitMaker: 559 posts
Armorama: 517 posts

Posted: Monday, May 23, 2016 - 01:24 PM UTC
I have a review of this here: http://leopardclub.ca/reviews/Meng/2A7/ and it will be on Armorama soon as well.
hliu24

Joined: November 19, 2010
KitMaker: 798 posts
Armorama: 797 posts

Posted: Monday, May 23, 2016 - 09:32 PM UTC
hliu24

Joined: November 19, 2010
KitMaker: 798 posts
Armorama: 797 posts

Posted: Monday, May 23, 2016 - 09:42 PM UTC

chnoone

Joined: January 01, 2009
KitMaker: 1,036 posts
Armorama: 1,033 posts

Posted: Tuesday, May 24, 2016 - 01:52 AM UTC
Quoted Text
weird...inside the red circle they give you a detail belong to upgraded version of those Leopard. Here is the thing. Tamiya one gives you a version which is belong to "late version" of that maintain window. which is welded structure. at the very beginning that area is sealed by bolts, in later upgrade those early version(which sealed by bolts) on that area were all welded base on the existed structure, so the bolts are still there. these maybe right since those A7 are upgraded from A6NL and A6M, However, these feature also appeared on their batch 8 Leopard 2 A4 Kit....
That is not quite correct ... the A7s are all EX-Dutch 2A6 which are bolted but have no weld seams:


From what I can identity from R. Zwillings splendid book on the 2A7 it is still not welded just sealed.
If you don't have the book try this: http://www.panzer-modell.de under "Referenzen" and then in "In Detail".
There is a gap/recess which is filled with some sealant material .... apparently only a few bolted ones got welded shut, by the Germans in addition, but this practice seemed to have stopped very early during the refurbishment from A4s to A5 & 6 wenn all welded hulls (5th Batch onwards) had been already processed and upgraded. The Germans then having to use hulls from earlier beatches and bring these hulls to Batch 5+ (upgraded hull armor) standards as well.
The Dutch upgraded their own tanks from A4 to A5 and then A6 standard.

As with the A4 MENG took a shortcut and got it wrong and it seems this mistake (remove bolts or create a gap/recess) has been reproduced on the A7 kit.
But the A7s are (all bolted) Dutch hulls from earlier A4 production batches.
So to replicate a correct A7 as to date you would have to remove the weld seams and create a gap with sealant filler .... HobbyBoss got it right on their 2A4 CAN.
Cheers
Christopher

hliu24

Joined: November 19, 2010
KitMaker: 798 posts
Armorama: 797 posts

Posted: Tuesday, May 24, 2016 - 02:21 AM UTC
Thank you Christopher for pointing it out, I will try to remove the weld seams , hope it won't be too hard. Please let us know if there are more mistakes.
Jay
Jay

chnoone

Joined: January 01, 2009
KitMaker: 1,036 posts
Armorama: 1,033 posts

Posted: Tuesday, May 24, 2016 - 02:38 AM UTC
Quoted Text
Thank you Christopher for pointing it out, I will try to remove the weld seams , hope it won't be too hard. Please let us know if there are more mistakes.
Jay
Careful ! This is just my observation confirmed by a friend of mine, a German officer, who saw the A7 first hand and came to the same conclusion.
But if they actually did weld the gap shut then it defiantly looks very different / much smoother and finer than on the MENG kit .... maybe Ralph Zwilling could shed some light on this matter .... I do wish it actually is a weld seam of some sort ... would make thing much easier.
Cheers
Christopher

Violetrock

Joined: March 09, 2003
KitMaker: 831 posts
Armorama: 791 posts

Posted: Tuesday, May 24, 2016 - 04:18 PM UTC
Different return roller configuration is correct, see page 134 in the Tankograd Leopard 2 book.
Meng configuration is early configuration up to 4th batch, while the Tamiya configuration is 5th batch onwards.
Reagrding the the welded cover, I think Meng got it right, but overpronounced the weld seam. Up to 4th batch, the cover was bolted and had a seal. From 5th batch onwards the cover was welded without bolts. Later conversions kept the bolts, but the cover was welded, too. Also found on page 134.
So, the hull is a 1st- 4th batch configuration, which was upgraded. One of you guys can check from which batch(es) the ex- Dutch Leopards are.
Thomas
hliu24

Joined: November 19, 2010
KitMaker: 798 posts
Armorama: 797 posts

Posted: Tuesday, May 24, 2016 - 11:06 PM UTC
Thanks Thomas.
Jay
Jay
hliu24

Joined: November 19, 2010
KitMaker: 798 posts
Armorama: 797 posts

Posted: Tuesday, May 24, 2016 - 11:13 PM UTC
Quoted Text
Quoted TextThank you Christopher for pointing it out, I will try to remove the weld seams , hope it won't be too hard. Please let us know if there are more mistakes.
Jay
Careful ! This is just my observation confirmed by a friend of mine, a German officer, who saw the A7 first hand and came to the same conclusion.
But if they actually did weld the gap shut then it defiantly looks very different / much smoother and finer than on the MENG kit .... maybe Ralph Zwilling could shed some light on this matter .... I do wish it actually is a weld seam of some sort ... would make thing much easier.
Cheers
Christopher
Thanks Christopher!
First time working on Meng's plastic and it was not that easy to remove the weld seams, sanding that area also was tricky cause the bolts were in the way.

Jay
hliu24

Joined: November 19, 2010
KitMaker: 798 posts
Armorama: 797 posts

Posted: Wednesday, May 25, 2016 - 11:24 AM UTC
hliu24

Joined: November 19, 2010
KitMaker: 798 posts
Armorama: 797 posts

Posted: Thursday, May 26, 2016 - 04:17 AM UTC
 |


