

Hosted by Darren Baker
miniart rant

dioman13

Joined: August 19, 2007
KitMaker: 2,184 posts
Armorama: 1,468 posts

Posted: Wednesday, April 13, 2016 - 08:02 AM UTC
I had a absolute failure with the one I tryed (before the vidio came out). I roofed for many years and if you look at that roof it is so thick it's insane. I now just pour a plaster sheet and scribe my brick/stone and call it even. At least my roofs are correct and my building don't look like anyone else's. Have some fun with it Tom, you're almost there and did a better job than I did. Got faith in ya.

avenue

Joined: May 25, 2013
KitMaker: 544 posts
Armorama: 542 posts
Posted: Wednesday, April 13, 2016 - 08:33 AM UTC
I encounter similiar problem,sometime the part simple do not fit.
But I believe miniart,should make it more user friendly.
But I believe miniart,should make it more user friendly.

parrot

Joined: March 01, 2002
KitMaker: 1,607 posts
Armorama: 1,581 posts
Posted: Monday, April 18, 2016 - 02:37 AM UTC
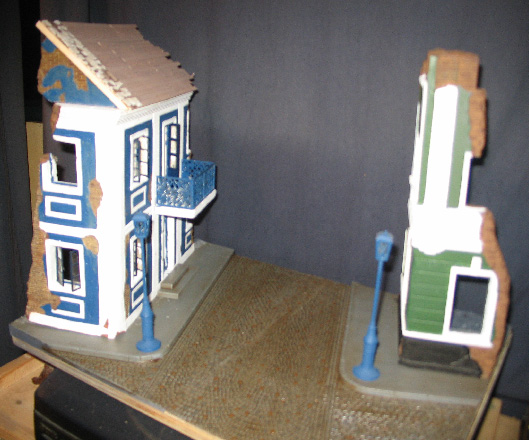
Starting to have some fun with it Bob.
Not anyway near the fun I had with my scratch built North Africa copy.Still using some of the great stuff you sent me for that one.Those acetate slides are the best.
Painting has been a chore.Going over and over the exterior panels.In hindsight it would have been best to air brush them all.Actually,all parts would have been easier to paint before assembly if the build wasn't such a pain in A.
The basic colors with a little weathering are done.Have to go over the off white panels again and tone down the weathering.
I need to find or scratch some kind of ornament for the peak of the roof.
They supply a ladder for the interior loft
 .2 hours cutting and trying to get it to fit?Don't think so.How 'bout 20 minutes with balsa.
Tom


Not anyway near the fun I had with my scratch built North Africa copy.Still using some of the great stuff you sent me for that one.Those acetate slides are the best.
Painting has been a chore.Going over and over the exterior panels.In hindsight it would have been best to air brush them all.Actually,all parts would have been easier to paint before assembly if the build wasn't such a pain in A.
The basic colors with a little weathering are done.Have to go over the off white panels again and tone down the weathering.
I need to find or scratch some kind of ornament for the peak of the roof.
They supply a ladder for the interior loft
.2 hours cutting and trying to get it to fit?Don't think so.How 'bout 20 minutes with balsa.Tom


bill_c
Joined: January 09, 2008
KitMaker: 10,553 posts
Armorama: 8,109 posts
Posted: Tuesday, April 19, 2016 - 02:06 AM UTC
Not to beat this to death, but the vacuform process means they can turn out lots of different buildings and they ship cheaply (plaster or even resin would make these prohibitively expensive).
If cut out CAREFULLY, the walls go together reasonably well. You WILL have to fill the seams in, but Tamiya putty works effectively for that. A little "sweat equity" allows you to have some selection of buildings. Here are ones I have used:
http://armorama.kitmaker.net/features/6983
http://armorama.kitmaker.net/features/6982
This Norman farmhouse cost nearly $60 with shipping because it was plaster and heavy as ****.
parrot
Joined: March 01, 2002
KitMaker: 1,607 posts
Armorama: 1,581 posts
Posted: Thursday, April 21, 2016 - 12:44 AM UTC
Hi Bill,with all respect I understand the cost of manufacturing,but if your not delivering a quality product the public will stay away.Diorama Plus has great ceramic buildings at not at a lot more.If you like MiniArt,great.
Just not for me.
Anyway,some progress.
Added some rubble to the roof,pigments,started the vine and decided it will be a garage.
Tom


Just not for me.
Anyway,some progress.
Added some rubble to the roof,pigments,started the vine and decided it will be a garage.
Tom


justsendit
Joined: February 24, 2014
KitMaker: 3,033 posts
Armorama: 2,492 posts
Posted: Thursday, April 21, 2016 - 01:45 AM UTC
Tom, That's looking really good ... I like the creeping vines!
Just got some more MiniArt dio stuff in the other day. Hopefully, I'll be getting at it soon!
mike
Just got some more MiniArt dio stuff in the other day. Hopefully, I'll be getting at it soon!
mike
parrot
Joined: March 01, 2002
KitMaker: 1,607 posts
Armorama: 1,581 posts
Posted: Sunday, April 24, 2016 - 01:15 AM UTC
Thanks Mike,cominig along.
Now it's the best it's going to get, started on the fun part of dio's.
I decided it will be on a small hill. Cut styro to fit. Gives me a good base to add interior details.
First marked out were the building will be .Then a base coat of the ground cover. Doesn't need to be perfect, will be covered.It will be on a rather large base ,with a road at the bottom of the hill. Some paint on the bottom to stop warping.
Tom


 http://put.url.here/image.file" BORDER="0">


parrot
Joined: March 01, 2002
KitMaker: 1,607 posts
Armorama: 1,581 posts
Posted: Saturday, April 30, 2016 - 12:10 AM UTC
Hi all,
Short update on this.
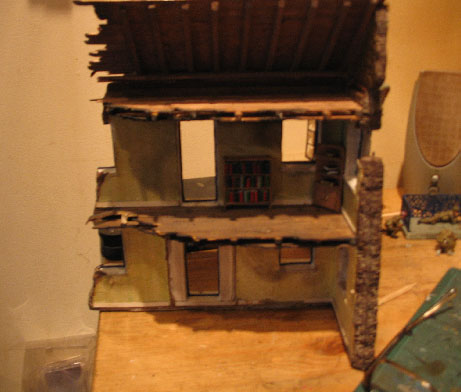
Tons of time working on the interior.I thought the loft should be part storage parts and part attic.Added some of both,parts,old photos.
Started work on some figures.One will look out the upstairs window.
Also working on a Bronco car from hell.Parts are ridiculous small.
This is getting much bigger than I wanted,but I still have to add a second base for the AFV's.
Forgot to mention,most tools and equipment are from Italeri.
Great kit for small tools if you need them.
Tom


Short update on this.
Tons of time working on the interior.I thought the loft should be part storage parts and part attic.Added some of both,parts,old photos.
Started work on some figures.One will look out the upstairs window.
Also working on a Bronco car from hell.Parts are ridiculous small.
This is getting much bigger than I wanted,but I still have to add a second base for the AFV's.
Forgot to mention,most tools and equipment are from Italeri.
Great kit for small tools if you need them.
Tom


jrutman
Joined: April 10, 2011
KitMaker: 7,941 posts
Armorama: 7,934 posts
Posted: Saturday, April 30, 2016 - 12:24 AM UTC
You may have had problems with the vacuform but you overcame them nicely it looks like to me. This has really come along buddy! Looks great. I like all the little details you added,signage,etc.
J
J

Lakota

#123
Joined: November 17, 2008
KitMaker: 1,202 posts
Armorama: 635 posts
Posted: Saturday, April 30, 2016 - 04:45 AM UTC
Great work Tom! 
I agree entirely with Jerry. Keep up the great work and thanks for sharing with us. I haven't tried a MiniArt kit yet but I have one in the stash, a Russian AT gun in a ruin.
Take care,
Don "Lakota"
I agree entirely with Jerry. Keep up the great work and thanks for sharing with us. I haven't tried a MiniArt kit yet but I have one in the stash, a Russian AT gun in a ruin.
Take care,
Don "Lakota"

cheyenne
Joined: January 05, 2005
KitMaker: 2,185 posts
Armorama: 1,813 posts
Posted: Saturday, April 30, 2016 - 03:18 PM UTC
Beautiful work Tom , vacuform scares me like a blind date .
You've done a fantastic job of this .
All the clutter and attention to detail , cool .
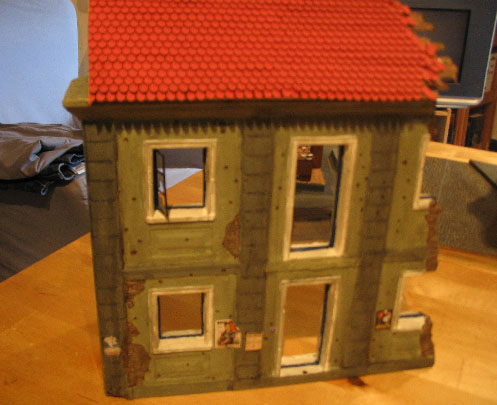
I do have to agree with Bob Davis , the roof is thicker than the concrete on my driveway , no fault of yours but from a construction viewpoint what were they thinking .
You've done a fantastic job of this .
All the clutter and attention to detail , cool .
I do have to agree with Bob Davis , the roof is thicker than the concrete on my driveway , no fault of yours but from a construction viewpoint what were they thinking .
parrot
Joined: March 01, 2002
KitMaker: 1,607 posts
Armorama: 1,581 posts
Posted: Sunday, May 01, 2016 - 01:49 AM UTC
Totally right.It's been bothering me to.Im thinking of drilling and adding timber to the roof,painting the top half brown.
Started the bottom half of the base today.This is going to be much larger than I thought.
Keep you updated.
Tom
Started the bottom half of the base today.This is going to be much larger than I thought.
Keep you updated.
Tom

Vicious

Joined: September 04, 2015
KitMaker: 1,517 posts
Armorama: 1,109 posts
Posted: Monday, May 02, 2016 - 05:22 AM UTC
Really nice!..the only thing i find little bit odd for me in the 2 "Cinzano" sign's ...why advertise a italian liquor in a French Garage?...

erichvon

Joined: January 17, 2006
KitMaker: 1,694 posts
Armorama: 1,584 posts

Posted: Monday, May 02, 2016 - 08:19 AM UTC
I've built a few and if I'm honest I didn't get a minutes pleasure out of building them. I've got about half a dozen I picked up cheap off ebay to build as well. Whilst they are bloody horrible to build and consime great quantities of filler, with patience they can turn out quite good. Yours looks good Tom even though you seem to have had a nightmare building it. One thing I do find frustrating about their buildings (the battle damaged ones)they always seem to have the damage at the same end kit to kit so it makes using a few together a bit difficult if say they've all had the right hand side of the building demolished. If they'd thought that buildings A and B would look good together, if they had opposing ends blown off you could position them as part of a row with a building in the middle completely destroyed leaving a gap. It's a bit difficult if they've all had the right hand side blown up I don't know why they've not thought of this. I used one of their diorama sets last year to do an Arnhem dio. I added a lot to one of the buildings as it was a bit basic for what I wanted but was a great building block as I added a wall to the top to give a slanted roof, framework in the roof, floors etc so they are very useful in that respect. This is the one I did it with. It's one of their first ones called Polish City Building and has a flat roof and one floor which is non existant
It's unrecognisable to the kit now as I added so much to it. I like the fact that you can add your own dimension to it but I've got to admit vacform is not a good medium. As Al pointed out if they moved away from vacform inevitably the prices would go up. Also in their favour is the weight. I don't show my finished models but as I mainly work towards dios I'd want to keep them as light as possible if I was transporting them about. A full street scene would be very heavy if it was all plaster. I've looked at some of the plaster buildings as an option but some of them are absolutely dire. I looked at some of the Fields Of Glory ones and they looked dreadful and there was nothing I could think of to improve them. At least with Miniarts, they're in proportion and the detailing is nice. Am I a fan of the Miniart buildings? I don't enjoy building them as it's frustrating and not at all easy. I do however like the fact that costwise they're reasonable, you get plenty of spares should you want to scratchbuild something, there's a nice variety of styles of building and should you want to you can modify them quite extensively. I bought two Lithuanian buildings recently. One so I can have it on a corner as it's meant to be and one I intend to flatten out as someone did very well for a Berlin dio on here
http://armorama.com/forums/202287&ord=&page=1
This was a great example of what you can do with them as a base building. I feel your pain Tom but until someone comes up with a better idea at the same price we'll have to make do.
I don't know why they've not thought of this. I used one of their diorama sets last year to do an Arnhem dio. I added a lot to one of the buildings as it was a bit basic for what I wanted but was a great building block as I added a wall to the top to give a slanted roof, framework in the roof, floors etc so they are very useful in that respect. This is the one I did it with. It's one of their first ones called Polish City Building and has a flat roof and one floor which is non existantIt's unrecognisable to the kit now as I added so much to it. I like the fact that you can add your own dimension to it but I've got to admit vacform is not a good medium. As Al pointed out if they moved away from vacform inevitably the prices would go up. Also in their favour is the weight. I don't show my finished models but as I mainly work towards dios I'd want to keep them as light as possible if I was transporting them about. A full street scene would be very heavy if it was all plaster. I've looked at some of the plaster buildings as an option but some of them are absolutely dire. I looked at some of the Fields Of Glory ones and they looked dreadful and there was nothing I could think of to improve them. At least with Miniarts, they're in proportion and the detailing is nice. Am I a fan of the Miniart buildings? I don't enjoy building them as it's frustrating and not at all easy. I do however like the fact that costwise they're reasonable, you get plenty of spares should you want to scratchbuild something, there's a nice variety of styles of building and should you want to you can modify them quite extensively. I bought two Lithuanian buildings recently. One so I can have it on a corner as it's meant to be and one I intend to flatten out as someone did very well for a Berlin dio on here
http://armorama.com/forums/202287&ord=&page=1
This was a great example of what you can do with them as a base building. I feel your pain Tom but until someone comes up with a better idea at the same price we'll have to make do.
erichvon
Joined: January 17, 2006
KitMaker: 1,694 posts
Armorama: 1,584 posts
Posted: Monday, May 02, 2016 - 08:25 AM UTC
Tom, what did you use for the vines? They look really effective.
parrot
Joined: March 01, 2002
KitMaker: 1,607 posts
Armorama: 1,581 posts
Posted: Wednesday, May 04, 2016 - 04:10 AM UTC
Hi guys,
The Cizano signs are really good point.Really didn't research or know.Removed the one on front,I'll leave the one inside.Maybe the owner is a collector?
All your comments are correct Karl.Good job on yours.
The vines are Woodland Scenics foliage. I tear small strips and spray with water.Spread them apart and use diluted white glue to attach them.Usually not as thick,but in this case to hide a lot of the buildings defects.
Working on the bottom section tonight and will update soon.
Thanks for looking in.
Tom
parrot
Joined: March 01, 2002
KitMaker: 1,607 posts
Armorama: 1,581 posts
Posted: Tuesday, May 17, 2016 - 10:42 PM UTC
Hi all,
Back with updates.Been working on figures and the vehicles.
Actually have more updates still in the camera.
Upload today.I have become obsessed with this dio.
The 2 guys sitting on the ground are actually tank riders for the Firefly I plan to add.Thought I'd leave them in because I realized they can also be used as soldiers at rest.
Nice weather coming and will get better outside pics soon.
Still a lot of work to do here.
Tom  .
.


Back with updates.Been working on figures and the vehicles.
Actually have more updates still in the camera.
Upload today.I have become obsessed with this dio.
The 2 guys sitting on the ground are actually tank riders for the Firefly I plan to add.Thought I'd leave them in because I realized they can also be used as soldiers at rest.
Nice weather coming and will get better outside pics soon.
Still a lot of work to do here.
Tom
.


jrutman
Joined: April 10, 2011
KitMaker: 7,941 posts
Armorama: 7,934 posts
Posted: Wednesday, May 18, 2016 - 02:23 AM UTC
Well,for all the ranting about Miniart you sure made it all look good!
J
J
parrot
Joined: March 01, 2002
KitMaker: 1,607 posts
Armorama: 1,581 posts
Posted: Wednesday, May 18, 2016 - 10:37 PM UTC
Thanks Jerry,
My rant still stands,but moving on.I'll still use Miniart for plans ,but will scratch in the future.
Here's the vehicles I plan to use.Added the telephone wires and yet to straighten them more at the ends.Thinking of adding a guy to the roof repairing it.
Tom


My rant still stands,but moving on.I'll still use Miniart for plans ,but will scratch in the future.
Here's the vehicles I plan to use.Added the telephone wires and yet to straighten them more at the ends.Thinking of adding a guy to the roof repairing it.
Tom


parrot
Joined: March 01, 2002
KitMaker: 1,607 posts
Armorama: 1,581 posts
Posted: Friday, May 27, 2016 - 11:52 PM UTC
Hi all,
Back to haunt you with this.Got some outside pics finally.
Still working on the vehicles,details and figures. Lots of figures and I'm not great at doing them.
Tom


Back to haunt you with this.Got some outside pics finally.
Still working on the vehicles,details and figures. Lots of figures and I'm not great at doing them.
Tom


jrutman
Joined: April 10, 2011
KitMaker: 7,941 posts
Armorama: 7,934 posts
Posted: Saturday, May 28, 2016 - 02:44 AM UTC
There is nothing like natural light to take good pics as Nick has shown us many times! These look really good man!
J
J
parrot
Joined: March 01, 2002
KitMaker: 1,607 posts
Armorama: 1,581 posts
Posted: Sunday, June 26, 2016 - 01:30 AM UTC
Hi guys,
Been a while. Really got caught up on this one. Still some touch ups,but I'm ready to say done.
Couldn't decide on the 3rd vehicle,Quade was too wide, so ended up with truck. Telephone wires wouldn't stay up with glue, so the ends are actual wire and in between thread. Figures!!!.I'm not very good. Very slowly getting better. At the most I would say OK.It's a total mix of Tamiya,MB and Bronco. The guy on the roof is scratch from the body parts box. Almost 30 figs.Insane for me to try.
Anyway, thanks for looking and great modeling.
Happy Canada Day and Fourth of July.
PS.A lot of pics.Ended up on a golf course to get rid of the background suburban houses and so on.
Tom 


Been a while. Really got caught up on this one. Still some touch ups,but I'm ready to say done.
Couldn't decide on the 3rd vehicle,Quade was too wide, so ended up with truck. Telephone wires wouldn't stay up with glue, so the ends are actual wire and in between thread. Figures!!!.I'm not very good. Very slowly getting better. At the most I would say OK.It's a total mix of Tamiya,MB and Bronco. The guy on the roof is scratch from the body parts box. Almost 30 figs.Insane for me to try.
Anyway, thanks for looking and great modeling.
Happy Canada Day and Fourth of July.
PS.A lot of pics.Ended up on a golf course to get rid of the background suburban houses and so on.
Tom


Stickframe
#362
Joined: December 01, 2013
KitMaker: 1,661 posts
Armorama: 1,202 posts

Posted: Sunday, June 26, 2016 - 01:46 AM UTC
Hi Tom - you sure did a great job pulling all of this together! Looks great! Thanks for posting lots of pics!
Cheers
Nick
Cheers
Nick
justsendit
Joined: February 24, 2014
KitMaker: 3,033 posts
Armorama: 2,492 posts
Posted: Sunday, June 26, 2016 - 02:38 AM UTC
Hi Tom,
Nice work sticking to your guns with your "rant" project looks fantastic! The guy on the roof adds a nice bit of interest and depicts the repair work in progress very nicely. I think he was well worth the extra effort.
Now that the dio is finished, it kinda deserves a feature with a better title, don't you think?
mike
parrot
Joined: March 01, 2002
KitMaker: 1,607 posts
Armorama: 1,581 posts
Posted: Tuesday, June 28, 2016 - 01:18 AM UTC
Thanks guys,
Been a lot of work and time. Wish the photos were better.
Thanks for sticking with the posts. I know a lot of people see posts as "oh no" ,more from this guy.
I left it on the rant to show beginning to end.
Mike,do you know how to add to Features?
Thinking of "D DAY - DAY 3".
Tom

Been a lot of work and time. Wish the photos were better.
Thanks for sticking with the posts. I know a lot of people see posts as "oh no" ,more from this guy.
I left it on the rant to show beginning to end.
Mike,do you know how to add to Features?
Thinking of "D DAY - DAY 3".
Tom
 |

WEB HOSTING BY


Copyright ©2021 Armorama and Kitmaker Network, a subsidiary of Silver Star Enterprises
All Rights Reserved. Please read our Conditions of Use and Privacy Policy.
All Rights Reserved. Please read our Conditions of Use and Privacy Policy.