_GOTOBOTTOM
Armor/AFV: Axis - WWII
Armor and ground forces of the Axis forces during World War II.
Hosted by Darren Baker
1/35 Scale Dragon JadgPanther
mmarchioli
Visit this Community
Florida, United States
Joined: March 18, 2008
KitMaker: 173 posts
Armorama: 168 posts
Posted: Sunday, April 17, 2016 - 07:55 AM UTC
Hi Folks! I've spent a lot of time lurking on these forums but never posted any of my work. I've started a 1/35 scale JadgPanther for a group build on another site, and thought I would share it here as well. The kit is the 1/35 scale Dragon JadgPanther Late production, and I have figures and aftermarket.


And my aftermarket


Fruil metal tracks
Modelkasten spare tracks
Alliance Modelworks Photoetch set
Royal Models figures (but I may end up using a different figure in the end)

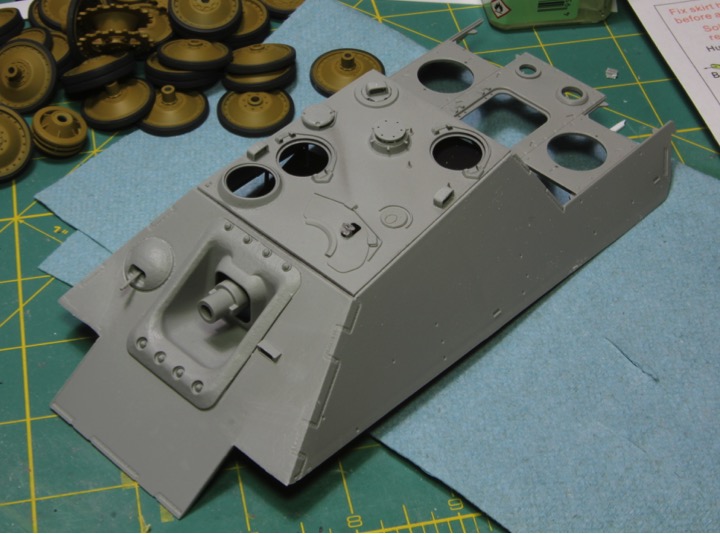
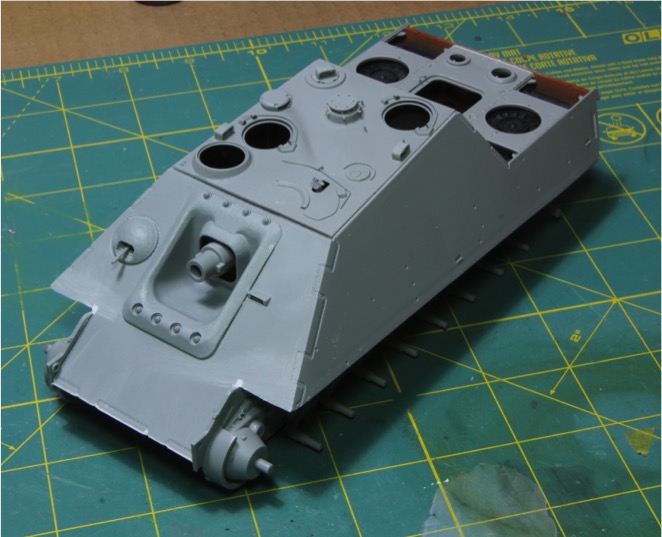
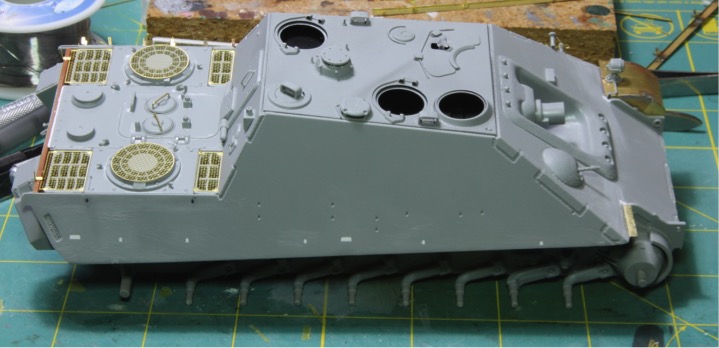
I finally got around to starting this build about a week ago. Frankly, not much to show, but it was a considerable amount of work. I forgot that these dragon kits have a ton of parts!

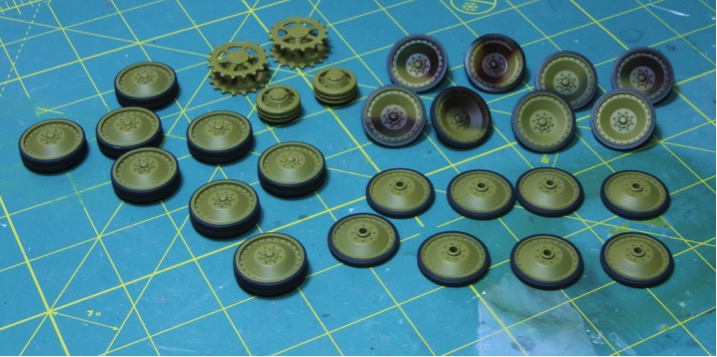
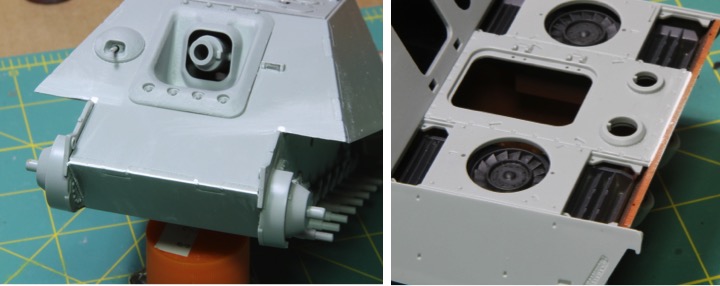
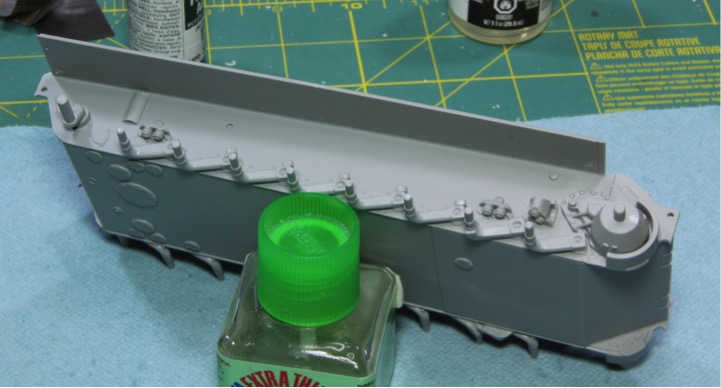
I finished the suspension assembly. It actually took a few hours and it seems a shame that none of the interior detail will be visible, but what are you going to do. I also cleaned up the road wheels, assembled the “middle” pair and then painted the rubber using Mr Color Tire Black. I’ll mask them and paint them once I decide what the camo scheme will look like.


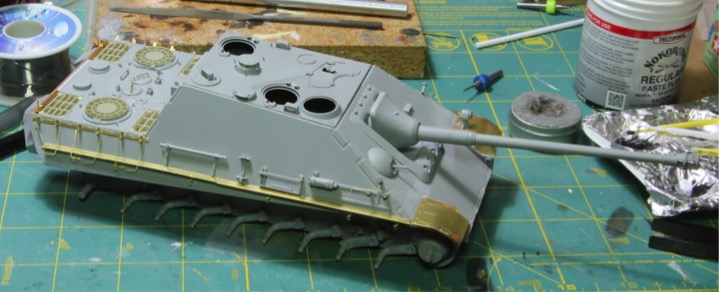
I also played around a little bit with paints. I was testing out my planned colors. I used the following, all from the Vallejo Model Air Range:

71011 Panzer Green
71025 Panzer Dark Yellow
71041 Panzer Brown

The brown doesn't look right to me, but I'm not sure. What do you guys think?


Ok – well its started. This one will be slow for a little bit, maybe an hour of work a week or so as I work on some other builds, but I have some inertia which is what matters!

Be back soon!
Mike
acebatau
Visit this Community
Colorado, United States
Joined: February 10, 2008
KitMaker: 730 posts
Armorama: 616 posts
Posted: Sunday, April 17, 2016 - 08:20 AM UTC
Lots of goodies you have there, nice start and good luck
Monte
Visit this Community
Rhode Island, United States
Joined: December 08, 2002
KitMaker: 833 posts
Armorama: 601 posts
Posted: Sunday, April 17, 2016 - 09:51 AM UTC
Mike, you might be doing a bit of overkill with the Fruil tracks and Modelkasten. It's been my experience with the Fruils that you get at least 15-20 extra pieces left over once you've built both sets of tracks you need.

Unless you're planning on doing something special that needs alot of tracks.
clovis899
#155
Visit this Community
California, United States
Joined: May 05, 2002
KitMaker: 774 posts
Armorama: 605 posts
Posted: Sunday, April 17, 2016 - 10:23 AM UTC
Mike,
That is an impressive amount of hardware for the kit, should look great when you finish. I think the Vallejo colors will work out just fine. If I could offer any advice after seeing your painted piece I would say you might want to back off on the PSI if you have that capability with your set-up. This should help to correct some of the overspray you are getting. Also, it looks like your green started to kind of puddle up there. If you practice moving the airbrush off the surface while letting up on the paint flow that should alleviate that problem.
Cheers,
Rick
Mannloon
Visit this Community
Wisconsin, United States
Joined: May 18, 2015
KitMaker: 99 posts
Armorama: 97 posts
Posted: Sunday, April 17, 2016 - 08:50 PM UTC
I think those paint colors look spot on.
marcb
Visit this Community
Overijssel, Netherlands
Joined: March 25, 2006
KitMaker: 1,244 posts
Armorama: 1,226 posts
Posted: Sunday, April 17, 2016 - 09:10 PM UTC
I would lighten the colors a bit with fe flesh color.

Good luck on your build.
mmarchioli
Visit this Community
Florida, United States
Joined: March 18, 2008
KitMaker: 173 posts
Armorama: 168 posts
Posted: Monday, September 05, 2016 - 02:24 AM UTC
Hi guys! I can’t believe its been so long since I posted on this thread. Thanks for all the comments and the help. That will prove useful as I get going here.

Now that my HAF F-16 is nearly done, its time to focus on the JadgPanther. There hasn’t been a ton of progress, but I have made a few strides during some off time on the F-16. I’m still trying to work out the figures for the tank itself, but we’ll get there.

First up, I found a bit of a problem with my kit. There are a number of warped pieces, including the lower hull. I didn’t even notice while I was installing the suspension. Here’s a look though, the walls are defiantly leaning in.


I decided to first attach the rear wall, then use some sprue at the front to spread it apart. That seemed to work pretty well, and when I finally get the top on, that should help get it all nice and solid.

After the rear wall was attached I added the cooling fans and then added a little paint. I had just received the Ammo from MIG German Armor Interior set and I wanted to give them a try. I used the red-oxide primer for the floor and the engine gray for the fans. I was very pleased with the end results. They sprayed very well and using thin layers building up the color left a super smooth finish. I didn’t bother weathering the colors because they are all but invisible. I also painted the mid section flat black, because I am going the have some crew in the hatches and the black will help hide the lack of interior.


I am planning to make a little bit of a diorama for this build. I worked on a bit of the planning for that. First step was to plan out the idea then get the base prepped. The idea will be the JadgPanther stopped on a road somewhere on the eastern front. There will be a mixed unit of soldiers on the rear deck and a few on the ground interacting with them. One edge will have some vegetation to effectively create a border to the scene. We’ll see how it goes.

First up, I measured out the size of the base and cut out some Styrofoam.


Then I did a bit of a preliminary layout.


After the foam was cut out I also made a frame for the whole thing.


Once I get a little further on the tank itself, I’ll get started on the groundwork and will move the dio over to the dioramas section.

Not much to show really, but I’m shaking off the rust and getting that all important forward momentum.

Thanks for the continued interest. See you all soon!
Mike
Thirian24
Visit this Community
Oklahoma, United States
Joined: September 30, 2015
KitMaker: 2,493 posts
Armorama: 2,344 posts
Posted: Monday, September 05, 2016 - 05:21 AM UTC
Great looking base.
DutyFirst1917
Visit this Community
Colorado, United States
Joined: February 03, 2016
KitMaker: 93 posts
Armorama: 86 posts
Posted: Monday, September 05, 2016 - 06:39 AM UTC
Very nice I was looking at this kit as my next purchase can't wait for the updates!

Cheers,

Tim
mmarchioli
Visit this Community
Florida, United States
Joined: March 18, 2008
KitMaker: 173 posts
Armorama: 168 posts
Posted: Friday, October 07, 2016 - 09:56 AM UTC
Hi guys, back with a little bit of progress on this kitty.

First off I cleaned and finished the road wheels. The rubber part was painted in Gunze Mr. Color Tire Black. Then masked off and the Panzer yellow, followed by the green and brown for the outer road wheels. I think they will look really good once I get them all weathered.


For the next set of steps, I deviated from the instructions. Since I knew the hull bottom was warped, I wanted to attach the top of the hull while there wasn’t anything attached on the outside. This meant I needed to do some work to get the parts installed from the interior attached. I started with the top of the tank. I needed to add some figures so I built a couple of platforms for the two half figures I am using to sit on. These comprised some plastic rod drilled and installed in the hull top, then a thick plastic sheet was cut and drilled to match the pattern of the rods. This allowed me to slide the platform up and down to correctly position each figure. Once I had them positioned correctly, I glued them in place.


I finished installing all the interior parts, including the gun breach and the hull mounted MG. Then the roof was installed. Sorry, didn’t take a lot of pictures during these steps. There really just wasn’t a lot of fuss. I also removed the molded on front mud guards as I plan to replace them with some photo etched replacements.


Once the top dried, I attached the two hull halves. I attached one side at a time, slowly adding Tamiya extra thin to the joint and holding until it had set. Unfortunately I was left with a couple of gaps. One was at the back where the hull top and the rear plate meet.


And the other was at the front.


Both were filled with some putty.


I’ll check how they turned out after a primer coat. Starting to really look the part now.


Thanks for watching guys, this one should start picking up speed now as this is the only build on the workbench right now.

As always questions and comments are welcome.
Mike
mmarchioli
Visit this Community
Florida, United States
Joined: March 18, 2008
KitMaker: 173 posts
Armorama: 168 posts
Posted: Sunday, November 06, 2016 - 06:17 AM UTC
Hi folks! There’s been a lot going on lately that has unfortunately kept me away from the bench. But most of that has been cleared up and I had a pretty good weekend, so here is some progress.

First up is the JadgPanther’s back deck. I pretty much just followed the instructions to add all the details. I decided not to bother replacing most of the little details with etch because the kit plastic is pretty good in my opinion. I did however decide to use the photo etch screens from the Alliance Modelworks set, instead of Dragon’s supplied screens. The aftermarket was just a little more refined. I did have to replace the two handles on the engine hatch as one was broken in the kit. I just used some same-sized brass rod bent using a handle making tool and glued them in place. I also used the etched brackets on the very rear, which are used to stow the tow cable. I figured they would be better then the kit parts. In the end only marginally so, the kit parts are pretty nice.


The next step was to get the rear of the hull finished. I just added the plastic following the directions. The exhaust pipes will be painted and weathered off the tank and added later.


I decided to try to solder some of the etched fenders and parts together. This is a new technique for me, so I spent some time practicing before I committed to using it for the kit. I used some of the PE that I didn’t plan on using, and then I gave it a shot on the kit itself. First up was the side skirt hanger. I bent all the parts and then soldered them together. Here was my first completed part.


Its not super clean like what I’ve seen people do, but for a first real attempt, I’m happy with the outcome. Just need to keep practicing. So I soldered the left side assemblies, and then just to compare, I used CA glue for the right side assemblies. Here’s a comparison. I’m sure you can tell which is which.


Obviously we see which is cleaner. The CA’ed assembly was a lot faster as well. But I’m happy to have learned a new skill and put it to use. Next up will be to assemble the parts for the sides, so we can see how well they mate up.

Sorry for the short update today, but I am marching right along.

Talk to you all soon, and as always, all comments/questions/critiques are welcome!
Mike
d6mst0
#453
Visit this Community
Texas, United States
Joined: August 28, 2016
KitMaker: 1,925 posts
Armorama: 601 posts
Posted: Sunday, November 06, 2016 - 07:06 AM UTC
Those solder joints will be a lot stronger than the CA joints. Once painted you won't be able to notice it.

I make my own ship main masts out of bass rod and solder yarnarms to them. Tight rigging will not bend the assembly.
Thirian24
Visit this Community
Oklahoma, United States
Joined: September 30, 2015
KitMaker: 2,493 posts
Armorama: 2,344 posts
Posted: Sunday, November 06, 2016 - 07:11 AM UTC
Looking real good Mike. Can't wait to see some more progress
Modelrob
Visit this Community
Arizona, United States
Joined: October 20, 2015
KitMaker: 304 posts
Armorama: 293 posts
Posted: Sunday, November 06, 2016 - 03:45 PM UTC
Nice work Mike, you are making some good progress.

Robert
mmarchioli
Visit this Community
Florida, United States
Joined: March 18, 2008
KitMaker: 173 posts
Armorama: 168 posts
Posted: Sunday, November 20, 2016 - 07:52 AM UTC

Quoted Text

Those solder joints will be a lot stronger than the CA joints. Once painted you won't be able to notice it.

I make my own ship main masts out of bass rod and solder yarnarms to them. Tight rigging will not bend the assembly.


Thanks for the encouragement Mark. Soldering is definitely the way to go, I just need to keep practicing.


Quoted Text

Looking real good Mike. Can't wait to see some more progress


Thank you Dustin!


Quoted Text

Nice work Mike, you are making some good progress.

Robert


Thanks Robert, I am having fun with this project.
mmarchioli
Visit this Community
Florida, United States
Joined: March 18, 2008
KitMaker: 173 posts
Armorama: 168 posts
Posted: Sunday, November 20, 2016 - 07:53 AM UTC
Hi guys! I am back with another update. Not sure if I’ll actually get this done by the end of the month, but I sure am going to try.

All of my progress this time is on the left side of the vehicle. Its been a little slow going as I continue to solder the photo etch. Like most new skills there are moments of happiness and moments of frustration, but practice makes perfect.

On to the update!

First thing I did was to fill in all the mounting holes for the parts I planned to use PE instead of the kit parts. Next I added the ledge/skirt attachment brackets to the side of the tank. This is the soldered version. Then I assembled the kit tool holder and the cleaning rod tube assembly. I decided after I had the tube assembled that I really should have used the photo etch for the handles on the end covers. So I removed the molded on chunk of plastic, assembled the etch, including the retention chains, and then mounted all the plastic to the hull. Here is the tube as supplied by Dragon:


And after I enhanced it. Sorry, forgot to take a picture before I mounted it on the hull. Both sides got the new handle and retention chain.


Next up was the spare track holder. I used the PE assembly from my aftermarket kit here as well. I chose to solder the assembly freehand, and I ended up with a pretty roughed up assembly. This assembly was a little frustrating and I almost tossed in the soldering iron! Oh well, practice practice practice I suppose. Here is the trach holder installed.


And here is a shot of the left side with everything installed.


Once I had this completed I worked on the front fender. This is the PE version from the Alliance Modelworks set. I soldered the seams and all the parts together and then mounted it on the front of the tank. The instructions in the PE set where not very clear on how to mount the fender, but you basically have to make a Z shaped bend out of the mounting piece. It took some effort, but I eventually got it all set. The kit headlight mounts to the fender.


I noticed today that the head lamp is actually crooked to the base. I’ll need to align that a little bit better.

That’s where I am today. I was hoping to have a primer coat on this beast this weekend, but obviously I didn’t get there. Better to not rush it though.

See you all soon!

Thanks for watching
Mike
mmarchioli
Visit this Community
Florida, United States
Joined: March 18, 2008
KitMaker: 173 posts
Armorama: 168 posts
Posted: Sunday, November 27, 2016 - 10:11 AM UTC
Hi guys, I have some progress to report, not as much as I hoped, but a family emergency kept me away from the bench for a big chunk of the long weekend.

Ok – progress on the right hand side of the tank. First up, the blank canvas. You can see I mounted the bracket for the front fender and I filled all the mounting holes that would be used for the kit parts that I replaced with PE.


I started with the fenders. I added the front fender first followed by the sides. This was lesson from the left side. I did it the other way around and ended up with a gap where the side and front fenders came together. I ended up knocking the side fenders off on the left side while I was working on the right side, so I ended up fixing the problem. A happy little accident in this case.


Next was the spare track link holder. This is the glued version instead of the soldered version. I’ve broken a number of those little brackets off, but it was expedient this time. I just need to practice soldering before it become a definite go to tool.


And finally the kit tool holders.


That completed the left side of the tank. After that was done I assembled the kit barrel. Its plastic but molded as a round piece instead of halves and has a multi part muzzle brake so I didn’t see a need to replace it wit ha turned metal one. This actually brings up a good point, this kit really didn’t need any aftermarket. It’s a good well detailed kit out of the box and while the PE does add a little finesse to it, I’m not sure the effort and time really warrant the end result. Just my opinion. Anyway – here’s a shot of the barrel, its just dry fitted to ease painting.


And that completed the primary assembly. I have a number of detail parts that need to be painted off the tank and added before weathering, but next step is primer and paint.


I am pretty happy with how this is turning out. I want to make sure to do a good job weathering, so I am not going to rush it.

Thanks for looking in folks! As always questions and comments are welcomed, and happy modeling!

Mike


cheswickthecat
Visit this Community
Washington, United States
Joined: October 13, 2007
KitMaker: 212 posts
Armorama: 208 posts
Posted: Sunday, November 27, 2016 - 11:16 AM UTC
Mike, that's coming along nicely! The PE definitely adds to the overall appearance despite its finicky nature. Maybe I missed this, but what tracks do you plan on using, kit or other? Thanks for sharing your progress.
Terry
mmarchioli
Visit this Community
Florida, United States
Joined: March 18, 2008
KitMaker: 173 posts
Armorama: 168 posts
Posted: Sunday, November 27, 2016 - 12:36 PM UTC

Quoted Text

Mike, that's coming along nicely! The PE definitely adds to the overall appearance despite its finicky nature. Maybe I missed this, but what tracks do you plan on using, kit or other? Thanks for sharing your progress.
Terry


Thanks Terry! I'm planning to use Fruils for this tank.
Obersoldaten
Visit this Community
Alba, Romania
Joined: May 01, 2017
KitMaker: 10 posts
Armorama: 10 posts
Posted: Sunday, May 21, 2017 - 08:11 PM UTC
Hey Mike, hows your tank turning out, did you make any progress? Im curious about the camo scheme youll use.
mmarchioli
Visit this Community
Florida, United States
Joined: March 18, 2008
KitMaker: 173 posts
Armorama: 168 posts
Posted: Monday, May 22, 2017 - 08:20 AM UTC

Quoted Text

Hey Mike, hows your tank turning out, did you make any progress? Im curious about the camo scheme youll use.


I ran into a small hiccup painting this. Just some paint issues, but I set it aside for a small break and well, there it sits on the shelf of doom. But this is a good reminder to get this back out, I am very motivated to build some german armor right now, gotta strike while the iron is hot!
Blaubar
Visit this Community
Rheinland-Pfalz, Germany
Joined: December 15, 2016
KitMaker: 261 posts
Armorama: 246 posts
Posted: Monday, May 22, 2017 - 10:47 AM UTC
Yeah,
get it out of the shelf of doom buddy. It's an interesting build and I look forward to seeing it finished!
mmarchioli
Visit this Community
Florida, United States
Joined: March 18, 2008
KitMaker: 173 posts
Armorama: 168 posts
Posted: Tuesday, August 08, 2017 - 07:15 AM UTC
Hello everyone! Its been a long time since I’ve worked on this model. I had some issue with the camo and I set it aside. Now that I reached the painting stage on my King Tiger, I figured why not work on them both together as the steps from here on out are fairly similar.

Alright, so the camo is finished up. The yellow and the green are from Vallejo and the brown is from Ammo by Mig. I did the paint free hand and really didn’t follow any real tanks, just did what came naturally.


I think it turned out pretty well. The camo could be a little tighter and I found a spot that needs to be touched up in yellow, but overall I’m pleased.

My question for the group, what do you think of the pattern, does it look ok, or do I need to add anything to it?

Thanks for looking! Hopefully this one will keep on moving!

Mike
 _GOTOTOP