Help with Dragon's Magic Tracks for Tiger II
Florida, United States
Joined: May 13, 2016
KitMaker: 70 posts
Armorama: 64 posts
Posted: Thursday, May 26, 2016 - 10:13 AM UTC
Hi guys. I recently began putting the tracks together on my King Tiger, Dragon kit number 6254. I encountered a problem when finishing one side... There seems to be an empty space the size of one link!
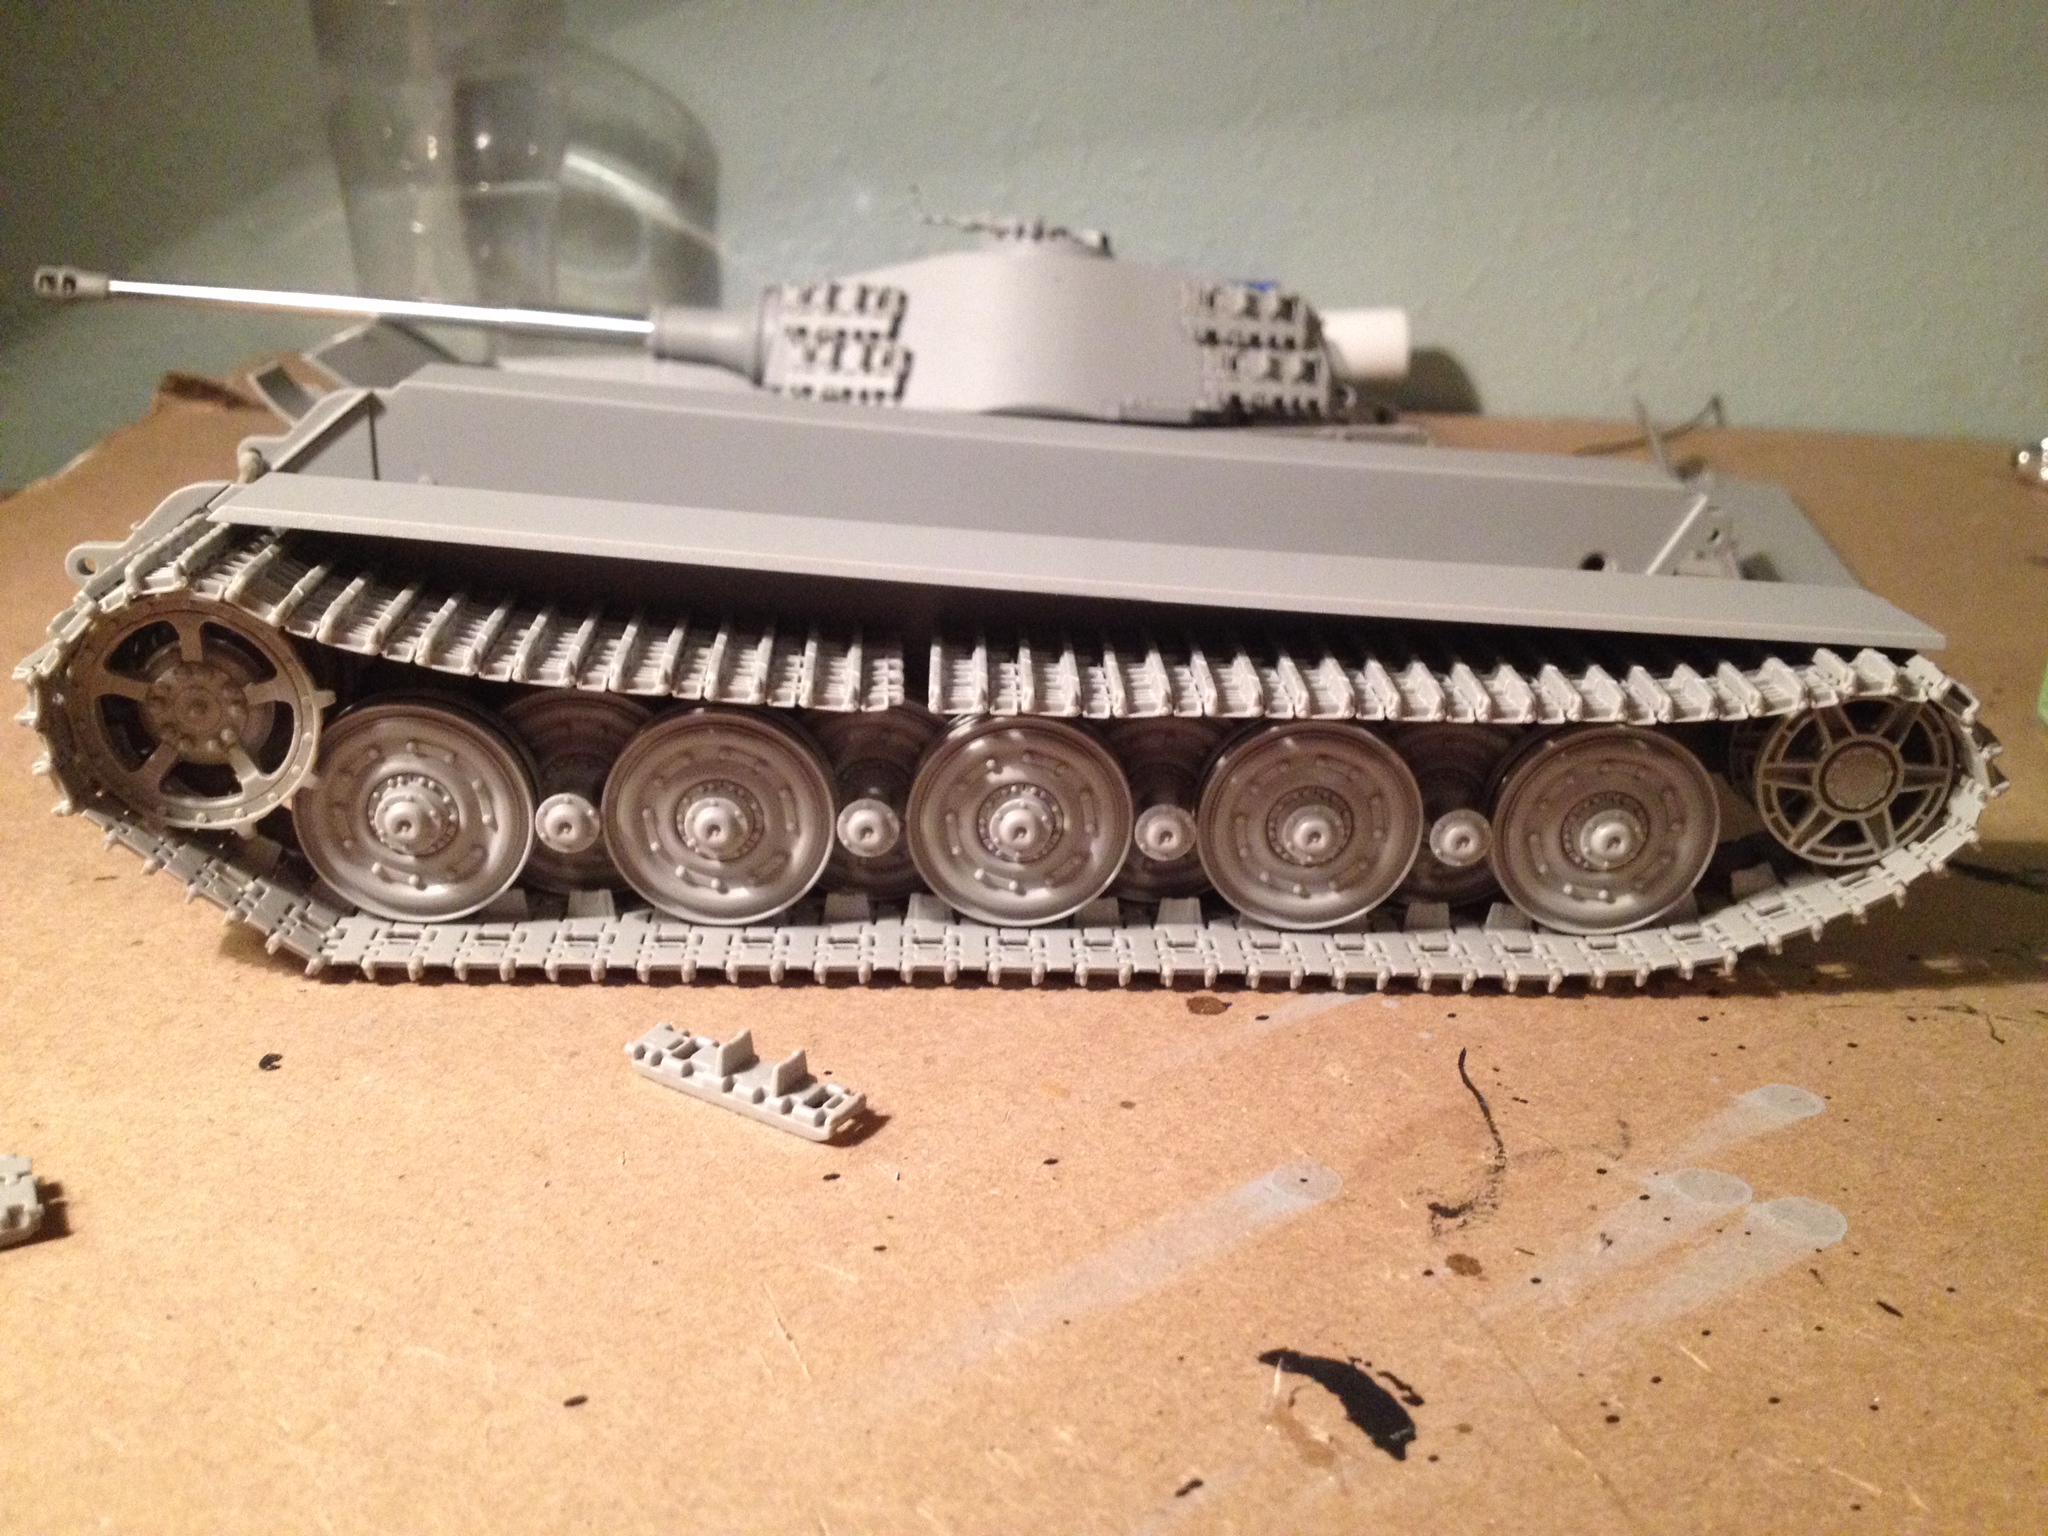
I have tightned them as much as I can while still retaining the "slack track" look. The space is still there... I can't seem to pull them completely together. There are 92 links in this track. 46 big parts with the bars that touch the ground (dunno the proper terminology) and 46 little connecting parts. What do I do? ):
Singapore / 新加坡
Joined: September 24, 2013
KitMaker: 75 posts
Armorama: 63 posts
Posted: Thursday, May 26, 2016 - 10:31 AM UTC
hi,
a suggestion, loosen the track tension at the drive sprocket so that you can fit in two links.
Hope this helps.
Kenneth
Florida, United States
Joined: May 13, 2016
KitMaker: 70 posts
Armorama: 64 posts
Posted: Thursday, May 26, 2016 - 10:32 AM UTC
The kit says to use 92 though... Will try... I did that previously only to see there was too much looseness. But will try again...
Florida, United States
Joined: May 13, 2016
KitMaker: 70 posts
Armorama: 64 posts
Posted: Thursday, May 26, 2016 - 10:35 AM UTC
Yeah, the tracks bulge too far out and are too loose with two additional links... ):
Florida, United States
Joined: May 13, 2016
KitMaker: 70 posts
Armorama: 64 posts
Posted: Thursday, May 26, 2016 - 10:50 AM UTC
Well, I somehow got them connected and it just looks... wrong. Like tight Sherman tracks. ):
United Kingdom
Joined: November 10, 2013
KitMaker: 195 posts
Armorama: 175 posts
Posted: Thursday, May 26, 2016 - 11:09 AM UTC
I have not used Dragon KT tracks but I would treat the bottom run like ordinary single link track and glue them but get a gnats of a gap between the links to gain the extra links width. If you see what I mean....

Florida, United States
Joined: May 13, 2016
KitMaker: 70 posts
Armorama: 64 posts
Posted: Thursday, May 26, 2016 - 11:14 AM UTC
So like, connect them but leave a nanometer of space between every link as opposed to FULLY attaching them? So as to gradually build up space?
United Kingdom
Joined: November 10, 2013
KitMaker: 195 posts
Armorama: 175 posts
Posted: Thursday, May 26, 2016 - 11:31 AM UTC
Yes, that's the idea. You can do a full bottom run and fix to the road wheels, or not, which ever way you like...
Singapore / 新加坡
Joined: September 24, 2013
KitMaker: 75 posts
Armorama: 63 posts
Posted: Thursday, May 26, 2016 - 11:38 AM UTC
Like i said loosen the track tension at the drive sprocket and tension at the idler so that you can add two links. anyway i never follow kit instructions on the number of links to use. I use the number as a guide and see how it looks and adjust accordingly.
the track above the wheels may not have the tensioned curve you are trying to create but at least is fit and it looks like a tank with loosened tracks after periods of use.
Kenneth
Ukraine / Україна
Joined: January 26, 2010
KitMaker: 570 posts
Armorama: 553 posts
Posted: Thursday, May 26, 2016 - 11:42 AM UTC
Your problem is in idler position. It is moved too far to the rear from the nearest road wheel, actual vehicles never had them in this configuration. Have a look at this image:
http://www.worldwar2aces.com/panzer-tank/kingtiger/kingtiger-1491.jpg
Singapore / 新加坡
Joined: September 24, 2013
KitMaker: 75 posts
Armorama: 63 posts
Posted: Thursday, May 26, 2016 - 11:43 AM UTC
I also noticed that you do have some track slack in front of the 1st road wheel and behind the last road wheel.
Perhaps you can move the sprocket inwards a little to reduce the slack in front of the 1st road wheel and tighten the slack at the back road wheel to to give you the track length you need to breach the gap.
Kenneth
Singapore / 新加坡
Joined: September 24, 2013
KitMaker: 75 posts
Armorama: 63 posts
Posted: Thursday, May 26, 2016 - 11:45 AM UTC
Apologies, i dont mean moving th e sprocket but rotating the sprocket inwards a bit to remove the slack in front of the 1 st raod wheel
Removed by original poster on 05/27/16 - 06:47:22 (GMT).
Florida, United States
Joined: May 13, 2016
KitMaker: 70 posts
Armorama: 64 posts
Posted: Thursday, May 26, 2016 - 11:48 AM UTC
Wow, thank you Paul!!! I hope I can fix that... Dragon's instructions for this kit are those weird 3D computer-generated image format. I was unable to see where the idler was supposed to be exactly.
I just need to remove the wheel... Ripping apart all of the cement... )))):
Update, got one idler wheel out... The other is being very resistant. I am crossing my fingers and praying to Dragon that I don't permanently break anything.
Florida, United States
Joined: May 13, 2016
KitMaker: 70 posts
Armorama: 64 posts
Posted: Thursday, May 26, 2016 - 01:08 PM UTC
Alright, I think I fixed it. It was the idler wheel lol... Thank you again Paul.
I just wish the underside of the sponsons were NOT part of the mold of the lower hull... Makes the tracks so hard to put on.
Ukraine / Україна
Joined: January 26, 2010
KitMaker: 570 posts
Armorama: 553 posts
Posted: Thursday, May 26, 2016 - 01:31 PM UTC
Good for you! Next time when you need to unglue/reposition a part just 'moisten' it with a drop of extra thin cement and pull gently.
Florida, United States
Joined: March 30, 2006
KitMaker: 3,736 posts
Armorama: 3,697 posts
Posted: Thursday, May 26, 2016 - 08:15 PM UTC
Never glue the idler wheel arm until you attach the tracks. It can be positioned to set the correct track tension, just as on the real vehicle.
United Kingdom
Joined: January 27, 2009
KitMaker: 592 posts
Armorama: 588 posts
Posted: Sunday, May 29, 2016 - 12:41 AM UTC
I didn't have a problem with the Tiger II (Porsche turret) but I had a similar problem with their T34STZ until I altered the idler.


