_GOTOBOTTOM
Armor/AFV: Axis - WWII
Armor and ground forces of the Axis forces during World War II.
Hosted by Darren Baker
A tale of two Kitties
iflytb20
#501
Visit this Community
Kerala, India / भारत
Joined: August 25, 2009
KitMaker: 292 posts
Armorama: 91 posts
Posted: Friday, June 03, 2016 - 01:30 PM UTC
Greetings folks

Ever since I saw a Tiger tank in a Commando comic as a kid, I was hooked to the Tiger. As a teen, my desktop's wallpaper was always a Tiger tank. Fast forward a few years and I started to try my hand with scale modelling. I am still a WIP, but I feel that I now have enough courage to tackle a Tiger kit. So, without any further delay, I present to you the two victims ..... er.... kits


1/35 Academy Tiger I Early & 1/35 Tamiya Tiger I Late/Final.

I will be building the Academy Tiger for the 500+ Campaign and the Tamiya one for the Tamiya Campaign. My plan is to build them side by side as far as possible. As the Academy one has the full interiors, I will be concentrating more on it initially do that the external finishing and painting can be done together.

I have not yet decided what unit/markings to go with. Just that the Tamiya one would be an Late version as the kit can be build as either a late or a final version.

Kits


For the Academy Kit the only AM I will be using is a metal barrel as the kit one is too badly warped and is only good for shooting around corners


For the Tamiya kit i'll be using an Zimmerit kit from Atak and a PE set by ET Models for the engine hatches.


So please stay tuned for more updates and please feel free to give me suggestions / tips / advises etc

Cheers
M4A1Sherman
Visit this Community
New York, United States
Joined: May 02, 2013
KitMaker: 4,403 posts
Armorama: 4,078 posts
Posted: Friday, June 03, 2016 - 02:26 PM UTC

Quoted Text

Greetings folks

Ever since I saw a Tiger tank in a Commando comic as a kid, I was hooked to the Tiger. As a teen, my desktop's wallpaper was always a Tiger tank. Fast forward a few years and I started to try my hand with scale modelling. I am still a WIP, but I feel that I now have enough courage to tackle a Tiger kit. So, without any further delay, I present to you the two victims ..... er.... kits


1/35 Academy Tiger I Early & 1/35 Tamiya Tiger I Late/Final.

I will be building the Academy Tiger for the 500+ Campaign and the Tamiya one for the Tamiya Campaign. My plan is to build them side by side as far as possible. As the Academy one has the full interiors, I will be concentrating more on it initially do that the external finishing and painting can be done together.

I have not yet decided what unit/markings to go with. Just that the Tamiya one would be an Late version as the kit can be build as either a late or a final version.

Kits


For the Academy Kit the only AM I will be using is a metal barrel as the kit one is too badly warped and is only good for shooting around corners


For the Tamiya kit i'll be using an Zimmerit kit from Atak and a PE set by ET Models for the engine hatches.


So please stay tuned for more updates and please feel free to give me suggestions / tips / advises etc

Cheers


Hi, Raj! GOOD LUCK to you! Will be watching your progress!
GazzaS
#424
Visit this Community
Queensland, Australia
Joined: April 23, 2015
KitMaker: 4,648 posts
Armorama: 2,248 posts
Posted: Friday, June 03, 2016 - 04:27 PM UTC
Hi Raj,
I'll be glad to watch this build. You should do fine if your P-38 is anything to judge by.

Cheers,

Gaz
iflytb20
#501
Visit this Community
Kerala, India / भारत
Joined: August 25, 2009
KitMaker: 292 posts
Armorama: 91 posts
Posted: Sunday, June 05, 2016 - 01:02 AM UTC
Dennis & Gaz

Thank you so much for your encouragement.

Update

STEP 1

So like I mentioned in the beginning, I would try and match the two build step by step. The Step 1 for both involve attaching the torsion bars to the lower hull. Unlike the Dragon kits, these two don't have the full torsion bars - just the arm. The Academy kit has half bars to be attached inside the hull to complete the illusion but they are not workable.


STEP 2

Step 2 involves invoking the gods of insanity - the road wheels And since i'm building two of them, please standby for a selfie in a straitjacket


The final drive housing, final drive sprocket and the idler wheel.

While both kits have a decent amount of fine details, the academy one had a fair bit of flash as well.


Impending Insanity. Even Lt Minion can't save me now.

The hull roof and rear plates are dry fitted in the above picture. I glued the zimmerit sheets on the Tamiya kit already. I'll post some close ups in the next update.

Thanks for looking and Cheers
GazzaS
#424
Visit this Community
Queensland, Australia
Joined: April 23, 2015
KitMaker: 4,648 posts
Armorama: 2,248 posts
Posted: Sunday, June 05, 2016 - 03:21 AM UTC
Hi Raj,
I recently completed the Academy Tiger late. I went OOB except for the tracks which I replaced with Friuls. To make the illusion of a working suspension I chopped off the locator pins along the base of the hull except for the front and rear pins so the tank wouldn't lose it's proper height. The Friul tracks provided the necessary sag.
I really enjoyed the Academy Tiger. The only thing I didn't like was the tracks. They were too inflexible. If I'm going to use rubber band tracks, I'd prefer they were flexible ehough to get the sag right with minimal effort.

Cheers,

Gaz
iflytb20
#501
Visit this Community
Kerala, India / भारत
Joined: August 25, 2009
KitMaker: 292 posts
Armorama: 91 posts
Posted: Monday, June 06, 2016 - 12:46 AM UTC
Gaz

Thanks for the heads up regarding the tracks. I'll see if Lt Minion can get them to behave, else i'll use my Master Club tracks.

Now I need help from the tiger experten here. For the Tamiya Late, I plan to finish it as Tiger 312 of sPzAbt 505. I hope that was a late and not a mid or a final version.


The Kitty in question.

For the Academy early, one of the choice of markings is for Otto Carius's Tiger 217. I am a bit of a Tiger noob but as per my (pathetic) research, 217 was a mid. Two questions that I have :
1. Did he command an Early Tiger?
2. Was 217 an Early or a Mid / Late?

Hope to get a reply soon.

Cheers
GazzaS
#424
Visit this Community
Queensland, Australia
Joined: April 23, 2015
KitMaker: 4,648 posts
Armorama: 2,248 posts
Posted: Monday, June 06, 2016 - 04:08 AM UTC
The Academy late kit actually has a decal set for Tiger 312. I think it might be safe to call it a late.

Gaz
iflytb20
#501
Visit this Community
Kerala, India / भारत
Joined: August 25, 2009
KitMaker: 292 posts
Armorama: 91 posts
Posted: Thursday, June 09, 2016 - 07:06 PM UTC
Gaz
Thanks for that. The tamiya one will be finished as 312. Still not decided the scheme for the Academy Kitty.

Update #2

I have cleaned up all the roadwheels. Only lost 4 fingers in the process I didn't realise till today that the steel wheeled Tigers had only 16 roadwheels per side as compared to the rubber one's 24. Sure saved me a ton of sanding.


At this point i've set aside the Tamiya kit and am building the interiors of the Academy kit. Working with various sub-assemblies so to speak. Hope to prime the interiors and paint the interiors colors over the weekend.


Finished the engine assembly. But i'm not too happy as the exhaust pipe stops about 5-6mm before the rear plate. Hope to scratch build a few parts. Please stay tuned for updates on that front.


Test fitting the driveshafts. I plan to assemble it from the transmission to the engine. And to enable me to do that I plan to attach the rear plate the last Let's see how that goes


Did a bit of scratch building in the firewall. The kit firewall does not have the access panel to the engine and as a result the engine is visible from the fighting compartment. No point in having a firewall if you can't keep out the fire right

I covered the gap with some sheet styrene. I also added part # G27 which, strangely, is marked as not to be used. I modified it a bit so that it could fit over my scratch built firewall panel. As per my references that is the fan for the ventilation system and therefore should be present. Dunno why Academy wants us to leave it on the sprue

That's all for now folks. Please feel free to comment on my build till date and please point out any mistakes that i may have done.

Cheers
GazzaS
#424
Visit this Community
Queensland, Australia
Joined: April 23, 2015
KitMaker: 4,648 posts
Armorama: 2,248 posts
Posted: Friday, June 10, 2016 - 02:18 AM UTC
I find the Academ-ugh kinda funny. That being said, I really enjoyed the kit. The only part I had to do any work with to fit was the forward glacis. No putty, just some sanding. The rest was a a breeze...

Oh, just remembered: I had to pin the C-clasps for the tracks that sit on the tank. They might be molded too thick, so insread of sanding them them down, I just pinned the attaching brackets and drilled holes.

Gaz
iflytb20
#501
Visit this Community
Kerala, India / भारत
Joined: August 25, 2009
KitMaker: 292 posts
Armorama: 91 posts
Posted: Wednesday, June 29, 2016 - 02:09 AM UTC
Gary

Thanks once again for the heads up. Please do let me know if you remember any other problems you faced in your build.

Update #3

Like i mentioned in my previous post, I am concentrating on the interiors of the Academy kit. I have still not decided how I will display the interiors, but most likely i'll be leaving the hull and the turret roof unglued.


Did a wee bit of scratch building on the engine. I added wire to depict the pipes for the engine coolant, styrene rods to depict the shafts, built the connector of the inertial starter (not seen in this pic ) and extended the exhausts till the real panel.


As I plan to keep the engine bay hatch opened, I tried to add some details to the inner side of the hatch. Hope it looks acceptable


The power pack of the tiger - the engine and the transmission.


Did some modifications to the turret. It is still a WIP at the moment. Hope to finish it in the next few days.


Painted the hull as per an early tiger scheme.


The various interior parts painted and ready for a bit of weathering.


Dry fitting the interiors have so far revealed a few fit issues. So far i've only managed to fix this one.


While surfing the shops online for some Tiger AMs, I found this little kitty on sale. And the best part - it has both the Magic Tracks and the DS track in the box


And for 120$, I would call this eBay shopping a good deal


Thanks for looking folks. Please feel free to point out any glaring mistakes this Tiger noob is making.

Cheers
iflytb20
#501
Visit this Community
Kerala, India / भारत
Joined: August 25, 2009
KitMaker: 292 posts
Armorama: 91 posts
Posted: Thursday, August 04, 2016 - 02:31 AM UTC
Update #4

Evening folks. It has been a while since I posted here. Got busy with work and couldn't find any free time to hit the bench. Had a couple of off day recently and managed to restart the build.


Completed the interiors on the Academy kit finally. Tried a bit of scratch building here and there. Will be adding the ammo later.


I wont be adding the pipes as I want to display the engine hatch in the open position. That and the fact that the vinyl part is completely glue and paint proof


The resin mantlet was damaged as the gun sleeve was broken. No matter what I tried, I couldn't fix it. So decide to make some home made zimmerit. I think I made a hash of it - oh well, i'll chalk it up to experience.


Finally I can restart the twin part of the twin build.


Had to ditch the escape hatch also as it was of mid and the lower half didn't have the mod to clear the turret ring.


That's all folks. Hope to post an update soon on the painting process. Thanks for looking.

Cheers
ColinEdm
Staff MemberAssociate Editor
ARMORAMA
Visit this Community
Alberta, Canada
Joined: October 15, 2013
KitMaker: 1,355 posts
Armorama: 1,229 posts
Posted: Friday, August 05, 2016 - 07:19 PM UTC
Great work Raj!
iflytb20
#501
Visit this Community
Kerala, India / भारत
Joined: August 25, 2009
KitMaker: 292 posts
Armorama: 91 posts
Posted: Saturday, August 13, 2016 - 02:30 AM UTC
@Colin
Thank you for dropping by

UPDATE #5

Finally managed to get some paint on the kitties.


Next step would be painting the various tools. Then the madness begins - indi tracks

Thanks for looking

Cheers
Thirian24
Visit this Community
Oklahoma, United States
Joined: September 30, 2015
KitMaker: 2,493 posts
Armorama: 2,344 posts
Posted: Saturday, August 13, 2016 - 02:55 AM UTC
Looking very nice.
iflytb20
#501
Visit this Community
Kerala, India / भारत
Joined: August 25, 2009
KitMaker: 292 posts
Armorama: 91 posts
Posted: Sunday, September 04, 2016 - 01:07 AM UTC
@ Dustin
Thanks for dropping by


UPDATE #6

I finally managed to gather enough courage to tackle the tracks. Cutting, cleaning and sanding 390 pieces surely took a toll on my sanity and my lifespan. I can still hear voices coming from my workbench


I also finished painting the exhaust stacks. I used a base coat of rust and built up on it using MIG pigments.


Next up, chipping and weathering of the hull and the turrets. It will be not much as I'm still learning the art of weathering and will be taking baby steps. Battle damage et al will be experimented on my future builds.


Thanks for looking.

Cheers
iflytb20
#501
Visit this Community
Kerala, India / भारत
Joined: August 25, 2009
KitMaker: 292 posts
Armorama: 91 posts
Posted: Wednesday, September 07, 2016 - 02:19 AM UTC
FINISHED

And I'm finished

Tried my hand at chipping and filters for the first time. I'm afraid I may have overdone it a bit. Ah well, I'll chalk it up to experience.


Academy 1/35 Tiger I Early

The Academy kit had good details but had a lot of fit issues. I had to use styrene fillers to make some parts fit. The kit also has some accuracy issues - both in the interiors and the pioneer tools. But for the price I got this kit (23 Euros), I got a lot of bang for my buck.


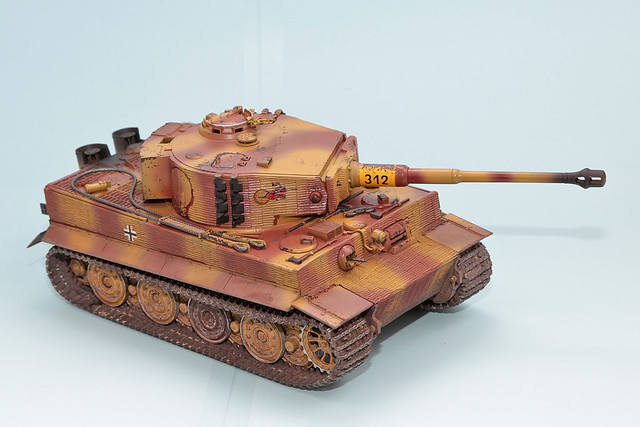
Tamiya 1/35 Tiger I Late

The Tamiya kit was a dream to build. Hardly any fit issues and the sprue gates were placed thoughtfully. The only place where I had a bit of a struggle was the zimmerit but I can't blame Tamiya for it. The biggest complaint was the lack of a coaxial MG in the kit and the solid guide horn on the tracks. But even the Academy kit has the same issue.

So how do they compare?

The Academy kit wins on value for money. The biggest negative is the fit issue followed closely by the accuracy issues.

The Tamiya kit wins on ease of construction and the fit. The only negative for me is the accuracy issue.

In the end, both were winners for me. I learned a lot while building them and I leveled up on my scratch building skills - I'm no longer a noob. I'm a Senior Noob now

I thank you all for dropping by and commenting on my build. See you all in my next project.


Cheers

 _GOTOTOP