_GOTOBOTTOM
Armor/AFV: Early Armor
WWI and other early tanks and armored cars.
Hosted by Darren Baker
Whippet Mk A
drkwing
Visit this Community
Ankara, Turkey / Türkçe
Joined: August 28, 2008
KitMaker: 233 posts
Armorama: 229 posts
Posted: Saturday, July 09, 2016 - 08:48 PM UTC
These past two years have been a very good era for the World War I tanks. Ive been building Meng's Whippet Mk A Medium tank for a while.


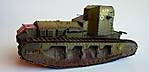
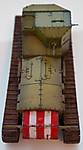
First of all, it's a quite good kit, a joy to build. The only exception being the individual track links . The joints between the links are very weak and during assembly they frequently disconnect.

The build phase is already finished.

I've given the Vallejo surface primer a try. Sprayed the black primer directly with my trusty Iwata and I really liked the result. The only trouble was cleaning the airbrush afterwards, which required considerably more effort than my usual tamiya paints.


janders
Visit this Community
Massachusetts, United States
Joined: July 10, 2016
KitMaker: 45 posts
Armorama: 45 posts
Posted: Saturday, July 09, 2016 - 09:15 PM UTC
Just finished this kit as my second model back into the hobby. I agree, it was a pleasure to build, fun subject, lots of choices for markings and weathering!

The individual links were a bit fiddly... I ended up gluing a few problematic links prior to draping them on the model. Really the only part of assembly that required any serious effort.


drkwing
Visit this Community
Ankara, Turkey / Türkçe
Joined: August 28, 2008
KitMaker: 233 posts
Armorama: 229 posts
Posted: Saturday, July 09, 2016 - 09:17 PM UTC
Very good finish! Excellent!!
janders
Visit this Community
Massachusetts, United States
Joined: July 10, 2016
KitMaker: 45 posts
Armorama: 45 posts
Posted: Saturday, July 09, 2016 - 09:46 PM UTC
which markings are you going to build yours up with? I was torn!
drkwing
Visit this Community
Ankara, Turkey / Türkçe
Joined: August 28, 2008
KitMaker: 233 posts
Armorama: 229 posts
Posted: Sunday, July 10, 2016 - 04:08 PM UTC
I am not so sure either or the decals.


The instructions sheet only provides instructions for the "FireFly" and "Ceasar II"

I might go for a Russian one...
drkwing
Visit this Community
Ankara, Turkey / Türkçe
Joined: August 28, 2008
KitMaker: 233 posts
Armorama: 229 posts
Posted: Sunday, July 10, 2016 - 04:42 PM UTC
Or I might go for the CAESAR II from Bovington.

Here are some of my photos I took in Bovington of the Caesar II:


and an interior shot:

drkwing
Visit this Community
Ankara, Turkey / Türkçe
Joined: August 28, 2008
KitMaker: 233 posts
Armorama: 229 posts
Posted: Sunday, July 10, 2016 - 04:44 PM UTC
drkwing
Visit this Community
Ankara, Turkey / Türkçe
Joined: August 28, 2008
KitMaker: 233 posts
Armorama: 229 posts
Posted: Sunday, July 10, 2016 - 09:46 PM UTC
Ive applied the first green coat with Gunze H48 Field Gray. Tried to leave the panel lines darker and sprayed the panels irregularly.


I'm using Gunze paints for the first time; been a Tamiya user for a long time. I used tamiya lacquer thinner with the gunze paint, but I am not so happy with gunze paints. Using quite lower pressure (~.5psi) still getting spiderwebs and too much paint from the airbursh. Ended up frequently with overspray which was never an issue with tamiya line.
drkwing
Visit this Community
Ankara, Turkey / Türkçe
Joined: August 28, 2008
KitMaker: 233 posts
Armorama: 229 posts
Posted: Sunday, July 10, 2016 - 09:48 PM UTC
Another shot from top:

janders
Visit this Community
Massachusetts, United States
Joined: July 10, 2016
KitMaker: 45 posts
Armorama: 45 posts
Posted: Monday, July 11, 2016 - 05:55 AM UTC
nice continued work.

So there are the British options on the instructions.

Then you can use the Russian option (I did) to make one of the tanks sent to help the white russian side by the british in the revolution. Most of these still had some British ID markings.

If you don't like THAT, you can use the communist russian markings to make one of the white russian tanks that was THEN captured by the red russian side in the revolution!

The GERMAN markings are for the grey variant used by the FreiCorps around 1919.

The review linked below has some good photos and also shots from the Takom instructions about decal placement--
http://www.themodellingnews.com/2015/08/review-takoms-35th-scale-whippet-gets.html
drkwing
Visit this Community
Ankara, Turkey / Türkçe
Joined: August 28, 2008
KitMaker: 233 posts
Armorama: 229 posts
Posted: Monday, July 11, 2016 - 05:43 PM UTC
If only Meng included the Skull & Bones decals for the Gray German Whippet..

drkwing
Visit this Community
Ankara, Turkey / Türkçe
Joined: August 28, 2008
KitMaker: 233 posts
Armorama: 229 posts
Posted: Saturday, July 23, 2016 - 05:36 PM UTC
Still working on it as much as I can..

I think I am done with painting. Masked the locations for the ID bands, sprayed AK's Worn Effects and then sprayed the red and white bands.

After that with some water and old brushes, chipped the red and whites to let the green be seen underneath.

Here is the result:


 _GOTOTOP