

What is the process to make a water pond? Do you put the ground work down and then pour the casting resin over that or do you pour it on the bare base?
Thanks
Mike
Hosted by Darren Baker
How to make a pond

Recon

Joined: October 19, 2002
KitMaker: 1,571 posts
Armorama: 764 posts

Posted: Tuesday, August 23, 2016 - 01:50 AM UTC

parrot

Joined: March 01, 2002
KitMaker: 1,607 posts
Armorama: 1,581 posts
Posted: Tuesday, August 23, 2016 - 03:08 AM UTC
Hey Mike,
First,what are you using as a base?
You need a wall around the pond to hold the resin in.
More info on your idea would help.
Tom

First,what are you using as a base?
You need a wall around the pond to hold the resin in.
More info on your idea would help.
Tom

jekrott
Joined: March 25, 2006
KitMaker: 485 posts
Armorama: 353 posts
Posted: Tuesday, August 23, 2016 - 03:17 AM UTC
Well start by making your base ground work,And what you may see in a pond weeds,grass rocks and so on.Don't forget to paint it as well.You may want to seal it first with a lite coating of resin if not it may seep through the ground work.Best thing to do is find a pond and take pictures of it and go off that.Hope that helps
Recon
Joined: October 19, 2002
KitMaker: 1,571 posts
Armorama: 764 posts
Posted: Tuesday, August 23, 2016 - 03:23 AM UTC
Thanks for the info. My base is a piece of plywood and I was going to use celluclay for my ground. I will be adding various weeds and grass for my foliage.
Mike
Mike

Delta42
Joined: August 27, 2002
KitMaker: 616 posts
Armorama: 511 posts
Posted: Tuesday, August 23, 2016 - 04:13 AM UTC
Hey Mike,
Here is a link to a good presentation on making water.
http://nebula.wsimg.com/439e6efa4ad4b7e3879216b4b6ae340d?AccessKeyId=65241B2E7F6627F93B2F&disposition=0&alloworigin=1
Dave
Here is a link to a good presentation on making water.
http://nebula.wsimg.com/439e6efa4ad4b7e3879216b4b6ae340d?AccessKeyId=65241B2E7F6627F93B2F&disposition=0&alloworigin=1
Dave

sdk10159
Joined: December 08, 2005
KitMaker: 556 posts
Armorama: 433 posts

Posted: Tuesday, August 23, 2016 - 05:06 AM UTC
Another way, depending on how deep you want to make the pond look, is to use Future Floor Wax in multiple layers. I use to method to make puddles.
YOu poor in a thin layer of Future, perhaps 1 or 2 mm thick, tinted with whatever color of acrylic paint. I've used brown for muddy water. Then let that dry. Repeat steps until you get the desired thickness. THe last layer, as it solidifies, you can blow on it to simulate waves.
I've never tried it for some big, like a pond, but it should work.
Steve

johhar
Joined: September 22, 2008
KitMaker: 476 posts
Armorama: 447 posts
Posted: Tuesday, August 23, 2016 - 05:18 AM UTC
What is the scale? If its 1/35, anything that would qualify as a pond would be pretty big.

Fletcher445
Joined: September 25, 2014
KitMaker: 11 posts
Armorama: 11 posts
Posted: Tuesday, August 23, 2016 - 07:16 AM UTC
You can make a pond appear deeper by using a darker green color in the middle, then feather out to a lighter brown soil color. This is the way the Model Railroaders do it. Also you should check out how that hobby does it on YouTube. Lots of great tips there.
Taylortony

Joined: November 30, 2010
KitMaker: 126 posts
Armorama: 102 posts
Posted: Tuesday, August 23, 2016 - 04:39 PM UTC
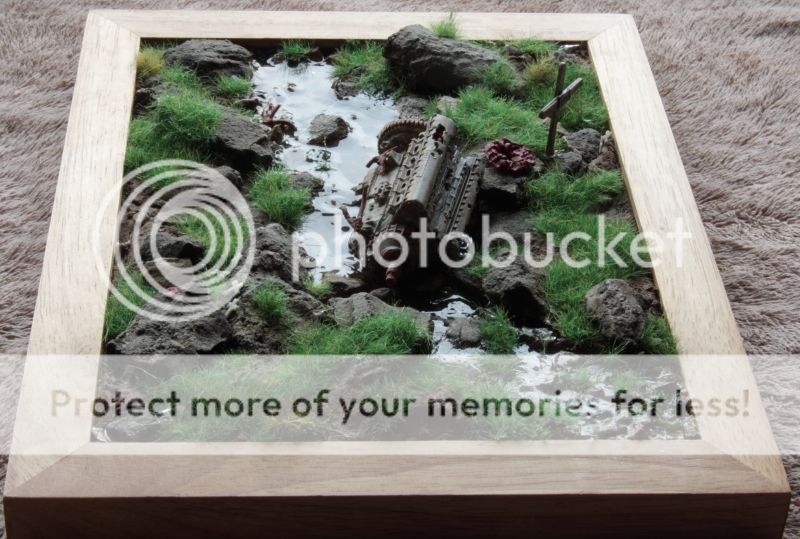
When I did mine in a picture frame (and you could see the bottom of the stream) I used plaster mixed with artists acrylic ( Big cheap no brand tube) to make it brown like soil, then I added loose leaf tea to give it body, I made the stream area and added fine gravel into it which I got off a local footpath, (where it gets almost broke down to dust) for the bed, I used cinders and stones from the cinder path and pushed them in or hot glued them to the base and added the soil mix around them, sticking the odd bit of grass in it.
I then added still water (Vallejo) a couple of MM deep and ensured the air was out of it with a cocktail stick, when dry I added more and kept doing that until I got the depth I wanted. I then added the grass, some pushed in when the base was wet, some later, the first coat or so of water will soak in as it seals it BTW. I found the water could be coaxed to follow gravity from the marshy area at the top into the pool / stream below. Ignore the poppies, they didn't work and were removed lol.
This was the result, I hope it helps It is really quite simple to do and my second only base, the first attempt some 40 plus years ago.


I then added still water (Vallejo) a couple of MM deep and ensured the air was out of it with a cocktail stick, when dry I added more and kept doing that until I got the depth I wanted. I then added the grass, some pushed in when the base was wet, some later, the first coat or so of water will soak in as it seals it BTW. I found the water could be coaxed to follow gravity from the marshy area at the top into the pool / stream below. Ignore the poppies, they didn't work and were removed lol.
This was the result, I hope it helps
It is really quite simple to do and my second only base, the first attempt some 40 plus years ago.pnance26
Joined: January 22, 2016
KitMaker: 766 posts
Armorama: 518 posts
Posted: Wednesday, August 24, 2016 - 12:39 AM UTC
You can check out my thread "On the beach, many years later" here in dioramas. I got some great advice from guys here. I also posted some in the water effects forum. There you can see the depth of the water.
As far as blowing across the top of Future, there is an easier way using a matte gel product. You can see the waves I created with it.
Lots of good info here, just keep searching... and drop a PM to anyone who has a good idea. Everyone here is willing to help.
As far as blowing across the top of Future, there is an easier way using a matte gel product. You can see the waves I created with it.
Lots of good info here, just keep searching... and drop a PM to anyone who has a good idea. Everyone here is willing to help.
 |

WEB HOSTING BY


Copyright ©2021 Armorama and Kitmaker Network, a subsidiary of Silver Star Enterprises
All Rights Reserved. Please read our Conditions of Use and Privacy Policy.
All Rights Reserved. Please read our Conditions of Use and Privacy Policy.