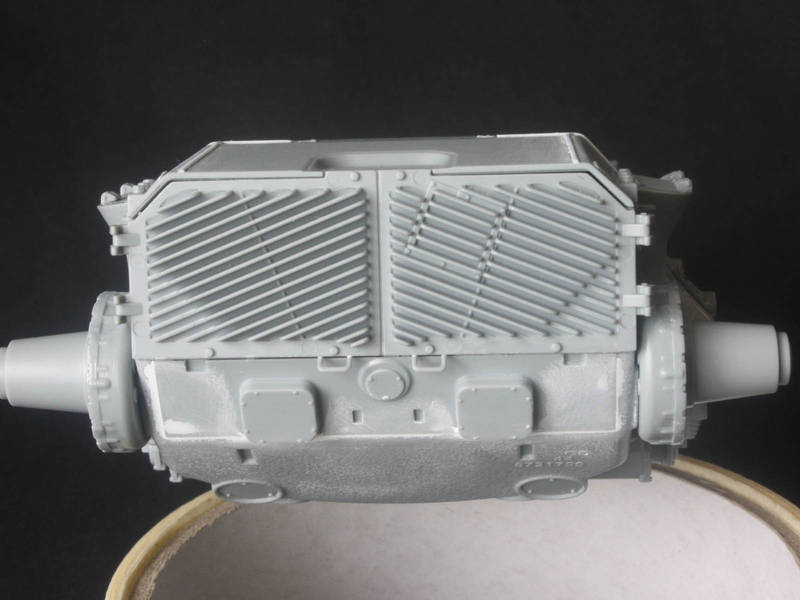
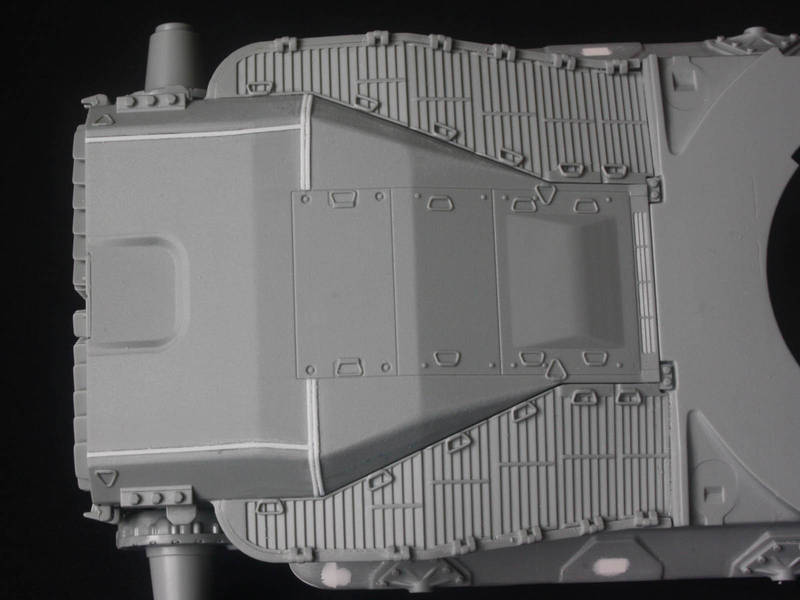
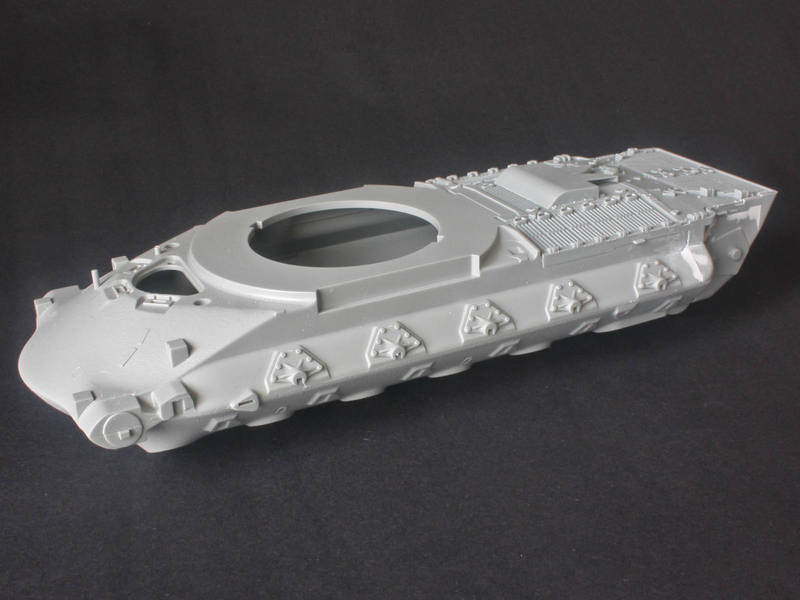
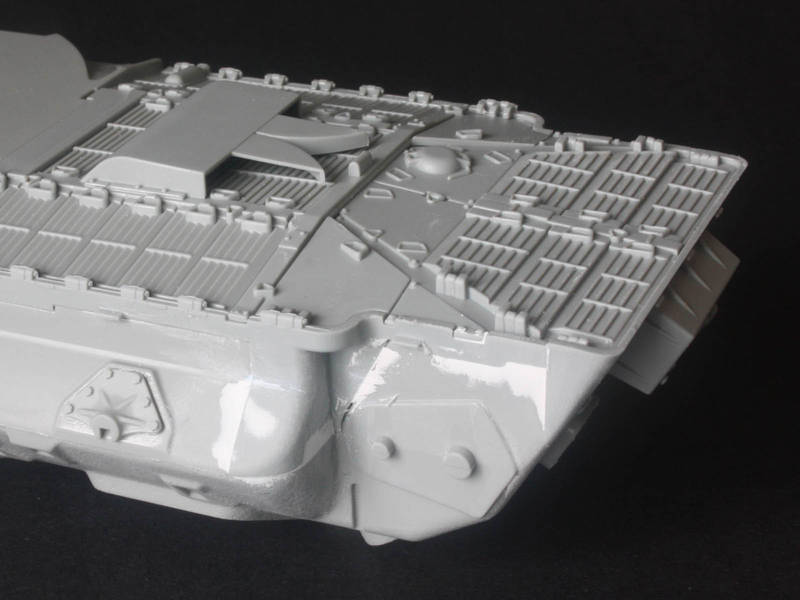
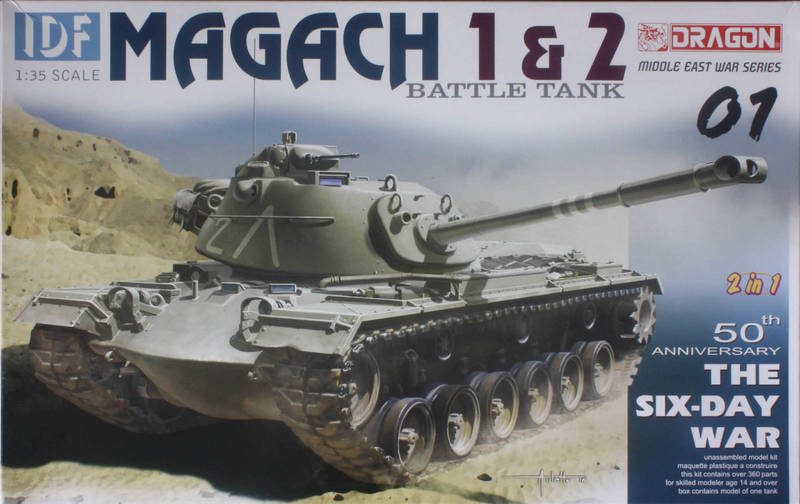
Guess who got a new M48 kit to build? I was really looking forward to this one because I hoped DML would finally give us a decent M48A2. Well, things are looking optimistic...
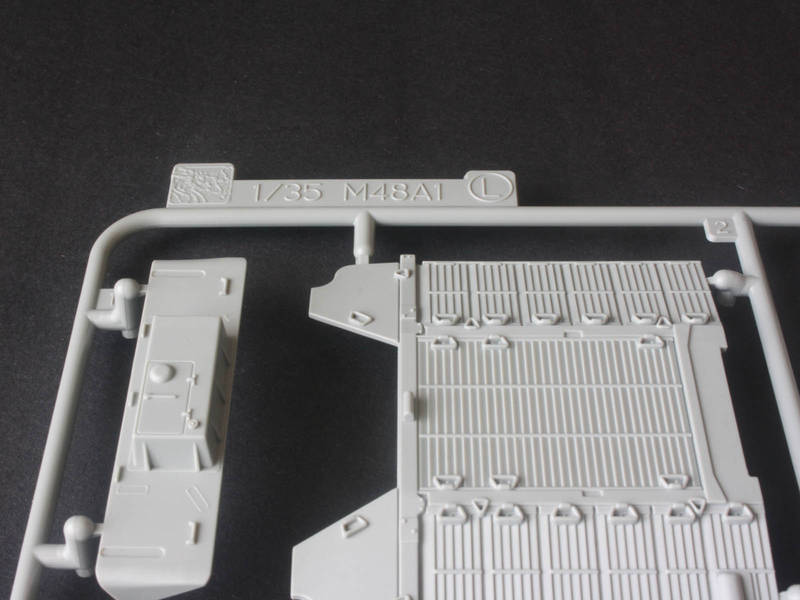
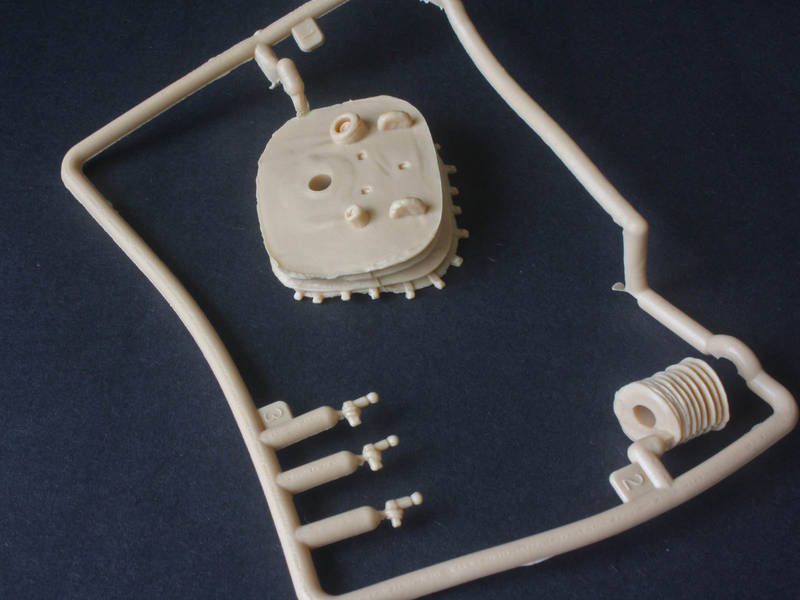
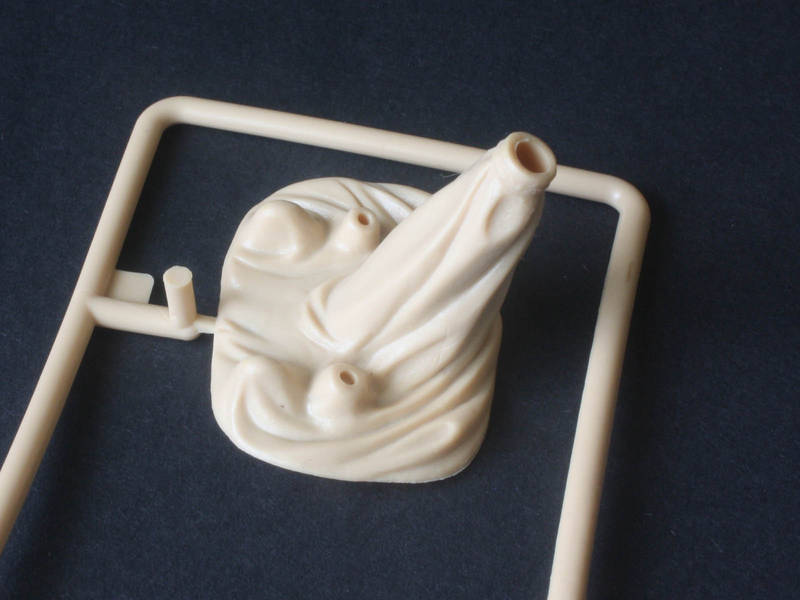
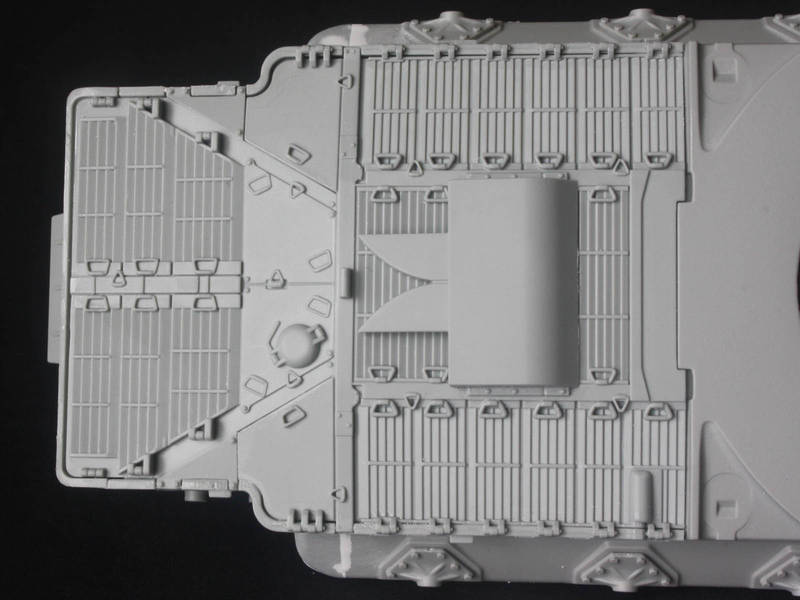
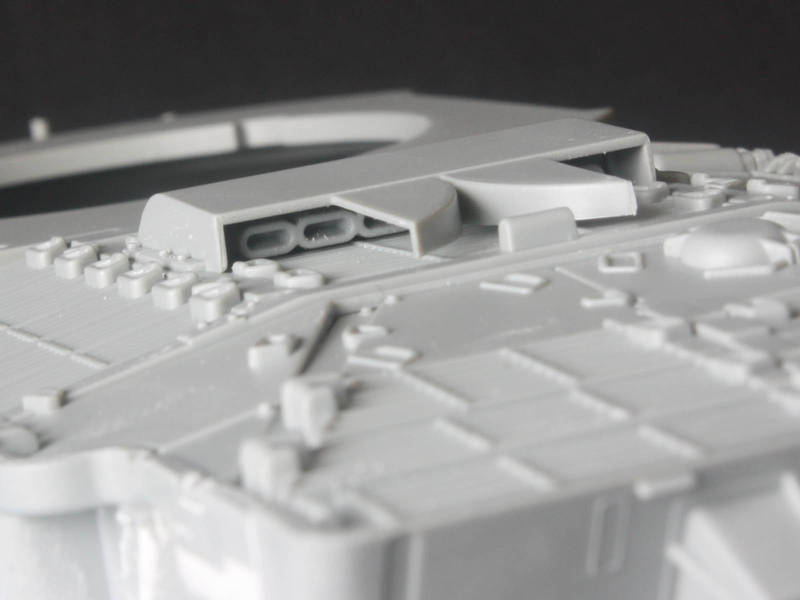
Cracking the box, I went straight to the engine deck options. There is the -A1 (for the Magach 1):
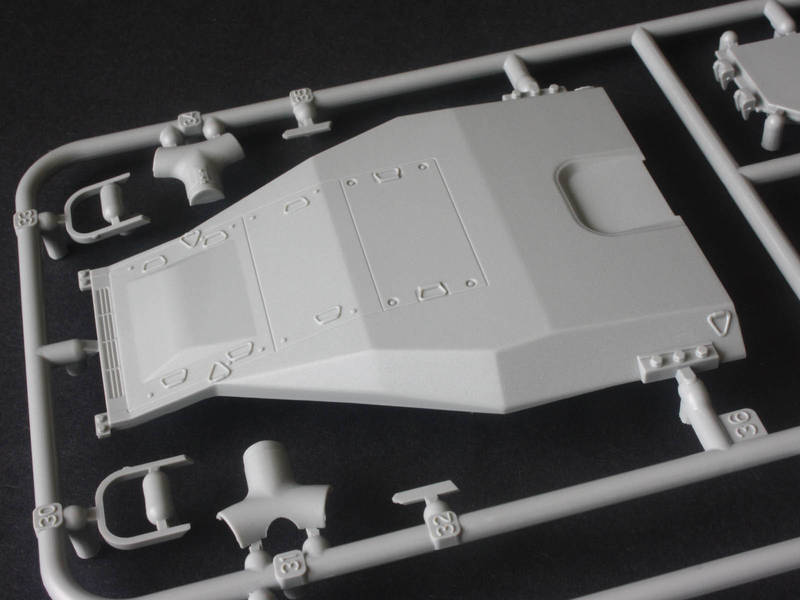
...and the -A2 (for the Magach 2):
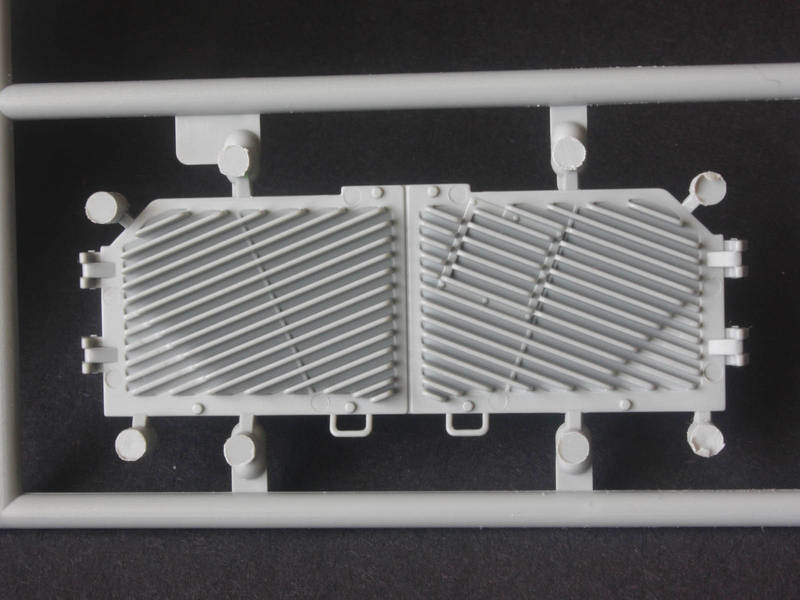
We also get a nifty new set of rear doors for the -A2:
In addition, we get a number of parts already seen in Dragon's other M48s, including the odd two-part mantlet cover in DS plastic:
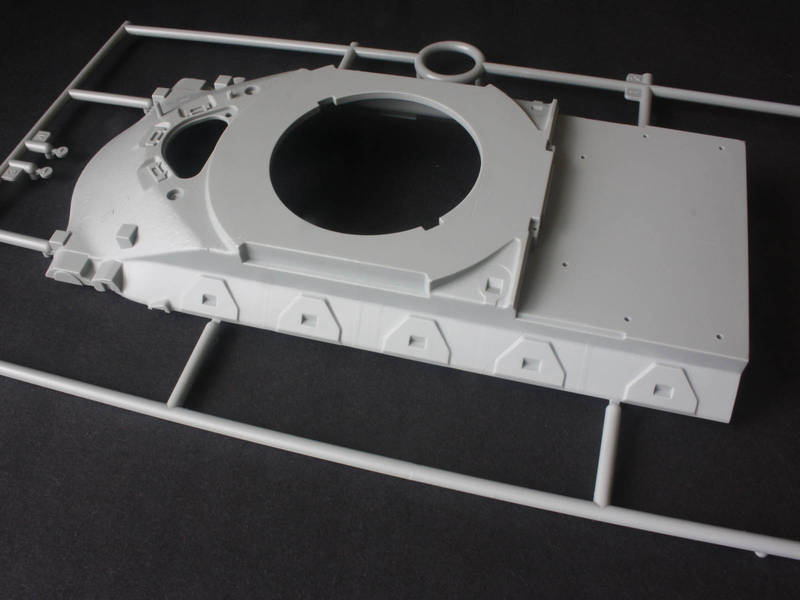
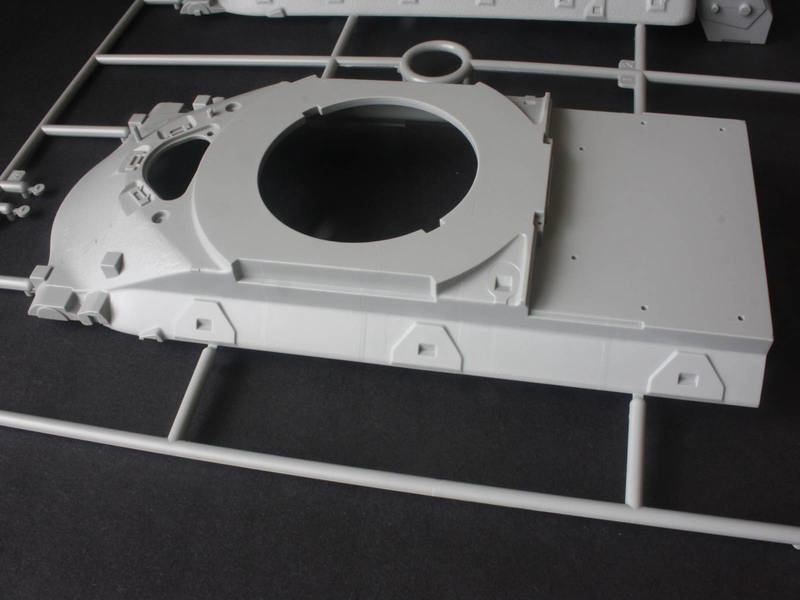
One pleasant surprise was the inclusion of pretty much all the -A3 parts, so we get three different engine decks, three gun tubes/mantlets, and two upper hulls. (5-roller and 3-roller):
That means there's a lot of flexibility in this kit, so to do it justice I raided a spare -A3 Mod B kit for duplicate parts so I could build both the Magach 1 and the Magach 2!
Hosted by Darren Baker
IDF Magach 1/2 by DML (IMG heavy!)
Posted: Sunday, September 04, 2016 - 10:05 PM UTC
Posted: Sunday, September 04, 2016 - 10:15 PM UTC
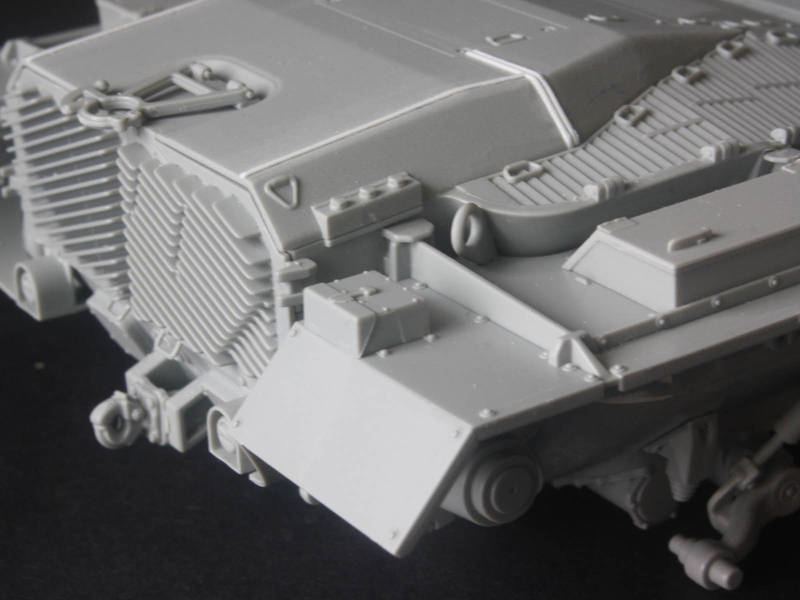
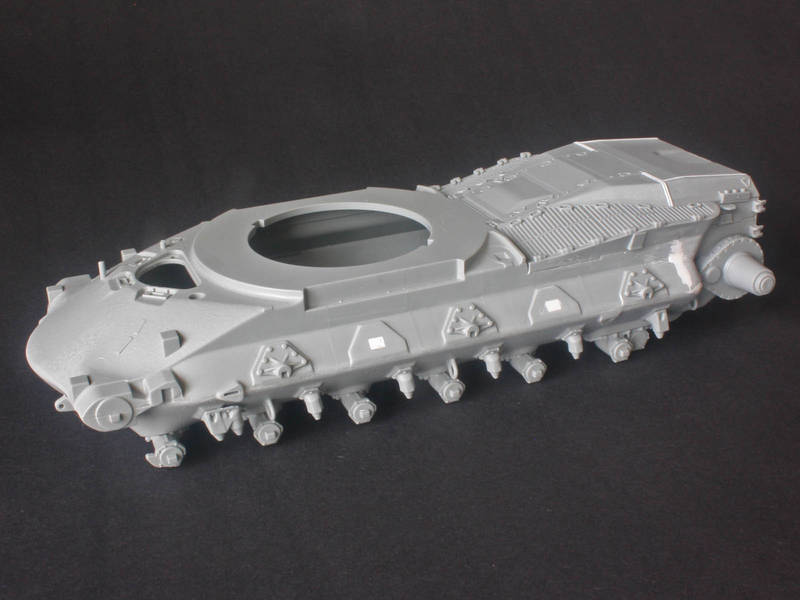
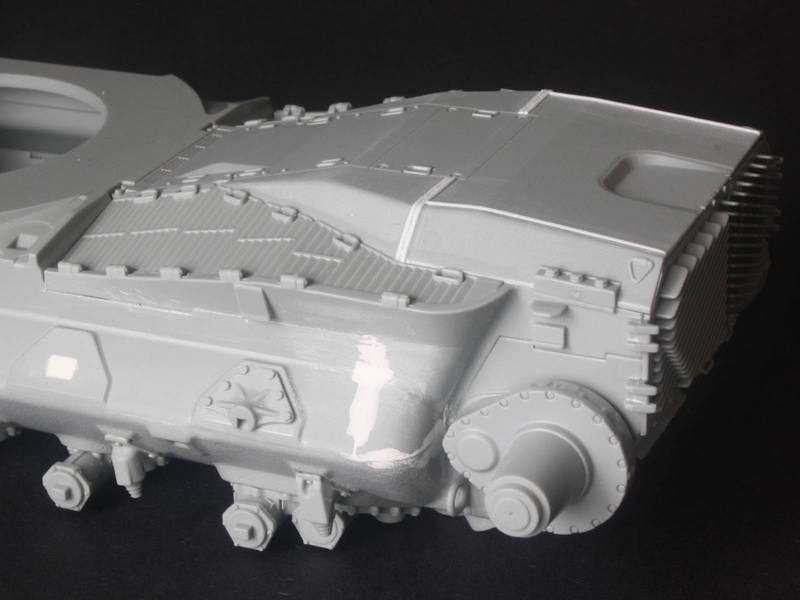
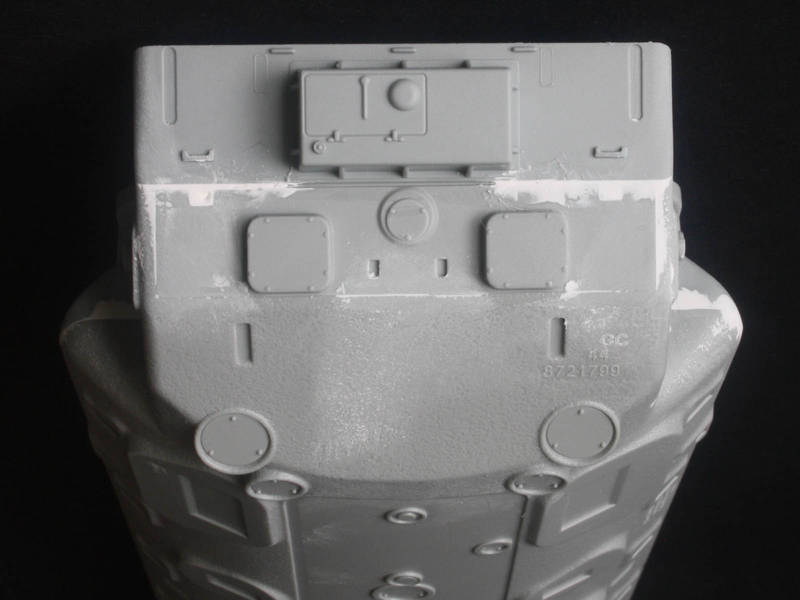
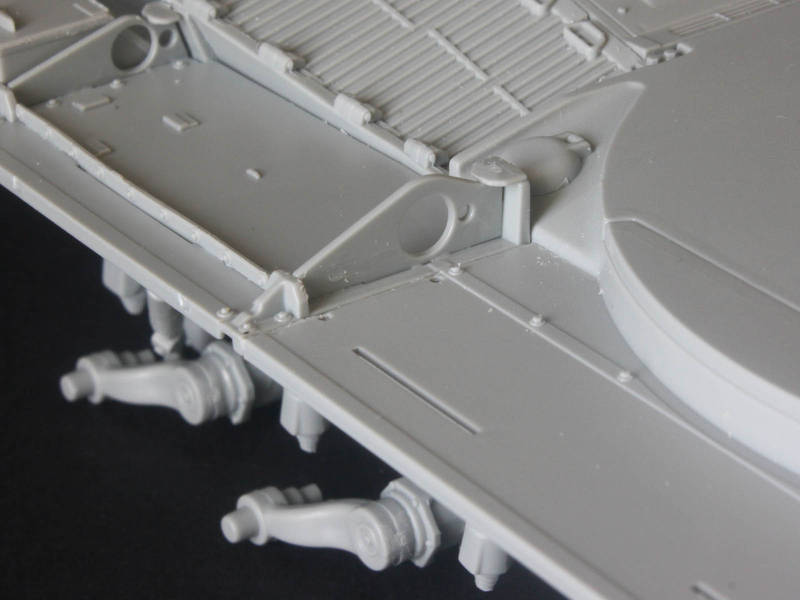
My first task in any tank is "building the box", or getting all the chunky hull parts together before adding any breakable details. So, throwing the confusing DML instructions to the wind, I started on both hulls. Starting with the -A2, I found the fit of the engine-room sides to be a bit vague, and needed a touch of putty afterwards. And you really need to add the side grilles before them, as they overlap the top of said grilles. This is the unfortunate cost of Dragon using a "one hull fits all" philosophy. And round the back there is a panel that needs to be blended in with putty since the real thing is a single casting for the entire hull tub.
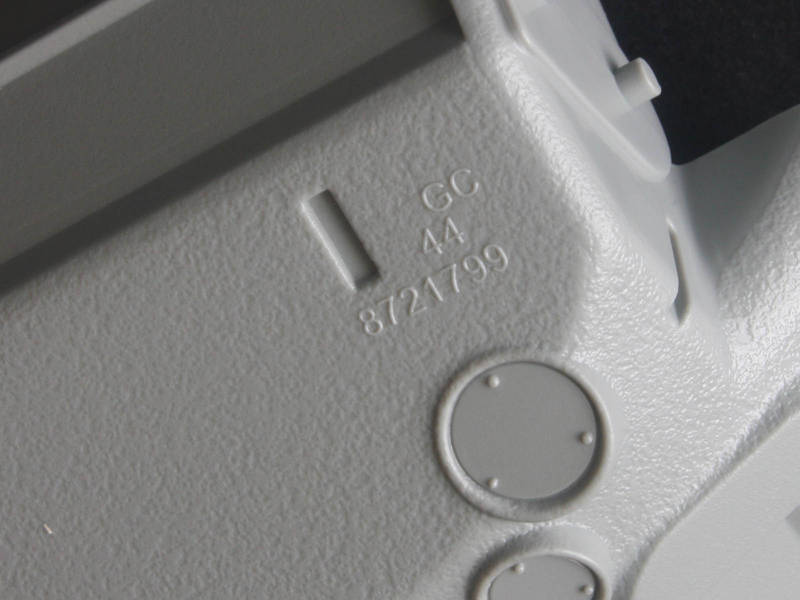
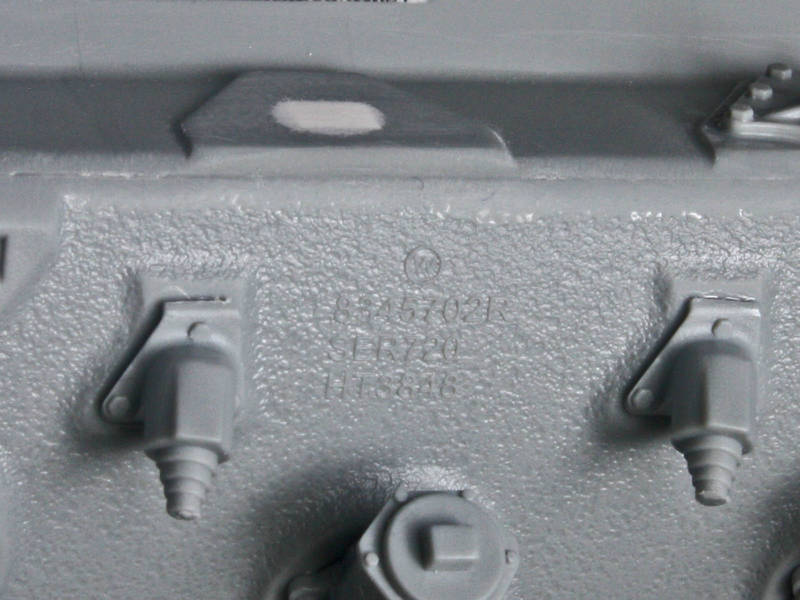
By the way, the foundry marks on the lower hull tub are from an early -A2 with five return-roller mounting pads - the intermediate two being left empty. This was a sort of transition from the five-roller hull of the -A1, and eventually a new hull was made with only three pads and a new drawing number. The numbers on the right side, under the rollers, don't match anything I've seen in walk-arounds...
-A2:
-A1:
More to come...
Posted: Sunday, September 04, 2016 - 10:56 PM UTC
Looks great so far Tom,Watching with interest and there are a few bits for the spares box it seems.
Richard
Richard
billflorig
Hawaii, United States
Joined: January 20, 2015
KitMaker: 152 posts
Armorama: 146 posts
Joined: January 20, 2015
KitMaker: 152 posts
Armorama: 146 posts
Posted: Sunday, September 04, 2016 - 11:53 PM UTC
Tom, I'll follow this closely as I just got the Dragon M48A3 Vietnam war version. You've provided some great tips already!
Cheers,
Bill
Cheers,
Bill
GTDeath13
Attica, Greece / Ελλάδα
Joined: June 12, 2015
KitMaker: 921 posts
Armorama: 919 posts
Joined: June 12, 2015
KitMaker: 921 posts
Armorama: 919 posts
Posted: Monday, September 05, 2016 - 12:35 AM UTC
I will be watching with interest too. I am very curious to see if this kit is worth buying, or if I can make do with the A1 kit and try to build the Revell M48A2C kit into a Magach 2.
Thank you for sharing your work.
Posted: Monday, September 05, 2016 - 02:34 AM UTC
Thanks guys - I'll be posting more later this week. The one thing that bothered me in this otherwise-sharply detailed kit was the missing welds on the engine cover. Revell botched these too, but at less than half the price...
Gotrek58
Nordrhein-Westfalen, Germany
Joined: January 11, 2009
KitMaker: 673 posts
Armorama: 286 posts
Joined: January 11, 2009
KitMaker: 673 posts
Armorama: 286 posts
Posted: Monday, September 05, 2016 - 04:07 AM UTC
Yesterday I got the Magach 3. With two of the first kits, I'll build the Magach 1, 2 and 3 - pretty nice kits with lots of possibilities. I'm still waiting for the DEF conversion to build the Magach 3 with the sherman hatch...
Michael
Michael
ReluctantRenegade
Wien, Austria
Joined: March 09, 2016
KitMaker: 2,408 posts
Armorama: 2,300 posts
Joined: March 09, 2016
KitMaker: 2,408 posts
Armorama: 2,300 posts
Posted: Monday, September 05, 2016 - 12:57 PM UTC
The details look crisp, however I see a significant amount of putty, which makes me wonder: how's the fitting ?
Posted: Monday, September 05, 2016 - 10:22 PM UTC
Quoted Text
The details look crisp, however I see a significant amount of putty, which makes me wonder: how's the fitting ?
Mostly the fit is great, but the back end of the hull is not so good. The parts fit together well enough, but there are visible joints where the real thing was a single smooth part - that's where the putty comes in. Some of it will be hidden by the fenders, but I tried to fix it all anyway just in case.
(The putty in the return-roller pads on the A2 hull is just to remove the mounting slot on the intermediate unused pads. Early A2 hulls had the five pads, but only three roller brackets, and many of the preserved A2s I have seen on the web show this trait. Later A2s had these intermediate pads deleted from the pattern - the three-pad hull top caters for them.)
Posted: Saturday, September 10, 2016 - 10:07 PM UTC
Next up - suspension!
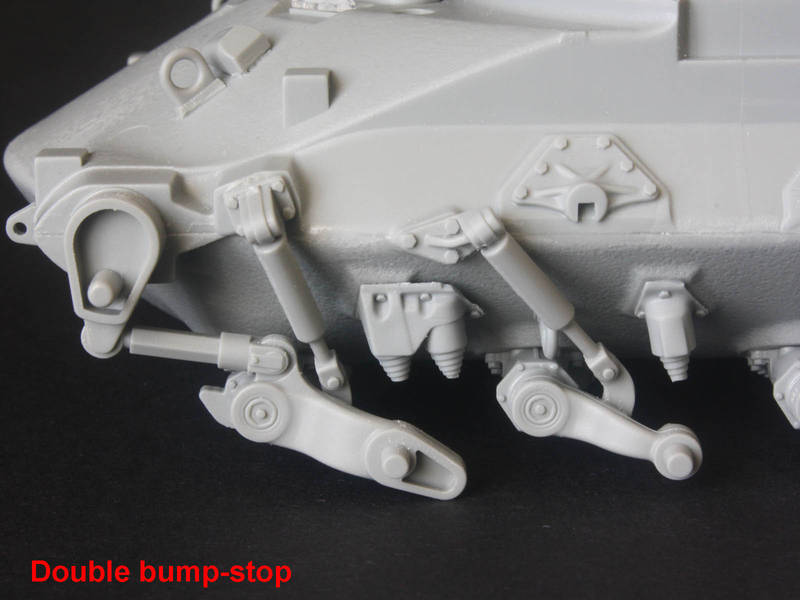
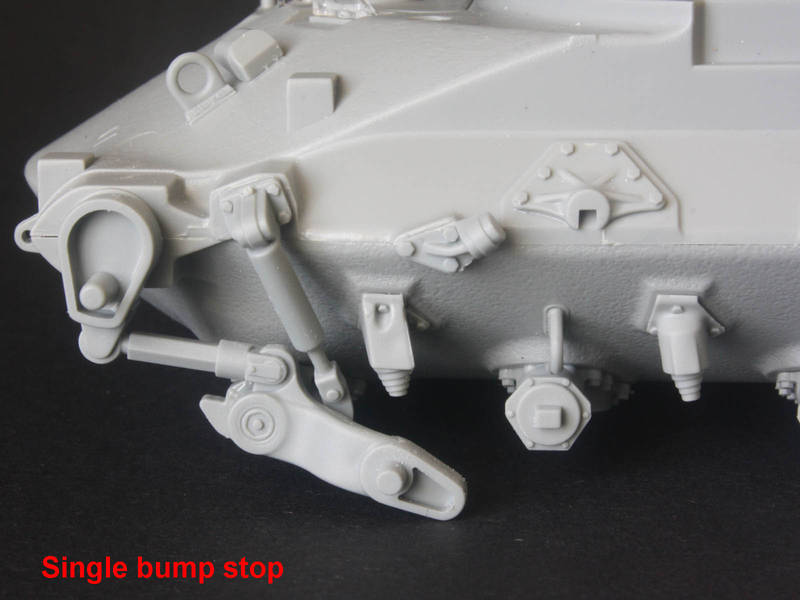
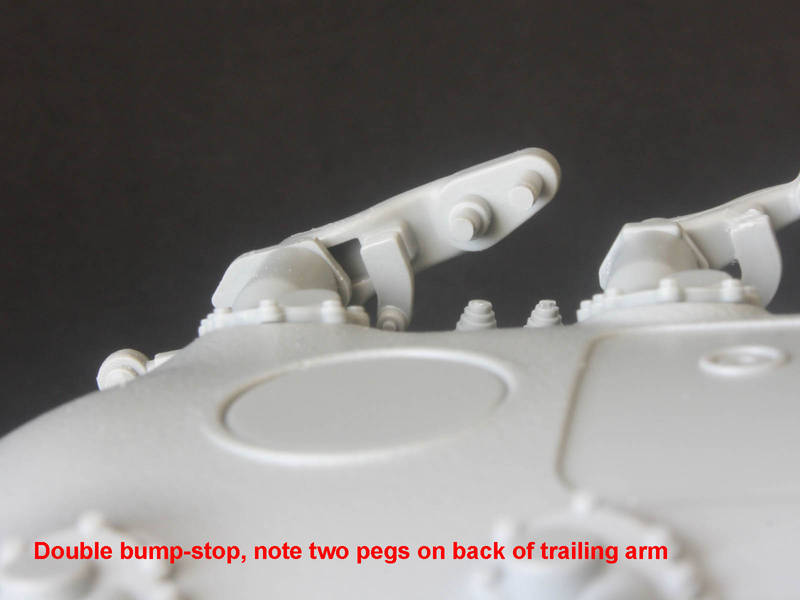
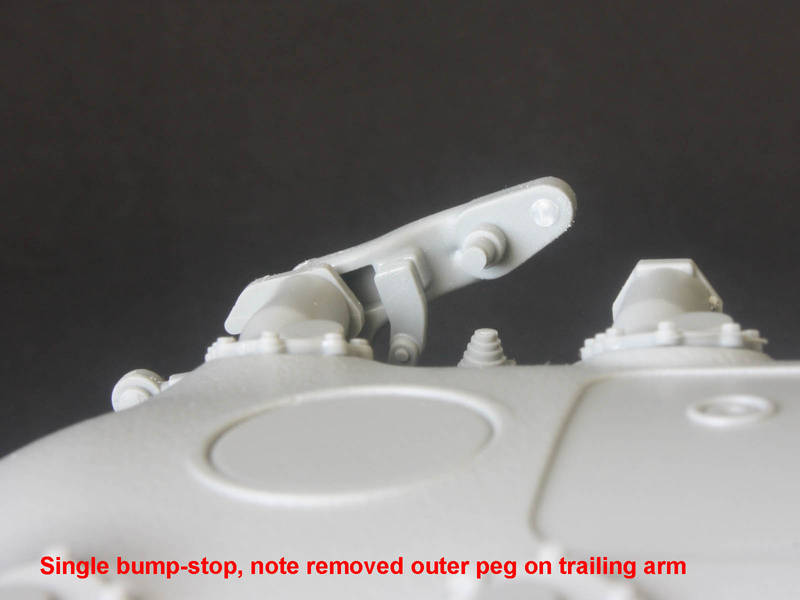
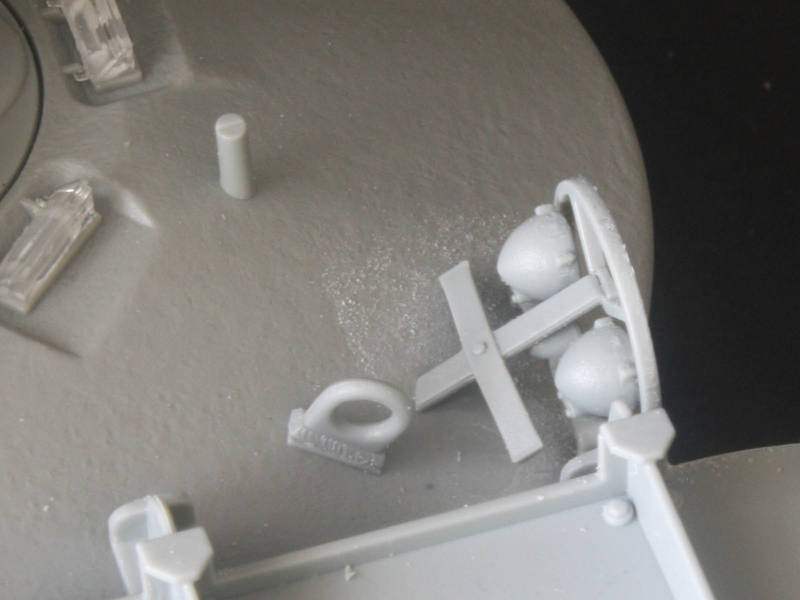
I found the hard way that you need to ad the tie-down loops before any of the suspension! (Unless keyhole surgery is your thing...) After that it was the bump-stops for the swing arms, followed by the arms and shocks. This is where it gets fun - the A2 uses a double bump-stop on the first wheel station, but many of the A1s left the factory and served with only a single stop in this position. This was a square affair identical to the stop at the rear-most wheel station, but the kit only gives one of those - for the rear. I wanted my A1 to use a single (like so many photos!) so I had to cut the second stop out of the kit's double part. I used a chisel blade to separate the little triangle with bolt head from the side (without feeding it to the ravenous Carpet Monster!), then cut off the offending second bump stop, before adding the surviving part and that triangle to the hull. If you need guidance, a look at the rear-most stop will make it clear exactly where to cut.
On the reverse of the first swing arm, there are two pegs that stick out and make contact with the bump stops on the real thing - I cut off the surplus second peg on my A1.
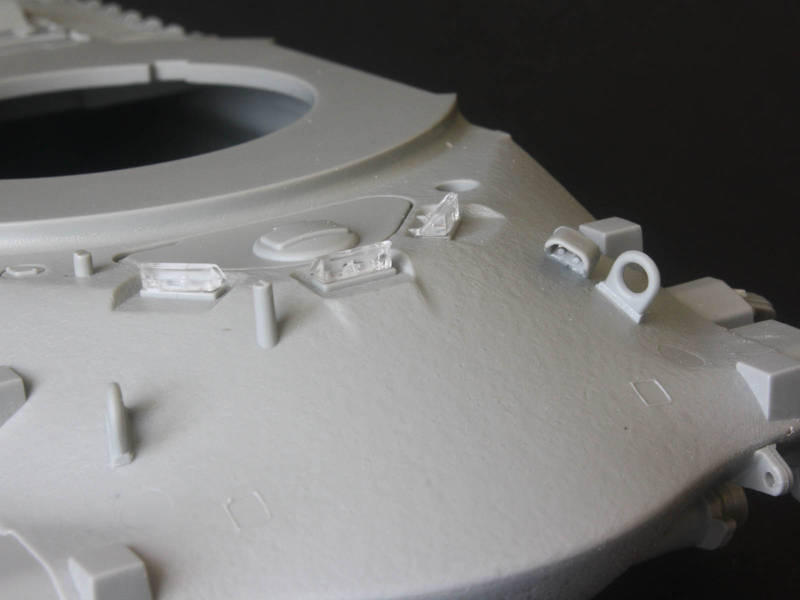
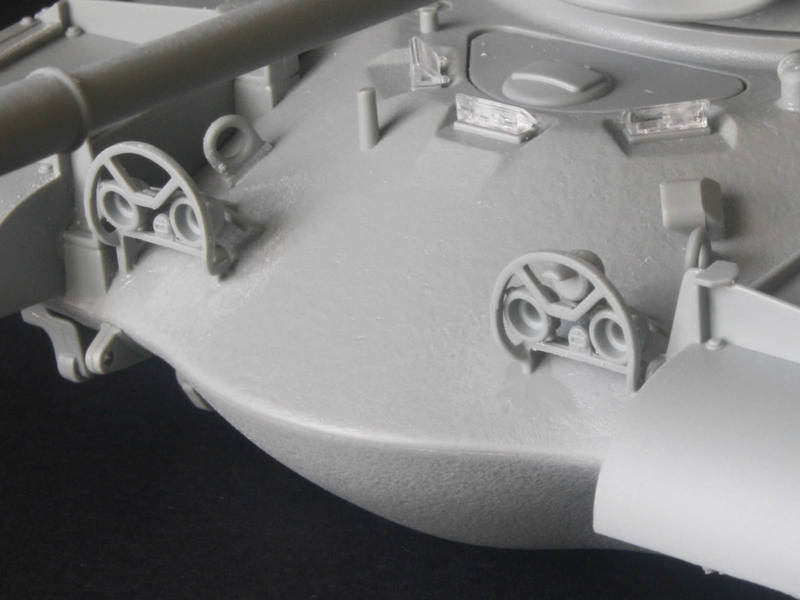
Up front I added some hull details such as the fire-extinguisher pull handles and driver's periscopes. These last are clear, but for the life of me I can't see why. I find it nigh-on impossible to paint around them, so invariably I wind up spraying them with the rest of the hull and then hand-painting after with black base and a transparent-green top coat, sealed with gloss. Any suggestions how to mask these microscopic parts to keep them clear?
That's all for now...
[Edit: The driver's hatch can be posed open, but with nothing inside I felt it was pointless...]
Posted: Wednesday, September 14, 2016 - 12:30 AM UTC
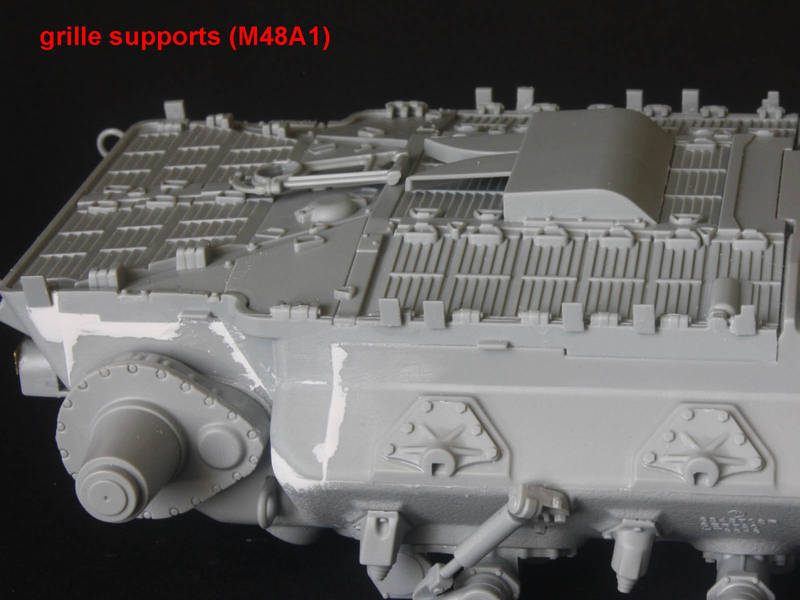
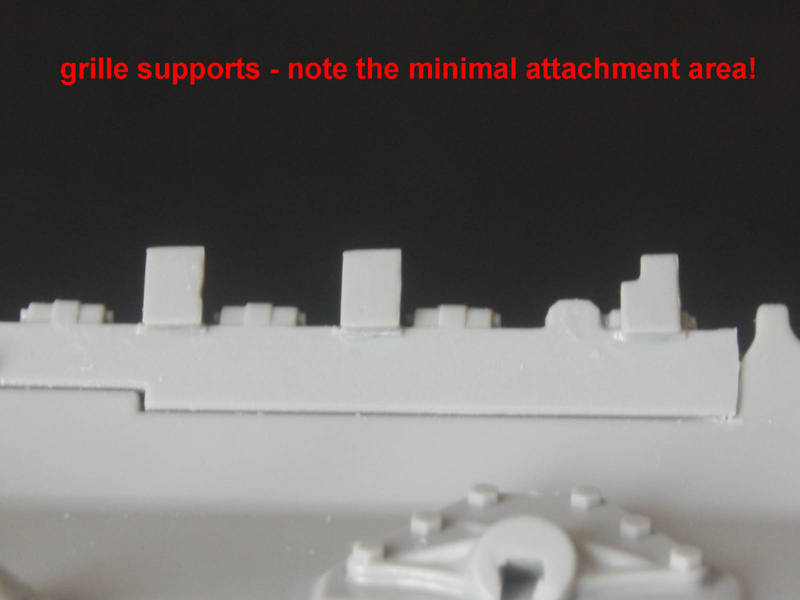
The other evening I sat down and added the tiny supports for the engine grilles of the -A1 hull. The real things are rectangular steel blocks welded to the outer edge of the hull, and they hold up the grille sections when they are swung open for engine maintenance. The kit parts are individual microscopic rectangles that are not much bigger than the sprue attachments - thanks DML! And most of them attach at one edge, so not much mating surface for a solid glue join. Why oh why weren't they moulded as part of the engine-bay side walls?
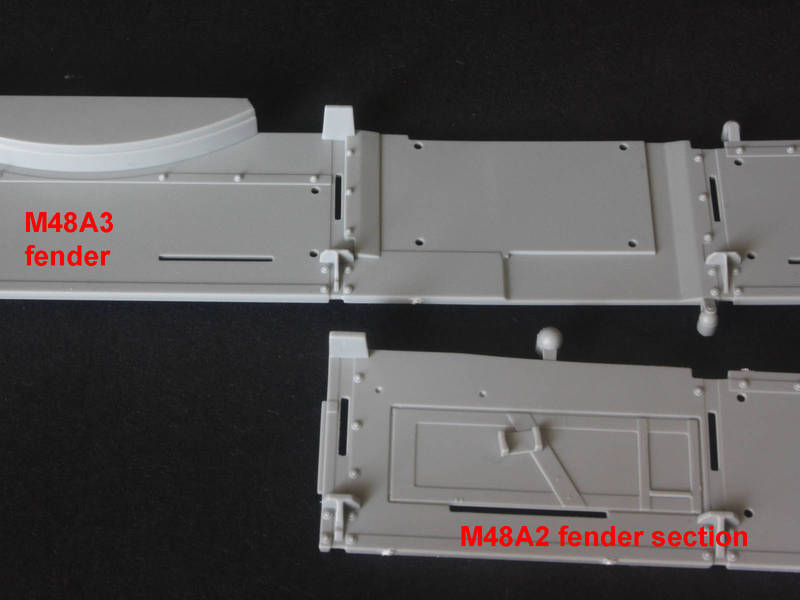
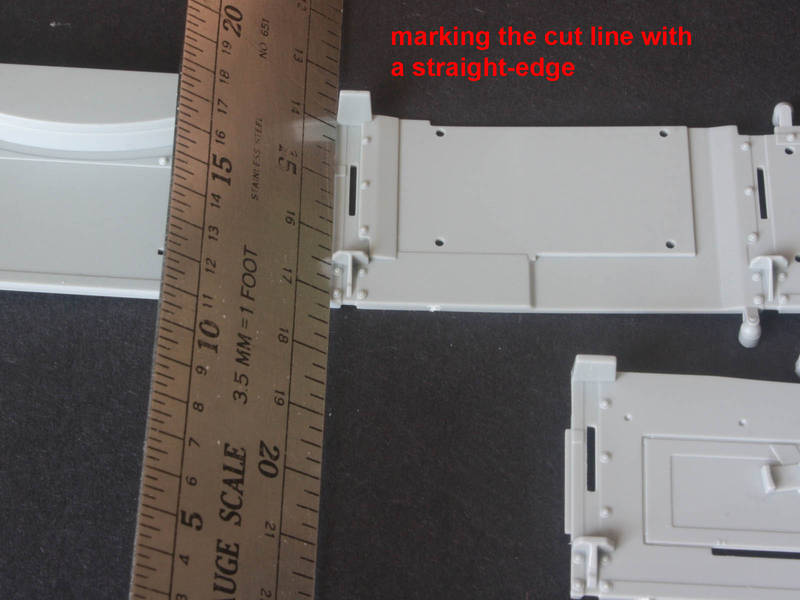
The fenders for the -A2 are interesting, as we are told to hack off the rear of the -A3 fenders to graft on a new -A2 section. But there isn't an obvious parting line! I used a straight-edge held tight against the two uprights for the middle fender bracket and lightly scored the plastic with a sharp knife until it was cut through. Using a saw would have removed too much material, and then I'd have been shimming with 0.020" plastic...
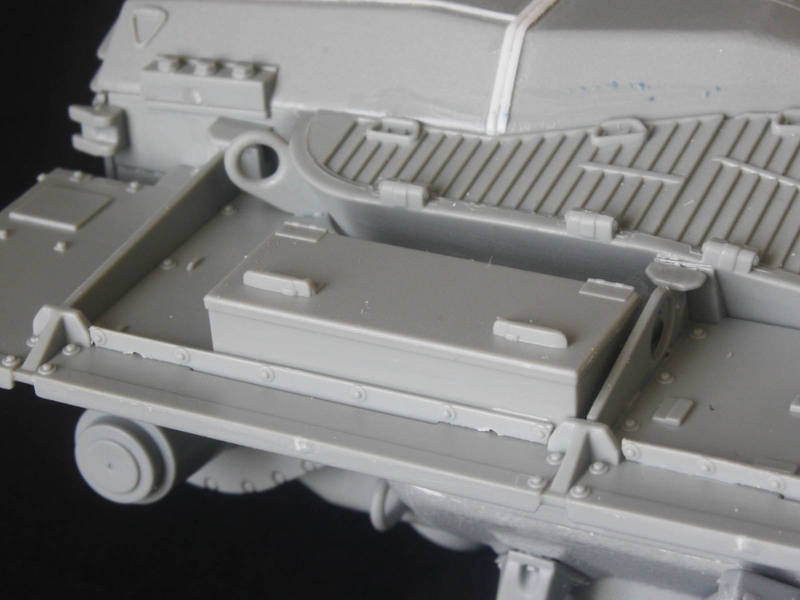
The fenders are very wobbly until glued to the hull, so I left them bare until they were attached, along with the front vertical parts and the rear curved part that reaches the tail lights. By the way, what's with the crude 1970s Tamiya-esque toolboxes with lumps for handles? Grrrr....
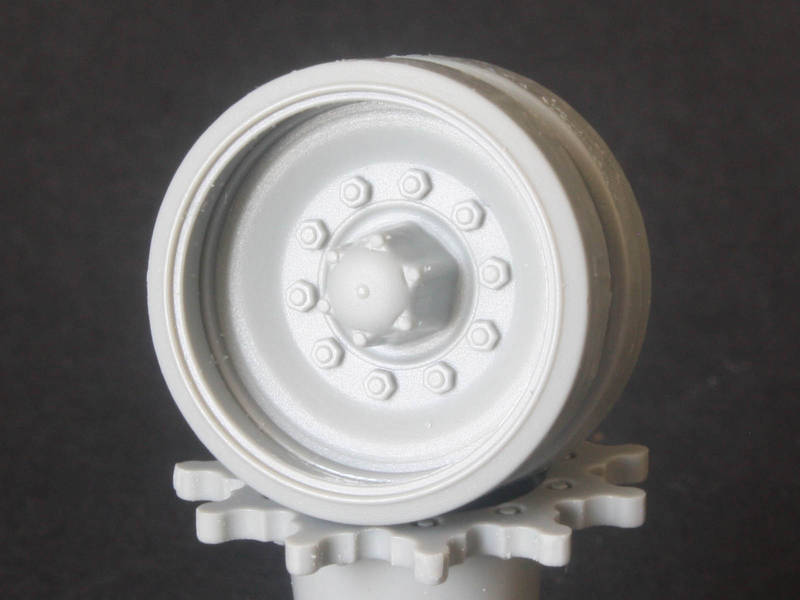
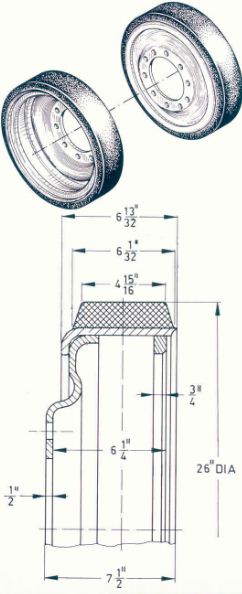
My other rant for tonight is the road wheels, as DML got the inner profile wrong. Where the real steel M48/60 wheels have a distinctive "donut" stiffening bulge on the face (between the hub bolts and the outer flange) DML chose to detail this as a sort of angled plateau instead. Trifling, I know, but annoying none the less...
Oh well, back to the bench...
Posted: Saturday, September 17, 2016 - 09:51 PM UTC
I'm nearly done with the two hulls. On the A1 I noted the fenders are a single piece, with the front vertical side moulded on. (The A2 by contrast has this as a separate piece.) This means we don't get any bolt-head detail on this highly visible inner face, so I may have to add my own. Worse still, the vertical parts of the fender supports that stand on the square pads on the nose should have a flange with lots of bolts, but DML simplified these and they are featureless. This is 2016, right?
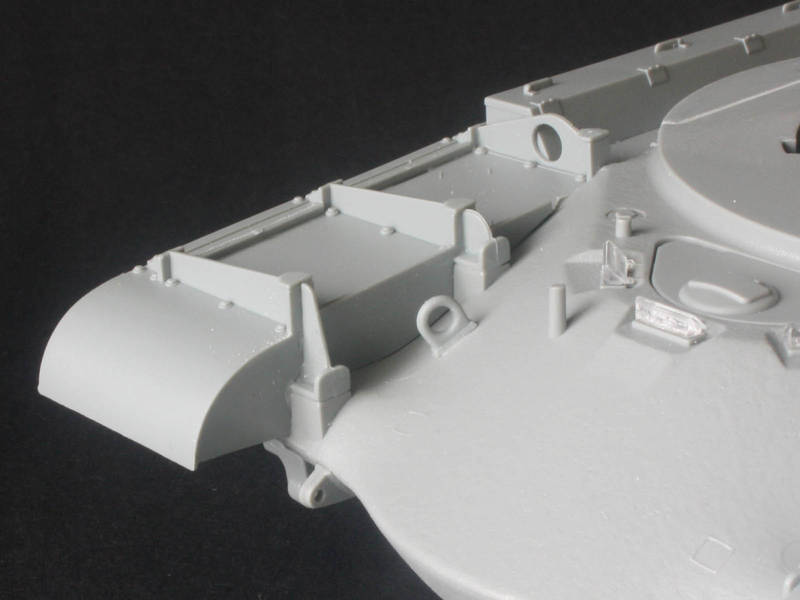
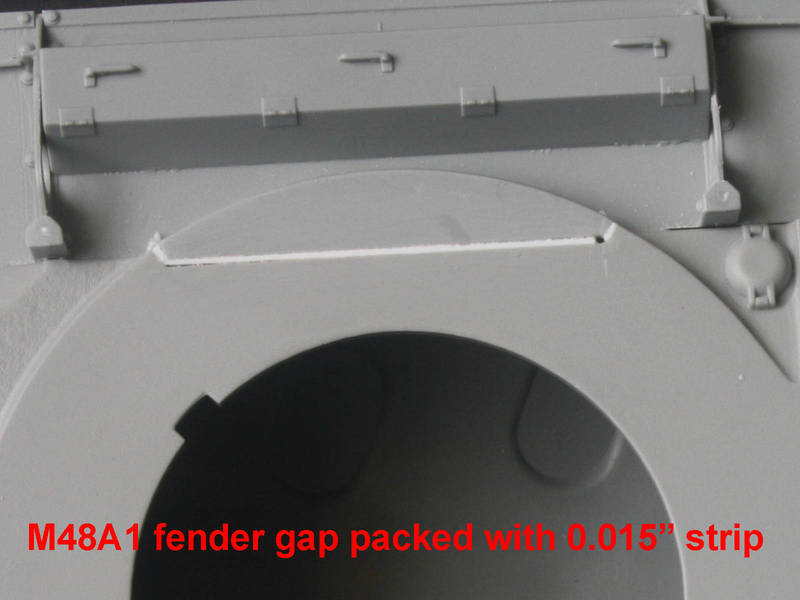
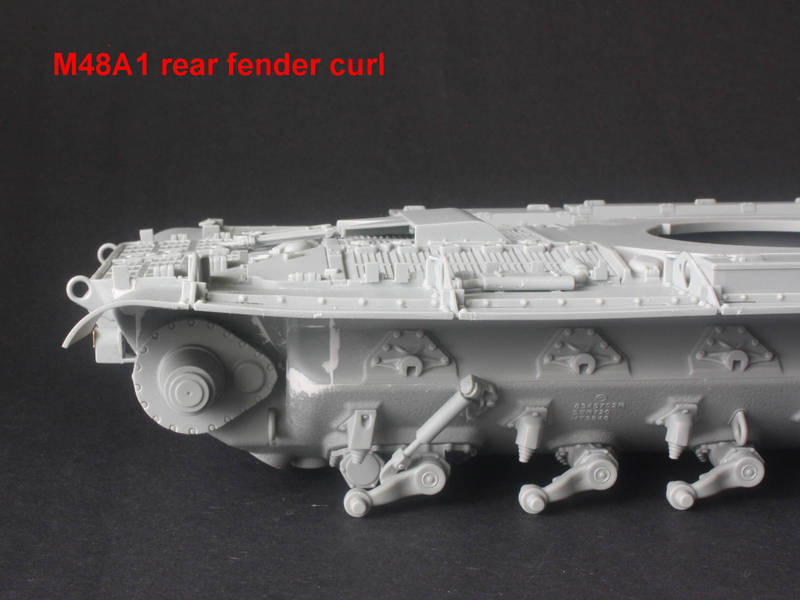
The fenders also had some fit issues in my sample, wanting to tilt up at the edges. The solution was to pack out the socket in the side of the turret ring with strips of 0.015" plastic to get the main fender areas level. Sadly, this could not cure the curl in the rear ends, which was most pronounced on the right. Fortunately a quick scan of real ones shows similar bending of these flimsy sheet-metal items!
The A2 hull by contrast had no fit issues with the fenders!
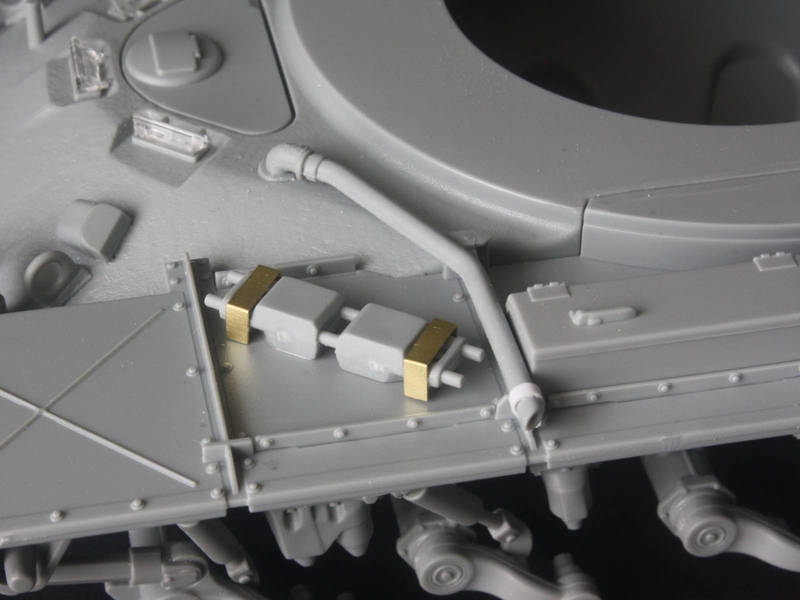
There were other oddities. On the front fenders are spare track links, with big flat brackets bent from PE. On the real thing these are canvas straps passing through Footman loops, so the brass is wrong. And using it forces the links to be "chevron-side down" to make the brass fit. In future I'd replace the brass with some 0.010x0.040" plastic strip.
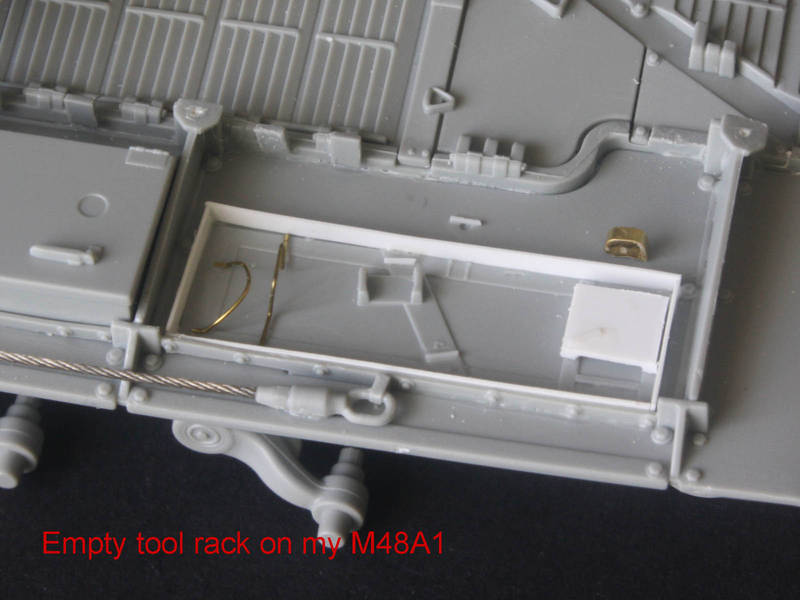
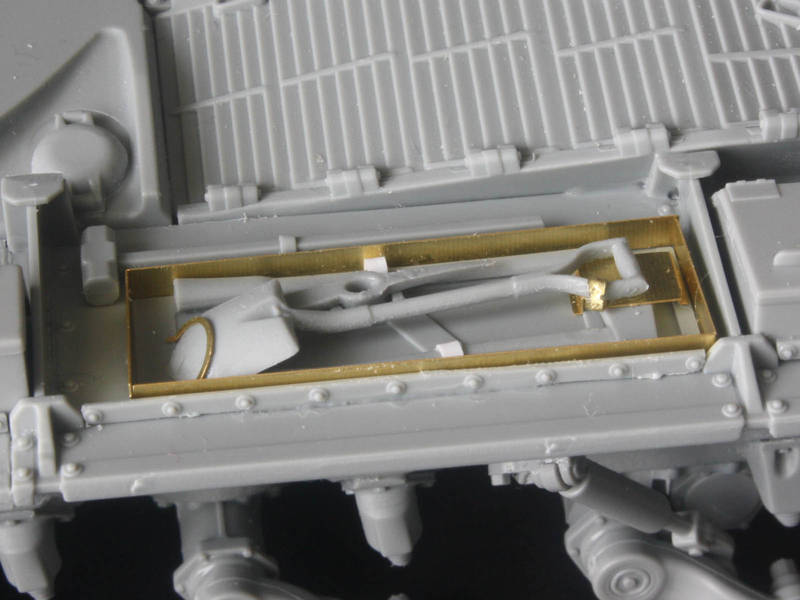
The tool rack uses more PE, and again we get problems - or is it just me? The brass straps are a PITA to use, so Evergreen to the rescue!
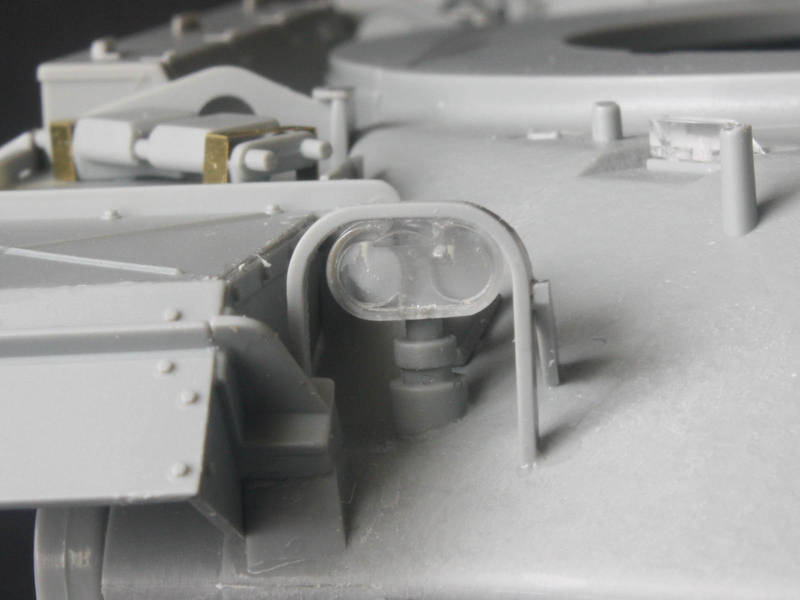
Finally, the A2 headlights are very nice, but the clear front is wasted on me. I cannot see how to mask the circular lenses since the rest of the face needs to be painted - I'll just have to go old school and paint them back in afterwards. (Had they made the lenses separate, that would have been great...)
Oh, and if you are curious, I don't have a seconds set of PE or tools for the A1, so the box frame will be Evergreen strip, and I will leave the rack "empty" with only the Footman loops. This is not uncommon in photos...
The fenders also had some fit issues in my sample, wanting to tilt up at the edges. The solution was to pack out the socket in the side of the turret ring with strips of 0.015" plastic to get the main fender areas level. Sadly, this could not cure the curl in the rear ends, which was most pronounced on the right. Fortunately a quick scan of real ones shows similar bending of these flimsy sheet-metal items!
The A2 hull by contrast had no fit issues with the fenders!
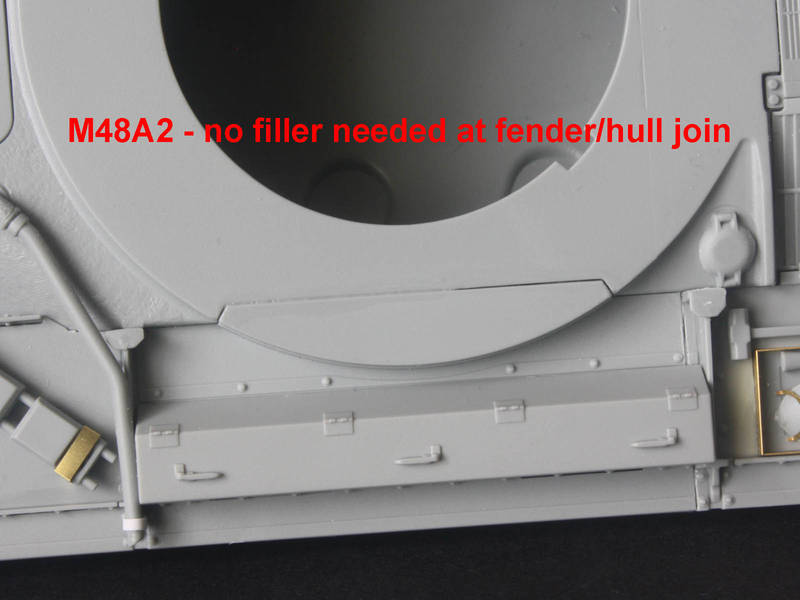
There were other oddities. On the front fenders are spare track links, with big flat brackets bent from PE. On the real thing these are canvas straps passing through Footman loops, so the brass is wrong. And using it forces the links to be "chevron-side down" to make the brass fit. In future I'd replace the brass with some 0.010x0.040" plastic strip.
The tool rack uses more PE, and again we get problems - or is it just me? The brass straps are a PITA to use, so Evergreen to the rescue!
Finally, the A2 headlights are very nice, but the clear front is wasted on me. I cannot see how to mask the circular lenses since the rest of the face needs to be painted - I'll just have to go old school and paint them back in afterwards. (Had they made the lenses separate, that would have been great...)
Oh, and if you are curious, I don't have a seconds set of PE or tools for the A1, so the box frame will be Evergreen strip, and I will leave the rack "empty" with only the Footman loops. This is not uncommon in photos...
ReluctantRenegade
Wien, Austria
Joined: March 09, 2016
KitMaker: 2,408 posts
Armorama: 2,300 posts
Joined: March 09, 2016
KitMaker: 2,408 posts
Armorama: 2,300 posts
Posted: Saturday, September 17, 2016 - 11:12 PM UTC
Thanks for sharing your build, some great info here. Judging the details, looks like a pretty decent kit...
Posted: Saturday, September 17, 2016 - 11:21 PM UTC
Hi Tom, for masking the round headlights. I have a leather hole punch, the kind with a wheel for different size holes. Put some Tamiya tape on a piece of evergreen styrene, punch the appropriate size hole, peel the tape off the plastic circle and place it on the headlight. Works like a charm, and they're perfectly round.
JUSTK
Trinidad And Tobago
Joined: December 01, 2005
KitMaker: 91 posts
Armorama: 85 posts
Joined: December 01, 2005
KitMaker: 91 posts
Armorama: 85 posts
Posted: Saturday, September 17, 2016 - 11:36 PM UTC
Hi there,
PLA water based cement can do the trick with a toothpick as a liquid mask.
Posted: Sunday, September 18, 2016 - 02:20 AM UTC
James, that leather-punch trick sounds interesting!
Kurt, I've done the PVA glue trick before, but find it tricky to remove afterwards - any handy tips? I've used liquid mask before with bits of string embedded as a handle to pull it off, but never on anything this tiny!
Posted: Sunday, September 18, 2016 - 02:31 AM UTC
Hi Israel, it sure is a good kit! Minor quibbles aside, it certainly builds the best A2 around, and the A1 is only matched by DML's other A1 kit. My only big complaint is the lack of upgrades like the Sherman cupola, the urdan cupola, M2HB on mantlet, extra MGs for loader and TC, and various stowage boxes that festoon any tank that was in IDF service long enough for the motor pool to get their hands on it!
(Yeah, I know most of that went with the Magach 3 upgrade...)
Posted: Thursday, October 13, 2016 - 05:42 AM UTC
In case anyone is still interested, I just posted a build review on this kit! (Been very busy these past few weeks, so no posts here – sorry!)
I found the headlights of the A1 a bit tricky to assemble, what with those tiny rounded lamps that need glued to the bracket – forget the tweezers unless feeding the Carpet Monster is your thing! I added all four lamps, but the instructions say to use only one on each bracket. This despite plenty of photos that show three or four lamps on the real thing. The big omission is the horn for the right-hand bracket – pity.
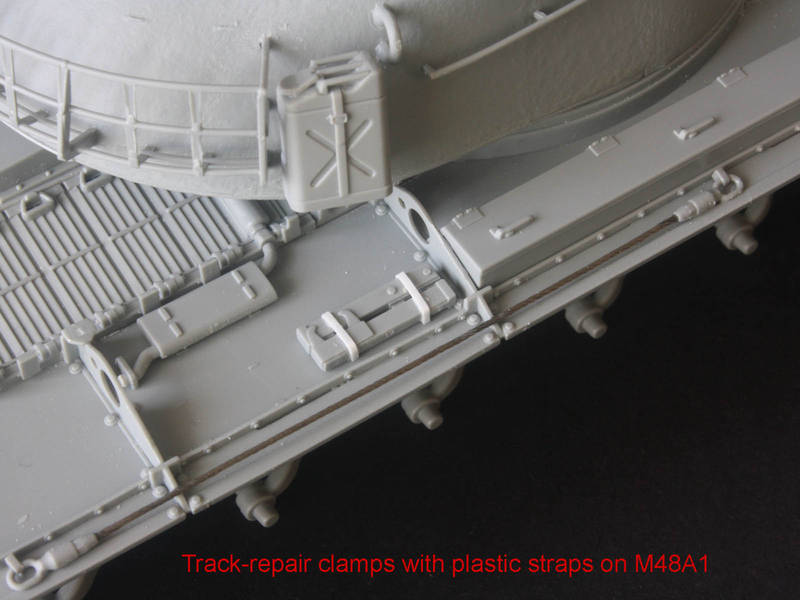
With the empty tool rack on the A1 and the revised straps on the track-jacks (the PE straps are rubbish), the hull of the A1 was finished.
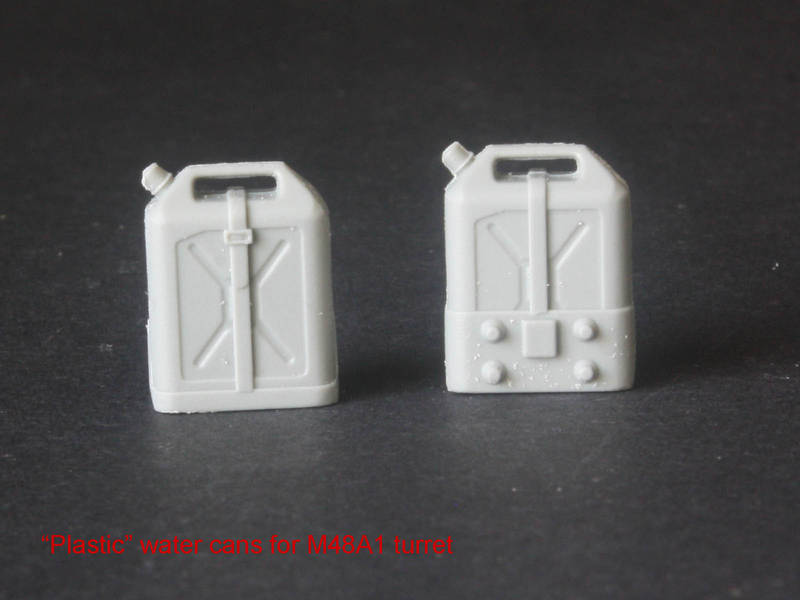
The turret was next, but mostly it followed the instructions without too much drama. The water cans offer a choice of plastic ones (for the A1) or a single metal one (for the A2), but most pics I’ve seen show two metal cans on pretty much all A1 and A2 tanks. So I had to scrounge a second metal can from the Mod B donor kit – you’ll need to be creative if there isn’t a spare in your collection. Anyone know when the plastic cans appeared? I am guessing they become common sometime between 1967 and 1973, as they seem to be all over Magach 3s and M51s in that later period.
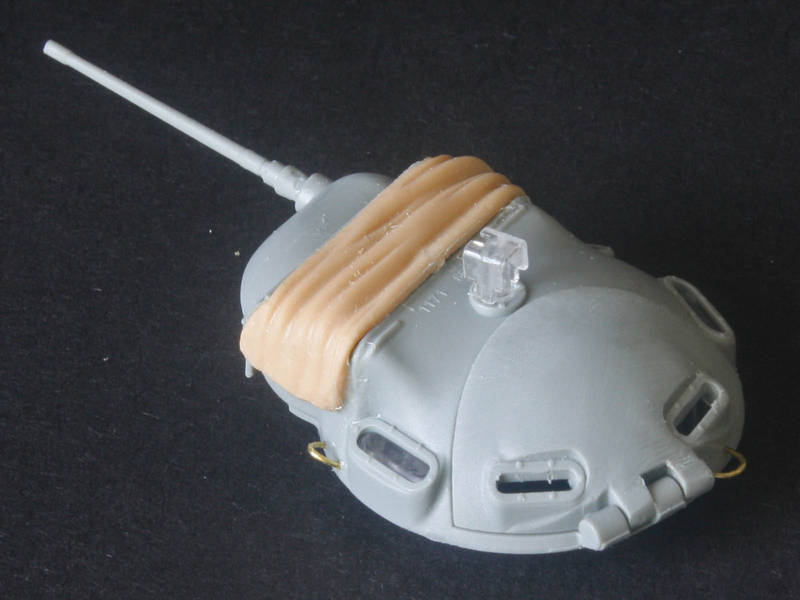
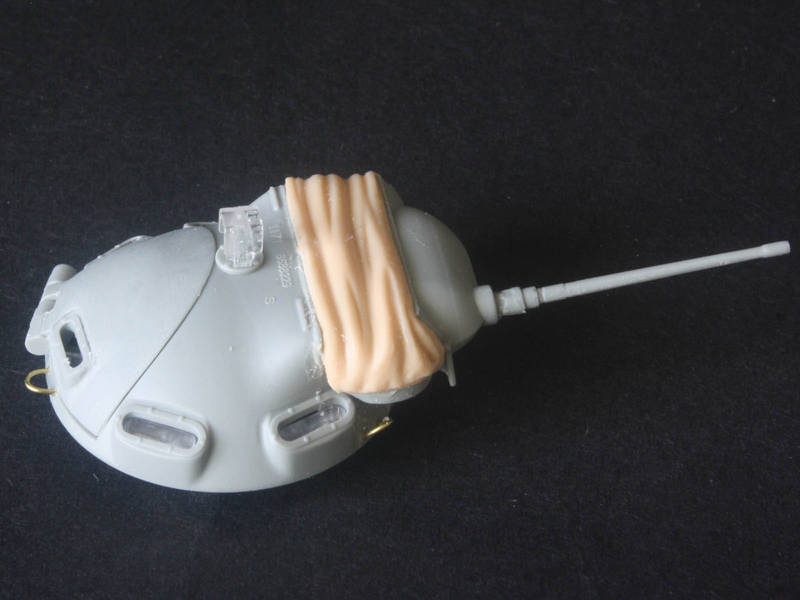
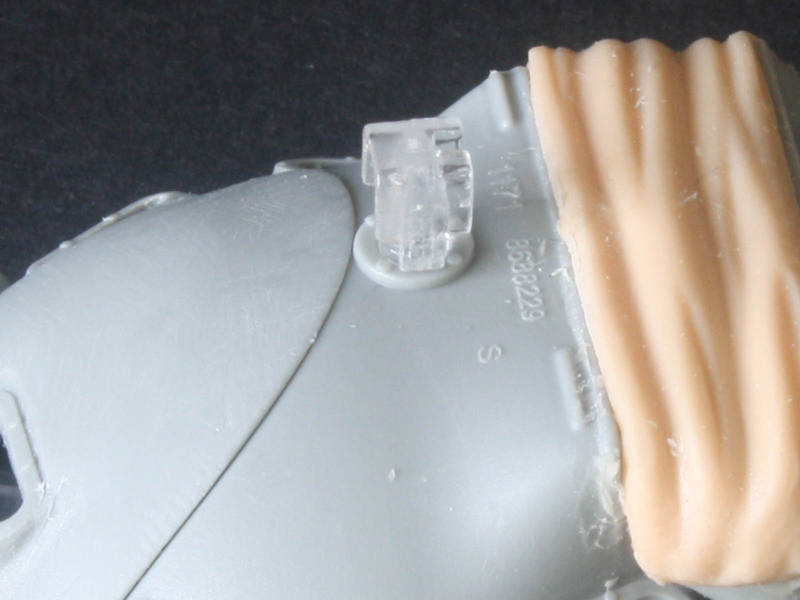
DML gives us a cupola with a DS dust cover, which I found a bit lumpen and lacking in detail – there are no bolt strips at the edges. Still, I was able to pose the MG slightly elevated instead of the usual “dead-level”. The lift rings are missing, so I bent some from brass wire and drilled mounting holes. Then there is that big hatch, completely devoid of interior detail. Pity, as the Revell kit has this sorted! Note to Dragon – must try harder!
There’s more to cover, but it’s late…
ReluctantRenegade
Wien, Austria
Joined: March 09, 2016
KitMaker: 2,408 posts
Armorama: 2,300 posts
Joined: March 09, 2016
KitMaker: 2,408 posts
Armorama: 2,300 posts
Posted: Thursday, October 13, 2016 - 11:56 AM UTC
Looking sharp, Tom! What kind of paint are you going to use?
avenue
Philippines
Joined: May 25, 2013
KitMaker: 544 posts
Armorama: 542 posts
Joined: May 25, 2013
KitMaker: 544 posts
Armorama: 542 posts
Posted: Thursday, October 13, 2016 - 02:29 PM UTC
different between dragon megach-1 and 2 and M-48A1?
or the only different if the box art and the decal,the rest stay same?
Posted: Thursday, October 13, 2016 - 02:47 PM UTC
Hi Israel, I haven't thought about paint. I must confess at this point I might actually "issue" them to a different country, as I have a soft spot for early Bundeswehr stuff. But there is an IDF paint mix in the instructions - pity I can't get any of those brands here! If I went with Tamiya acrylics, do you have a recommended IDF mix?
Richard, as far as I can see this new Magach 1&2 kit has all the parts from the M48A1 kit, except the decals. If you need a US or German A1 then the A1 boxing may be better because it has those markings in the box, but if you just want an A1 and can find your own decals this kit offers a ton of extras and options.
ReluctantRenegade
Wien, Austria
Joined: March 09, 2016
KitMaker: 2,408 posts
Armorama: 2,300 posts
Joined: March 09, 2016
KitMaker: 2,408 posts
Armorama: 2,300 posts
Posted: Thursday, October 13, 2016 - 02:58 PM UTC
Quoted Text
Hi Israel, I haven't thought about paint. I must confess at this point I might actually "issue" them to a different country, as I have a soft spot for early Bundeswehr stuff. But there is an IDF paint mix in the instructions - pity I can't get any of those brands here! If I went with Tamiya acrylics, do you have a recommended IDF mix?
Hi Tom,
I find this chart pretty accurate: http://idfmodelling.free.fr/article01.htmlhttp://idfmodelling.free.fr/article01.html
Israel
Posted: Saturday, October 15, 2016 - 05:26 PM UTC
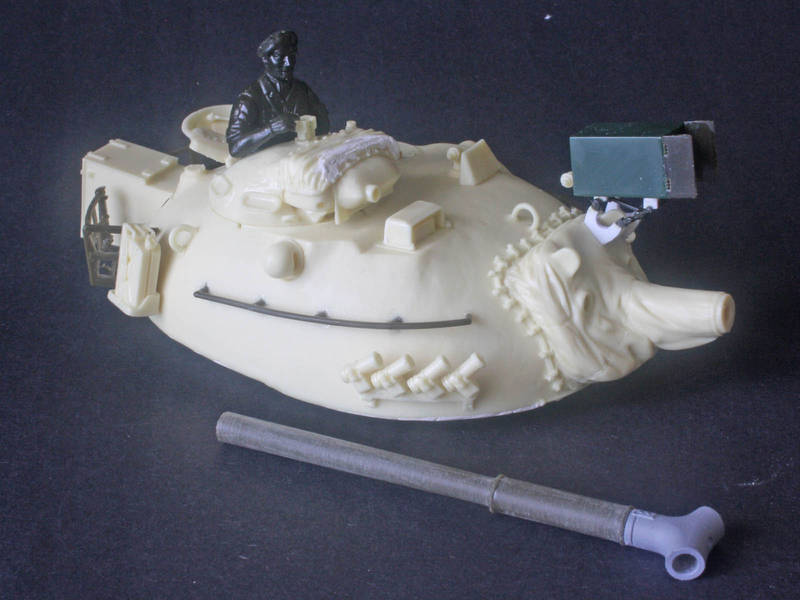
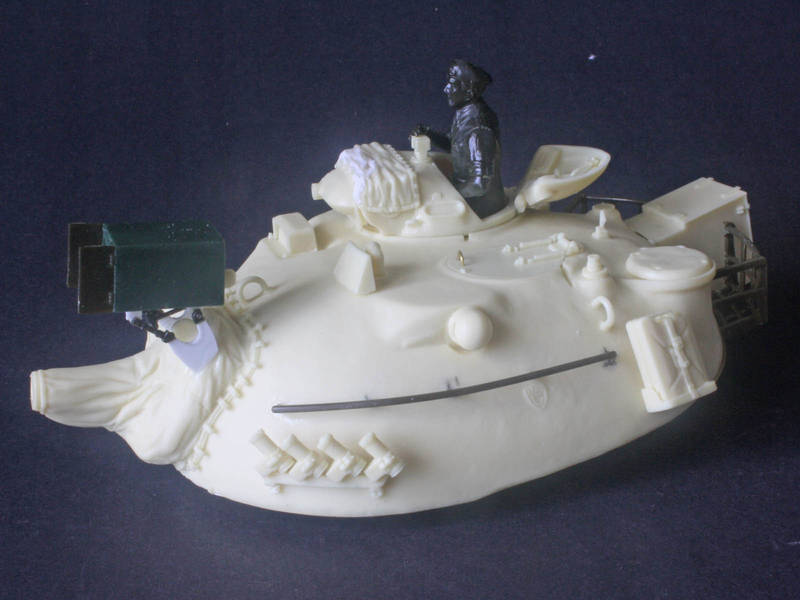
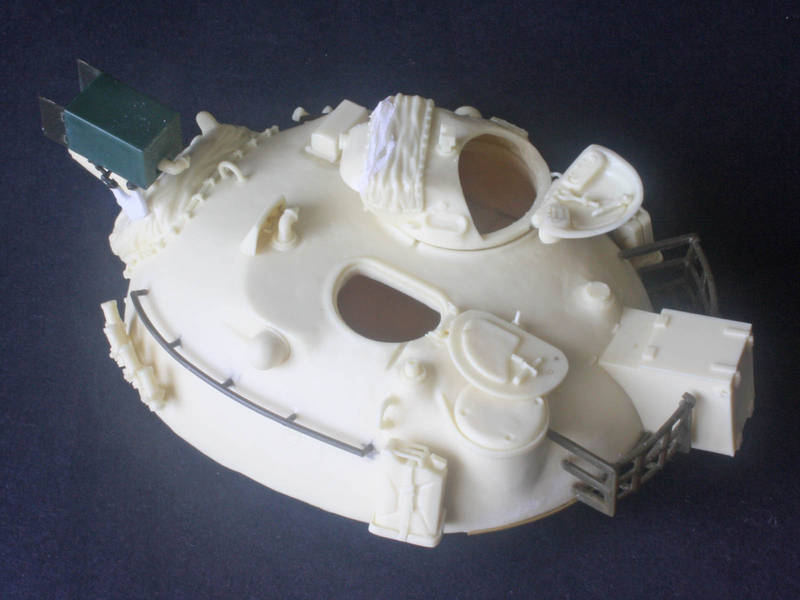
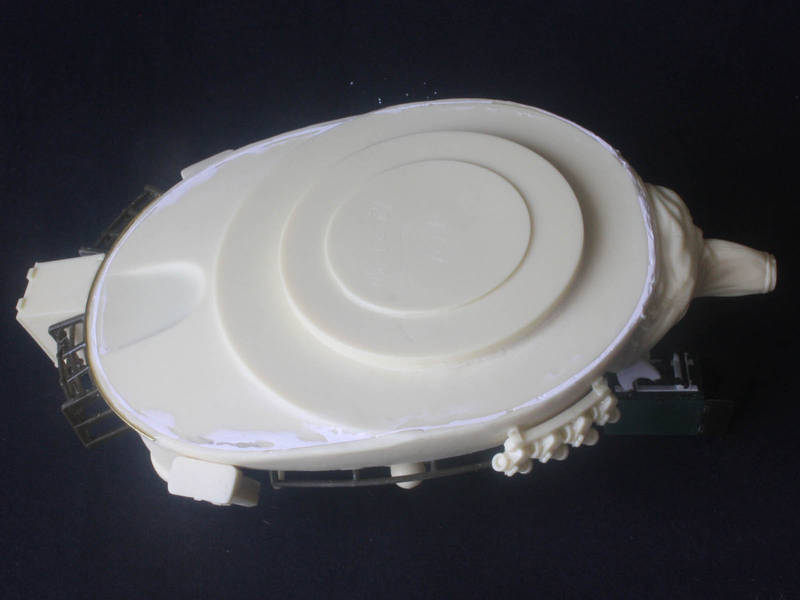
Ok, now I have a dilemma! I'm leaning towards an IDF scheme for the A1, but still thinking of doing the A2 as a German vehicle. What causes me some concern is the turret - do I use the DML turret and add the usual German upgrades? (Smoke launchers, mantlet cover, IR searchlight & stowage box, etc.) Or do I use the Legends resin turret that has been hanging around since I abandoned a Tamiya conversion after Revell released their A2 kits? It is a lovely turret, and has all the necessary details. But the base is bigger than the hole in the DML kit, so I'd need to do some cutting to make it fit. And the DML turret is plastic - a much more enjoyable material to work with. Then again, the resin turret is already built...
Thoughts on a postcard?
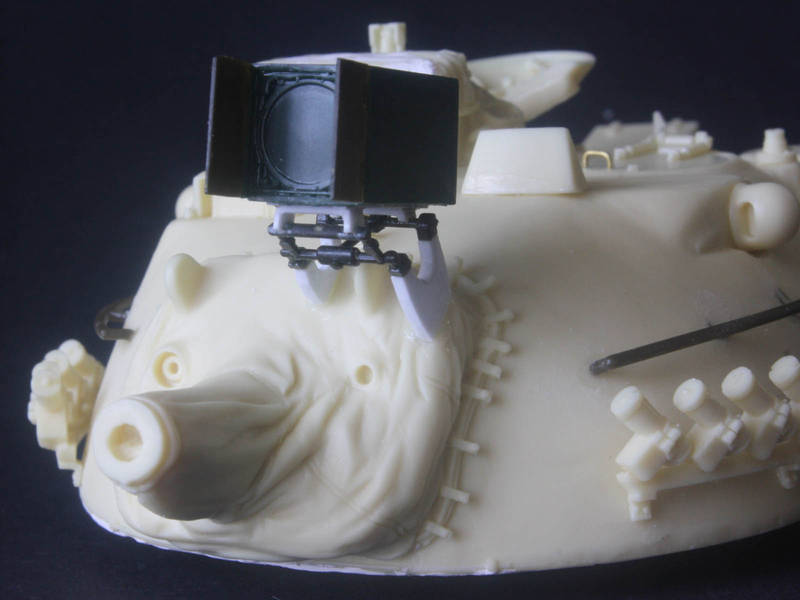
The figure is the old Italeri TC from the Leo 1A4. The main barrel is from the Tamiya kit, with 3D printed brake. And the basket/side rails are from Tamiya's M48A3 too. The searchlight is a mix of parts (some Italeri) because the nice resin one in the Legends set is cast with the doors closed. (I got the Legends conversion for a song because it was missing the PE fret, and the upper hull is warped in two directions making it useless. For less than the price of a Revell or Tamiyas kit it offered a great turret and all the German hull accessories like lights & convoy plate. But I certainly wouldn't buy one at full retail price...)
MichaelSatin
Campaigns Administrator
Colorado, United States
Joined: January 19, 2008
KitMaker: 3,909 posts
Armorama: 510 posts
Joined: January 19, 2008
KitMaker: 3,909 posts
Armorama: 510 posts
Posted: Saturday, October 15, 2016 - 09:04 PM UTC
Quoted Text
Quoted TextHi Israel, I haven't thought about paint. I must confess at this point I might actually "issue" them to a different country, as I have a soft spot for early Bundeswehr stuff. But there is an IDF paint mix in the instructions - pity I can't get any of those brands here! If I went with Tamiya acrylics, do you have a recommended IDF mix?
Hi Tom,
I find this chart pretty accurate: http://idfmodelling.free.fr/article01.htmlhttp://idfmodelling.free.fr/article01.html
Israel
Not sure why but that link didn't seem to work. I think this is where Israel was going: http://idfmodelling.free.fr/article01.html. The Tamiya XF-57 + XF-60 mix (1:1) is what I'm using for '67 vehicles and I think it looks pretty darn close.
Nice work, BTW!
Michael
ReluctantRenegade
Wien, Austria
Joined: March 09, 2016
KitMaker: 2,408 posts
Armorama: 2,300 posts
Joined: March 09, 2016
KitMaker: 2,408 posts
Armorama: 2,300 posts
Posted: Saturday, October 15, 2016 - 09:06 PM UTC
Quoted Text
Not sure why but that link didn't seem to work. I think this is where Israel was going: http://idfmodelling.free.fr/article01.html. The Tamiya XF-57 + XF-60 mix (1:1) is what I'm using for '67 vehicles and I think it looks pretty darn close.
Nice work, BTW!
Michael
Yepp, that's what I meant. Thanks, Michael!