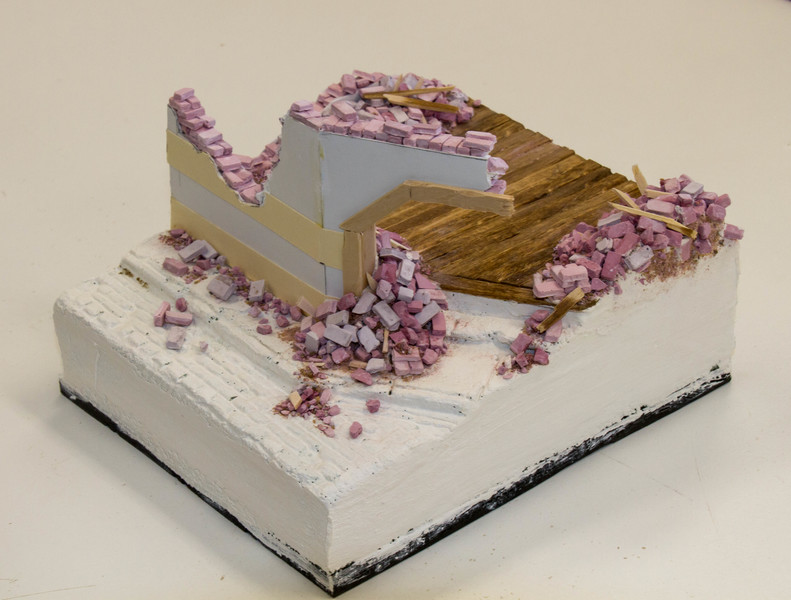
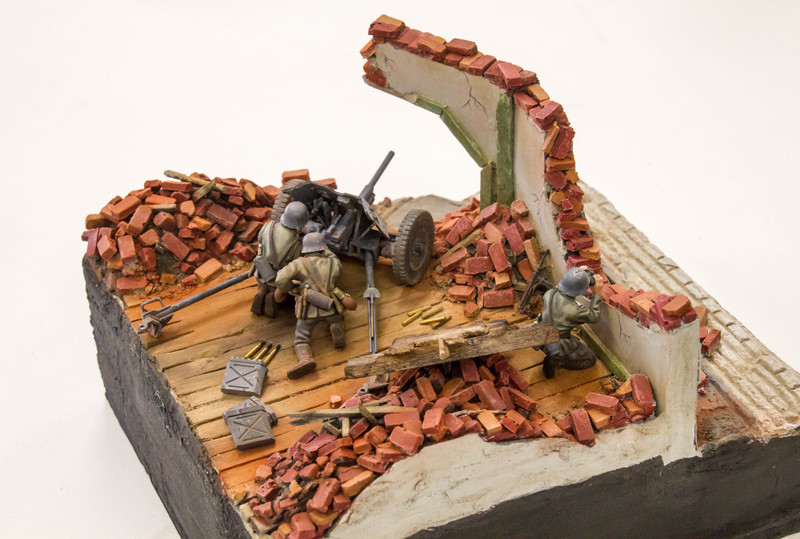
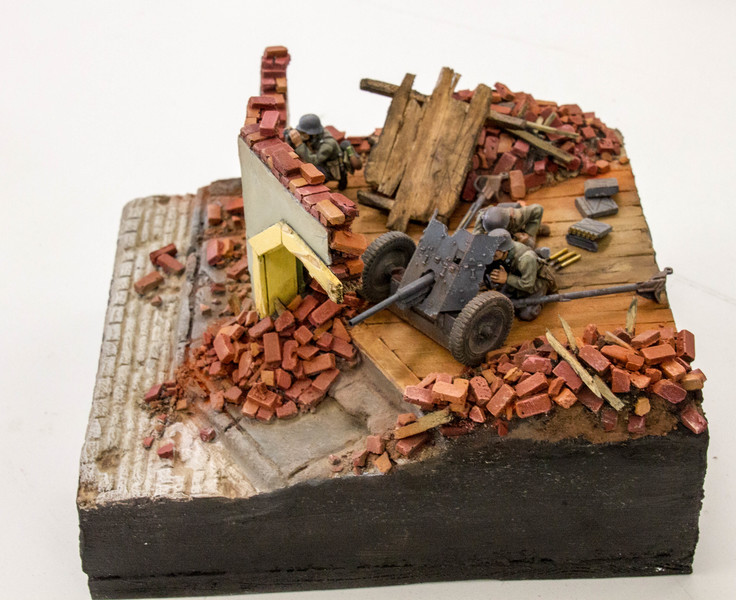
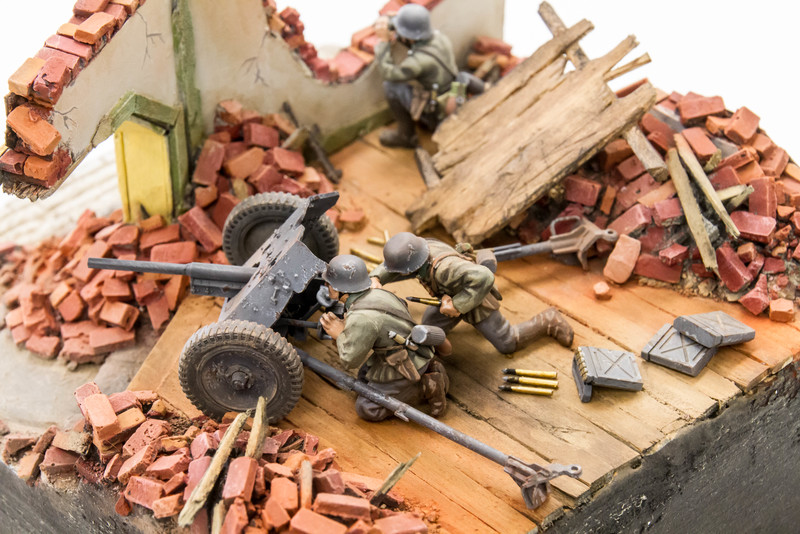
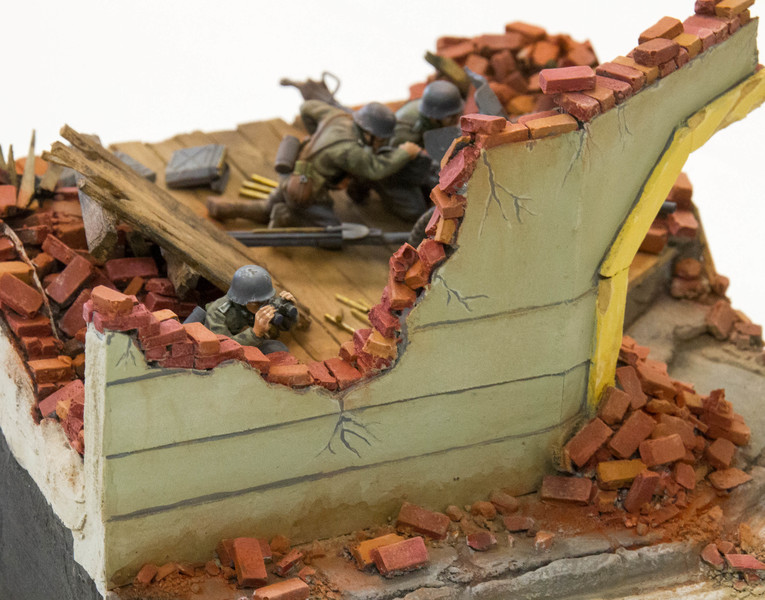
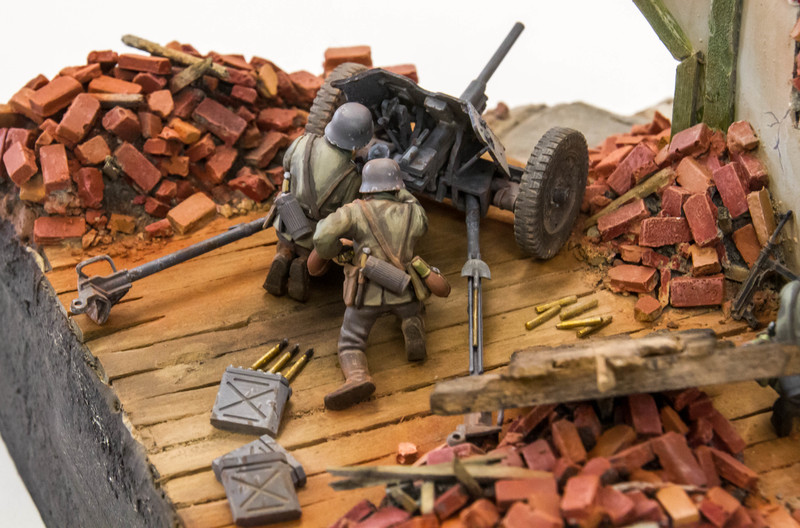
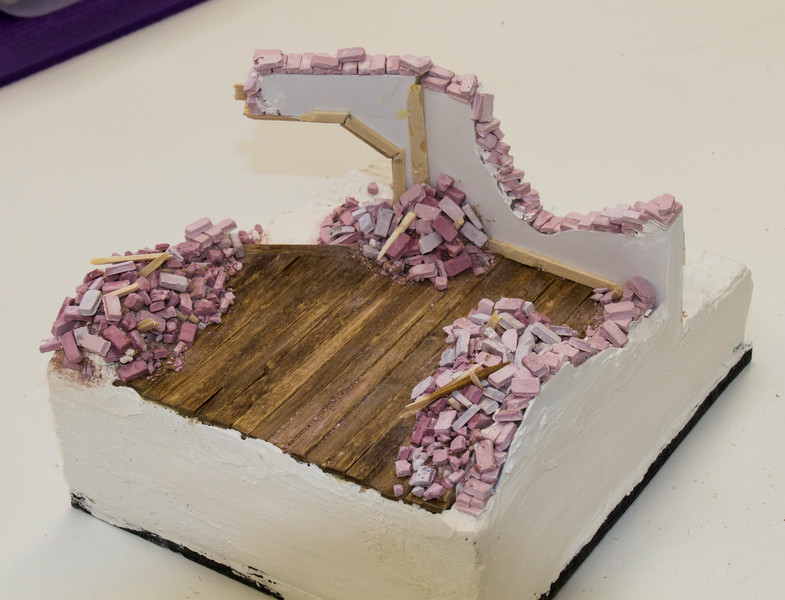
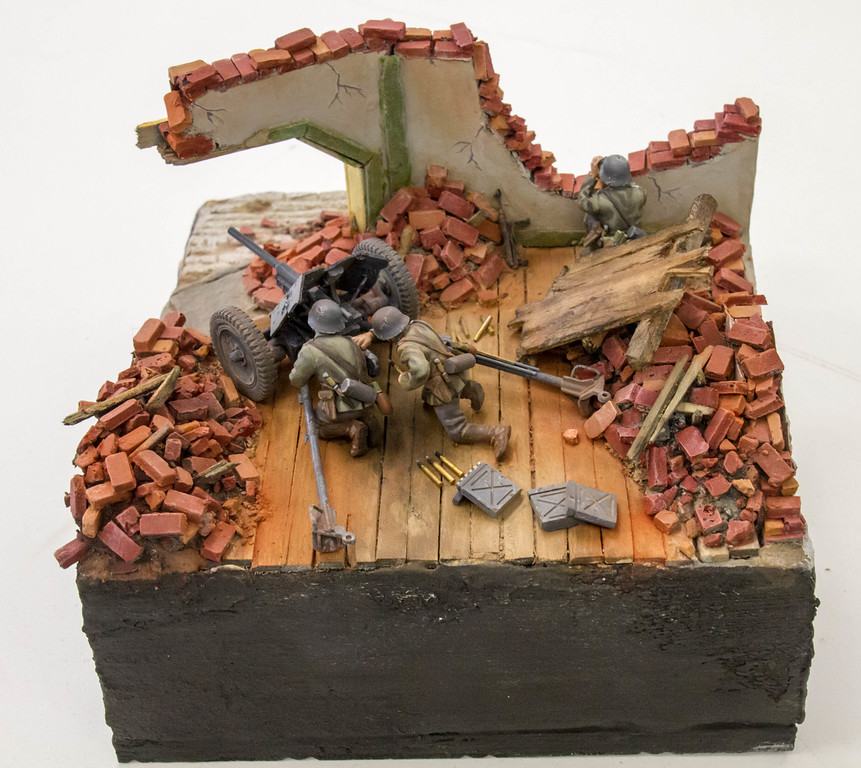
I just finished up this diorama that had been hanging out over the last year. It is based on the Tamiya’s Kit of the 37mm Anti-Tank Gun. It is a nice little kit that went to gather nicely though the figures are a little dated, ok maybe a lot dated. The base is made from green flower arranging foam I find it an excellent material to work with. The street and side walk were carved from the foam and the walls are foam board. I used J-works brick molds to make the bricks. The whole diorama was painted with Cracker barrel Craft paint and Vallejo paints.
I hope you all enjoy
Robert
The first two shots are before any paint was applied.
Completed shots
Dioramas
Do you love dioramas & vignettes? We sure do.
Hosted by Darren Baker, Mario Matijasic
Prepare To Fire
Modelrob
Arizona, United States
Joined: October 20, 2015
KitMaker: 304 posts
Armorama: 293 posts
Joined: October 20, 2015
KitMaker: 304 posts
Armorama: 293 posts
Posted: Wednesday, November 16, 2016 - 03:34 PM UTC
Posted: Wednesday, November 16, 2016 - 04:14 PM UTC
Great set-up, and an excellent use of that gun and figures.
Maybe you should add more dust on the base?
Jacob
Maybe you should add more dust on the base?
Jacob
Modelrob
Arizona, United States
Joined: October 20, 2015
KitMaker: 304 posts
Armorama: 293 posts
Joined: October 20, 2015
KitMaker: 304 posts
Armorama: 293 posts
Posted: Wednesday, November 16, 2016 - 07:45 PM UTC
Quoted Text
Great set-up, and an excellent use of that gun and figures.
Maybe you should add more dust on the base?
Jacob
Thanks Jacob, I will take a look at the dust and see what could be done. Thanks again for taking the time to look.
Robert
jrutman
Pennsylvania, United States
Joined: April 10, 2011
KitMaker: 7,941 posts
Armorama: 7,934 posts
Joined: April 10, 2011
KitMaker: 7,941 posts
Armorama: 7,934 posts
Posted: Wednesday, November 16, 2016 - 09:18 PM UTC
Nice concept! The set-up looks good.
J
J
erichvon
England - East Midlands, United Kingdom
Joined: January 17, 2006
KitMaker: 1,694 posts
Armorama: 1,584 posts
Joined: January 17, 2006
KitMaker: 1,694 posts
Armorama: 1,584 posts
Posted: Wednesday, November 16, 2016 - 10:25 PM UTC
The figures and Pak 36 are nicely done. The one thing that lets it down is the tidiness. All of the bricks are intact, none chipped, broken in half or scorched as they would be if the building had either been hit with an explosive munition or burned down. It also looks like someone has swept up recently. I don't mean that disparagingly but it takes the edge off it for me.
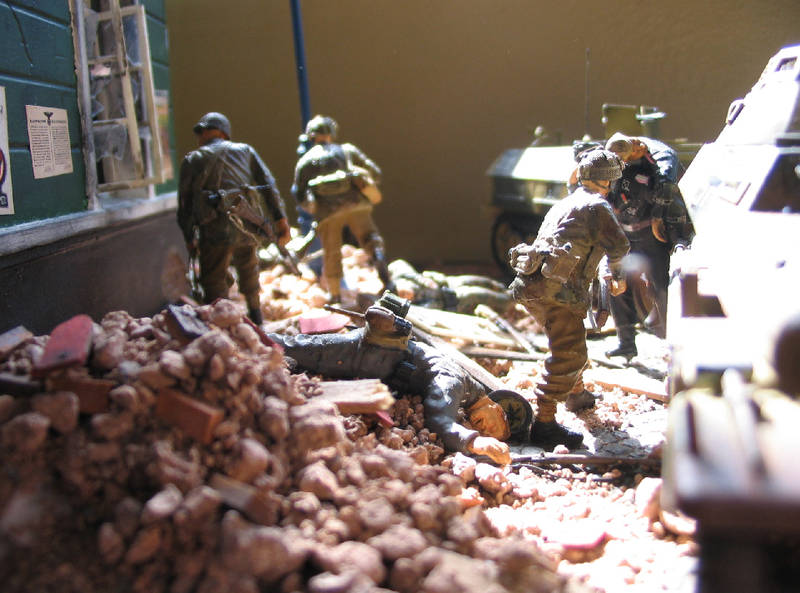
One of the things I use is cat litter for debris. Stick it in a plastic tub with some heavily diluted paint in whatever brick colour you choose, let it soak in and then let it dry for a few days. Once dry put in your bricks and give it a really good shake up so the bricks get mixed in and get broken as well so you end up with a mixture of rubble, bricks and dust. Use that as your base and add some more bricks to the top. Only a suggestion so please don't take it the wrong way. This is an example of how it worked for me.
As you can see it's really irregular shapes and sizes as rubble usually is with some whole bricks in the mix. I hadn't got many when I built it otherwise there'd have been more mixed in but it was a couple of buildings I was doing it for.
obg153
Texas, United States
Joined: April 07, 2009
KitMaker: 1,063 posts
Armorama: 1,049 posts
Joined: April 07, 2009
KitMaker: 1,063 posts
Armorama: 1,049 posts
Posted: Wednesday, November 16, 2016 - 10:40 PM UTC
Nicely done! I like the angles on your layout, and despite their age, those figures came out great. I do agree that there should be more dust/debris in the rubble.
Modelrob
Arizona, United States
Joined: October 20, 2015
KitMaker: 304 posts
Armorama: 293 posts
Joined: October 20, 2015
KitMaker: 304 posts
Armorama: 293 posts
Posted: Wednesday, November 16, 2016 - 11:12 PM UTC
Quoted Text
The figures and Pak 36 are nicely done. The one thing that lets it down is the tidiness. All of the bricks are intact, none chipped, broken in half or scorched as they would be if the building had either been hit with an explosive munition or burned down. It also looks like someone has swept up recently. I don't mean that disparagingly but it takes the edge off it for me.
One of the things I use is cat litter for debris. Stick it in a plastic tub with some heavily diluted paint in whatever brick colour you choose, let it soak in and then let it dry for a few days. Once dry put in your bricks and give it a really good shake up so the bricks get mixed in and get broken as well so you end up with a mixture of rubble, bricks and dust. Use that as your base and add some more bricks to the top. Only a suggestion so please don't take it the wrong way. This is an example of how it worked for me.
As you can see it's really irregular shapes and sizes as rubble usually is with some whole bricks in the mix. I hadn't got many when I built it otherwise there'd have been more mixed in but it was a couple of buildings I was doing it for.
Thanks Karl for taking the time to look. I agree with you on the rubble, I have already noted your technique and plan to use it on my next destroyed building. Again thanks for the suggestion.
Robert
Modelrob
Arizona, United States
Joined: October 20, 2015
KitMaker: 304 posts
Armorama: 293 posts
Joined: October 20, 2015
KitMaker: 304 posts
Armorama: 293 posts
Posted: Wednesday, November 16, 2016 - 11:14 PM UTC
Jerry and Jack thanks for taking a look. Jack I agree with the rubble. I plan to use Karl's method next time I do a destroyed building.
Robert
Robert
Armorsmith
Pennsylvania, United States
Joined: April 09, 2015
KitMaker: 1,063 posts
Armorama: 1,000 posts
Joined: April 09, 2015
KitMaker: 1,063 posts
Armorama: 1,000 posts
Posted: Wednesday, November 16, 2016 - 11:34 PM UTC
Nice compact scene. I tend to agree with some of the others that it's a bit too tidy. But hey, they are Germans, so maybe they cleaned up a little before setting up. All kidding aside it is an effective scene with good composition and balance that makes effective use of the gun, figures, and space.
Modelrob
Arizona, United States
Joined: October 20, 2015
KitMaker: 304 posts
Armorama: 293 posts
Joined: October 20, 2015
KitMaker: 304 posts
Armorama: 293 posts
Posted: Wednesday, November 16, 2016 - 11:58 PM UTC
Quoted Text
Nice compact scene. I tend to agree with some of the others that it's a bit too tidy. But hey, they are Germans, so maybe they cleaned up a little before setting up. All kidding aside it is an effective scene with good composition and balance that makes effective use of the gun, figures, and space.
Thanks for looking. Maybe I should make a couple of small brooms for it. Again thanks for taking the time to comment.
Robert
historianmodeler
United States
Joined: October 27, 2013
KitMaker: 62 posts
Armorama: 62 posts
Joined: October 27, 2013
KitMaker: 62 posts
Armorama: 62 posts
Posted: Thursday, November 17, 2016 - 01:33 AM UTC
What is your opinion of those J-works brick molds? Easy to use?
Awesome little dio!!!!
americanpanzer
Iowa, United States
Joined: May 12, 2014
KitMaker: 542 posts
Armorama: 539 posts
Joined: May 12, 2014
KitMaker: 542 posts
Armorama: 539 posts
Posted: Thursday, November 17, 2016 - 02:29 AM UTC
looks good! gives me some ideas for Tamiya's old 75mm gun and 3 crew figures languishing in my stash;
Modelrob
Arizona, United States
Joined: October 20, 2015
KitMaker: 304 posts
Armorama: 293 posts
Joined: October 20, 2015
KitMaker: 304 posts
Armorama: 293 posts
Posted: Thursday, November 17, 2016 - 03:49 PM UTC
Brian- Thanks for stopping by and looking.
Kody- Thanks for looking, I really like the J-works molds they were very easy to work with.
easyco69
Ontario, Canada
Joined: November 03, 2012
KitMaker: 2,275 posts
Armorama: 2,233 posts
Joined: November 03, 2012
KitMaker: 2,275 posts
Armorama: 2,233 posts
Posted: Thursday, November 17, 2016 - 07:06 PM UTC
Quoted Text
What is your opinion of those J-works brick molds? Easy to use?
Awesome little dio!!!!
Cute lil dio. I did the exact same thing with the Tamiya Pak 40...in a house with wooden floors..wall paper..old picture on the wall lol. Ace
Hey Biggles:
I bought the square roadway ones & the individual smaller bricks from J's Work. Good products.The square roadway one is a little too big..if they made it a little smaller it would be perfect . They do have different roadway products..sidewalks...drains etc.. The liquid plastic is expensive. There is another company in the UK that also create rubber molds like J's Work in 1/35..look them up.
http://www.dioramadebris.co.uk/
I bought the individual bricks in 1/35 off these UK guys, good product.
You could also buy liquid rubber & duplicate any bags, walls or packs that come in kits. Create a mold out of rubber then use liquid 2 part plastic to make your own parts. Same idea for bricks & rubble. Make a clay mold .
But I found a cheaper way is buy cork squares at walmart & just cut them...glue them to foam board , also at walmart. Also use clay.
Here's a shot of some products.
See the white plastic , thin brick piece in the lower right of the picture? It is the top of that Miniart Brick Road . I can use it for dirt roads with bricks showing through the road etc..I made a rubber mold of that too..just thin brick pieces. Just thought I'd show ya this picture I did about a year ago, funny you mentioned J's Work.
Thirian24
Oklahoma, United States
Joined: September 30, 2015
KitMaker: 2,493 posts
Armorama: 2,344 posts
Joined: September 30, 2015
KitMaker: 2,493 posts
Armorama: 2,344 posts
Posted: Thursday, November 17, 2016 - 07:13 PM UTC
Wow what an amazing Dio, Rob! I'm blown away!
obg153
Texas, United States
Joined: April 07, 2009
KitMaker: 1,063 posts
Armorama: 1,049 posts
Joined: April 07, 2009
KitMaker: 1,063 posts
Armorama: 1,049 posts
Posted: Thursday, November 17, 2016 - 08:34 PM UTC
The method Karl described works pretty well. I only use water based paints though, since the litter seems to absorb it better. Also, just use the cheapo, store brand and nothing with added scents/chems. It can be used in many types of scenes, from urban to the desert. I've even used some scattered along a creek bed.
Modelrob
Arizona, United States
Joined: October 20, 2015
KitMaker: 304 posts
Armorama: 293 posts
Joined: October 20, 2015
KitMaker: 304 posts
Armorama: 293 posts
Posted: Friday, November 18, 2016 - 04:10 PM UTC
Thanks for stopping by to look Dustin and Jack
David thanks for looking and I am going to have to try some of thous techniques.
Robert
David thanks for looking and I am going to have to try some of thous techniques.
Robert
cheyenne
New Jersey, United States
Joined: January 05, 2005
KitMaker: 2,185 posts
Armorama: 1,813 posts
Joined: January 05, 2005
KitMaker: 2,185 posts
Armorama: 1,813 posts
Posted: Friday, November 18, 2016 - 05:09 PM UTC
Nice work Rob , gotta agree about the debris but the old figs and 37 are an outstanding job .
erichvon
England - East Midlands, United Kingdom
Joined: January 17, 2006
KitMaker: 1,694 posts
Armorama: 1,584 posts
Joined: January 17, 2006
KitMaker: 1,694 posts
Armorama: 1,584 posts
Posted: Friday, November 18, 2016 - 11:08 PM UTC
Rob, glad you like the idea. As Jack mentioned, if you get cheap acylic paint in those massive tubes they sell in bargain bookshops (at least they do in the UK)or art shops in basic colours you can mix your own brick shades to dilute. One of the best things about cat litter is it's really absorbent so takes the colour well and it's dirt cheap. I bought a 2kg bag about 12 years ago and am still using it after quite a few dios lol. It goes a very long way for very little cost. I've been thinking about getting some of the Diorama Debris moulds and now having seen how they turn out I'm definitely going to get some as bags of bricks are a rip off for what you actually get. I've got a couple of quite big dios planned which I need a lot for so thanks for the heads up on them
Modelrob
Arizona, United States
Joined: October 20, 2015
KitMaker: 304 posts
Armorama: 293 posts
Joined: October 20, 2015
KitMaker: 304 posts
Armorama: 293 posts
Posted: Saturday, November 19, 2016 - 01:01 AM UTC
Quoted Text
Nice work Rob , gotta agree about the debris but the old figs and 37 are an outstanding job .
Thanks Cheyenne, It was a learning experience. Already working on the next urban Diorama ideal.
Robert
parrot
Ontario, Canada
Joined: March 01, 2002
KitMaker: 1,607 posts
Armorama: 1,581 posts
Joined: March 01, 2002
KitMaker: 1,607 posts
Armorama: 1,581 posts
Posted: Saturday, November 19, 2016 - 11:07 PM UTC
Very nice work.
A little more dust and grime maybe,great painting and layout .
tom
A little more dust and grime maybe,great painting and layout .
tom