

So I got my Voyager 35018 today which is, supposedly the early middle version A for the III and IV.
Check out my gallery but at this time I do not recommend them.
Hosted by Darren Baker
Panzer III/IV Early middle type A from Voyage

Mortifa

#464

Joined: December 02, 2016
KitMaker: 267 posts
Armorama: 196 posts

Posted: Thursday, December 29, 2016 - 01:39 PM UTC
Mortifa
#464
Joined: December 02, 2016
KitMaker: 267 posts
Armorama: 196 posts
Posted: Thursday, December 29, 2016 - 02:14 PM UTC

RobinNilsson

Joined: November 29, 2006
KitMaker: 6,693 posts
Armorama: 5,562 posts
Posted: Thursday, December 29, 2016 - 02:31 PM UTC
Quoted Text
So I got my Voyager 35018 today which is, supposedly the early middle version A for the III and IV.
Check out my gallery but at this time I do not recommend them.
May I ask why you don't recommend them ? What is the problem?
Would be nice to know ...
/ Robin
Mortifa
#464
Joined: December 02, 2016
KitMaker: 267 posts
Armorama: 196 posts
Posted: Thursday, December 29, 2016 - 02:43 PM UTC
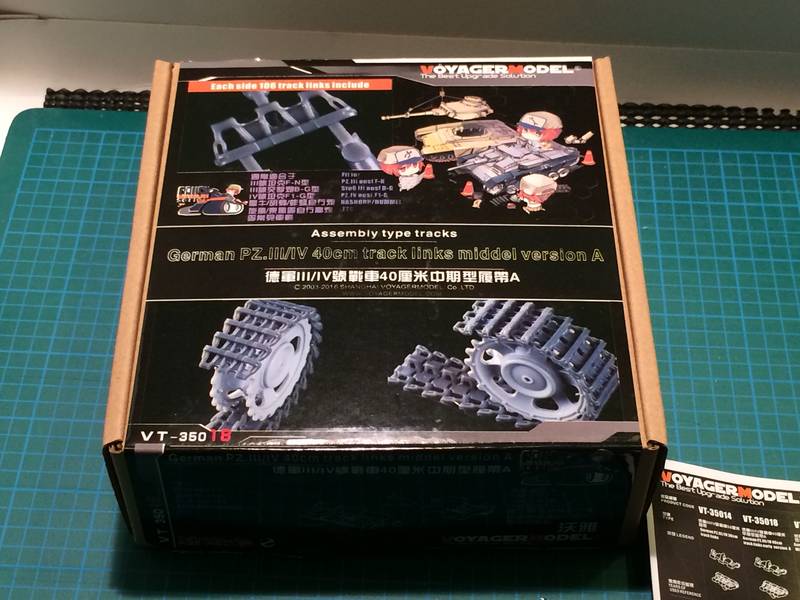
The box arrived and I opened it just to get a look at what my money had gotten me. Though there are issues already with the outside of the box. It is identified as an Early Version A on the pamphlet the box states it is a Middle version A
Mortifa
#464
Joined: December 02, 2016
KitMaker: 267 posts
Armorama: 196 posts
Posted: Thursday, December 29, 2016 - 02:54 PM UTC
The two ziplock bags.
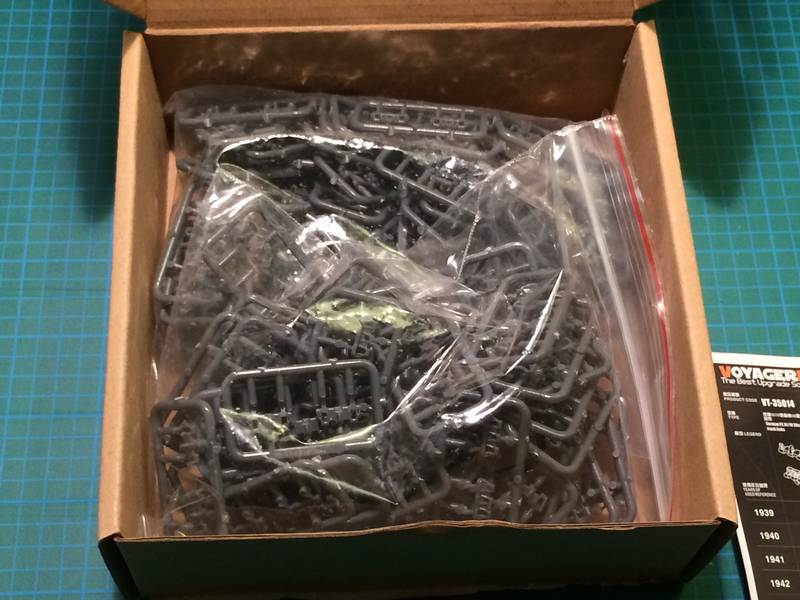
When you open the box you get an advertising pamphlet and two ziplock bags.
There are no instructions, nor do the images on the box or the pamphlet show you the steps to take to assemble the tracks.
Below is the pamphlet.
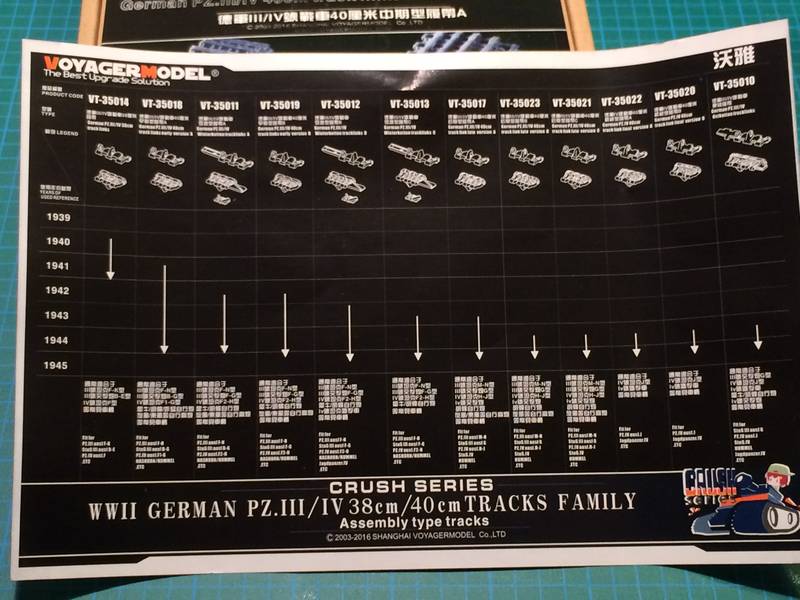
When you open the box you get an advertising pamphlet and two ziplock bags.
There are no instructions, nor do the images on the box or the pamphlet show you the steps to take to assemble the tracks.
Below is the pamphlet.

ChrisK89

Joined: June 04, 2015
KitMaker: 80 posts
Armorama: 73 posts
Posted: Thursday, December 29, 2016 - 03:01 PM UTC
These tracks seem to be right to my eyes.
You wanted early/middle 40cm Type A tracks with hollow guide horns and without ice cleats and you got them, didn't you?
You wanted early/middle 40cm Type A tracks with hollow guide horns and without ice cleats and you got them, didn't you?
Mortifa
#464
Joined: December 02, 2016
KitMaker: 267 posts
Armorama: 196 posts
Posted: Thursday, December 29, 2016 - 03:14 PM UTC
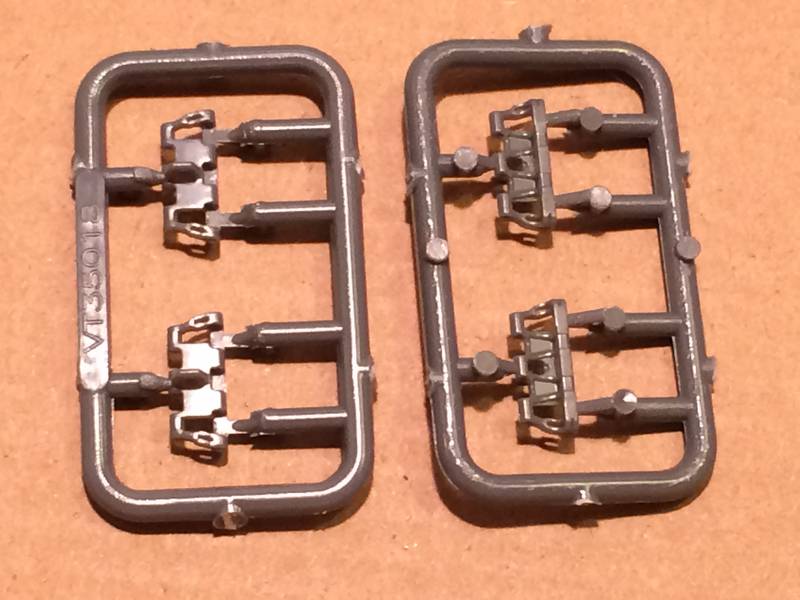
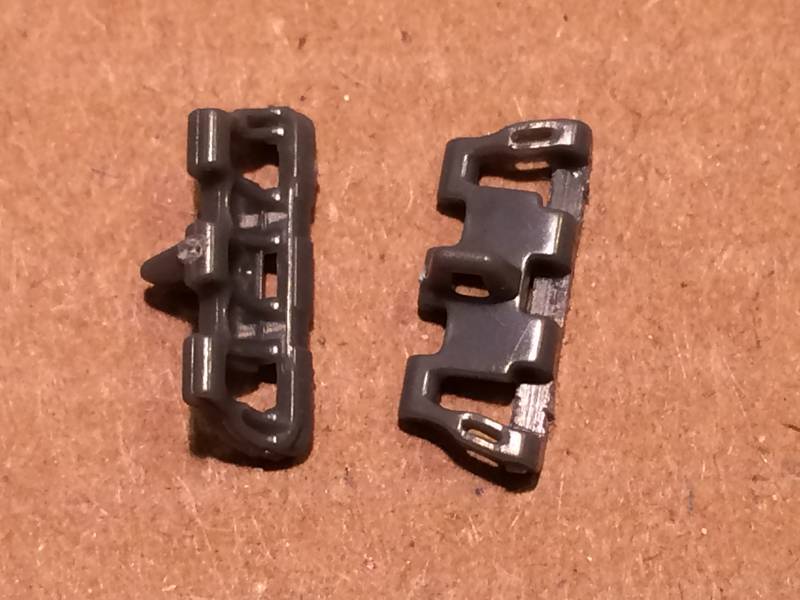
Now the parts look good. You get 212 tracks, per sprue.
I believe the sprue looks good, I did not see any glaring problems, the plastic feels good and did cut nicely.
And that is where I see a problem.
I believe the sprue looks good, I did not see any glaring problems, the plastic feels good and did cut nicely.
And that is where I see a problem.
Mortifa
#464
Joined: December 02, 2016
KitMaker: 267 posts
Armorama: 196 posts
Posted: Thursday, December 29, 2016 - 03:18 PM UTC
Although the tracks look well made and it appears, to me, that the detail of the tracks were properly represented the tracks have not gone together for me.
Although not the greatest focus this shot shows a major issue.
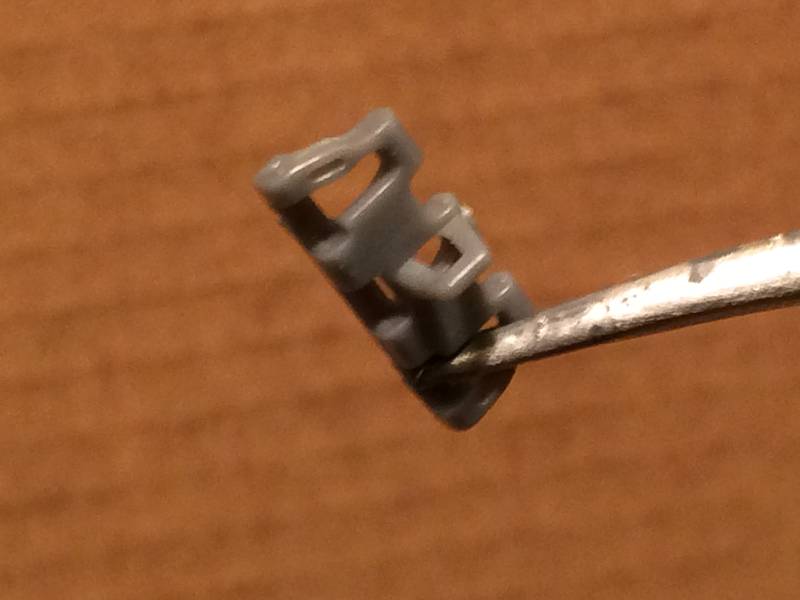
As you can see there are no pins or indentations for the links to join and if there were these tracks are very tight fitting. The few links I did cut away from the sprue did not go together well and once together did not hold.
Glue may fix that/
Although not the greatest focus this shot shows a major issue.
As you can see there are no pins or indentations for the links to join and if there were these tracks are very tight fitting. The few links I did cut away from the sprue did not go together well and once together did not hold.
Glue may fix that/
RobinNilsson
Joined: November 29, 2006
KitMaker: 6,693 posts
Armorama: 5,562 posts
Posted: Thursday, December 29, 2016 - 04:23 PM UTC
The english text on the box doesn't seem to say anything about clickable tracks (I can't read the chinese ?? text) ?
The image on the side of the box shows drawings of the links and these are without any knobs/indentations so I get the impression that these are intended to be glued.
Some of the clickable types are also prone to falling apart so I glue them even if they are supposed to be clickable.
The injection gate has to be somewhere and the position chosen by Voyager is one of the best (can be cleaned up without destroying any vital detailing).
As for assembly instructions: I personally don't think that they are really needed since there is only one type of part ...
/ Robin
Tutorial for indy link tracks which require glue:
Once upon a time I tried to assemble one long length of track and then getting it on the tank while the glued joints were still soft enough. This is a sure way to disaster so don't even try.
Basics:
Look at the tank from the side: There is one length on the ground, flat if the "ground" is flat et.c. Then there are short lengths going up from the ground towards the idler and the drive sprocket, these can be straight, hanging down or
bent upwards/inwards depending on what the tank is doing (moving forward, backward, turning or small maneuvers). Then comes the curved bits around the idler and the sprocket. Depending on the type of track on the real vehicle the top
run is either almost totally straight or hangs down slightly. Look at images of the real thing before building, Shermans and US tanks = straight, German WWII = slight sagging, Soviet WWII significant sag. Look at images!
Use solvent glue like Humbrol Liquid Poly, do NOT use tube glue unless you are an expert in handling that stuff. Liquid glue took my modelling forward by leaps an bounds.
How to do it:
Described for one side of the tank:
Make a long flat section that goes from the middle of the first road wheel to the middle of the last road wheel. Let it dry completely. By middle of the road wheel I mean the point where it touches flat ground.
Make a long run to reach from the sprocket wheel (one tooth onto the sprocket wheel) all the way to the top of the idler wheel. For a PzIII or IV it should hang down
about the thickness of one track link (check images), on a Sherman it is straight.
Put it in position on the tank when it is still slightly soft but DO NOT glue it in place yet. Gently shape the track sagging (check images), one link should engage the sprocket and the other end bent down over the idler if the section is long enough.
Now you have the top and bottom sections of the track and need to join them.
Make a short bit (short bit A) , 3 to 4 links and shape around the sprocket wheel, three to four bits is the longest section that will still be removable from the sprocket when it is dry. Make a short bit (short bit B), 5-7 links and shape around the idler (no teeth -> longer section is possible to remove when dry) DO NOT glue to the idler yet.
Now it is time to start to start counting links for the two sections that will go up from the ground towards the sprocket and the idler. The difficult part here is to get just the right curve. These two sections is where you adjust the total length of the
track so that you don't end up with a gap shorter than one track link.
The instruction sheets for Dragon kist usually show the correct number of links.
The length (C) from the ground up to the sprocket wheel should reach 1-2 teeth onto the sprocket leaving a gap at least the length of 'short bit A' between itself and the top run. The section going up to the idler shall be made to reach from the bottom run all the way up to short bit B and short bit B shall reach the top run.
Now you have two long bits where the glue has dried (top and bottom) and two
short semi soft bits, one going between top and bottom around the idler and one
connecting the bottom bit to the sprocket wheel. Gently bend the shorter bits so that the track sits correctly. Check images. It may be necessary to give the top run a little more or a little less sag to get everything to fit, gentle force.
When everything has dried it is time to join the lengths (except short bit A) to one long deep U and make another short bit, AA, to fill in the last few links on the sprocket wheel. If you feel that this is tricky then leave the length C loose until mounting on the tank.
When all this has dried you will have three pieces: the deep U, short bit A and AA (plus possibly length C),
Time for painting, the deep U is fragile but it can still be handled if you are careful.
Paint the base colour and most of the later steps, ask the forum for hints and tips about colours and stuff. The last painting can be done with the track on the tank.
The insides, the side of the track touching the wheels, should be painted before mounting on the tank, outsides are easy to reach afterwards.
The track is mounted on the tank by pushing it on from the idler end, if you are right handed: sprocket wheel to the left, left hand holds tank, right hand holds track and pushes track to the left towards the sprocket. Fit the links over the sprocket and glue in place. By making the joins over the sprocket wheel the teeth will hold everything in place. Use very fine and thin sandpaper to remove the paint where the road wheels and return rollers touches the track and add small amounts of liquid glue. Let it dry.
Time for last paint job.
Please feel free to ask questions, the description above will be hard to understand until you sit there with the pieces working it out. Ask and ask again
while building and I will try to answer.
Just for the fun of it I built an M113 with indy-track and glued all the wheels to the tracks so that the whole assembly could be taken off the vehicle in one piece.
I don't remember if it was just for the fun of it or if there was something forcing me but I know that it can be done
regards / Robin

supaderpa

Joined: March 28, 2016
KitMaker: 157 posts
Armorama: 140 posts
Posted: Thursday, December 29, 2016 - 05:25 PM UTC
Well, I have the ostketten ones and they went splendid on my panzer iv j. Keep in mind that these tracks are just your typical indy links which require glue to hold and are not workable. They'll require some cleanup but as Robin pointed out is fairly easy to do without damaging the links.
i think the box cover is a pretty good reference as to how the tracks should go on. All the links are the same anyway unlike the ostketten and winterketten which have right and left links.
All in all, I think the voyager tracks are pretty good value for money.
i think the box cover is a pretty good reference as to how the tracks should go on. All the links are the same anyway unlike the ostketten and winterketten which have right and left links.
All in all, I think the voyager tracks are pretty good value for money.
RobinNilsson
Joined: November 29, 2006
KitMaker: 6,693 posts
Armorama: 5,562 posts
Posted: Thursday, December 29, 2016 - 08:09 PM UTC
The later type where the pin only has a head on the inside of the track (towards the tank hull) are also left/right and need to be kept track of (not only the winterketten ....)
/ Robin
/ Robin
Mortifa
#464
Joined: December 02, 2016
KitMaker: 267 posts
Armorama: 196 posts
Posted: Thursday, December 29, 2016 - 10:14 PM UTC
Thank you.
There really was not much info out there about the tracks, though someone had posted they had no problem with them.
My first couple of posts I was still trying to figure out how to put the images in.
The tracks do look good and as someone pointed out they are well made. So if all it takes is a bit of sandpaper and glue, that is fine, and yes I know they can only go together one way, but thanks.
Mortifa
#464
Joined: December 02, 2016
KitMaker: 267 posts
Armorama: 196 posts
Posted: Thursday, December 29, 2016 - 10:17 PM UTC
Quoted Text
The english text on the box doesn't seem to say anything about clickable tracks (I can't read the chinese ?? text) ?
The image on the side of the box shows drawings of the links and these are without any knobs/indentations so I get the impression that these are intended to be glued.
Some of the clickable types are also prone to falling apart so I glue them even if they are supposed to be clickable.
The injection gate has to be somewhere and the position chosen by Voyager is one of the best (can be cleaned up without destroying any vital detailing).
As for assembly instructions: I personally don't think that they are really needed since there is only one type of part ...
/ Robin
Tutorial for indy link tracks which require glue:
Once upon a time I tried to assemble one long length of track and then getting it on the tank while the glued joints were still soft enough. This is a sure way to disaster so don't even try.
Basics:
Look at the tank from the side: There is one length on the ground, flat if the "ground" is flat et.c. Then there are short lengths going up from the ground towards the idler and the drive sprocket, these can be straight, hanging down or
bent upwards/inwards depending on what the tank is doing (moving forward, backward, turning or small maneuvers). Then comes the curved bits around the idler and the sprocket. Depending on the type of track on the real vehicle the top
run is either almost totally straight or hangs down slightly. Look at images of the real thing before building, Shermans and US tanks = straight, German WWII = slight sagging, Soviet WWII significant sag. Look at images!
Use solvent glue like Humbrol Liquid Poly, do NOT use tube glue unless you are an expert in handling that stuff. Liquid glue took my modelling forward by leaps an bounds.
How to do it:
Described for one side of the tank:
Make a long flat section that goes from the middle of the first road wheel to the middle of the last road wheel. Let it dry completely. By middle of the road wheel I mean the point where it touches flat ground.
Make a long run to reach from the sprocket wheel (one tooth onto the sprocket wheel) all the way to the top of the idler wheel. For a PzIII or IV it should hang down
about the thickness of one track link (check images), on a Sherman it is straight.
Put it in position on the tank when it is still slightly soft but DO NOT glue it in place yet. Gently shape the track sagging (check images), one link should engage the sprocket and the other end bent down over the idler if the section is long enough.
Now you have the top and bottom sections of the track and need to join them.
Make a short bit (short bit A) , 3 to 4 links and shape around the sprocket wheel, three to four bits is the longest section that will still be removable from the sprocket when it is dry. Make a short bit (short bit B), 5-7 links and shape around the idler (no teeth -> longer section is possible to remove when dry) DO NOT glue to the idler yet.
Now it is time to start to start counting links for the two sections that will go up from the ground towards the sprocket and the idler. The difficult part here is to get just the right curve. These two sections is where you adjust the total length of the
track so that you don't end up with a gap shorter than one track link.
The instruction sheets for Dragon kist usually show the correct number of links.
The length (C) from the ground up to the sprocket wheel should reach 1-2 teeth onto the sprocket leaving a gap at least the length of 'short bit A' between itself and the top run. The section going up to the idler shall be made to reach from the bottom run all the way up to short bit B and short bit B shall reach the top run.
Now you have two long bits where the glue has dried (top and bottom) and two
short semi soft bits, one going between top and bottom around the idler and one
connecting the bottom bit to the sprocket wheel. Gently bend the shorter bits so that the track sits correctly. Check images. It may be necessary to give the top run a little more or a little less sag to get everything to fit, gentle force.
When everything has dried it is time to join the lengths (except short bit A) to one long deep U and make another short bit, AA, to fill in the last few links on the sprocket wheel. If you feel that this is tricky then leave the length C loose until mounting on the tank.
When all this has dried you will have three pieces: the deep U, short bit A and AA (plus possibly length C),
Time for painting, the deep U is fragile but it can still be handled if you are careful.
Paint the base colour and most of the later steps, ask the forum for hints and tips about colours and stuff. The last painting can be done with the track on the tank.
The insides, the side of the track touching the wheels, should be painted before mounting on the tank, outsides are easy to reach afterwards.
The track is mounted on the tank by pushing it on from the idler end, if you are right handed: sprocket wheel to the left, left hand holds tank, right hand holds track and pushes track to the left towards the sprocket. Fit the links over the sprocket and glue in place. By making the joins over the sprocket wheel the teeth will hold everything in place. Use very fine and thin sandpaper to remove the paint where the road wheels and return rollers touches the track and add small amounts of liquid glue. Let it dry.
Time for last paint job.
Please feel free to ask questions, the description above will be hard to understand until you sit there with the pieces working it out. Ask and ask again
while building and I will try to answer.
Just for the fun of it I built an M113 with indy-track and glued all the wheels to the tracks so that the whole assembly could be taken off the vehicle in one piece.
I don't remember if it was just for the fun of it or if there was something forcing me but I know that it can be done
regards / Robin
Going to keep this handy and thanks.

TopSmith

Joined: August 09, 2002
KitMaker: 1,742 posts
Armorama: 1,658 posts

Posted: Thursday, December 29, 2016 - 10:29 PM UTC
This goes to the point that there are three type of track people.
1. The rubber band group who dislike the indy link process and will defer on the total reality look.
2. The Fruile crowd who like the indy look but want their track to assemble as a strong flexible strip like the real deal. It can be easier to install. (I belong to this group, group 3 stuff drives me nuts). This is probably the most expensive choice.
3. The plastic indy glue together group. They don't mind the extra work because it saves them a few hard earned bucks and sometimes provides options not provided by option 2. This option, if done correctly, will look just as good as option 2.
Sounds like you were confused in which group you belong.
RobinNilsson
Joined: November 29, 2006
KitMaker: 6,693 posts
Armorama: 5,562 posts
Posted: Thursday, December 29, 2016 - 11:14 PM UTC
Quoted Text
This goes to the point that there are three type of track people.
1. The rubber band group who dislike the indy link process and will defer on the total reality look.
2. The Fruile crowd who like the indy look but want their track to assemble as a strong flexible strip like the real deal. It can be easier to install. (I belong to this group, group 3 stuff drives me nuts). This is probably the most expensive choice.
3. The plastic indy glue together group. They don't mind the extra work because it saves them a few hard earned bucks and sometimes provides options not provided by option 2. This option, if done correctly, will look just as good as option 2.
Sounds like you were confused in which group you belong.
Maybe slightly irritated at suddenly getting dumped in group 3 without warning

Mortifa
#464
Joined: December 02, 2016
KitMaker: 267 posts
Armorama: 196 posts
Posted: Friday, December 30, 2016 - 12:49 AM UTC
Quoted Text
Well, I have the ostketten ones and they went splendid on my panzer iv j. Keep in mind that these tracks are just your typical indy links which require glue to hold and are not workable. They'll require some cleanup but as Robin pointed out is fairly easy to do without damaging the links.
i think the box cover is a pretty good reference as to how the tracks should go on. All the links are the same anyway unlike the ostketten and winterketten which have right and left links.
All in all, I think the voyager tracks are pretty good value for money.
I would agree, they are very nicely made.
My point though is for a person just venturing into the Indy track world there should be a little more reference. I looked at a few videos, my search skills must be off, as I could not find many on tracks. I did find that there were good products and stuff people would really dislike.
Masterclub was not well rated.
Bronco, middle of the road.
Mini Art was not spoken well of.
RIICH models I found nothing
AFV club has two flavours.
Now I have looked at Kaizen, and think they are the ones I wanted, but c'est le vie' I will grab them next time.
There were a couple of other brands and metal ones, so I know I have options.
On one of the reviews there was someone who defended a set that got bad reviews. It was from that retort that I was aware of how these separated from the sprue would be of concern to some who may read this.
stevieneon

Joined: January 24, 2009
KitMaker: 144 posts
Armorama: 143 posts

Posted: Friday, December 30, 2016 - 12:50 AM UTC
I got a few sets of ostketten on preorder a few months ago, and I love them. They ARE a tight fit certainly, but do not fall apart! I got 2 sets from HK with postage for 22 quid. Now that is a bargain. Highly recommended from me. Even without the instructions! 
TopSmith
Joined: August 09, 2002
KitMaker: 1,742 posts
Armorama: 1,658 posts
Posted: Friday, December 30, 2016 - 08:22 PM UTC
I really recommend that you try a set of Friule's if you are new to indy track. The fit is good and they are easy to install. I use a straightened staple instead if the wire when I assemble mine. I then go back and clip off the extra length. They are damn near indestructible and behave like real track.
Mortifa
#464
Joined: December 02, 2016
KitMaker: 267 posts
Armorama: 196 posts
Posted: Monday, July 03, 2017 - 11:46 PM UTC
Okay, so I finally got around to using these and I must say that my inexperience was a major hurdle.
These tracks are a great addition and I may buy a few extra sets so I have more tools, or whatever.
Using them on an old Dragoon Nashorn Kit#6001 and they work with the Magic tracks, which gives me options as these are more detailed than the Magic tracks. So what I am planning on doing is using the Magic tracks for the lower part, and then transitioning over to the Voyager as the tracks move up. What I am hoping for is the look of tracks that have mud, or packed earth, falling out of the spaces in the tracks, with them mostly free of debris as they come back down to the lower tracks again.
These tracks come together very nicely with a minimal of work and with their detail should add to the detail of the model.
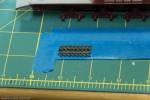
The Magic tracks for the lower portion of the tracks.
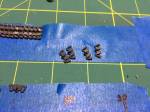
A side by side of the Voyager, on the left as you are looking at the picture, and Magic tracks on the right.
Much more detail with the Voyager tracks.
These tracks are a great addition and I may buy a few extra sets so I have more tools, or whatever.
Using them on an old Dragoon Nashorn Kit#6001 and they work with the Magic tracks, which gives me options as these are more detailed than the Magic tracks. So what I am planning on doing is using the Magic tracks for the lower part, and then transitioning over to the Voyager as the tracks move up. What I am hoping for is the look of tracks that have mud, or packed earth, falling out of the spaces in the tracks, with them mostly free of debris as they come back down to the lower tracks again.
These tracks come together very nicely with a minimal of work and with their detail should add to the detail of the model.
The Magic tracks for the lower portion of the tracks.
A side by side of the Voyager, on the left as you are looking at the picture, and Magic tracks on the right.
Much more detail with the Voyager tracks.
 |

WEB HOSTING BY


Copyright ©2021 Armorama and Kitmaker Network, a subsidiary of Silver Star Enterprises
All Rights Reserved. Please read our Conditions of Use and Privacy Policy.
All Rights Reserved. Please read our Conditions of Use and Privacy Policy.