I did notice in these pics the seats are too far forward so I popped them off and leaned them back more.
Hosted by Darren Baker
M151A2 Radios and Antennas

Burik

Joined: March 12, 2002
KitMaker: 1,437 posts
Armorama: 1,303 posts

Posted: Tuesday, January 24, 2017 - 08:06 AM UTC
Radios mounted and wired up.Some minor fixes are needed - like shortening the one mic cord. I am still planning what to do with the radio operator in the back, whether he will be holding the mic or what. I'd like to find an African figure to place on the side of the road.
I did notice in these pics the seats are too far forward so I popped them off and leaned them back more.


I did notice in these pics the seats are too far forward so I popped them off and leaned them back more.
Posted: Tuesday, January 24, 2017 - 10:24 AM UTC
Love it! I'm an old 31 Victor (Commo Dog) from back in the day. I lived, breathed and slept with these radios. So happy to see actual cabling and even the yellow markings on the cables. If you could cram a KY-57, or three, in there somehow that would take the cake 


HeavyArty


Joined: May 16, 2002
KitMaker: 17,694 posts
Armorama: 13,742 posts

Posted: Tuesday, January 24, 2017 - 05:34 PM UTC
Its looking great so far. Good job on the radios and the MERDC paint.

Burik

Joined: March 12, 2002
KitMaker: 1,437 posts
Armorama: 1,303 posts

Posted: Tuesday, January 24, 2017 - 06:00 PM UTC
Thanks. You can't see all the wires in the photos but they are there. I used small tubing drilled at the ends for the connection points. Some were bent as in photos.
BruceJ8365

Joined: December 25, 2012
KitMaker: 441 posts
Armorama: 441 posts

Posted: Wednesday, January 25, 2017 - 09:25 AM UTC
Awesome attention to detail! Love the tags on the cables.
My fav vehicle. I know you're not done yet, but don't forget the slave receptival on the passenger side crown. I think the put a place for it on the Tamyia kit, but not the receptical itself.
Also the heater vent on the crows needs a little handle


free photo upload
My fav vehicle. I know you're not done yet, but don't forget the slave receptival on the passenger side crown. I think the put a place for it on the Tamyia kit, but not the receptical itself.
Also the heater vent on the crows needs a little handle


free photo upload

Burik

Joined: March 12, 2002
KitMaker: 1,437 posts
Armorama: 1,303 posts

Posted: Friday, January 27, 2017 - 02:54 AM UTC
Quoted Text
My fav vehicle. I know you're not done yet, but don't forget the slave receptival on the passenger side crown. I think the put a place for it on the Tamyia kit, but not the receptical itself.
Also the heater vent on the crows needs a little handle
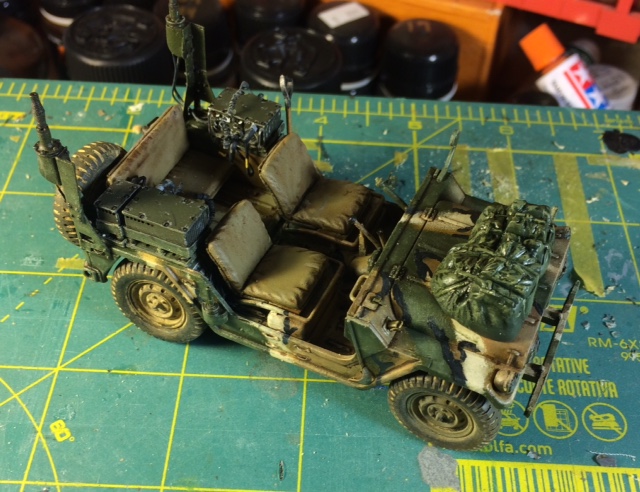
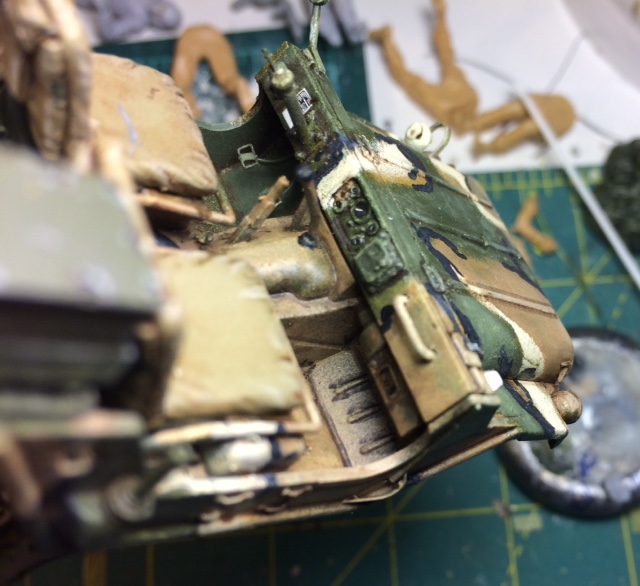
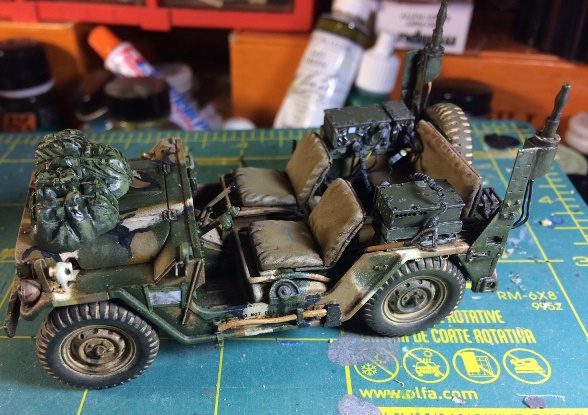
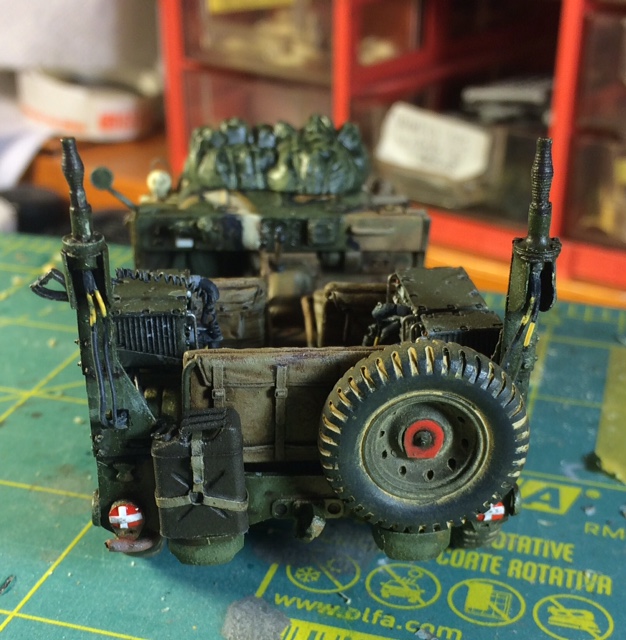
Thank you, Bruce. I did not know that. I added those items. I forgot to add an ID plate to the heater kit under the dashboard, and I did that, with some grunting - I have dry transfers for the plates and it is not easy to rub it on in such a confined space.
I am testing the hood stowage.

BruceJ8365

Joined: December 25, 2012
KitMaker: 441 posts
Armorama: 441 posts

Posted: Sunday, January 29, 2017 - 07:00 AM UTC
Looks awesome, love the heater and spare tire retainer w reflector. I also like the tape on the composite lights (left over from an airborne drop I'd imagine ... All the breakable parts get tape across them that's supposed to be removed).
It'd be kind of difficult, to store Alice packs on the hood. There's just one tiny footman loop there and it's to secure the windshield when it's folded down. Sometimes you leave the windshield on, fold it forward and can attach all sorts of gear to the folded windshield.
In airborne mutts you often see the big bag for camo netting stored flopped across the folded windshield.
The spare tire is a good attaching point for an Alice pack if you don't mind it getting splashed and muddy. You can really put anything on the drivers side rear because of the exhaust. Between the front seats is a space that's great to put a tool bag or ammo box for storage, it gets pretty hot though because the exhaust is right under there. You can smash the folded soft to and barely fit it under the rear seat - but I noticed you've removed the top bows so no need to carry the soft top. The side rear view mirror mounting points are a handy place to hang small items. There's also the windshield hing right there. There's just no good place for storage on these little guys... This is why you see so many with m416 trailers...

HeavyArty


Joined: May 16, 2002
KitMaker: 17,694 posts
Armorama: 13,742 posts

Posted: Sunday, January 29, 2017 - 07:08 AM UTC
Bruce, Bob is basing his jeep (as did Tamiya) on the below picture from Grenada, '83. The bags are held on with a strap that goes around the bumper to hold them on. I'm not sure where the other ends attach, I'm assuming under the dash, or onto the steering column and grab handle.


BruceJ8365

Joined: December 25, 2012
KitMaker: 441 posts
Armorama: 441 posts

Posted: Sunday, January 29, 2017 - 07:14 AM UTC
Quoted Text
Bruce, Bob is basing his jeep (as did Tamiya) on the below picture from Grenada, '83. The bags are held on with a strap that goes around the bumper to hold them on. I'm not sure where the other ends attach, I'm assuming under the dash, or onto the steering column and grab handle.
Awe, I see! That'd work. It looks like the straps tie off at the windshield hinges on each side... Sort of where the side view mirrors are mounted. It also looks like they used the white straps that are used to secure the jeep to the platform in airborn drops. Pretty creative!

Burik

Joined: March 12, 2002
KitMaker: 1,437 posts
Armorama: 1,303 posts

Posted: Sunday, January 29, 2017 - 07:00 PM UTC
Hi Guys,
I was going to ask about just what you guys were discussing on the hood stowage. I will be going with the white straps. And yes, it seems that they used the windshield hinges.
A few OUF vets have seen the model and some did place a pack on the spare. Also off the back of the rear seat. I may do that.
My plan is to have all seats occupied and even a guy sitting on the spare tire. Photos show this. My point is to show the little vehicle being overused, as it were. The vignette will depict the jeep stopped and the 2-505 guys chatting with a local. So they will have camo faces and camo "rags" on their Kevlars. Some stowage between front seats too. Vets have suggested rear tires to be bowed in too but I am not so sure I want to do that.

BruceJ8365

Joined: December 25, 2012
KitMaker: 441 posts
Armorama: 441 posts

Posted: Sunday, January 29, 2017 - 09:22 PM UTC
Quoted Text
Vets have suggested rear tires to be bowed in too but I am not so sure I want to do that.
Looking good1... The heavier the load the less the rear wheels are bowed in (e.g. V shaped when looking at it from the rear). Just putting four guys in it will lower it and the wheels are perpendicular to the ground, let alone all the gear. Only an empty M151 would have the rear wheels noticeable bowed inward.

Burik

Joined: March 12, 2002
KitMaker: 1,437 posts
Armorama: 1,303 posts

Posted: Monday, April 03, 2017 - 06:40 AM UTC
What things look like now.


HeavyArty


Joined: May 16, 2002
KitMaker: 17,694 posts
Armorama: 13,742 posts

Posted: Monday, April 03, 2017 - 07:43 AM UTC
Looking great Bob. Nice job.
Kevlar06


Joined: March 15, 2009
KitMaker: 3,670 posts
Armorama: 2,052 posts

Posted: Monday, April 03, 2017 - 07:50 AM UTC
Quoted Text
....I forgot to add an ID plate to the heater kit under the dashboard, and I did that, with some grunting - I have dry transfers for the plates and it is not easy to rub it on in such a confined space.
>
Nice build-- as a former "owner" of several M151A1s (had 63 in my Smoke Gernerator Company in 1983) I've been following this excellent build from "afar". For future reference, if you run into a problem like the one described above with dry transfers-- there's a simple solution-- just apply the dry transfer to clear decal paper, seal, cut, and use it like a regular water slide decal. Works every time.
VR, Russ

Burik

Joined: March 12, 2002
KitMaker: 1,437 posts
Armorama: 1,303 posts

Posted: Monday, April 03, 2017 - 05:14 PM UTC
Thanks for that tip.
Bob
Bob

Burik

Joined: March 12, 2002
KitMaker: 1,437 posts
Armorama: 1,303 posts

Posted: Thursday, May 11, 2017 - 07:11 AM UTC

BruceJ8365

Joined: December 25, 2012
KitMaker: 441 posts
Armorama: 441 posts

Posted: Thursday, May 11, 2017 - 08:55 AM UTC
Damn! Nice!
Probably one of the best MUTTs I've seen.
The figures really bring it to life. I love the material in their helmets.
I've seen that poster too. Lots of accurate research and attention to detail. Great job!
Probably one of the best MUTTs I've seen.
The figures really bring it to life. I love the material in their helmets.
I've seen that poster too. Lots of accurate research and attention to detail. Great job!
 |


